
How to Build a Profitable QR Code API with Django and Rapid API in 2023: A Step-by-Step Guide for Beginners
Discover how I built a profitable QR Code API with Django & RapidAPI in 2023. Customize with color/logo & ensure secure access. Dive in now!
This article is not affiliated with, or advertising RapidAPI or any other website. This article is my own that I wrote to teach you step by step how you can create an API and get a possible revenue on it on this app called RapidAPI.
The modern world is woven together by a tapestry of digital threads. Among these threads, QR codes stand out as one of the most versatile connectors between our physical and online realms. Imagine sipping coffee at a local cafe, spotting a QR code on the coaster, and with a quick scan, finding yourself immersed in a digital story about the origins of your brew. This convenience has made QR codes the unsung heroes of today’s digital age.
Yet, behind every QR code, there’s a robust engine that generates it, an API. If you’ve ever lounged in your favorite chair, relishing a cup of coffee and pondered, “Is creating something like this within my reach?”, let me share a bit of wisdom: it most definitely is. The magic lies in harnessing potent tools like Django and Rapid API, and believe me, the journey is more invigorating than intimidating.
Picture Django as more than just a techy framework; it’s like your favorite notebook, waiting for your ideas to spill onto its pages. Now, blend this with Rapid API — imagine it as that bustling town square where people gather, eager to witness and embrace new wonders. You have the recipe to concoct something that isn’t merely functional but is also cherished and sought-after.
As we navigate this guide, think of it as a scenic road trip. Starting with Django, it’s like mapping our route. Incorporating token security feels akin to ensuring our ride’s safety features are top-notch. Displaying our masterpiece on Rapid API is like setting up a charming stall at a local market. And to ensure everything runs smoothly, we’ll give it a whirl with some Postman tests — think of it as those delightful taste testers in a bakery.
Alright, let’s tie up our figurative sneakers and set forth on this enriching expedition. By the time we reach our destination, you’ll possess more than a mere creation; you’ll be equipped with a narrative, an experience, and lessons worth reminiscing. Here’s to the adventures that await!
Laying the Groundwork: Environment Creation & Activation
Every great structure starts with a strong foundation, and in software development, a virtual environment acts as this foundation. It’s a self-contained directory that encapsulates a Python environment, ensuring that each project has its own set of dependencies, isolated from global settings.
Creating and Activating the Environment:
On macOS and Linux:
# Create a virtual environment named 'myenv'
python3 -m venv myenv

# Activate the environment
source myenv/bin/activate
On Windows:
# Create a virtual environment named 'myenv'
python -m venv myenv

# Activate the environment
myenv\Scripts\activate.bat
Installing & Importing Packages:
Django:
- Installation:
pip install Django==4.2.6Think of Django as the backbone of your web project. It provides you with the necessary scaffolding to build robust web applications. By choosing a specific version (like 4.2.6), you ensure stability and reliability.
Django Rest Framework (DRF):
- Installation:
pip install djangorestframework==3.14.0While Django lays the groundwork, DRF steps in to make the process of building web APIs simpler and more efficient. It offers functionalities like serialization and handles HTTP methods with ease.
Psycopg2-binary:
- Installation:
pip install psycopg2-binary==2.9.9A bridge between Django and PostgreSQL databases. If you plan on using a PostgreSQL database, this package ensures Django can communicate with it smoothly.
Whitenoise:
- Installation:
pip install whitenoise==6.6.0While our core focus is building a functional API, aesthetics and user experience are crucial too. Whitenoise takes care of serving static files, making the API not just functional, but also visually appealing.
DotEnv:
- Installation:
pip install python-dotenv==1.0.0Imagine having a diary where you jot down your secrets. DotEnv acts like a protector for this diary in the world of programming. It allows you to utilize environment variables from a .env file, ensuring sensitive data like API keys or database passwords remain secure.
QR Code & Pillow:
pip install qrcode==7.4.2 pillow==9.5.0These tools transform data into visual QR codes. While QR Code handles the creation, Pillow is a Python Imaging Library that supports opening, manipulating, and saving various image file formats.
Setup Django Project & App
Setting the Stage — A New Django Project & App:
Before you start painting, you need a canvas. In the Django world, it’s our project. Let’s initiate one:
django-admin startproject api_project .
With our stage set, let’s bring in our main actor, the app:
django-admin startapp api_app
Guarding Our Secrets — The .env Magic:
Remember those cherished childhood secrets? Well, in the digital realm, we have a few secrets too! Let’s protect them with elegance:
# settings.py
import os
from dotenv import load_dotenv

load_dotenv()

BASE_DIR = Path(__file__).resolve().parent.parent
SECRET_KEY = str(os.getenv('SECRET_KEY'))
And oh, jot down that secret in an .env file:
SECRET_KEY=yoursecretkeyA Touch of Aesthetics with Whitenoise:
While the engine room is important, so is the presentation hall. Whitenoise takes care of dressing up our Django project:
# settings.py
MIDDLEWARE = [
    'django.middleware.security.SecurityMiddleware',
    'whitenoise.middleware.WhiteNoiseMiddleware', # Our aesthetic touch!
    ... # Other middleware entries
]
Inviting Our Companions — Installed Apps:
Our Django project loves company! Let’s introduce it to some reliable friends:
# settings.py
INSTALLED_APPS = [
    'django.contrib.admin',
    ... # Standard Django apps
    'api_app',             # Our very own star!
    'rest_framework',      # Our communicator!
    'rest_framework.authtoken'  # For those secret handshakes!
]
Building Bridges with PostgreSQL:
Our project needs to store memories, and what better than a diary that’s both robust and flexible?
# settings.py
DATABASES = {
    'default': {
        'ENGINE': 'django.db.backends.postgresql_psycopg2',
        'NAME': str(os.getenv('DB_NAME')),
        'PASSWORD': str(os.getenv('DB_PASSWORD')),
        'USER': str(os.getenv('DB_USER')),
        'HOST': str(os.getenv('DB_HOST')),
        'PORT': str(os.getenv('DB_PORT')),
    }
}
Oh, and remember to note down the details in our .env file for safekeeping:
SECRET_KEY=yoursecretkey
DB_NAME=yourdbname
DB_PASSWORD=yourdbpassword
DB_USER=yourdbuser
DB_HOST=yourdbhost
DB_PORT=yourdbport
Setting the Tune with Rest Framework:
A good orchestra plays harmoniously, and our Django project is no different. To ensure this, we need to fine-tune our REST framework. Just as a maestro understands the nuances of every instrument, our settings guide the entire performance:
# settings.py
REST_FRAMEWORK = {
    'DEFAULT_AUTHENTICATION_CLASSES': [
        'rest_framework.authentication.TokenAuthentication',  # Our chosen instrument for secure authentication.
        # Feel free to introduce other authentication instruments here.
    ],
    'DEFAULT_RENDERER_CLASSES': [
        'rest_framework.renderers.JSONRenderer',  # Ensures our tune is melodious and JSON-formatted.
        # Got other rendering preferences? Add them right in.
    ],
}
Choreographing the Dance of Static & Media Files:
Just as in ballet, grace and precision are paramount. Our static files need a proper stage and our media, a spotlight:
STATIC_URL = '/static/'

STATIC_ROOT = os.path.join(BASE_DIR, 'staticfiles')  # A grand stage for our static performers.

STATICFILES_DIRS = [
    os.path.join(BASE_DIR, 'static')  # Our backstage, where static files are prepped.
]

STATICFILES_STORAGE = 'whitenoise.storage.CompressedManifestStaticFilesStorage'  # A tool to ensure every performance is crisp.

MEDIA = os.path.join(BASE_DIR, 'media')  # A special corner for our media to shine.
Crafting the Pathways with URLs:
The pathways of our project, much like the lanes in a city, guide our visitors. Let’s lay them down with intention:
Our Main Roadmap — project urls:
from django.contrib import admin
from django.urls import path, include
from rest_framework.authtoken.views import obtain_auth_token

urlpatterns = [
    path('admin/', admin.site.urls),  # The city hall of our Django city.
    path('api/', include('api_app.urls')),  # Our main boulevard for API interactions.
    path('api-token-auth/', obtain_auth_token, name='api_token_auth'),  # A secure checkpoint for authentic visitors.
]
Our Special Path — api_app/urls.py:
from django.urls import path
from .views import ApiQrCode

urlpatterns = [
    path('qrcode/', ApiQrCode.as_view())  # A path that leads to our QR code magic show.
]
Django Views and the Magic Wand of QR Codes:
Remember the time when webpages felt magical? Well, in Django, our wizards are called “views”. In our story, we’re crafting a magical wand (view) that churns out QR codes.
Importing Ingredients:
First off, every great recipe starts with gathering your ingredients. In programming, this means importing the necessary libraries — these are pre-written code snippets that give us superpowers, like creating QR codes, or making sure only the right people can ask our app to do stuff.
# We're importing a bunch of tools that help with user authentication,
# creating QR codes, handling requests and responses, and working with images.
from rest_framework.authentication import TokenAuthentication
from rest_framework.permissions import IsAuthenticated
from rest_framework.views import APIView
from rest_framework.response import Response
import qrcode
from django.http import HttpResponse
from rest_framework.parsers import JSONParser, FormParser, MultiPartParser
from PIL import Image, ImageDraw, ImageFont
from .serializers import QrCodeSerializer
from rest_framework import status

# These are some custom tools specifically for our app.
from .permissions import IsAuthenticatedOrFromRapidAPI
from .authentications import RapidAPIAuthentication
Prepping the Kitchen:
Now, we’re setting up our workspace, or in this case, our API view. This is like deciding whether you’re going to bake, fry, or steam your dish. Here, we’re saying, “Hey, when you want to talk to me, use these rules, please!”
class ApiQrCode(APIView):
    # Setting up the parsers. It's like choosing the language we want to communicate in.
    parser_classes = (JSONParser, FormParser, MultiPartParser)

    # These are our security guards, making sure only the right folks get in.
    authentication_classes = [TokenAuthentication, RapidAPIAuthentication]
    permission_classes = [IsAuthenticatedOrFromRapidAPI]
The Cooking Show Begins:
This is where we start cooking! When someone sends us data, it’s like they’re ordering food at a restaurant. We need to make sure we understand their order (or request) and then cook up a delicious QR code based on their specifications.
    def post(self, request):
        # This is us reading the order and making sure it makes sense.
        serializer = QrCodeSerializer(data=request.data)

        # If the order is good...
        if serializer.is_valid():
            # We get the specific ingredients for our dish.
            url = serializer.validated_data['url']
            color = serializer.validated_data.get('color', None)
            company_name = serializer.validated_data.get('company_name', None)

            # If they didn't specify a color, we just default to classic black.
            if color is None:
                color = '#000000'

            # Here's where we start making the QR code, based on their order.
            qr = qrcode.QRCode(version=5, box_size=10, border=4)

            # We put their URL into the QR code.
            qr.add_data(url)

            # And now we cook it up!
            qr.make(fit=True)
            img = qr.make_image(fill_color=color, back_color='white')

            # We're not done! We can add some garnish, too.
            pil_img = img.convert('RGBA')
            draw = ImageDraw.Draw(pil_img)

            # Figuring out how much space we have for the garnish.
            width, height = pil_img.size

            # If they gave us a company name, we add this as a final touch!
            if company_name is not None:
                # We make sure the name looks good on the QR code, nice and centered.
                font_size = int(min(width, height) / 30)
                font = ImageFont.truetype('api_app/Lato-Bold.ttf', font_size)
                text_width, text_height = draw.textsize(company_name, font=font)

                # We place the name right in the middle.
                text_x = int((width - text_width) / 2)
                text_y = int((height - text_height) / 2)

                # Add a nice background for the text to make it stand out.
                padding = 10
                rect_x1 = text_x - padding
                rect_y1 = text_y - padding
                rect_x2 = text_x + text_width + padding
                rect_y2 = text_y + text_height + padding
                draw.rectangle((rect_x1, rect_y1, rect_x2, rect_y2), fill='white')

                # And finally, we write the company name onto the QR code.
                draw.text((text_x, text_y), company_name, font=font, fill='black')

            # The dish is ready to serve!
            img = pil_img

            # We serve our dish on a nice plate, in this case, an 'image/png' plate.
            response = HttpResponse(content_type='image/png')
            img.save(response, 'PNG')

            return response

        # If there was a problem with the order...
        else:
            # We kindly let them know what was wrong.
            return Response(serializer.errors, status=status.HTTP_400_BAD_REQUEST)
On the line
font = ImageFont.truetype('api_app/Lato-Bold.ttf', font_size)We want to add a font, so you will need to dowload Lato-Bold.ttf (or any other font, or leave empty) and put it in the api_app folder.
Code fromapi_app/views.py with more nice comments so you can better understand ❤️
# Let's begin by importing the tools we'll need on our journey!
from rest_framework.authentication import TokenAuthentication
from rest_framework.permissions import IsAuthenticated
from rest_framework.views import APIView
from rest_framework.response import Response
import qrcode  # Our magic wand to make QR codes
from django.http import HttpResponse
from rest_framework.parsers import JSONParser, FormParser, MultiPartParser
from PIL import Image, ImageDraw, ImageFont  # Our artistic tools for image crafting
from .serializers import QrCodeSerializer  # This will help us understand incoming data
from rest_framework import status  # To talk back in HTTP language

# Some custom tools we've built for our special journey
from .permissions import IsAuthenticatedOrFromRapidAPI
from .authentications import RapidAPIAuthentication

# Welcome to the heart of our journey, the QR code forest!
class ApiQrCode(APIView):
    # Here we decide which languages we're comfortable speaking with our visitors.
    parser_classes = (JSONParser, FormParser, MultiPartParser)

    # Our friendly forest guards who check the visitor's passes.
    authentication_classes = [TokenAuthentication, RapidAPIAuthentication]

    # Rules of the forest! Who's allowed and who's not.
    permission_classes = [IsAuthenticatedOrFromRapidAPI]

    # When someone sends a postcard (POST request) to the forest...
    def post(self, request):
        # We try to understand their message using the QrCodeSerializer.
        serializer = QrCodeSerializer(data=request.data)

        # If we can understand their message...
        if serializer.is_valid():
            # We extract the important bits from their message.
            url = serializer.validated_data['url']
            color = serializer.validated_data.get('color', None)
            company_name = serializer.validated_data.get('company_name', None)

            # If they didn't mention a favorite color, we choose classic black.
            if color is None:
                color = '#000000'

            # Using our QR wand, we start crafting the magical QR code.
            qr = qrcode.QRCode(version=5, box_size=10, border=4)
            qr.add_data(url)  # We pour the URL essence into the mix.
            qr.make(fit=True)  # We make sure it's a perfect fit!
            img = qr.make_image(fill_color=color, back_color='white')  # The QR code comes to life!

            # We use some artistic tools to refine our creation.
            pil_img = img.convert('RGBA')
            draw = ImageDraw.Draw(pil_img)
            width, height = pil_img.size  # Checking the canvas size

            # If they whispered a company name, we inscribe it onto the QR code.
            if company_name is not None:
                # Adjusting the font size to make it look perfect!
                font_size = int(min(width, height) / 30)
                font = ImageFont.truetype('api_app/Lato-Bold.ttf', font_size)
                text_width, text_height = draw.textsize(company_name, font=font)

                # Finding the perfect spot for the name.
                text_x = int((width - text_width) / 2)
                text_y = int((height - text_height) / 2)

                # We add a small glowing rectangle behind the name to make it stand out.
                padding = 10
                rect_x1 = text_x - padding
                rect_y1 = text_y - padding
                rect_x2 = text_x + text_width + padding
                rect_y2 = text_y + text_height + padding
                draw.rectangle((rect_x1, rect_y1, rect_x2, rect_y2), fill='white')

                # With a steady hand, we write the company name onto the QR code.
                draw.text((text_x, text_y), company_name, font=font, fill='black')

            # Our QR code artwork is ready!
            img = pil_img

            # We lovingly place it on a digital canvas and present it to our visitor.
            response = HttpResponse(content_type='image/png')
            img.save(response, 'PNG')
            return response

        # If we couldn't understand their message...
        else:
            # We kindly ask them to check their postcard for mistakes.
            return Response(serializer.errors, status=status.HTTP_400_BAD_REQUEST)
Setting Up Your QR Code Toolbelt: serializers.py Creation 🛠
Begin by bringing in the necessary tools from Django’s rest framework:
from rest_framework import serializersLet’s ensure the colors we receive are just the way we like them — in hex format!
def validate_hex_color(value):
    """
    Ensure that we're receiving a color in the neat hex format.
    """
    if len(value) != 7:  # Hex colors have 7 characters, including the '#'.
        raise serializers.ValidationError("Hang on! Make sure your color is in hex format.")

    if value[0] != "#":  # Hex colors always start with a '#'.
        raise serializers.ValidationError("Woah! Hex colors start with '#'.")

    for char in value[1:]:
        if char not in "0123456789abcdefABCDEF":  # Only these characters are allowed in hex colors.
            raise serializers.ValidationError("Hold up! That's not a hex character.")

    return value
Time to define our QR Code’s magic recipe!
class QrCodeSerializer(serializers.Serializer):
    url = serializers.CharField(required=True)
    color = serializers.CharField(required=False, validators=[validate_hex_color])
    company_name = serializers.CharField(required=False)
Full api_app/serializers.py
from rest_framework import serializers

def validate_hex_color(value):
    """
    Check that the color field is a valid hex color.
    """
    if len(value) != 7:
        raise serializers.ValidationError("Color must be a valid hex color.")
    if value[0] != "#":
        raise serializers.ValidationError("Color must be a valid hex color.")
    for char in value[1:]:
        if char not in "0123456789abcdefABCDEF":
            raise serializers.ValidationError("Color must be a valid hex color.")

    return value

class QrCodeSerializer(serializers.Serializer):
    url = serializers.CharField(required=True)
    color = serializers.CharField(required=False, validators=[validate_hex_color])
    company_name = serializers.CharField(required=False)
To integrate with RapidAPI, we’ll employ a specific strategy. Each request from RapidAPI contains a unique identifier in the header: X-RapidAPI-Proxy-Secret. This identifier acts as a secret handshake, with a value only we should be privy to. Consequently, our API will grant access based on two conditions:
- The request header contains the correct
X-RapidAPI-Proxy-Secret. - The user possesses the required authentication token.
To handle these checks, I’ve crafted two modules: permissions.py and authentications.py. You might have noticed that I've already incorporated them into our views.
As an immediate next step, ensure that you add the corresponding variable to the .env file.
RAPID_API_KEY=
I’ll show you a little later from where to get it.
api_app/authentications.py
# Import necessary modules from Django's Rest Framework and the built-in 'os' module
from rest_framework.authentication import BaseAuthentication
from rest_framework.exceptions import AuthenticationFailed
import os

# Define a custom authentication class that inherits from BaseAuthentication
class RapidAPIAuthentication(BaseAuthentication):

    # Define the authentication method
    def authenticate(self, request):

        # Try to retrieve the 'X-RapidAPI-Proxy-Secret' header from the request
        rapidapi_secret = request.headers.get('X-RapidAPI-Proxy-Secret')

        # If the retrieved header value matches our stored RAPID_API_KEY environment variable, the request is authenticated
        # We're returning (None, None) because while the request is authenticated, we're not associating it with any user
        if rapidapi_secret == str(os.getenv('RAPID_API_KEY')):
            return (None, None)  # Authentication is successful but no user is associated

        # If the header is present but doesn't match our stored value, raise an authentication error
        if rapidapi_secret is not None:
            raise AuthenticationFailed('Invalid RapidAPI secret key.')

        # If the header isn't even present, it means no authentication attempt was made. So, just return None.
        # By returning None, the system knows that this authentication method didn't apply, and it will move on to the next authentication method (if any exists)
        return None
In summary, this class, RapidAPIAuthentication, checks if an incoming request contains a specific header (X-RapidAPI-Proxy-Secret) and whether its value matches an environment variable (RAPID_API_KEY). If it does match, the request is authenticated. If the header is present but does not match, an authentication error is raised. If the header isn't present at all, the system knows this authentication method didn't apply and can try others.
api_app/permissions.py
# Import necessary modules from Django's Rest Framework and the built-in 'os' module
from rest_framework.permissions import BasePermission
import os

# Define a custom permissions class that inherits from BasePermission
class IsAuthenticatedOrFromRapidAPI(BasePermission):

    # Define the method to check if a request has the permission to proceed
    def has_permission(self, request, view):

        # If the user making the request is already authenticated, then grant permission
        if request.user and request.user.is_authenticated:
            return True  # Allow if user is authenticated

        # Check if the request contains the 'X-RapidAPI-Proxy-Secret' header
        rapidapi_secret = request.headers.get('X-RapidAPI-Proxy-Secret')

        # If the header is present and its value matches our stored RAPID_API_KEY environment variable,
        # it means the request is coming from RapidAPI and has the correct key, so grant permission
        if rapidapi_secret and rapidapi_secret == os.getenv('RAPID_API_KEY'):
            return True  # Allow if from RapidAPI with correct key

        # If neither of the above conditions is met, deny permission
        return False
In summary, the IsAuthenticatedOrFromRapidAPI permission class allows a request to proceed in one of two situations:
- If the user making the request is already authenticated.
- If the request contains the
X-RapidAPI-Proxy-Secretheader and its value matches an environment variable (RAPID_API_KEY), indicating it's a legitimate request from RapidAPI.
If neither of these conditions is met, the request is denied.
Ok so Safety First: Let’s Turn Off Debug Mode
It’s like riding a bike — once you’re confident, you take off the training wheels!
# SAFETY REMINDER: When cruising in the real world, wear your helmet (turn off debug)!
DEBUG = False

# Specify where you're allowed to ride (or from where your app can be accessed)!
ALLOWED_HOSTS = ['127.0.0.1', 'your-domain.com']
Prepping Your Bike for the Ride: Migration & Static Files Collection
Before you can ride, make sure your bike’s parts (database tables) are in place and your stickers (static files) are collected!
# Set up your database tables
python manage.py migrate

# Gather your static decor
python manage.py collectstatic
Hit the Road: Testing with Postman
Power up your server:
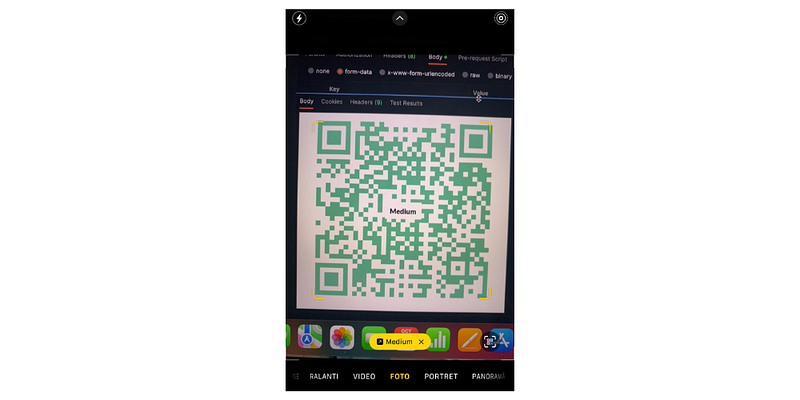
python manage.py runserverGrab your Postman helmet and start testing your bike (app)! 🚴♀️🔍
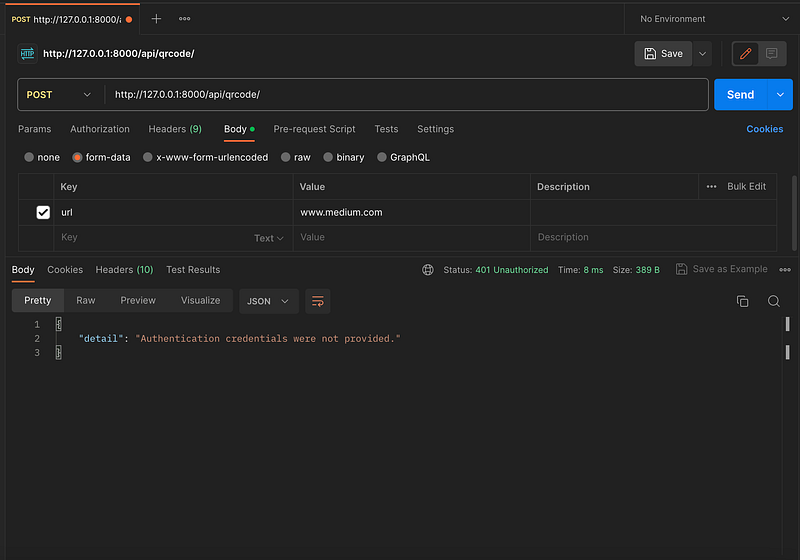
But as far as we see we have authentication error, before using the API we have to authenticate, let’s see first with the token and then with RapidAPI
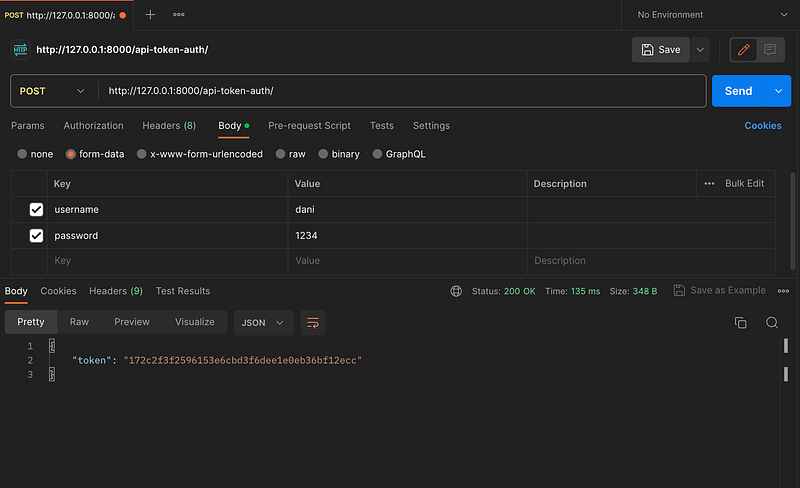
To get the auth token we will post http://127.0.0.1:8000/api-token-auth/ with a username and password, let’s create a simple user
python3 manage.py shell
>>> from django.contrib.auth.models import User
>>> user = User.objects.create_user('dani', '[email protected]', '1234')
And send this in body
You’re all set to make requests to http://127.0.0.1:8000/api/qrcode/. Just a gentle reminder: always include the token in the headers of your request.
Authorization: Token YOUR_TOKEN_HEREAnd now its working
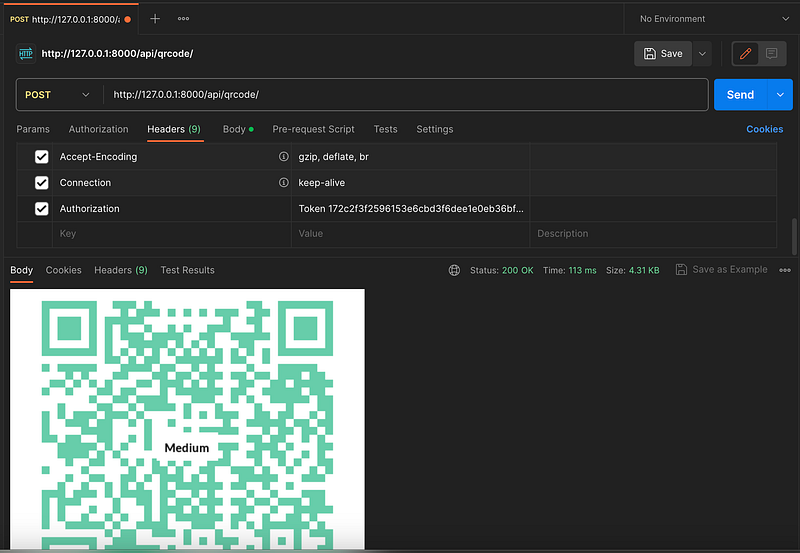
When making your request, remember to include the necessary details in the body, such as url. Feel free to add optional fields like color and company_name if desired.

Alright, you’re at a crossroads now! Here are your two paths:
- Testing Locally: If you just want a quick test, I recommend using
ngrok. It's a breeze to set up. Simply runngrok http 8000and voila, your app goes live all over the world with ngrok url! Do note, however, this is only a temporary setup. - Deployment: If you’re thinking long-term and want your API to be accessible at all times, it’s a good idea to deploy it on a server. I’ve done a step by step, which you can reference.
Once you’ve set up your endpoint and domain at domain.com/api/qrcode/, the next step is to integrate it with RapidAPI. The process is straightforward and user-friendly. Let's dive into how to get your API up and running on RapidAPI!

Create an Account > My APIs > Add API Project
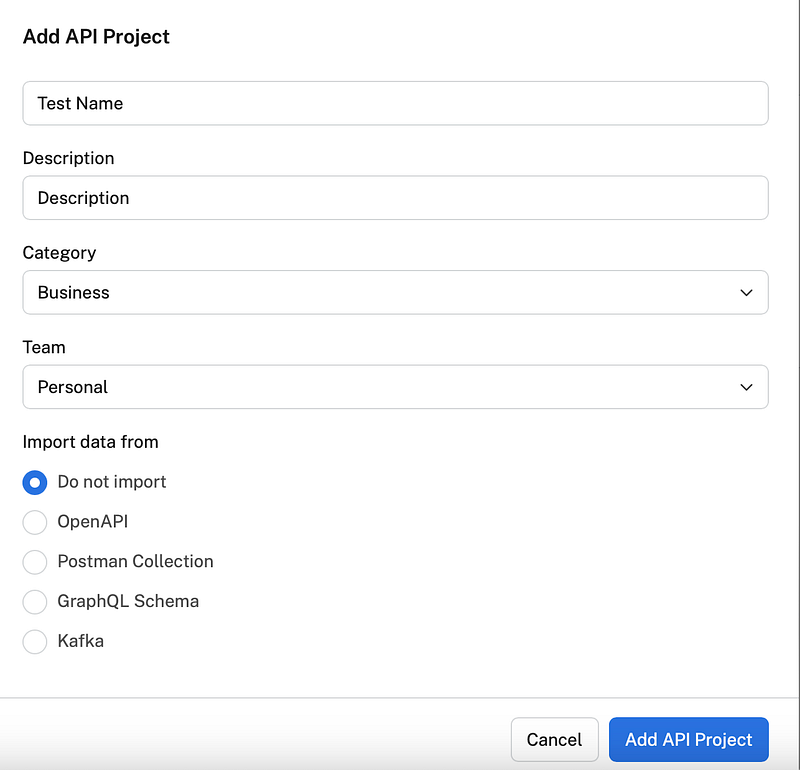
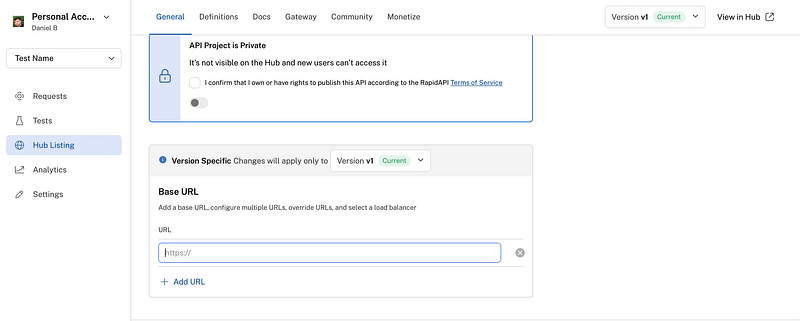
Once you’ve filled in the details about your API, such as its name, description, category, etc., on the Hub Listing page, simply scroll down to the ‘Base URL’ section and enter your domain there.
Simple like https://www.domain.com
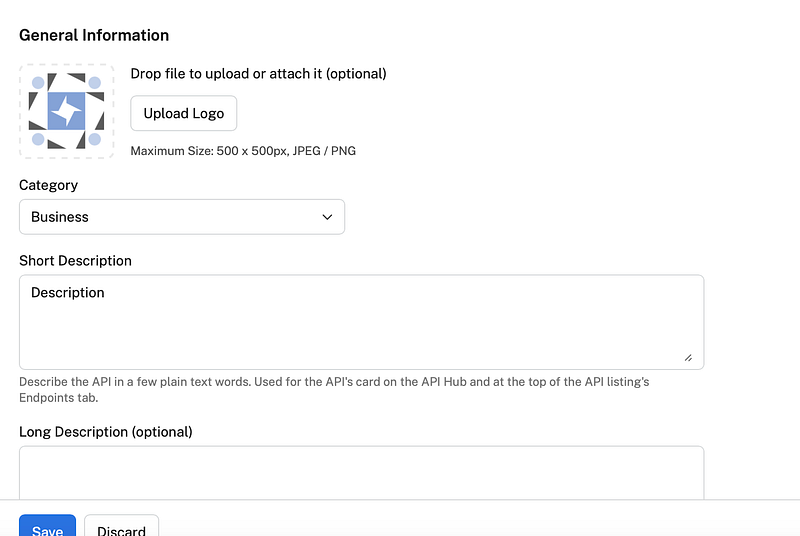
Setup general informations
Navigate to “Definitions” and establish a new REST endpoint.
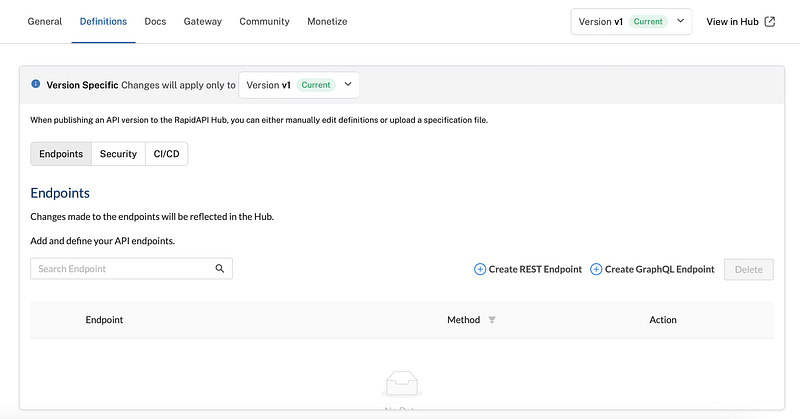
Add name and description
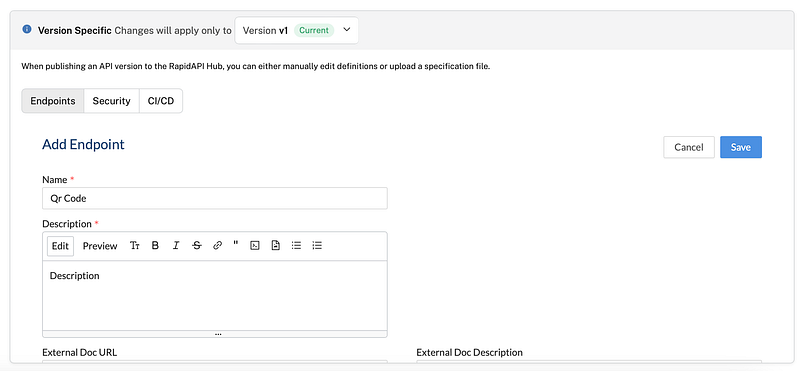
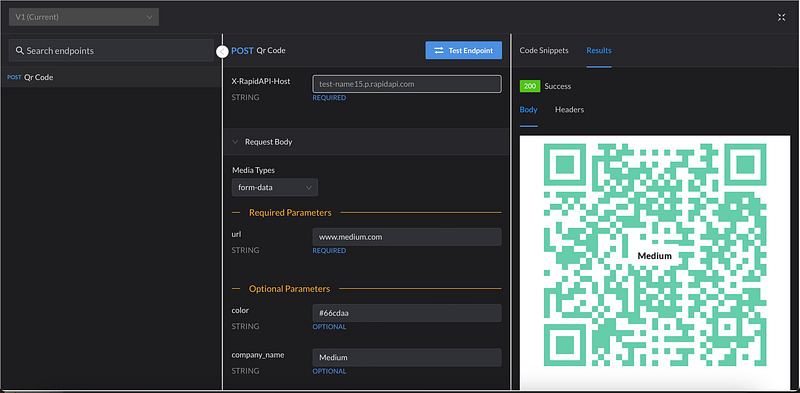
Proceed further down and incorporate the endpoint /api/qrcode/ along with its associated method e.g. POST

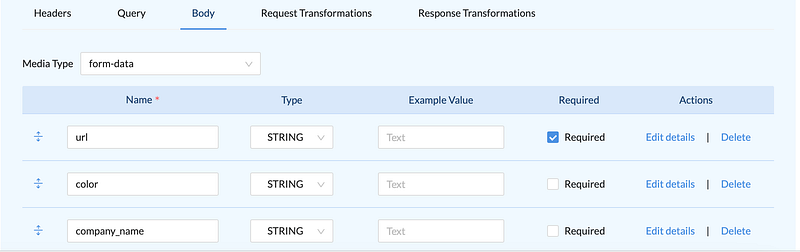
Configure the body to use form-data. Ensure that the url is set as a required field, while color and company_name are optional. For further clarity, navigate to 'edit details' where you can provide descriptions for each variable and even add example values.
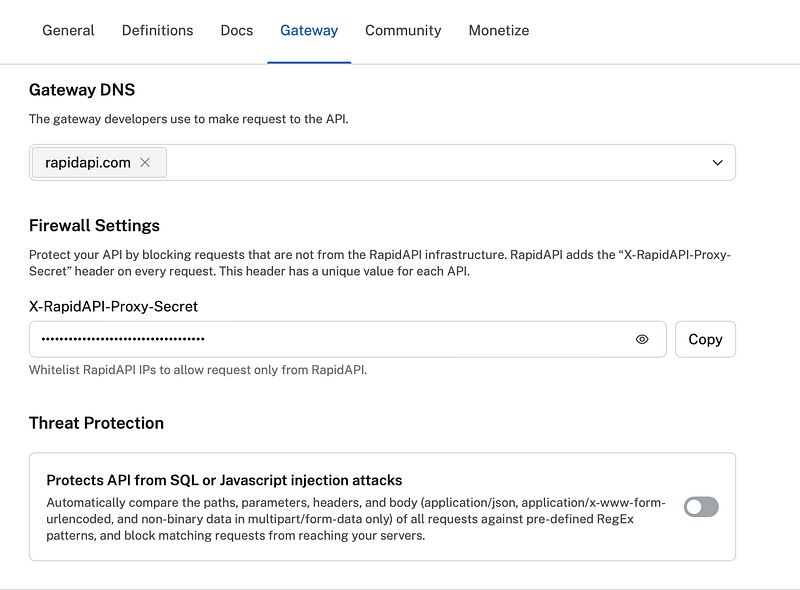
All right, let’s move to the testing phase. If you attempt to test our API on “View on Hub,” you’ll notice an “Unauthorized” message. To address this:
- Navigate to the “Gateway” section.
- Locate and copy the “Rapid Api Secret.”
- Proceed to your
.envfile and introduce this secret as the value for theRAPID_API_KEYvariable.
Great news! Our application is now live. We’ve set it up to allow both authenticated users and users from RapidAPI to access our API seamlessly.
Remember, the finishing touch involves heading over to the ‘Monetization’ section. Here, you can tailor the plans to your liking. Once that’s settled, switch the ‘Visibility’ to ‘On’, ensuring that your API is accessible to users.
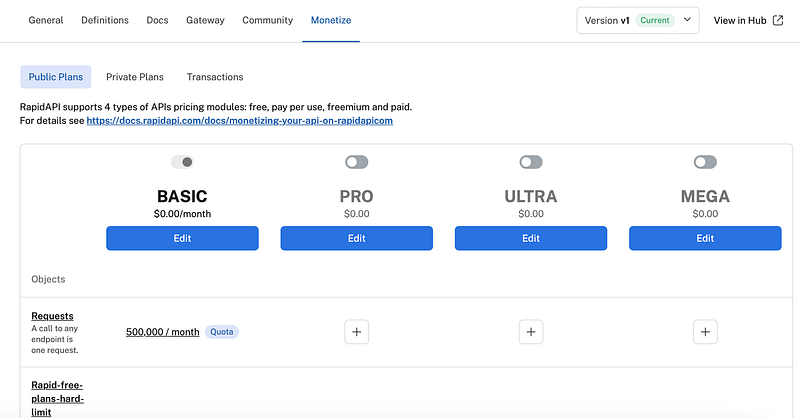
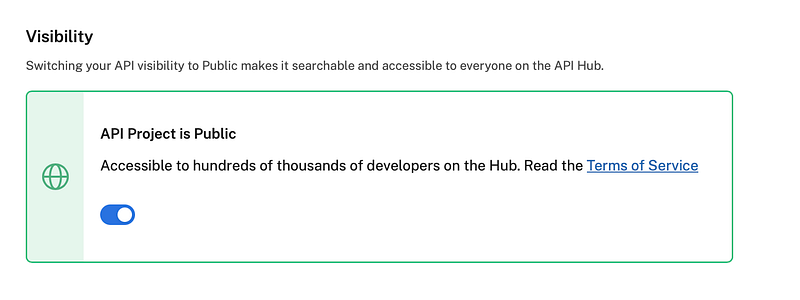
And that’s it for now! You’ve now set up an API on RapidAPI, and there’s potential to monetize it. If you’ve got a great and innovative idea, the sky’s the limit.
If you enjoyed this article, please give it a clap, consider following me, and if you’re interested, join my Discord channel — we can learn together.
Thank you for your time and continued support! 👋
In Plain English
Thank you for being a part of our community! Before you go:
- Be sure to clap and follow the writer! 👏
- You can find even more content at PlainEnglish.io 🚀
- Sign up for our free weekly newsletter. 🗞️
- Follow us on Twitter(X), LinkedIn, YouTube, and Discord.


