
How to Build a DApp Portfolio Without Spending a Penny
Use testnets and free web services to deploy Ethereum DApps for free

Building a portfolio of decentralized applications (DApps) is the best way to show the world you’re a blockchain developer.
You might think that maintaining a portfolio of public DApps costs a lot of money. Hosting websites and domains costs money, and deploying smart contracts costs Ether.
I’m here to tell you that you can build, deploy, and maintain multiple Ethereum DApps without paying a penny for hosting or a single Wei on the Ethereum main network (mainnet).
Using Testnets
Test networks (testnets) are public blockchain networks that mirror the mainnet production environment.
They allow core developers to test new features like sharding and consensus mechanisms before they’re deployed to the mainnet. They also allow DApp developers to test their applications before deploying their immutable code to the mainnet.
There are several testnets to chose from, each with slightly different characteristics like their consensus mechanism, and node software support.
The Ropsten testnet most closely resembles the Ethereum mainnet. MetaMask Chrome extension supports Ropsten, Kovan, Rinkeby, and Goerli testnets by default.
Obtaining Ether on any of these test nets is as simple as requesting it from a faucet. Most networks have a chatbot-style faucet, where you paste the public address of your deployment account.
Deploying Your Smart Contracts
This example assumes that you’re familiar with Truffle Suite. If not, don’t worry. There are plenty of walkthroughs and tutorials that you can follow to learn about deploying DApps using Truffle Suite.
Once you’ve got some Ether on your desired testnet, you need an Ethereum node from which to deploy your contracts. Nodes take a long time to set up and technical knowledge that takes even longer to learn…bummer.
Fortunately, there are Blockchain infrastructure services that cut out all of the complications of setting up a node. My favorite to use is Infura.
Create an Infura account and a new project. Head over to the settings tab where you’ll be able to choose which network you want to interact with.
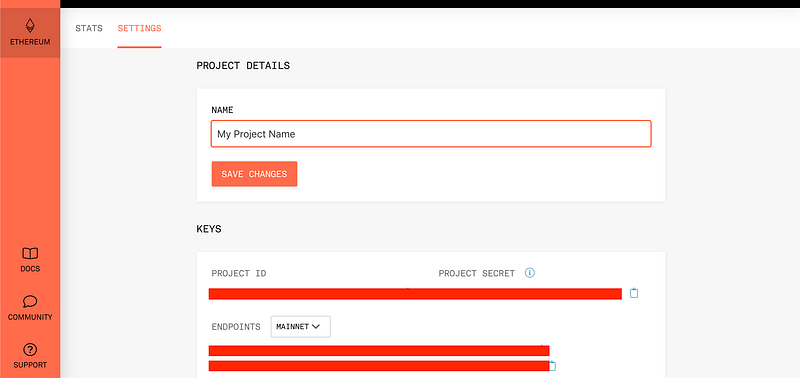
Make a note of the HTTPS endpoint for the network you want to deploy to.
I’m going to show the example of a truffle-config.js file configured to deploy to the Kovan testnet.
Make sure you have the following packages in your repository, which you can install with npm:
"truffle-hdwallet-provider": "1.0.4",
"truffle-hdwallet-provider-privkey": "1.0.3",
"web3": "1.0.0-beta.46"Note: I’m using web3 version 1.0.0 here. You must use this or a later version for successful deployment.
Next, alter your truffle-config.js file to add the new network to the networks object. Figure 2 shows what the result of that alteration looks like.
Your project is now set up to migrate your smart contracts to the Kovan testnet, using the following command:
truffle migrate --network kovanFree Web Services
Now that your smart contracts are live on a public (test) network, you need to host your front end on the web so that users can start playing with your DApp.
There are several options. You can run a web server from home, which would take time and money, or you can use industry-leading hosting services like DigitalOcean or AWS, which charge a monthly fee (albeit small for the lower-end packages).
What you need is a free hosting service, that is fast and easy to use, and provides a platform to beta test your DApp.
These services exist! I’m going to walk through two of them. Introducing Heroku and GitHub Pages.
Heroku
“Heroku is a platform as a service (PaaS) that enables developers to build, run, and operate applications entirely in the cloud.” — Heroku.com
Heroku has great support for a multitude of tech and is especially good at deploying Node applications. Assuming you’re using Truffle Suite for your project, you’ll have no problem deploying with Heroku.
To deploy to Heroku using the command line, you first need to head to the Heroku downloads page and install the Heroku command-line interface (CLI)
Go to Heroku.com, create an account, and create a new app. Once you’ve performed the basic setup, head over to the “Settings” tab and locate your “Heroku git URL”. Figure 3 shows where to find it.
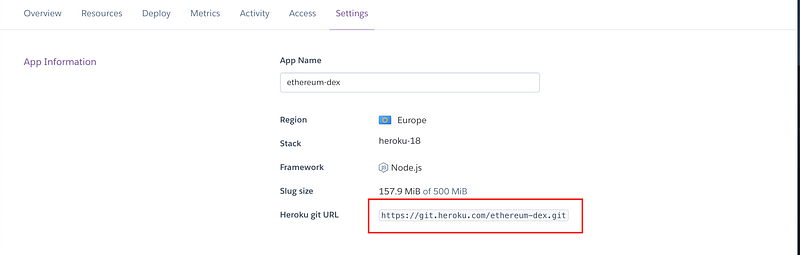
Open your terminal and navigate to your project root folder. Assuming you’re already using Git for version control, use the Heroku Git URL to add a new remote like this (where [heroku_git_url] is the URL from your Heroku app):
git remote add heroku [heroku_git_url]Then, using the newly installed Heroku CLI, log in to your account:
heroku loginThis should open up your browser to confirm. Once successfully logged in, all that’s left is to deploy! Run the following to push to Heroku:
git push heroku masterWait for the logs to finish and voila, your DApp is now live!
Heroku assigns a URL depending on the name of your project. To open, head back to Heroku.com and click the “Open app” button shown in figure 4.

Your DApp is now live on Heroku!
GitHub Pages
“GitHub Pages is a static site hosting service that takes HTML, CSS, and JavaScript files straight from a repository on GitHub” — Github.com
Anyone who has used Git knows about GitHub. It’s the biggest open-source version control platform in the world and is used by countless developers every single day.
GitHub Pages is a service that allows the hosting of static websites directly from a GitHub repo. This means that as long as your app doesn’t do any server-side computation (like PHP, for example), you’re good to go!
If you’re not already using GitHub for your repo, I highly recommend you do to take advantage of this. Assume you are, and your project is using Truffle Suite, head to your command line and navigate to the root directory of your project.
Install the gh-pages package by running the following command:
npm install --save gh-pagesNext, you need to add a few details to your package.json file. Open the package file in your text editor.
Inside the main object, add the following, where [user-name] is your GitHub username and [repo-name] is the name of your GitHub repo:
"homepage": "https://[user-name].github.io/[repo-name]/",Add the following options into the “scripts” section of the package.json:
"predeploy": "npm run build",
"deploy": "gh-pages -d build",
All that’s left now is to run npm run deploy to deploy your DApp to GitHub Pages.
Your DApp is now live on GitHub Pages!
Conclusion
Building a portfolio of DApps doesn’t have to cost anything.
By using Heroku, GitHub Pages, and Ethereum testnets, you can make your projects public and usable by anyone so long as they have a web3 compatible browser or extension like MetaMask.


