
How To Authenticate Into Azure Machine Learning Using The R SDK
In my previous article I’ve shown how to install the Azure Machine Learning R SDK:
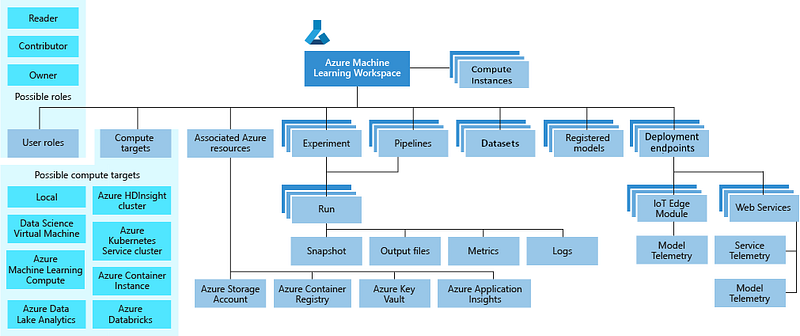
After verified the installation is done and it’s working, you need to log in into Azure Machine Learning and to get a reference to the Workspace object, that will allow you to work with all the artifacts you create when you use Azure Machine Learning. The centrality of the Workspace is shown in the following taxonomy:
This article will show you how to authenticate in Azure ML using different technologies in order to get the reference to a Workspace object.
Authentication Methods
You can authenticate in multiple ways:
- Interactive Login — The simplest and default mode when using Azure Machine Learning (Python / R) SDK. It uses an interactive dialog
- Azure CLI — To use with the azure-cli package
- Service Principal — To use with automatically executed machine learning workflows
- Managed identities for Azure resources — To use with Managed Service Identity-enabled assets such as with an Azure Virtual Machine, for example
The Azure Machine Learning tokens (generated when a Run is submitted and only available to the code that submitted the run) are out-of-scope of this article.
Interactive Authentication
First of all grab your Workspace config.json file, downloading it directly from its Azure blade:
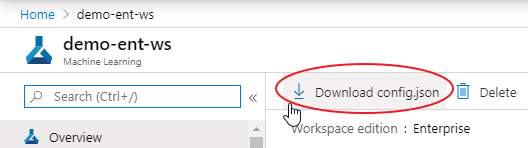
Supposing you’re using a Windows laptop like me, you can directly upload the file into your machine’s R Home folder, using copy and paste, or using WinSCP for a Linux based one. If you can’t manage how to do that, you can simply open the downloaded config.json file on your laptop and copy its content; then paste the content into a R script, assigning it to a variable; at the end just write that content of the variable into a file to be saved on your R machine:
# Check the current working directory. Your config.json file will be created there
getwd()
config_json <- '{
"subscription_id": "<your-subscription-id>",
"resource_group": "<your-resource-group>",
"workspace_name": "<your-workspace-name>"
}'fileConn <- file("./config.json")
writeLines( config_json, fileConn )
close(fileConn)Now you can simply get the reference to your Workspace object in this way:
library(azuremlsdk)ws <- load_workspace_from_config()If you’re using a Compute Instance, you don’t need to download or create the config.json file. You can just use the load_workspace_from_config() function.
You can also explicitly specify the connection details using the get_workspace() function:
ws <- get_workspace( "<your-workspace-name>",
               subscription_id = "<your-subscription-id>",
               resource_group = "<your-resource-group>" )
Both the load_workspace_from_config() and the get_workspace() functions will prompt for interactive authentication. If a browser is installed, a new tab will be opened, waiting for your credentials; otherwise a message like the following one will be shown:
Performing interactive authentication. Please follow the instructions on the terminal.
To sign in, use a web browser to open the page https://microsoft.com/devicelogin and enter the code XXXXXXXXXX to authenticate.
If you have access to multiple tenants, you need to explicitly define what tenant you are targeting. In that case, the interactive_login_authentication() function has to be used to store the authentication information in a variable and the use it to get the Workspace reference:
auth <- interactive_login_authentication( tenant_id="<your-tenant-id>" )ws <- get_workspace( "<your-workspace-name>",
subscription_id = "<your-subscription-id>",
resource_group = "<your-resource-group>",
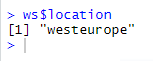
auth = auth )Just to check if the object reference is working correctly, you can ask for the Workspace location using this code:
ws$locationSomething like the following result is expected:
Azure Command-Line Interface (CLI) Authentication
Azure CLI is a set of commands used to create and manage Azure resources, designed to get you working quickly with Azure, with an emphasis on automation.
You need to install Azure CLI in your machine. Once it is installed, if you want to check if Azure CLI is working, just try the following script in your Windows command prompt:
az --versionYou may get the following error:
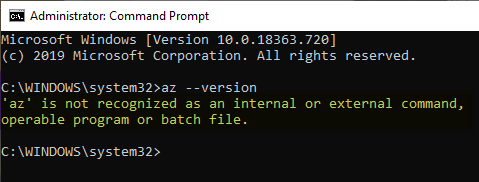
In this case you need to restart your machine in order to make sure your modified PATH environment variable will expand correctly. After you’ve restarted your machine, the C:\Program Files (x86)\Microsoft SDKs\Azure\CLI\wbin path declared in your PATH environment variable should work properly. Infact, runing az into the regular command prompt should return this result:
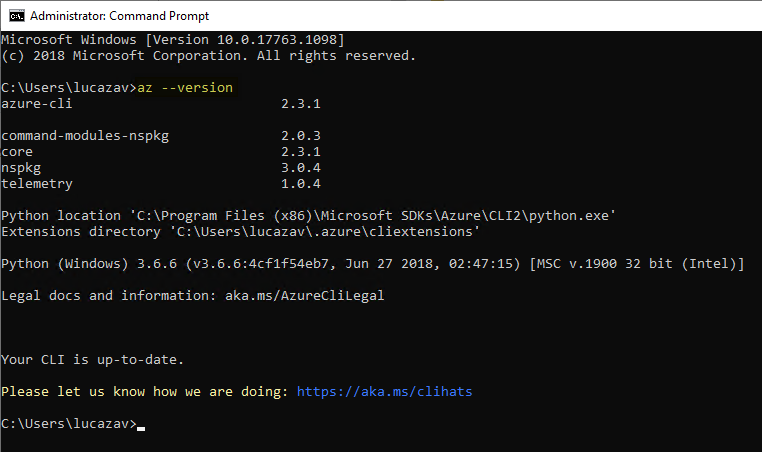
Azure CLI is also available for Linux systems and Windows Subsystems for Linux (WSL).
The last installation you have to do is the one of azure-cli package needed by the Azure ML Python SDK (into the r-reticulate default environment). Once you get the latest version number available here, you can simply run the following command in your RStudio:
reticulate::py_install("azure-cli==2.3.1", envname = "r-reticulate", pip = TRUE)Now, since we’re interested in logging in into Azure Machine Learning, it’d be enough to run the following command:
az loginYou can execute it into your command prompt or in your terminal window in RStudio. Also in this case, you’ll be prompted to login in a new browser tab or, if a browser is not available on your machine, to open a browser page at https://aka.ms/devicelogin and enter the authorization code displayed in your terminal. After logged in, in my case I get these messages:
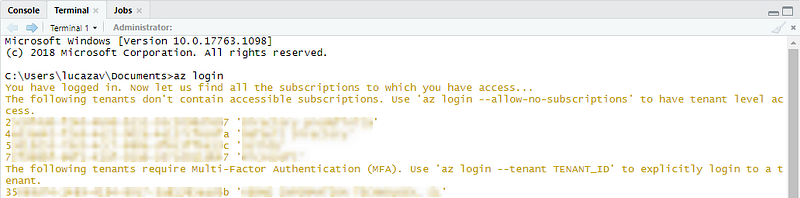
As suggested in the returned message, if your account is tied to multiple tenants, you need to specify to what tenant you want to log in using the az login --tenant <your-tenant-id> command:
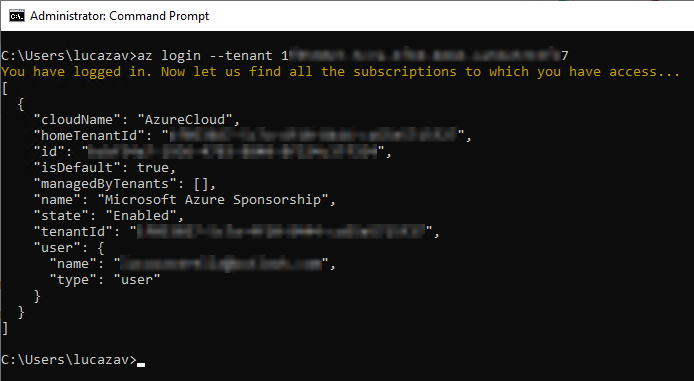
Instead of invoking the az login command using command prompts, you could also run it directly into your R script using the shell function:
shell("az login --tenant <your-tenant-id>")If you want to bypass the interactive login using az, you could run this command:
az login --tenant <your-tenant-id> -u <your-email-address> -p <your-password>As usual, it’s better to store your password in an environment variable, so that you avoid to expose it in plain text, and use it into the command (for example, $MY_PASS). You can set an environment variable in R using this function:
Sys.setenv(MY_PASS = "<your-password>")Keep in mind that
For Multi-Factor Authentication tenants you necessary have to use interactive login through az login without -u. This requirement comes from Azure Active Directory token service.
Now let’s check if it’s possible to get the object reference to the Workspace as done before executing the following R script:
library(azuremlsdk)shell("az login --tenant <your-tenant-id>")cli_auth <- azureml$core$authentication$AzureCliAuthentication()ws <- get_workspace( "<your-workspace-name>",
subscription_id = "<your-subscription-id>",
resource_group = "<your-resource-group>",
auth = cli_auth )ws$locationAs you can see, the AzureCliAuthentication() function is not yet exposed as a main function of the azuremlsdk package (it’ll be very soon, the product team is working hard!). So you need to invoke it passing through the azureml object imported via reticulate at the azuremlsdk startup. If the output is like the one in fig. 3, you are correcly logged in Azure Machine Learning and you have a Workspace object reference working properly.
If you’re interested in understanding how az login works behind the scene, here an interesting article:
Just note that the Interactive authentication described in the previous paragraph isn’t aware of Azure CLI tokens.
Service Principal Authentication
As Microsoft Docs say, “Service principals are accounts not tied to any particular user, which can have permissions on them assigned through predefined roles. Authenticating with a service principal is the best way to write secure scripts or programs, allowing you to apply both permissions restrictions and locally stored static credential information”.
So service principals are the best choice when setting up machine learning workflows as automated processes and when you need to authenticate to an Azure Machine Learning REST API.
A service principal could be created working on the Azure Portal, but the fastest way is using Azure CLI and its Azure Machine Learning extension (azure-cli-ml). This extension provides commands for working with Azure Machine Learning, allowing you to automate your machine learning activities. Thanks to it you can manage all the Azure Machine Learning artifacts through Azure CLI.
All the following steps could be done on your preferred terminal (as previously seen) or also on Azure Cloud Shell. Make sure you have already installed Azure CLI as explained in the previous paragraph.
First of all you need to install the azurecli-ml extension:
az extension add --name azure-cli-mlThen run the following command to create an Azure Active Directory service principal named ml-auth and configure its access to Azure resources:
az ad sp create-for-rbac --sdk-auth --name ml-authwhere --sdk-auth is a parameter that makes the output result compatible with Azure SDK auth file. If run correctly, you can see this result:
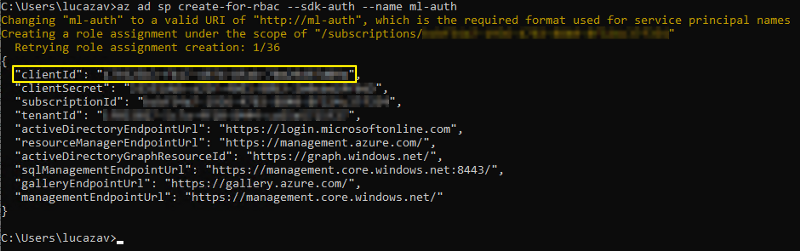
Now run the next command replacing your clientId in the right place to get the details of the just created service principal:
az ad sp show --id <your-client-id>Here the result:
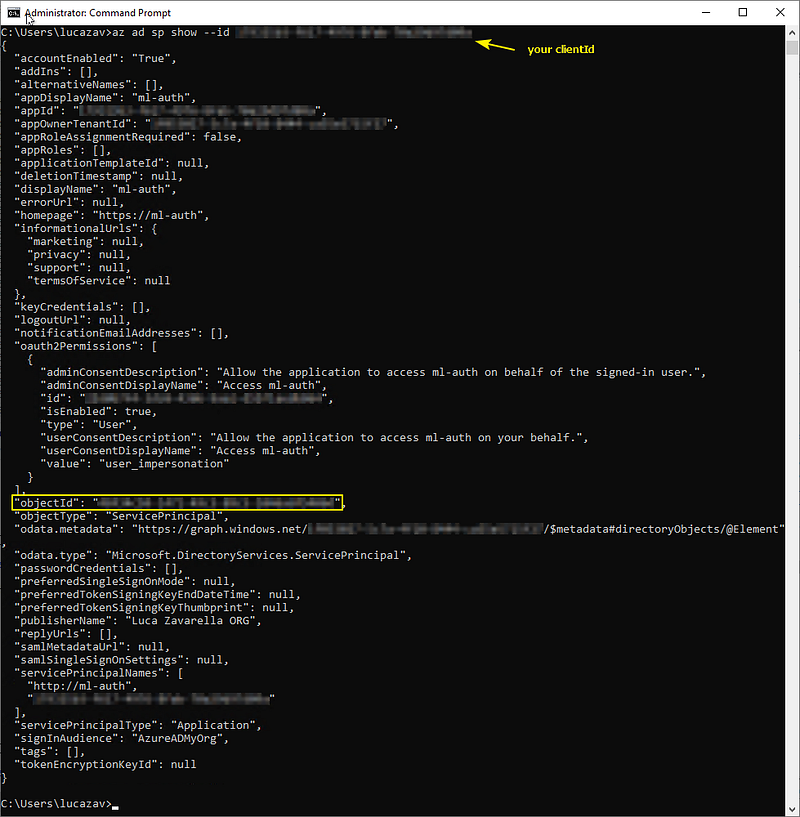
Take note of the objectId field as you will use it in the next command to assign your service principal access to your machine learning workspace:
az ml workspace share -w <your-workspace-name> -g <your-resource-group-name> --user <your-sp-object-id> --role ownerThe --role parameter allows you to set the access role for the service principal. In general you will use either owner or contributor: both have write access to existing resources, but only owner can provision these resources.
This call does not produce any output, but you now have a service principal authentication set up for your workspace.
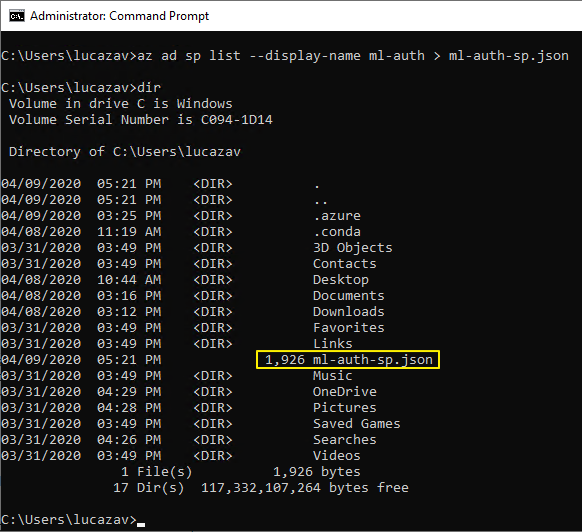
Remember you can always redirect the output of your commands into a file using the > pipe. For example, if you want to get the details of your service principal just created and put them in a JSON file, you can use the following command:
az ad sp list --display-name ml-auth > ml-auth-sp.jsonHere the file just created:
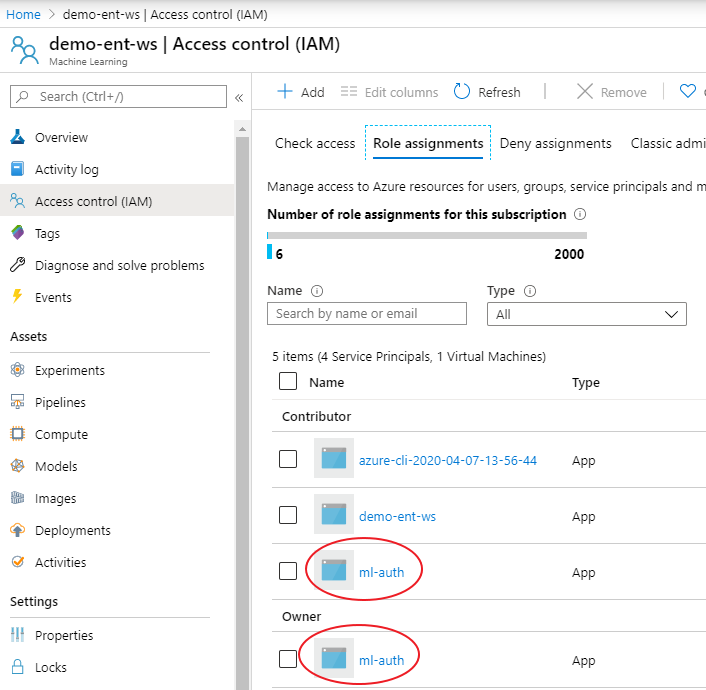
To double-check the service principal is associated to your Workspace, just go to your Workspace Identity Access Management (IAM) blade on Azure Portal:
Now you can authenticate to your workspace using the R SDK without physically logging in as a user:
library(azuremlsdk)sp_auth <- service_principal_authentication(
tenant_id = "<your-tenant-id>",
service_principal_id = "<your-sp-client-id>",
service_principal_password = "<your-sp-client-secret>" )ws <- get_workspace( "<your-workspace-name>",
subscription_id = "<your-subscription-id>",
resource_group = "<your-resource-group>",
auth = sp_auth )ws$locationwhere service_principal_id maps to the service principal clientId, and service_principal_password maps to the service principal clientSecret.
Even in this case the ServicePrincipalAuthentication() function is not directly exposed by the R SDK.
If all worked fine, you’d see you workspace location as result.
Managed Identities For Azure Resources
A typical challenge in cloud development is how to manage credentials in a developer’s code. Instead of hard code them into the script, you could store them into the Azure Key Vault, a service born to keep safe your credentials, secrets, and other stuff. But the problem is that you have to authenticate to the Key Vault in order to retrieve them. In this case managed identities are the best way to access to Key Vaults.
In general, any service that supports Azure Active Directory (AD) may have an automatically managed identity. This identity can be used to authenticate to the service without any credential in the code.
This service was formerly known as Managed Service Identity (MSI). Managed identities are service principals of a special type, which are locked to only be used with Azure resources. When a managed identity is deleted, the corresponding service principal is automatically removed.
In our case, assuming that a data scientist works on an Azure VM (so it supports Azure AD), in order to let him to access to a Workspace without credentials, you have to:
- Enable a System-assigned Managed Identity for the VM
- Grant the VM to access to your Workspace
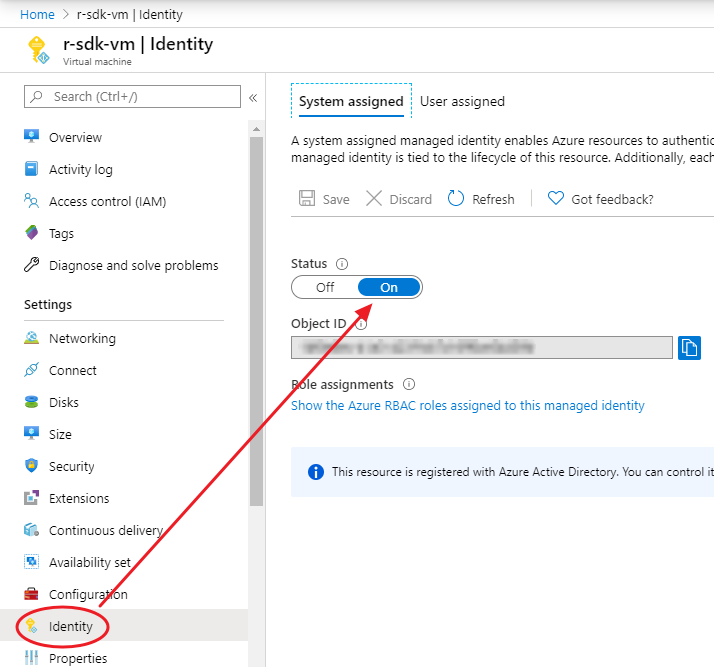
The first step can be done through Azure CLI (make sure you’ve installed it as explained in a previous paragraph). You could check if a managed identity is already set for you VM in the following way:
az vm identity show --name <your-vm-name> --resource-group <your-resource-group>In my case it’s already set and I get this result:

If nothing is set, you could assign a managed identity using this command:
az vm identity assign -g <your-resource-group> -n <your-vm-name>After that, go to your Workspace IAM blade on the Azure Portal and allow your Azure VM to access to it:
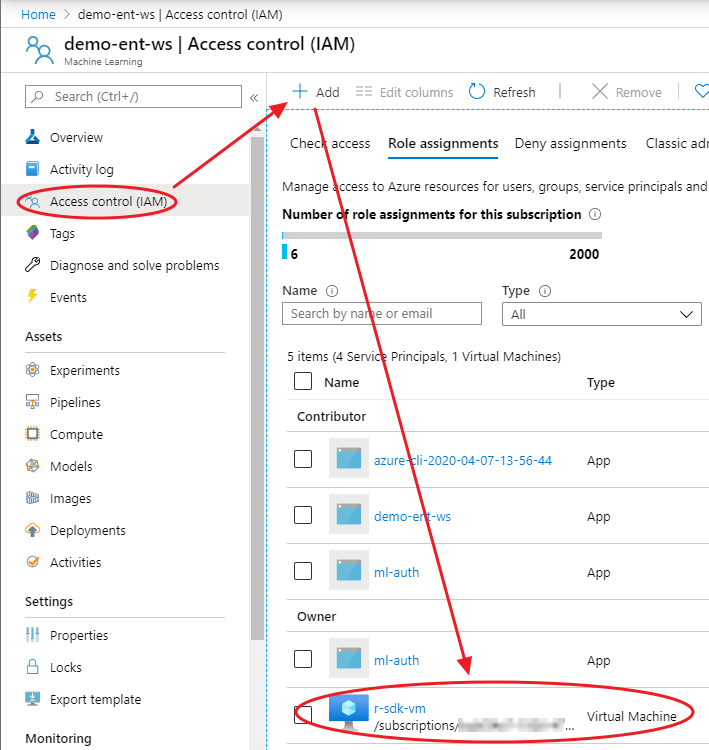
Now you can finally log in into your Azure VM and get the Workspace object reference with the following code in your RStudio:
library(azuremlsdk)msi_auth <- azureml$core$authentication$MsiAuthentication()ws <- get_workspace( "<your-workspace-name>",
subscription_id = "<your-subscription-id>",
resource_group = "<your-resource-group>",
auth = msi_auth )ws$locationYou should see the location of your Workspace as result of your script.
Also in this case the MsiAuthentication() function is not yet exposed as a main function of the azuremlsdk package, so you need to go deep into the azureml object functions to find it.
The Workspace Key Vault
We talked about the Azure Key Vault in an example before. Did you know that any Azure ML Workspace has a Key Vault associated to it? Search for “Key Vaults” in the Azure Portal and you’ll see a Key Vault named like your Workspace, without dashes and with a numeric suffix:
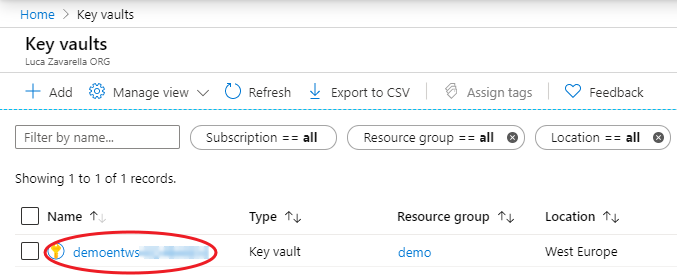
Access the default Key Vault from Workspace
You can access to it once you have an object reference to your Workspace. So, using one of the upon mentioned method to authenticate and get your Workspace reference ws, you can access to the Key Vault in the following way:
kv <- get_default_keyvault(ws)So let’s try to use it to store the service principal id and password we used in a previous paragraph, in order to get it back in a secure way:
set_secrets( kv, list("sp-ws-id" = "<your-sp-id>",
                      "sp-ws-psw" = "<your-sp-password>") )
The only allowed characters for a secret name are letters (uppercase and lowercase), numbers and the dash (not the underscore).
At this point you could access to your secrets list in the following way:
my_secrets_list <- list_secrets(kv)# If you'd have a nice tidy view of your secrets
library(dplyr)my_secrets_list %>%
purrr::map_df( ~ as_tibble(.) )You could also get directly your named secret thanks to the get_secrets() helper function:
get_secrets(kv, list("sp-ws-id"))Access the default Key Vault directly from your R code
Suppose now you want to access to your Azure ML Workspace using the previous stored service principal credentials. Accessing your Key Vault through the Workspace is not possible now, as you need the secrets stored in your Key Vault to access to the Workspace itself.
In this case managed identities come to the rescue!
First of all make sure your Azure VM has the system assigned managed identity enabled:
Then make sure your managed identity enabled Azure VM can access to the default Key Vault, so that you won’t need credentials to read from it when coding from your VM:
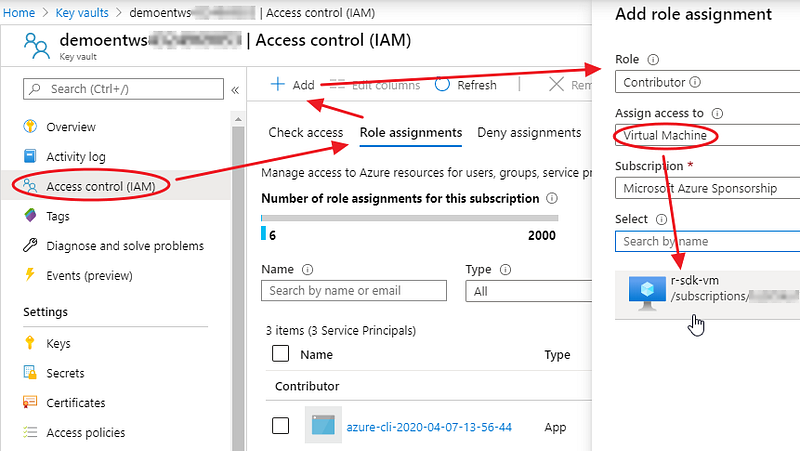
Lastly you need to grant your VM principal into Access policies of your Key Vault:
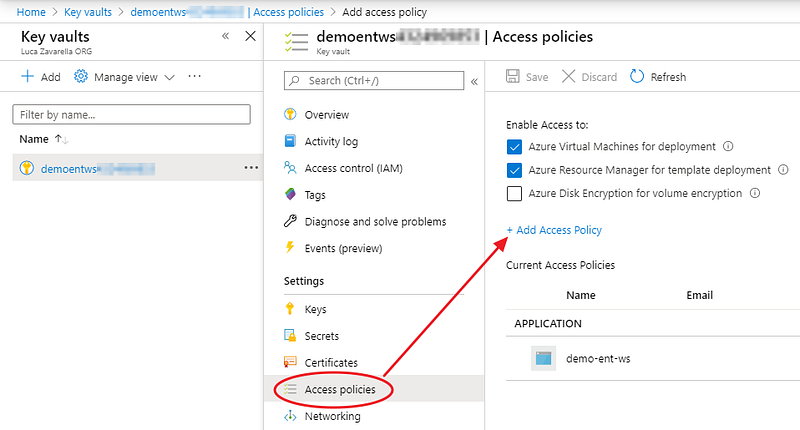
Feel free to choose the permissions you need to manage your stuff into the Key Vault before to add the VM principal:
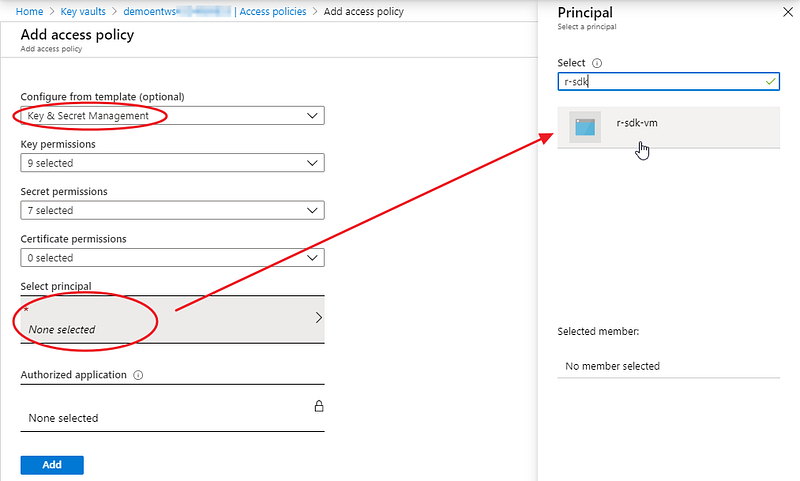
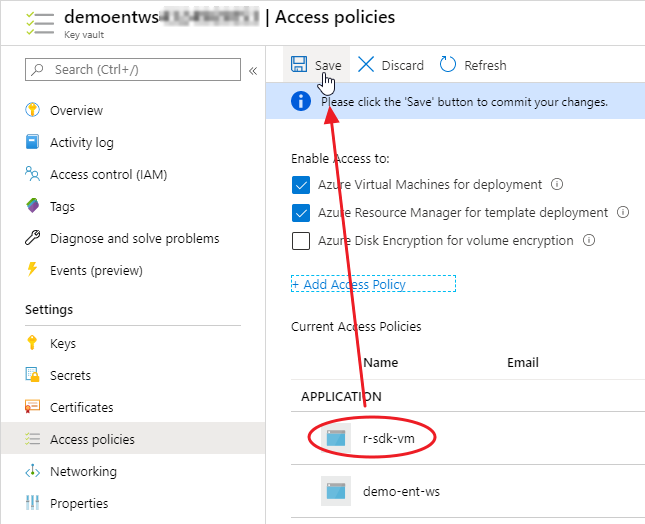
When selected your VM principal, remember to save your new configuration for the default Key Vault:
That’s all! Now you can try the following R code into RStudio on your Azure VM to get access to your Workspace using the created service principal and a couple of packages from the AzureR family:
# You need to install the AzureKeyVault and AzureAuth packages
install.packages("AzureKeyVault", "AzureAuth")library(AzureKeyVault)
library(azuremlsdk)# Get the token as a managed identity VM.
# Don't leave the slash at the end of the resource URL!
tkn <- AzureAuth::get_managed_token( resource = "https://vault.azure.net" )# Access to the default Key Vault exposed to your VM
kv <- key_vault( "<your-key-vault-name>",
tenant = "<your-tenant-id>",
token = tkn )# Just chek your secrets keys are available and working
kv$secrets$list()# Use Key Vault secrets to get an authentication to your workspace
sp_auth <- service_principal_authentication(
tenant_id = "<your-tenant-id>",
service_principal_id = kv$secrets$get("sp-ws-id")$value,
service_principal_password = kv$secrets$get("sp-ws-psw")$value )ws <- get_workspace( "demo-ent-ws",
subscription_id = "<your-subscription-id>",
resource_group = "<your-resource-group-id>",
auth = sp_auth )ws$locationConclusions
In this article all the authentication methods to access to an Azure Machine Learning Workspace and its Key Vault using the R SDK have been exposed and detailed. Once logged in into your Workspace, you’re able to manage all your Azure Machine Learning artifacts at the best.


