
Flutter, how to add Done button over numeric keyboard on iOS App ?
Unfortunately, when using number input fields, there is no Done button inside / above the keyboard in iOS. This issue can block your UX and give your users a bad experience.
In this tutorial I will show you how to include a Done button on the top right corner above the numeric keyboard.
After completing this tutorial you will have something like this you made by yourself!
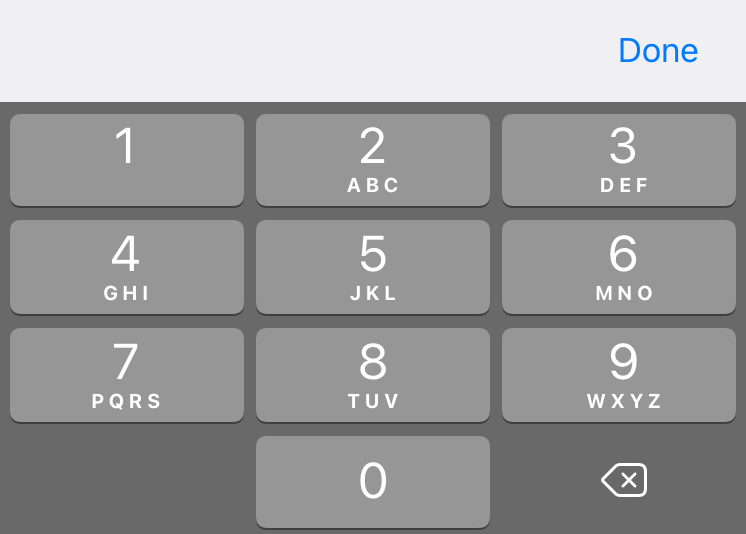
The regular way for numerical entry

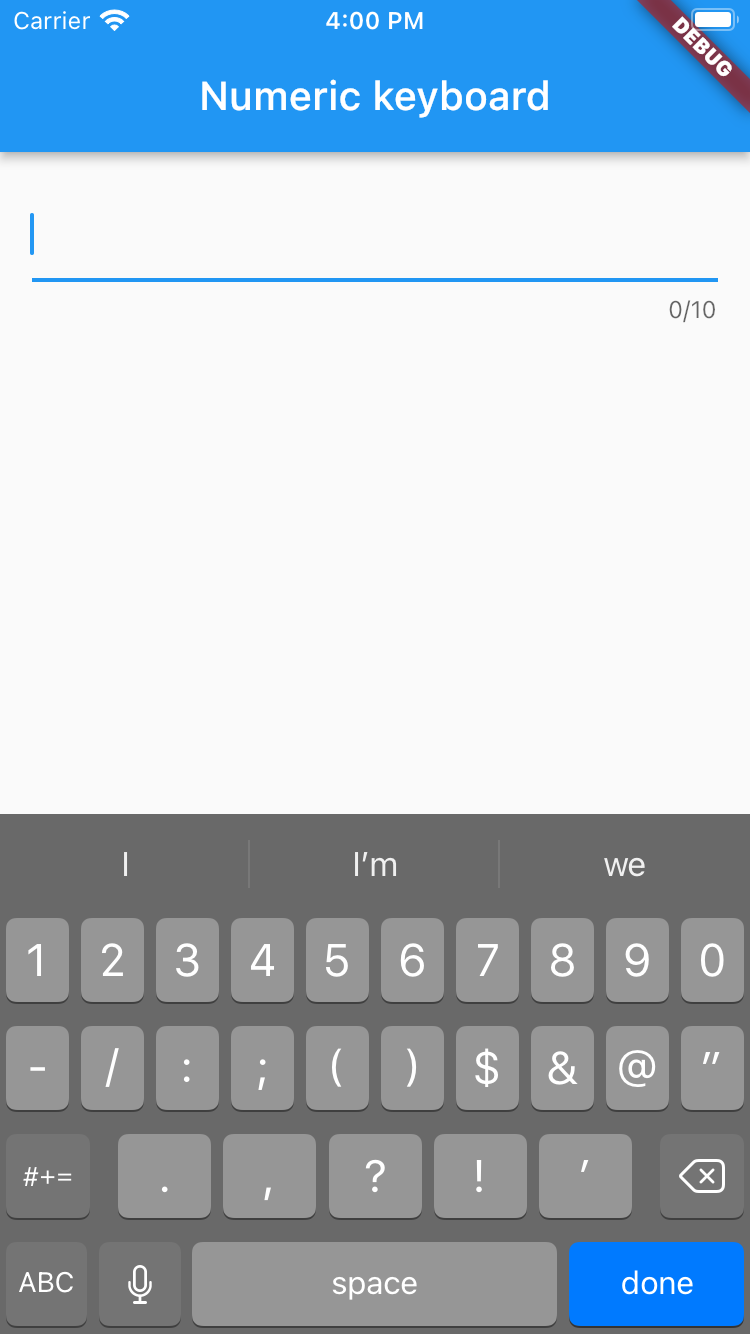
This what append when you use the regular way for numeric entry
TextField(
  keyboardType: TextInputType.number,
  maxLength: 10,
),
An easy trick to have a Done button
On common and easy trick to have a done button is to use a regular text input and filtering entry to allow only digits input.
TextField(
  keyboardType: const TextInputType.numberWithOptions(
      signed: true,
      decimal: true),
  maxLength: 10,
  inputFormatters: [FilteringTextInputFormatter.digitsOnly],
),
This works fine but it’s not really user friendly !
Let me show you how to do it smart
Create the done view
First of all you need a done view to show the done button correctly. Create a dart file named inputdoneview.dart and copy/paste this code:
import 'package:flutter/cupertino.dart';
import 'package:flutter/material.dart';

class InputDoneView extends StatelessWidget {
  const InputDoneView({Key? key}) : super(key: key);

  @override
  Widget build(BuildContext context) {
    return Container(
        width: double.infinity,
        color: CupertinoColors.extraLightBackgroundGray,
        child: Align(
            alignment: Alignment.topRight,
            child: Padding(
              padding: const EdgeInsets.only(top: 4.0, bottom: 4.0),
              child: CupertinoButton(
                padding: const EdgeInsets.only(
                    right: 24.0, top: 8.0, bottom: 8.0),
                onPressed: () {
                  FocusScope.of(context).requestFocus(FocusNode());
                },
                child: const Text("Done",
                    style: TextStyle(color: CupertinoColors.activeBlue,)
                ),
              ),
            )
        )
    );
  }
}
As you can see you can easily change the Done button text, color and position with your own desire.
Create keyboard overlay
We need a class to show and remove our UnputDoneView on keyboard overlay: create a new dart file name it keyboardoverlay.dart and copy/paste the code below.
class KeyboardOverlay {
  static OverlayEntry? _overlayEntry;

  static showOverlay(BuildContext context) {
    if(_overlayEntry != null) {
      return;
    }

    OverlayState? overlayState = Overlay.of(context);
    _overlayEntry = OverlayEntry(builder: (context) {
      return Positioned(
          bottom: MediaQuery.of(context).viewInsets.bottom,
          right: 0.0,
          left: 0.0,
          child: const InputDoneView());
    });

    overlayState!.insert(_overlayEntry!);
  }

  static removeOverlay() {
    if (_overlayEntry != null) {
      _overlayEntry!.remove();
      _overlayEntry = null;
    }
  }
}
Keyboard visibility
Last think we need is a tool to let us informed on keyboard visibility. We will you use this dependency from https://pub.dev/packages/keyboard_visibility
It’s an easy tool also easy to install. Just type this line on terminal just rub this command with Flutter:
$ flutter pub add keyboard_visibilityThis will add a line like this to your package’s pubspec.yaml (and run an implicit flutter pub get):
dependencies:
  keyboard_visibility: ^0.5.6
That’s all. We now have all we need to create our entry as we want !
Let use our work !
In main.dart file copy / paste this code to test everything you learn on this tutorial
import 'package:flutter/cupertino.dart';
import 'package:flutter/material.dart';
import 'package:flutter/services.dart';
import 'keyboardoverlay.dart';

void main() {
  runApp(const MyApp());
}

class MyApp extends StatelessWidget {
  const MyApp({Key? key}) : super(key: key);

  // This widget is the root of your application.
  @override
  Widget build(BuildContext context) {
    return MaterialApp(
      title: 'Numeric keyboard Done',
      theme: ThemeData(
        primarySwatch: Colors.blue,
      ),
      home: const MyHomePage(title: 'Numeric keyboard'),
    );
  }
}

class MyHomePage extends StatefulWidget {
  const MyHomePage({Key? key, required this.title}) : super(key: key);
  final String title;

  @override
  State<MyHomePage> createState() => _MyHomePageState();
}

class _MyHomePageState extends State<MyHomePage> {

  FocusNode numberFocusNode = FocusNode();
  TextEditingController textController = TextEditingController();

  @override
  void initState() {
    super.initState();
    numberFocusNode.addListener(() {
      bool hasFocus = numberFocusNode.hasFocus;
      if (hasFocus) {
        KeyboardOverlay.showOverlay(context);
      } else {
        KeyboardOverlay.removeOverlay();
      }
    });
  }

  @override
  void dispose() {
    // Clean up the focus node
    numberFocusNode.dispose();
    super.dispose();
  }

  @override
  Widget build(BuildContext context) {
    return Scaffold(
      appBar: AppBar(
        title: Text(widget.title),
      ),
      body: Padding(
        padding: const EdgeInsets.all(16.0),
        child: Column(
          children: [
            // Regular way
           const TextField(
              keyboardType: TextInputType.number,
              maxLength: 10,
            ),
            const Text('Enter a number and done (trick)'),
            TextField(
              keyboardType: const TextInputType.numberWithOptions(
                  signed: true,
                  decimal: true),
              maxLength: 10,
              inputFormatters: [FilteringTextInputFormatter.digitsOnly],
            ),
            const Text('Enter a number and done'),
            TextField(
              keyboardType: TextInputType.number,
              maxLength: 10,
              focusNode: numberFocusNode,
              controller: textController,
              onChanged: (value) {},
              inputFormatters: [FilteringTextInputFormatter.digitsOnly],
            ),
          ],
        ),
      ),
    );
  }
}
I hope you’ve learned a bit more about Flutter and this tutorial helped you on your learning path.
You can download the sample project from GitHub by following this link:


