
How to Actually Deploy Docker Images Built on M1 Macs With Apple Silicon
A guide to help you deploy cross-platform builds from your M1 Mac
While using an early “Tech Preview” Docker Desktop build for Apple Silicon I quickly ran into a learning curve related to different architectures and deployment. I can build and run images on my M1 Mac just fine now but this was the error I saw when pushing an image built on a Mac with Apple Silicon to an ECS instance on AWS:
standard_init_linux.go:219: exec user process caused: exec format errorHopefully, this guide will help you start deploying images built from your amazing new machine faster!
Install a Compatible Docker Version
Kudos to the Docker team for moving very fast on a build for the M1 chip. You can get the latest “Tech Preview” from their website. Note that they do not recommend using this version in production.
While you can run Docker containers built on your Mac just fine now, you need to make a build you can run somewhere else on a different architecture. Fortunately, Docker has a tool called buildx that has you covered.
Once installed, the first thing you have to do to start building for other architectures is to enable the experimental features:
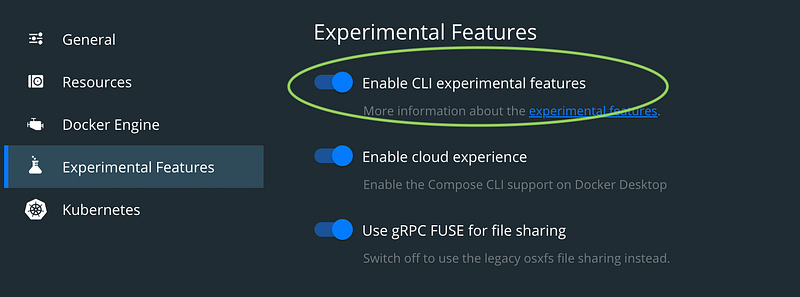
This will make the Docker buildx program available. Docker has documentation and several blog posts about it. We will walk through it now.
Use buildx
Buildx comes with a default builder that you can observe by typing docker buildx ls into your terminal. However, we want to make and use a builder ourselves.
Make a builder
You will need a new builder, so make one with docker buildx create --name m1_builder. Now you should see the new builder when running docker buildx ls.
Use and bootstrap the builder
The next steps are to “use” the new builder and bootstrap it. Start with docker buildx use m1_builder and then docker buildx inspect --bootstrap, which will inspect and bootstrap the builder instance you just started using. You should see something like this:
computer@computer-m1 ~ % docker buildx inspect — bootstrap[+] Building 5.3s (1/1) FINISHED=> [internal] booting buildkit 5.3s=> => pulling image moby/buildkit:buildx-stable-1 3.1s=> => creating container buildx_buildkit_m1_builder0 2.3sName: m1_builderDriver: docker-containerNodes:Name: m1_builder0Endpoint: unix:///var/run/docker.sockStatus: runningPlatforms: linux/arm64, linux/amd64, linux/riscv64, linux/ppc64le, linux/s390x, linux/arm/v7, linux/arm/v6
You can see that this builder has a whole host of platforms it will build for!
Build with the builder
Now, cd your terminal into a place where you want to build and push an image so you can run this pseudo-command:
docker buildx —-platform linux/amd64,linux/arm64,linux/arm/v7 -t <remote image repository> --push .You should see the “in use” builder go crazy and build the architectures you specified.
If you wan’t the skinniest possible build you will need to know the architecture you are deploying to. In my case my AWS ECS tasks required linux/amd64 which is the only option I use after the --platform flag.
Manifest
Once your image has been built and pushed, you can inspect the manifest with:
docker buildx imagetools inspect <remote image repository>You should see a manifest printout with all your different architectures. Most services that pull an image are smart enough to know which architecture to go get.
Clean up
Finally, as you might have experienced, Docker can start to take up a bit of disk space. If you did not use buildx, you probably ran docker system prune --all, the equivalent for buildx is luckily semantically similar.
docker buildx prune --allThat’s it! Happy container development!


