
How I Created Easy Gen AI Demos for Non-Technical Colleagues and Users
An Easy Guide to Quick Demos With Few Lines of Code Using Gradio
In this post, we’ll see how to write quick machine learning and Gen AI demos with few lines of code using Gradio.
Specifically, you’ll learn how to:
- Write an interactive chatbot powered by OpenAI GPT-3.5.
- Stream the response and add memory to your chatbot to improve the user experience.
- Write a chatbot with a customized look to chat with your fine-tuned Mistral 7B, which has been trained on financial knowledge data (see the following article).

I have been working in financial services for years, surrounded by colleagues with economic and risk management backgrounds. Some of them are also really good at numbers and models (risk models, credit models, but not Large Language Models).
When my proposal for a side-project on leverage on LLM to improve the team’s productivity was accepted, one of the challenges I faced was how to communicate complex machine learning concepts to my collegues who are non-IT audiences.
One solution I found was to create interactive demos.
Demos are a great way to show people how machine learning works in practice and to let them try out the demo in their browsers.
However, creating demos can be time-consuming and challenging, especially if you’re not a web developer.
That’s where Gradio comes in.
What Is Gradio?
Gradio is an open-source Python library that is used to build machine learning and data science demos and web applications.
With Gradio, you can quickly create a beautiful user interface around your machine learning models and let people try them out and interact with your demo, all through the browser.
Gradio is useful for:
- Demoing your machine learning models for clients, collaborators, users, or students.
- Deploying your models quickly with automatic shareable links and getting feedback on model performance.
- Debugging your model interactively during development using built-in manipulation and interpretation tools.
Chatbot Powered By OpenAI GPT3.5
You can find the accompanying Colab notebook here. The code snipets shown here are largely inspired by the Gradio documentation.
1. Install necessary packages
!pip install -q gradio
!pip install openai
!pip install tiktoken
2. Get your OpenAI API key
you’ll need an OpenAI API key to get access to OpenAI’s language models. To obtain your key, visit the OpenAI developer portal, sign up, and retrieve your API key.
OPEN_API_KEY = your_api_key3. Define your chat function
When working with gradio ChatInterface API, the first thing we should do is define the chat function. The chat function should take two arguments: message and then history (the arguments can be named anything, but must be in this order).
message: astrrepresenting the user’s input.history: alistoflistrepresenting the conversations up until that point. Each inner list consists of twostrrepresenting a pair:[user input, bot response].
This function should return a single string response, which is the bot’s response to the particular user input message.
In short, the chat function sends the user’s query and the previous conversation history to GPT-3.5 Turbo and returns the model response.
Adding the chatting history to the chatbot is important because it allows the user to ask follow-up questions, as each interaction with GPT-3.5 Turbo is standalone.
# Import the necessary libraries
import openai  # Import OpenAI library for making API requests
import gradio as gr  # Import Gradio for creating a user interface

# Set the OpenAI API key - Replace OPENAI_API_KEY with your actual API key
openai.api_key = OPENAI_API_KEY

# Define a function called get_completion
def get_completion(message, history):
    history_openai_format = []

    # Iterate through the conversation history (a list of tuples with human and assistant messages)
    for human, assistant in history:
        # Add the user's message to the formatted history with the role "user"
        history_openai_format.append({"role": "user", "content": human })

        # Add the assistant's response to the formatted history with the role "assistant"
        history_openai_format.append({"role": "assistant", "content": assistant})

    # Add the current user's message to the formatted history
    history_openai_format.append({"role": "user", "content": message})

    # Make an API request to OpenAI's ChatCompletion model
    response = openai.ChatCompletion.create(
        model='gpt-3.5-turbo',  # Specify the model to use
        messages=history_openai_format,  # Provide the formatted conversation history
        temperature=0,  # Set temperature to 0 for more focused and deterministic responses
    )

    # Extract and return the content of the model's response
    return response.choices[0].message["content"]
4. Create the chatbot with only one line of code!
gr.ChatInterface(get_completion).queue().launch()This single line of code will create a look like this.

5. Add Streaming And Memory to Your Chatbot
Now, let’s further improve the user experience of the chatbot above by streaming the model’s responses. Here’s the code to achieve that:
def get_completion_with_streaming(message, history):
    history_openai_format = []

    # Iterate through the conversation history (a list of tuples with human and assistant messages)
    for human, assistant in history:
        # Add the user's message to the formatted history with the role "user"
        history_openai_format.append({"role": "user", "content": human })

        # Add the assistant's response to the formatted history with the role "assistant"
        history_openai_format.append({"role": "assistant", "content": assistant})

    # Add the current user's message to the formatted history
    history_openai_format.append({"role": "user", "content": message})

    # Make an API request to OpenAI's ChatCompletion model with streaming enabled
    response = openai.ChatCompletion.create(
        model='gpt-3.5-turbo',  # Specify the model to use
        messages=history_openai_format,  # Provide the formatted conversation history
        temperature=1.0,  # Set temperature to control the randomness of responses
        stream=True  # Enable streaming mode for partial responses
    )

    # Initialize a variable to hold the partial message
    partial_message = ""

    # Iterate through the response chunks
    for chunk in response:
        # Check if the chunk contains content
        if len(chunk['choices'][0]['delta']) != 0:
            # Append the content of the chunk to the partial message
            partial_message = partial_message + chunk['choices'][0]['delta']['content']

            # Yield the partial message, allowing for streaming responses
            yield partial_message
With streaming, the user doesn’t have to wait as long for a message to be generated.
Chatting With Mistral 7b
In this example, we’ll load and run the fine-tuned Mistral 7B on a Google Colab instance using the Transformers library.
Even with quantization to efficiently reduce memory usage, the model is still too large to run on a free Colab instance, so you’ll need a Pro account. We’ll not see how to run the model in this post, but you can find the accompanying Colab notebook here.
Alternatively, if you want to run the model locally, you can check out the text-generation-inference.
1. Define your chat function
The chat function takes user query and conversation history, sends them to the model to generate a response, and yields the generated response in a streaming manner.
# Import necessary libraries and modules
import gradio as gr
import torch
from transformers import AutoModelForCausalLM, AutoTokenizer, StoppingCriteria, StoppingCriteriaList, TextIteratorStreamer
from threading import Thread

# Move the model to the GPU (cuda:0)
model = model.to('cuda:0')

# Define a custom StoppingCriteria class for text generation
class StopOnTokens(StoppingCriteria):
    def __call__(self, input_ids: torch.LongTensor, scores: torch.FloatTensor, **kwargs) -> bool:
        # Define stop tokens (e.g., [29, 0]) that determine when to stop text generation
        stop_ids = [29, 0]
        for stop_id in stop_ids:
            if input_ids[0][-1] == stop_id:
                return True
        return False

# Define a function called predict for text generation
def predict(message, history):
    # Combine the user's message and conversation history
    history_transformer_format = history + [[message, ""]]

    # Create an instance of the custom StoppingCriteria class
    stop = StopOnTokens()

    # Prepare the conversation history in a specific format
    messages = "".join(["".join(["\n<human>:"+item[0], "\n<bot>:"+item[1]])
                for item in history_transformer_format])

    # Tokenize the formatted conversation history and move it to the GPU
    model_inputs = tokenizer([messages], return_tensors="pt").to("cuda")

    # Create a TextIteratorStreamer to iterate over generated tokens
    streamer = TextIteratorStreamer(tokenizer, timeout=10., skip_prompt=True, skip_special_tokens=True)

    # Define text generation parameters
    generate_kwargs = dict(
        model_inputs,
        streamer=streamer,
        max_new_tokens=1024,
        do_sample=True,
        top_p=0.95,
        top_k=1000,
        temperature=1.0,
        num_beams=1,
        stopping_criteria=StoppingCriteriaList([stop])
    )

    # Start text generation in a separate thread
    t = Thread(target=model.generate, kwargs=generate_kwargs)
    t.start()

    partial_message = ""

    # Iterate over generated tokens and yield partial messages
    for new_token in streamer:
        if new_token != '<':
            partial_message += new_token
            yield partial_message
2. Try it out with Gradio one line magic!
gr.ChatInterface(predict).queue().launch()This code will launch the Gradio interface and let’s chat with our Mistral 7B!
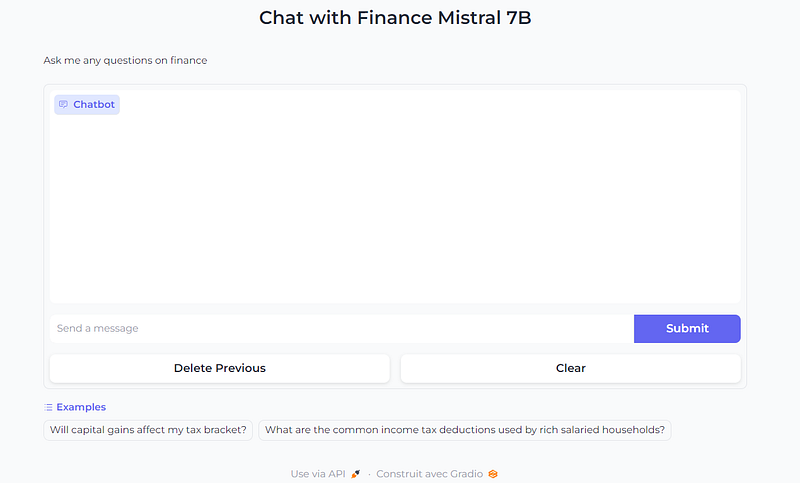
3. Improve the Chatbot UI with customization
Now that we’re familiar with Gradio’s ChatInterface, we can further customize the look and feel of the chatbot. For example, we can add a title and description above the chatbot, and show examples to make it easier for users to try it out.
gr.ChatInterface(
    predict,
    chatbot=gr.Chatbot(height=300),
    textbox=gr.Textbox(placeholder="Send a message", container=False, scale=7),
    title="Chat with Finance Mistral 7B",
    description="Ask me any questions on finance",
    theme="soft",
    examples=["Will capital gains affect my tax bracket?", "What are the common income tax deductions used by rich salaried households?"],
    cache_examples=True,
    retry_btn=None,
    undo_btn="Delete Previous",
    clear_btn="Clear",
).queue().launch()
This code snippet will give the Chatbot a look like this.
Closing Thoughts
In this article, we have created a chatbot powered by OpenAI, a demo to chat with the finetuned Mistral 7B model, and shown how to stream model output to improve the user experience.
Gradio makes it really easy for anyone to create machine learning demos, with just a few lines of code. So, even if you’re not a front-end developer, there’s no excuse not to put in the extra mile and create a great UI for your demo. It will make a big difference!
Alternatively you can use Gradio Bloc if you want to more control and adding more customization.
Teaser : Gradio 4 Coming Soon on October 31st. Gradio 4 is the next major release, allowing to do MUCH more with your machine learning apps, , so stay tuned!
Before you go! 🦸🏻♀️
If you liked my story and you want to support me:
- Clap my article 50 times, that will really really help me out.👏
- Follow me on Medium and subscribe to get my latest article🫶
Reference