
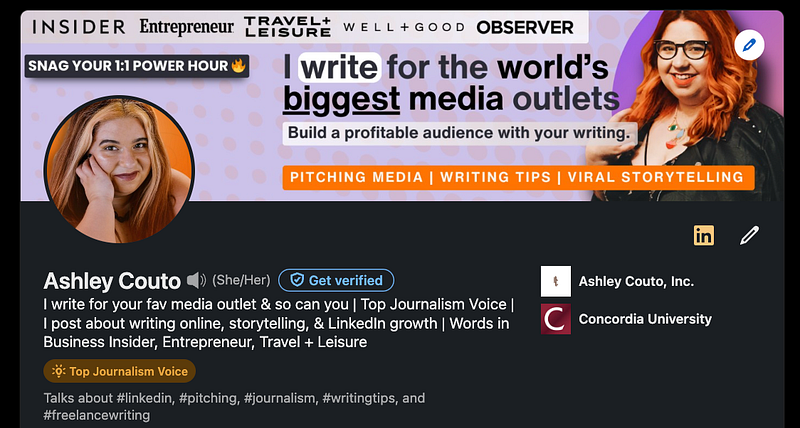
How I Became a LinkedIn Top Voice in Under 30 Days With Less Than 1000 Followers
The most straightforward and time-effective strategy to getting a Top Voice badge.
LinkedIn is a weird place, made stranger by shiny vanity badges. My ideal clients care about shiny vanity badges, so I’m willing to pursue them because they feed my business. I like cashing cheques in my bank account, not my ego account.
I’m a fan of doing as little as possible to get significant results, and this is that strategy. If you want a Top Voice badge or, like me, your clients think it’s a flex worth having, so you’re trying to get one, this is the most straightforward path.
You don’t need a big following for this strategy to work. I had less than 1000 followers on LinkedIn at the time.
What is a LinkedIn Top Voice badge?
LinkedIn has had a Top Voice system for the last few years, where they brand someone’s account with a blue LinkedIn symbol if they’re the top one or two people in their category.
Last year, they launched the Top Community Voices program, which allows you to contribute to AI-generated articles to give them more color and accuracy. As a reward, the people with the most valuable contributions become Top Community Voices in a particular category.
Top Voice badges are given to the top 5% of contributors in a particular category. There’s no exact formula for how LinkedIn calculates who these contributors are, but it appears to be a mix of:
- Engagement on your answers
- Social Selling Index score
- The popularity of your content on the LinkedIn platform
- How many Top Voice badges you have
Engagement on your posts is the biggest factor in the equation because the better the engagement, the quicker your ascent toward that top voice badge.
But I jumped from the Top 20% of contributors to the top 10% in my Top Voice badge category when my SSI score went up 5 points. If you don’t know what SSI is, it’s LinkedIn’s way of judging how well you’re using the platform based on its four criteria for successful LinkedIn users:
- How established your professional brand is
- Finding the right people
- Engaging with insights
- Building relationships
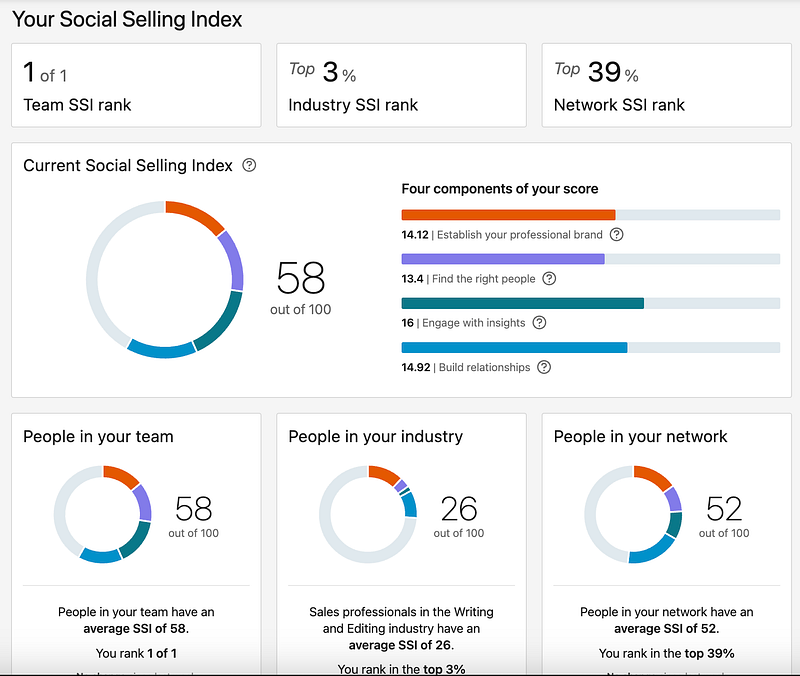
Your SSI is determined in part by how well your content performs. After I had two or three posts reach the thousands in impressions and my engagement boosted, I was invited to contribute.
Finally, after I got my Top Publicity Voice badge, I jumped from the Top 43% in journalism to the top 10%, so being an expert in one category weights you favorably in the process.
Step One: Pick the right Top Voice badge category
This is where most people need to do better. If you’ve gotten one of those LinkedIn emails about wanting your expert insight and clicked on that category to contribute, you’ve already made an error.
LinkedIn always pushes you to contribute to the most competitive categories instead of the ones where you’re most likely to get a Top Voice badge. If you’ve been contributing to LinkedIn’s suggested articles, unless you’re in the top 10% of contributors, I need you to follow my advice when I say stop: There’s an easier way.
LinkedIn has hundreds of top voice categories. You can see them all right here. You want to pick one that’s low competition and relevant to your niche.
These are the characteristics of a low-competition category:
- Most of the articles have 0–4 contributions
- The articles are not updated very often
- There is a low engagement count on the top responses
I teach people how to write for the biggest media outlets on earth and pitch their stories, opinions, and expertise to editors. Typically, the type of person who wants that achievement is an entrepreneur who generally wants publicity.
The “publicity” category was a dead zone before I arrived. Now, I work as a journalist, but I used to co-own a 7-figure PR firm, so let’s say I know a thing or two about how to get someone into the media. It made sense to go for that one.
What you don’t want to do — and I see this all the time on LinkedIn- is get a badge for something unrelated. If you’re an SEO marketer, a Top Voice badge in Leadership Development is useless as it doesn’t further your credibility in your ideal client’s eyes.
Step Two: Contribute to three articles per week
I contributed three times a week because I post three times a week, so my LinkedIn audience knew I’d be on the platform. They were looking out for my name. I would contribute two hours after letting my content go live.
I waited for my post to start racking up impressions so LinkedIn didn’t kill the reach in favor of pushing my collaborative article.
What I wish I would’ve done is post on the weekend. LinkedIn is a tumbleweed on Saturday and Sunday compared to during the week, so I could have boosted my engagement and shortened my timeline, even more to stop contributing to articles as often.
I recommend posting on the weekend if you can. Otherwise, that two hours after your content strategy works well, too.
I recommend posting on articles that have no contributions or two or fewer. It will be easy for you to move to the top expert spot that way. You don’t have to contribute to every single element of the article. Find one section to comment on and leave your 750-character or less comment.
Step Three: Like your own contributions
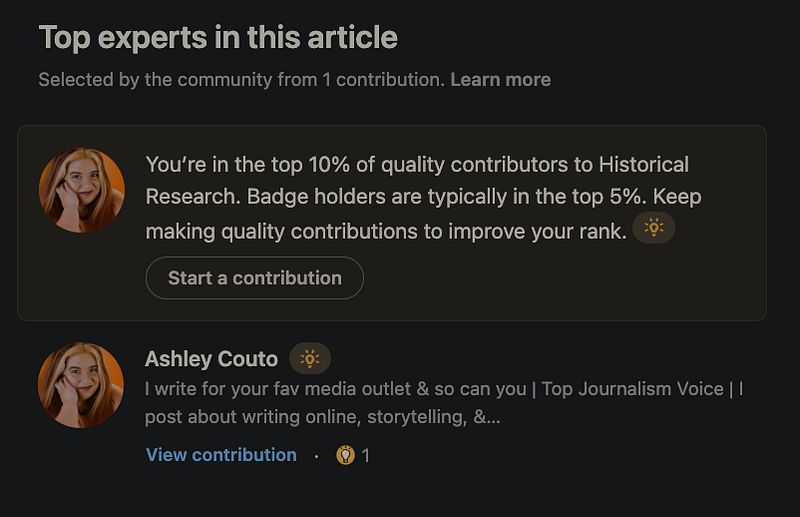
This point might ruffle some feathers: You must like your contributions. Why? French Philosopher Jean Baudrillard calls this “sign value.” If someone else likes your content, it’s perceived as more valuable than other unliked contributions. This starts a likes chain for your content that gets non-you people liking it, too.
LinkedIn only shows who’s liked a particular contribution if you hover. Leverage sign value to help yourself get ahead. Sometimes, just liking your post is enough to bump it to the “top experts in this article” section.
Step Four: Regularly monitor your progress
When you contribute your first three answers in a category for the first time, about 48–72 hours later, LinkedIn will tell you where you rank percentage-wise. You can click on any article in your chosen category to see your percentage.
Keep posting in articles to move your percentage up. When you get to 9%, I recommend contributing to 4 or 5 articles in one go, which will often be enough to push you over the edge.
As I started figuring out the system, I shared it with clients, and we’ve all seen similar results. Once you reach 9%, one big push is often enough to get you over the line.
Step Five: Display your badge on your profile (and post about it)
LinkedIn doesn’t e-mail you when you make Top Voice, so you must check. Your status from number four will switch to maintaining your badge and continuing valuable contributions. You can go to your profile to choose your badge and display it on your profile.
Make sure you make a LinkedIn post celebrating the milestone for your audience, as most of them won’t be going to your profile to check daily, and LinkedIn doesn’t display the badge on the main feed.
So there you have it. That’s my secret sauce to getting a Top Voice badge with a small following in less than 30 days without spending all your time on LinkedIn. My contributions took me 90 minutes total, but not more than that.
If you want to know how to contribute to the biggest media outlets on earth, create effective viral content, or become a better writer, follow me on LinkedIn. I only post helpful, easily digestible strategies that I’ve personally used so I know they work.


