
Helm vs Kustomize: why, when, and how
This article is also available as a video if you prefer visuals:
The challenge
Before we start our discussion let’s have a look at why we’d even want to use Helm or Kustomize.
So many environments, so many YAML files!
Kubernetes has made it quite easy to create different environments for different use cases. Using namespaces on the same cluster or even having multiple clusters, you can host dev, test, QA, UAT, staging, preprod, prod… the list can go on. But the question becomes: how to manage all those environments?
The first and most straightforward approach would be to create replicas of the same manifests' directory and give each one a descriptive name. That is, CTRL-C the source files and CTRL-V for each environment.
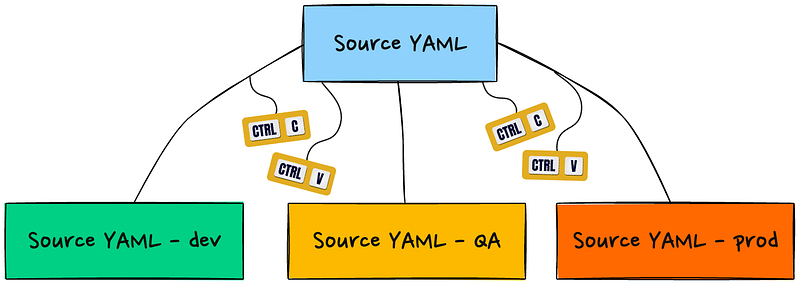
For simple projects where you need to make only very few changes to each environment, the above approach may serve you well. For example, all the YAML manifests are exactly the same except for the image tag. Open the deployment.yaml file in each directory and make the change. Save, run kubectl apply -f . and you’re done.
However, most of the time the differences among environments are not that simple. Consider the following example:
- Dev environment uses some container command arguments that allow debugging. They should not be available in QA or prod environments.
- QA deploys some sidecars for running some tests. Neither Dev nor prod has that.
- Prod RBAC is more restrictive than the other two environments for obvious reasons.
And that’s not even half of the story:
- The application got bigger and needs other dependent services. For example, a MySQL backend and a Redis cache server. Each of which has its own manifests, configuration settings, and environment differences.
- We need to implement a CI/CD pipeline that would test, build, and deploy our application (alongside its dependencies) to multiple environments.
As you can see, using kubectl on its own becomes a nightmare. That’s where we start exploring more advanced tools. We’re specifically referring to Helm and Kustomize. Let’s first explore how each of them can address the above challenges.
Helm
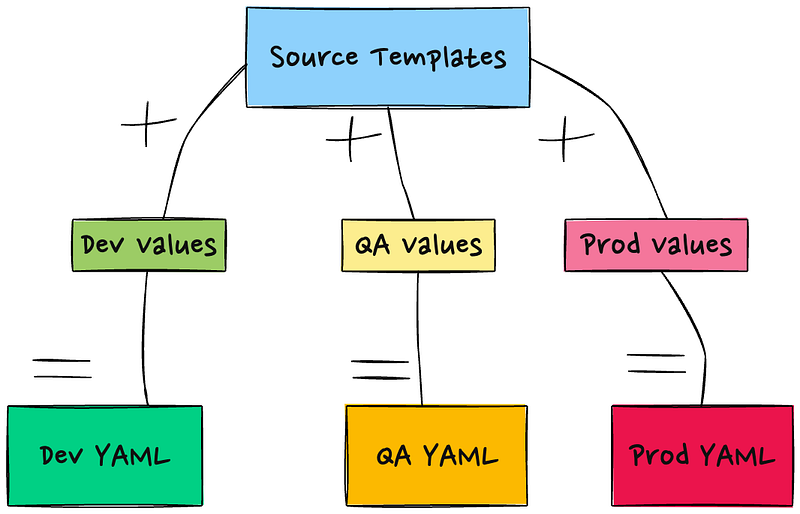
Regarded as the Kubernetes package manager, Helm provides a way to package, distribute, and manage applications as “charts.” A Helm chart consists of a collection of templates and values files, where templates define the Kubernetes resources (e.g., deployments, services, config maps) and values files allow customization of the template values.
This way you can have a set of templates that has placeholders for parameters that change from one deployment (or environment) to the other. For example, the following is a Helm deployment template that takes the replicas count, image name and tag, container port, and container startup arguments from a values file:
apiVersion: apps/v1
kind: Deployment
metadata:
  name: {{ .Release.Name }}-deployment
spec:
  replicas: {{ .Values.replicaCount }}
  selector:
    matchLabels:
      app: {{ .Release.Name }}
  template:
    metadata:
      labels:
        app: {{ .Release.Name }}
    spec:
      containers:
        - name: {{ .Chart.Name }}
          image: {{ .Values.image.repository }}:{{ .Values.image.tag }}
          ports:
            - containerPort: {{ .Values.containerPort }}
          args:
            - {{ .Values.startupArguments }}
Anything between {{ and }} are dynamic. That is, they get replaced with actual values when the chart is deployed. A corresponding values file could look as follows:
replicaCount: 3

image:
  repository: myapp/image
  tag: v1.0.0

containerPort: 8080

startupArguments: arg1 arg2 arg3
Note: The .Release.Name and .Chart.Name variables are taken from Chart.yaml which can be considered as another source of parameters. It is used to give Kubernetes components unique names in the cluster so that we can deploy several versions of the same chart to the same cluster.
When Helm is applied to the cluster, this is what the Kubernetes API server receives:
apiVersion: apps/v1
kind: Deployment
metadata:
  name: myapp-deployment
spec:
  replicas: 3
  selector:
    matchLabels:
      app: myapp
  template:
    metadata:
      labels:
        app: myapp
    spec:
      containers:
        - name: myapp
          image: myapp/image:v1.0.0
          ports:
            - containerPort: 8080
          args:
            - arg1
            - arg2
            - arg3
This way, we can have a different values file for each environment/use-case.
For environment-wide changes, you need to modify the source template, and you do that only once. For environment-specific changes, you can use the Values file for each environment.
Kustomize
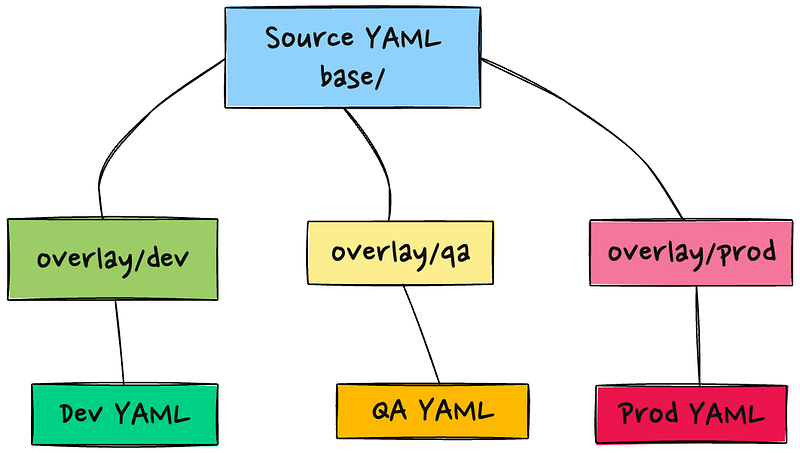
Kustomize aims at achieving the same result, but it does not use templates. Instead, it allows you to keep an intact version of your YAML files in a directory. By convention, it is called base but you can name it however you like. For each environment/scenario/use-case, you can create a directory (or a directory tree). Each directory needs a YAML file called kustomization.yaml . The purpose of this file is to inform Kustomize about which manifest files it should consider and what changes it needs to apply to each one based on the instructions that place. This is best demonstrated with an example. Let’s see how we could use Kustomize to arrive at the same result as Helm.
First, we need to create a directory structure:
myapp/
├── kustomization.yaml
├── base
│   └── deployment.yaml
└── overlay
    └── deployment.yaml
The contents of myapp/kustomization.yaml is as follows:
apiVersion: kustomize.config.k8s.io/v1beta1
kind: Kustomization

resources:
  - base/deployment.yaml

patchesStrategicMerge:
  - overlay/deployment.yaml
The base/deployment.yaml looks like this:
apiVersion: apps/v1
kind: Deployment
metadata:
  name: myapp-deployment
spec:
  replicas: 3
  template:
    spec:
      containers:
        - name: myapp
          image: myapp/image:v1.0.0
          ports:
            - containerPort: 8080
Notice that it is a fully valid YAML that can be applied as is if we need to.
To change this Deployment to fit our environment needs, we use the overlay/deployment.yaml , which should be something like this:
apiVersion: apps/v1
kind: Deployment
metadata:
  name: myapp-deployment
spec:
  template:
    spec:
      containers:
        - name: myapp
          args:
            - arg1
            - arg2
            - arg3
And the resulting file that gets sent to the Kubernetes API server becomes:
apiVersion: apps/v1
kind: Deployment
metadata:
  name: myapp-deployment
spec:
  replicas: 3
  template:
    spec:
      containers:
        - name: myapp
          image: myapp/image:v1.0.0
          ports:
            - containerPort: 8080
          args:
            - arg1
            - arg2
            - arg3
To apply the same mechanism to our three environments, the directory structure could be like this:
myapp/
├── kustomization.yaml
├── base
│   └── deployment.yaml
├── overlays
│   ├── dev
│   │   └── kustomization.yaml
│   ├── qa
│   │   └── kustomization.yaml
│   └── prod
│       └── kustomization.yaml
└── patches
    └── deployment-patch.yaml
If there’s an environment-wide change, you need to make it only once in the base/deployment file and it will be propagated everywhere. Environment-specific changes are done in the kustomization file of the respective environment.
So, now we know how each tool addresses our challenges, let’s see the strengths and weakness points of each.

Round 1: Installation and Setup
Helm needs to be installed on your machine or server. For a comprehensive guide on how to install it, you can refer to this article.
While Kustomize has a separate package that can be downloaded from https://kubectl.docs.kubernetes.io/installation/kustomize/, it is already bundled with kubectl since version 1.14. So, unless you don’t have (or need) kubectl on your system, Kustomize can be invoked by simply running kubectl -k .
Winner: Kustomize.
Round 2: Package management
Since Helm is — by definition — a package manager, it offers repositories where you can search for and download a specific chart by its version. Consequently, you can also install several versions of the same chart to the same cluster at the same time. Kustomize does not package its files into a deployable unit. Obviously, we can achieve the same result manually with Kustomize (Git releases is one option). However, Helm provides this functionality out of the box.
Winner: Helm
Round 3: Templating capabilities
Helm relies entirely on Go templates. It also adds some functions borrowed from the Sprig library to make templating even more versatile. Kustomize does not use templates at all. Instead, it uses overlays and patches to modify YAML manifests on the fly before applying to the cluster.
Go is a fully-fledged programming language. So, you can expect to find powerful text manipulation techniques. For example:
- Loops and conditionals like (
range) and conditionals (if,else,with). This can be useful in generating repetitive resources or making decisions based on user-provided values. - Template functions via the Sprig library, which provides a variety of functions like
default,pick,omit,trim,upper,lower,quote, and many others.
On the other hand, Kustomize does not have access to this. Nevertheless, it has a few tricks under its sleeve too. For example:
- Generators for ConfigMaps and Secrets. These are specified declaratively, and Kustomize generates the resources when building the final YAML.
- Variants: Kustomize uses overlays to manage different variations of the same application, which can be helpful in managing different environments (development, staging, production).
- Transformers which are used to update the fields of resources. Common transformers include adding a prefix/suffix to resource names, updating labels and annotations, and updating namespaces. Transformers can be applied selectively to different resources, offering a high degree of control.
Winner: Draw (but it really depends on the level of customization you are after)
Round 4: Debugging
It is obvious that you need to test the YAML files for errors before applying them to the cluster. YAML uses whitespaces and indentation to define objects, lists, and other components. A sing incorrect indentation can ruin the entire deployment. Both Helm and Kustomize allow you to “see” the resulting YAML manifests before applying them to the cluster.
Kustomize has the build command which generates the final manifests after applying all the patches, overlays, transformers, etc. into one big file that contains the entire payload. But you can also run kubectl apply -k --dry-run to also validate the YAML manifests against the API server.
Helm has several ways of doing the same thing:
You can use helm template to render the YAML manifests before they get sent to the API server. You can also use helm lint to check the chart against best practices.
Using helm install --dry-run (or helm upgrade ) you can also test the manifests against the API server. That is, even if your YAML is correct syntax-wise, the API server may reject it for other reasons. For example, a missing CRD or an admission controller. Helm allows you to catch those errors before applying the payload to Kubernetes. This avoids having a broken chart that needs to be uninstalled and reinstalled.
Winner: Draw
Round 5: Versioning and Rollback
As mentioned earlier, Helm is capable of deploying several versions of the same chart to the same cluster at the same time. Helm refers to a deployment version as a revision . It maintains a history of the revisions that were deployed to the cluster and allows you to roll back to a previous revision when needed. While it is possible to do the same thing with Kustomize, the process is complex and error prone.
Winner: Helm
Round 6: Secrets management
In many cases you need to store some sensitive information as part of the application deployment. Think of API keys, user credentials, tokens, and others. In all cases, Kubernetes provides the Secret object where you can save confidential information. Let’s see how each tool handles Secret creation:
Helm
Store the private data in the values.yaml file where it can be converted to base64 on the fly in the Secret YAML manifest using the b64enc function. For example:
# values.yaml
database:
  username: admin
  password: secret
and
# templates/secrets.yaml
apiVersion: v1
kind: Secret
metadata:
  name: db-secret
type: Opaque
data:
  username: {{ .Values.database.username | b64enc }}
  password: {{ .Values.database.password | b64enc }}
Where the resulting YAML could be like this:
---
# Source: my-chart/templates/secrets.yaml
apiVersion: v1
kind: Secret
metadata:
  name: db-secret
type: Opaque
data:
  username: YWRtaW4=
  password: c2VjcmV0
The problem here is obvious: you need to commit the Values file (which contains the credentials in plain text) to version control. One possible solution is to create a separate Values file for storing sensitive information and avoid including it in the git repository by adding it to the .gitignore file. However, this adds another level of complexity since we are managing multiple Values files now.
Kustomize
We can use the Kustomize secretGenerator to automatically create the Secret YAML from plain files. For example, we can create the credentials files as follows:
# Create the secret file
echo -n 'admin' > ./username.txt
echo -n 'secret' > ./password.txt
The Kustomization file would look something like:
# kustomization.yaml
secretGenerator:
- name: db-secret
  files:
  - username.txt
  - password.txt
and the resulting manifest would be:
apiVersion: v1
kind: Secret
metadata:
  name: db-secret-8h5h97g6k8
type: Opaque
data:
  username.txt: YWRtaW4=
  password.txt: c2VjcmV0
While username.txt and password.txt will, too, be added to .gitignore , you don’t need to recreate them (after running git clone or git pull ) in every deployment unless you want to modify the credentials.
Obviously, storing sensitive information in Base64 is as good as using plain text since Base64 is an encoding format not an encryption method. That is, anyone can just convert a Base64 string to its original format using a command line tool. Accordingly, best practices entail that we encrypt secret data. Both Helm and Kustomize are capable of doing this using third-party plugins.
For example, if you are using Kustomize can use the kustomize-secret-generator plugin, which enables you to fetch secrets from Google Cloud Secret Manager, AWS Secrets Manager, or HashiCorp. The idea here is that the secret is stoed in an an encrypted form in one of the supported platforms. When needed, the user can rely on the plugin to fetch the secret, decrypt it, and apply it to the cluster. The following demonstrates how Kustomize can do that with HashiCorp’s Vault:
# kustomization.yaml
secretGenerator:
- name: db-secret
  kvSources:
  - pluginType: vault
    name: my-vault
    namespace: default
    path: secret/data/my-service
    key: db-password
While Helm has Helm-Secrets plugin, it does not offer native support for fetching secrets from other platforms. Instead, it uses Mozilla SOPS for encryption. The key itself can be stored in variety of Key Management Systems such as AWS KMS, GCP KMS, Azure Key Vault, and PGP. For example:
helm secrets enc secrets.yaml
The above command encrypts the Secret template at rest. Now, you can just commit it to Git. When you retreive it on another machine, you need to decrypt the template before applying it to Kubernetes:
helm secrets dec secrets.yaml
Winner: Kustomize
Round 7: Handling extremely large applications
When talking about applications with hundreds of manifests that contain thousands of lines, handling them using Helm templates can quickly become overwhelming. Kustomize here could be a better choice.
For example, if you have a look at Kubeflow, the well-known Kubernetes-based Machine Learning platform, you’d see that it is using Kustomize as a deployment tool. The reason is that the platform is overly huge, and it has many dependencies that also need to be deployed in a specific order. To give you a better picture, this is a subset of the resources that needs to be deployed (we haven’t looked at patches or overlays even):
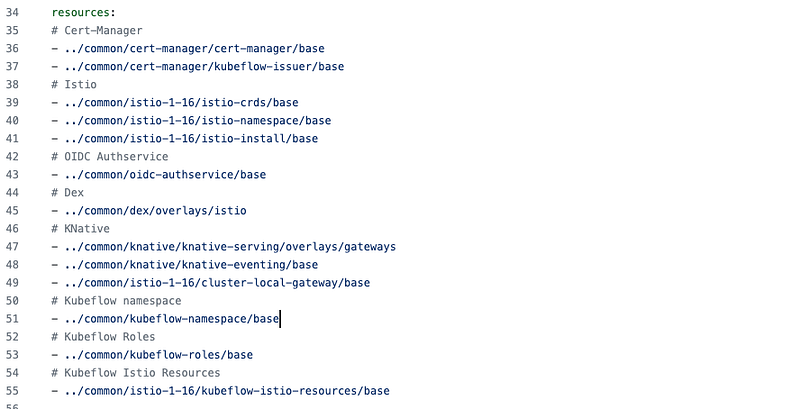
Winner: Kustomize
Round 8: Integration with CI/CD tools
Helm is widely adopted, and thus, it’s more often supported out of the box by many CI/CD tools. Kustomize support is growing, but it’s not as widespread.
Winner: Helm
Round 9 (final): Subcomponents and Dependencies
Helm has built-in support for dependency handling. If your chart requires some prerequisites (database, cache server, OAuth service, etc.) you can easily add them as dependencies in the Chart.yaml file. Helm will make sure that they are downloaded and available before running the main chart. You can also select which versions you require. With Kustomize, this is handled totally manually and on the user’s side.
Winner: Helm
and the winner is (drums rolling)

Helm!
However, there is no winner or loser here. Each tool has its own strengths and weakness points. It all depends on what you want to achieve in your project, its size, the number of environments you need to deploy to and the level of complexity. The purpose of this “battle” was only to show you the difference between both tools not to advocate one over the other.
Having said that, many projects — in fact — use both tools together in the same codebase. However, this article is too long to discuss this feature of Kustomize. But you can have a look at the docs on this link: https://github.com/kubernetes-sigs/kustomize/blob/master/examples/chart.md
Conclusion
Helm and Kustomize aim at serving the same purpose: making it easier to deploy large applications with many interdependent YAML manifests in a DevOps way. Each tool, however, has its use-cases where it shines over the other. In this article, we tried to put both tools facing each other and see their pros and cons. The choice of using Helm or Kustomize in your next project highly depends on several factors, but we hope this article helps you make the right decision.
I hope you found this article about Helm and Kustomize valuable. If you’d like to delve deeper and become proficient in Helm, I highly recommend checking out my comprehensive course on Udemy: Helm — The Kubernetes Package Manager Hands-on course. It’s structured for learners of all levels and is full of hands-on examples and insightful tips. Click here to start mastering Helm today!


