
Hashicorp Vault for secret management in Kubernetes Cluster
INTRODUCTION
Hashicorp Vault provides all of the power and security of Vault, without the complexity and overhead of managing it yourself. It also provides various authentication methods like AWS, Kubernetes, Tokens, OIDC, Azure Active Directory, etc. to provision and dynamically injects secrets in infrastructure like EC2 Machine, Kubernetes pods, etc. HashiCorp Cloud Platform features a web user interface to deploy and manage resources, including HCP Vault deployments in AWS. However, If you prefer to automate HCP Vault deployment, one recommended approach is to use HashiCorp Terraform with the HCP provider.
What we will cover:
In this post we will cover the following:
- Vault installation with High availability configuration in Kubernetes cluster using terraform.
- Enabling Kubernetes authentication in Vault using terraform.
- Inject Secrets in running pod dynamically.
Pre-requisites
- Kubernetes cluster up and running
- kubectl, terraform, helm, vault CLI installed
- some basic knowledge of terraform, kubectl and vault commands. (I will provide a link in end for reference)
Vault installation using terraform:
First of all, It is required to run the HashiCorp vault in any infrastructure. In this example, we will install the Hashicorp vault in the Kubernetes cluster using the Helm release with terraform provider.
Note*: This helm release is using some value overrides based on my local cluster configuration. Please find below sample/my values.tf file to override helm values in vault and consul release.
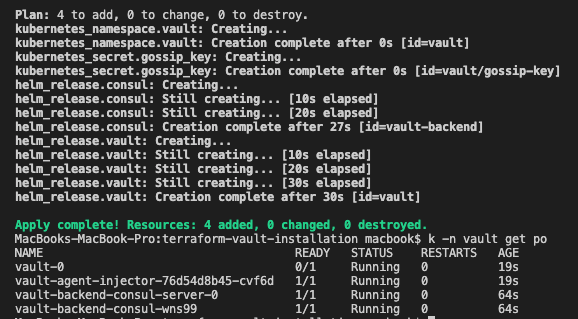
Run terraform init and terraform apply commands to deploy vault with consul backend. Once helm releases complete, run kubectl -n vault get pods commands to see running pods. Notice vault-0 pod is running but not in a ready state.
Note:* K is an alias for kubectl (in the above example command).
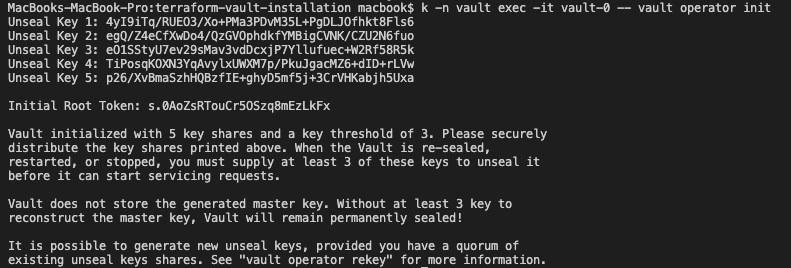
When a Vault server is started, it starts in a sealed state. In this state, Vault is configured to know where and how to access the physical storage but doesn’t know how to decrypt any of it.
Unsealing is the process of obtaining the plaintext master key necessary to read the decryption key to decrypt the data, allowing access to the Vault.
Prior to unsealing, almost no operations are possible with Vault. For example, authentication, managing the mount tables, etc. are all not possible. The only possible operations are to unseal the Vault and check the status of the seal.
We need to run the following commands to initialize and unseal the vault. Kubectl -n vault -it vault-0 — vault operator init It will initialize the vault server and generate unseal keys and root token. Keep these unseal keys and root token somewhere secured.
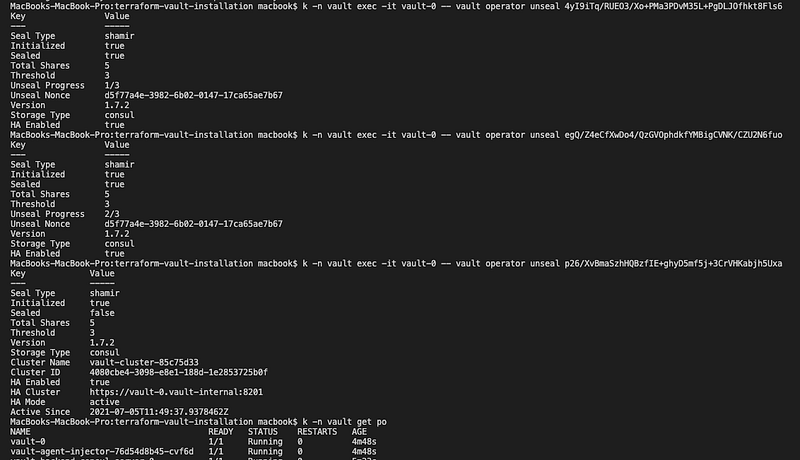
Now run unseal command on all vault-related pods to unseal vault servers. kubectl -n vault -it vault-0 — vault operator unseal ‘Key1’ (run this at least 3 times as vault server requires 3 unique unseal keys), then run kubectl -n vault get pods and you will notice vault-0 (vault related pods) is in Ready state.
Note*: There are solutions available from HCP vault to automatically unseal vault servers with cloud providers provided Kubernetes PASS solutions like EKS, GKS, AKS.
Enable Kubernetes Authentication
Now, we have a vault server up and running in the Kubernetes cluster and we have securely stored unseal keys and a root token so that they can be used for vault administration or unseal pods if there is any scale-up.
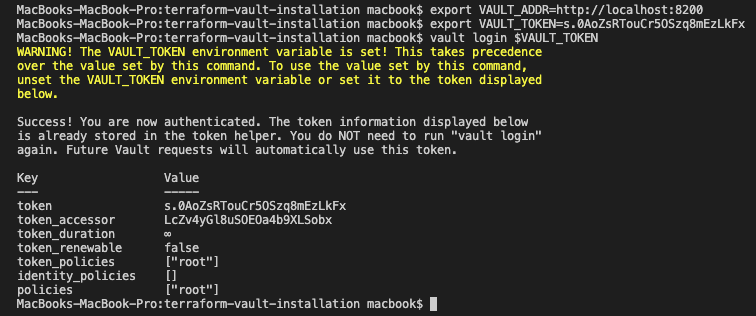
To enable Kubernetes authentication with terraform we need to set two environment variables VAULT_ADDR (vault server address) and VAULT_TOKEN (root token). To set VAULT_ADDR, we can use service port forwarding to access the vault server on localhost.

export environment variables and login to vault using vault login $VAULT_TOKEN command.
Now enable secrets engine in vault and create one secret as per application location by running the following commands: vault secrets enable -path=secrets kv (kv for key-value pair) verify by running the vault secrets list command. Your console output will look this:

Run vault kv put secrets/your secret path/name key=value command to write one secret in vault and verify by running vault kv get secrets/path/name. Refer to below example.

Now we have a secrets engine enabled and we store one secret which will be read by our test application.
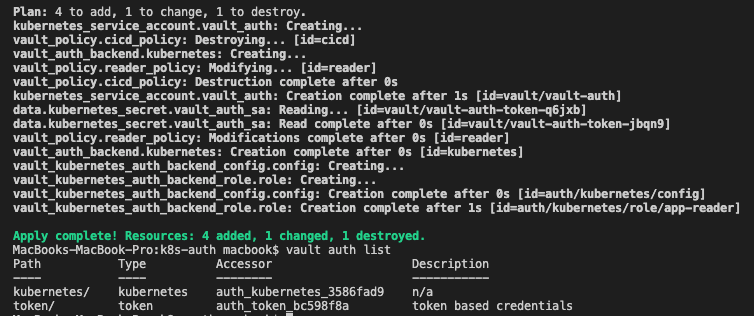
Run following terraform to enable Kubernetes authentication in the vault.
I have also created one data.tf file to read service account secret and define vault policy.
This solution will change based on your Kubernetes installation. If you are using Cloud PASS solution then you need to use different data source objects to read Kubernetes endpoint, certificate, etc. I am using docker-desktop local cluster so reading configuration from local. Once terraform apply completes you will see the below output, run vault auth list to verify Kubernetes authentication is enabled.
Dynamically Injecting Secrets in running POD
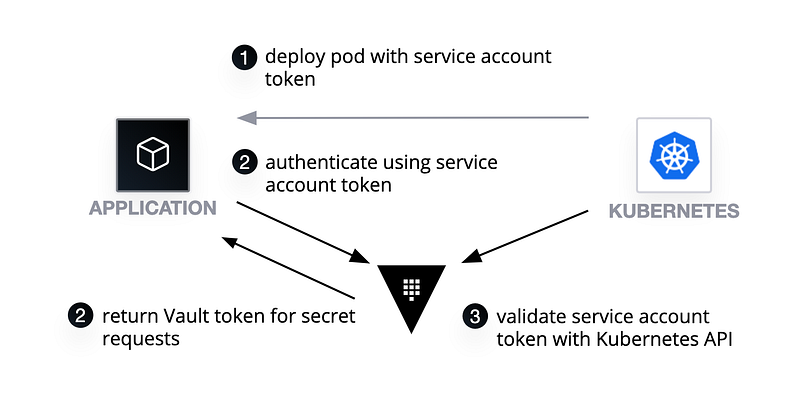
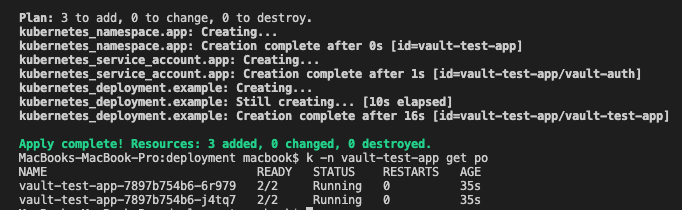
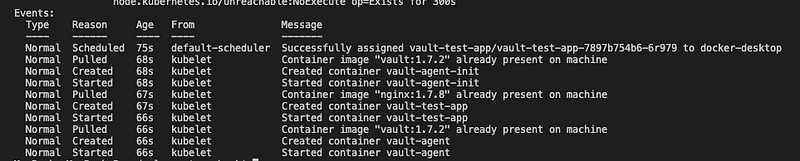
Now we have a vault with Kubernetes authentication enabled and some test secrets available for application to consume. I have created one sample Kubernetes deployment using terraform to test this. Here I am using the vault injector feature which was deployed as part of the vault helm release. Vault injector makes it really easy to inject secrets in a running pod with just a few annotations on the deployment object. Refer below an example:
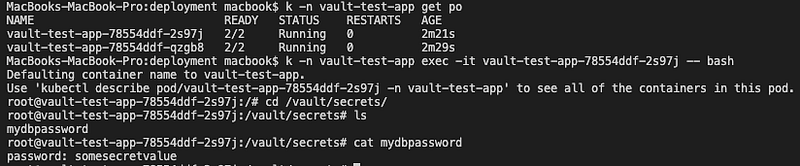
Notice annotations in the template. It will use an injector agent to read secrets from the application path (secrets/myproject/dbpassword) and store in /vault/secrets/mydbpassword location inside the pod. Vault injector will automatically start the side-car container to read secrets and mount on the application pod. Notice 2/2 Ready check here although we provided only one container in the deployment manifest.
Exec inside pod to see if vault agent has mounted secrets in file store: run kubectl exec -n namespace -it pod-name — bash and then cd /vault/secrets you will notice one mydbpassword file. cat the file to see the content.
With the annotation approach, we can inject multiple secrets by using multiple “vault.hashicorp.com/agent-inject-secret-yourfilename”: secret path (keep file name unique).
Other Solutions:
To inject secrets dynamically inside the running pod, there are other options as well like using HCM template in config map and then mount config map on the pod or using HCM rest API calls inside init container to mount secrets on shared file store. References: https://learn.hashicorp.com/tutorials/vault/agent-kubernetes?in=vault/kubernetes https://www.vaultproject.io/api
Best Practices:
- Deploy consul and vault with tls enabled. This can be enabled with helm values override. Refer: https://www.vaultproject.io/docs/platform/k8s/helm/configuration
- Use auto-unseal feature if possible with Cloud PASS solution. Refer: https://learn.hashicorp.com/collections/vault/auto-unseal
- Create separate vault auth role and policy for each application with access to only application-related secrets path.
- Use base64 encoded secrets instead of plain credentials.
- Avoid root token and create tokens for applications/users with fine-grained access.
- Integrate with authentication models like Azure Active Directory, OKTA, LDAP, GitHub, etc. for user authentication and authorization. Refer to this link for available authentication methods: https://www.vaultproject.io/docs/auth
Full code reference: https://github.com/ajaychoudhary01/terraform-vault-installation