
Harnessing the Power of Autogen Multi-Agent Systems via API Integration

Building LLM-powered autonomous agents has become a much-talked-about topic with the speed Large Language Models are evolving today. In the past year alone, a lot of new technologies and frameworks have emerged based on this idea.
When exploring such available options, we came across Autogen, an open-source agent communication framework developed by Microsoft.
Autogen fills a gap that many such new technologies have failed to address: allowing multiple agents to collaborate to achieve a common goal.
It adds minimal yet vital functionality on top of an LLM to support initialization and collaboration of multiple agents. It allows setting up one-to-one communication avenues between these agents as well as group chats with several participant agents. This, especially, was indispensable for our use case.
But as a framework still in its early age, we found integrating Autogen’s agent system into an actual production environment, like a web app, via an API to be a challenge still. Due to the lack of existing documentation or resources, it required a few workarounds in the agent communication flow that we had to discover the hard way.
So, in this article, I want to discuss the step-by-step process of connecting Autogen agents to an API and the challenges that come with it for documentation purposes. But first, I’ll start with a more detailed introduction of Autogen.
What is Autogen?
As introduced before, Autogen is an LLM-based agent communication framework. It supports creating agents with different personas. These agents can then collaborate either using one-to-one message passing or a group chat setting where each agent takes turns speaking.
Autogen comes with a few built-in agent types with different capabilities. For example:
- User Proxy Agent: A proxy for the user that can retrieve user inputs and execute code.
- Assistant Agent: An agent with a default system message that allows them to behave as an assistant for completing a task.
- Conversable Agent: An agent with conversational abilities used as the building block of assistant and user proxy agents.
It also comes with several experimental agents such as Compressible Agent and GPT Assitant Agent.
While Autogen primarily supports OpenAI LLMs such as GPT 3.5 and GPT 4 for agent creation, you can configure it to work with local or other hosted LLMs as well.
Autogen Group Chat
Group chats in Autogen allow several agents to collaborate within a group setting. Key characteristics of this setup are:
- Each agent has visibility of all the messages other agents in the group send.
- Once initiated, the group chat continues until one of the termination conditions is met. (Ex: An agent using the terminate message in a reply, the user choosing to exit the chat, reaching the maximum chat round count of the group, etc.)
- Each group chat has a manager agent who oversees message broadcasting, speaker selection, and chat termination.
- Autogen currently supports four methods for selecting the next speaker in each chat round - manual: ask the user to manually select the next speaker - random: randomly select the next speaker - round robin: select the next speaker using a round-robin method - auto: ask the LLM to pick the next speaker with chat history as context
These characteristics make Autogen group chat ideal for agent collaboration. However, they bring their own challenges when you want more control over how agents collaborate within this environment.
Autogen for Application Development
As it is now, Autogen is intended to be used as a tool where the user has full visibility of all internal communication between different agents. This makes integrating Autogen into an application where the user should not be privy to such information a tricky job.
For example, if you build a system where several agents work together as sales assistants, you may not want to expose how they internally plan and choose sales strategies before deciding the final response to a user query. You also may not want to expose the user to the complexity of such internal communication.
In addition to that, we also faced the following issues when trying to integrate an Autogen agent system with an API.
- Autogen is primarily a CLI tool. (Ex: It prints agent messages to the CLI and prompts the user to provide feedback through the CLI)
- Autogen doesn’t provide a consistent way to end a particular chat sequence without explicit user input.
But the good news is we could use certain customizations Autogen already supports to work around these issues. They allowed us to satisfactorily integrate Autogen into an API. Here’s how we did it.
Autogen-Based Tour Agent System
Overview
From here onwards, I’ll follow an example of an Autogen-based tour agent system to show how you can expose it through an API.
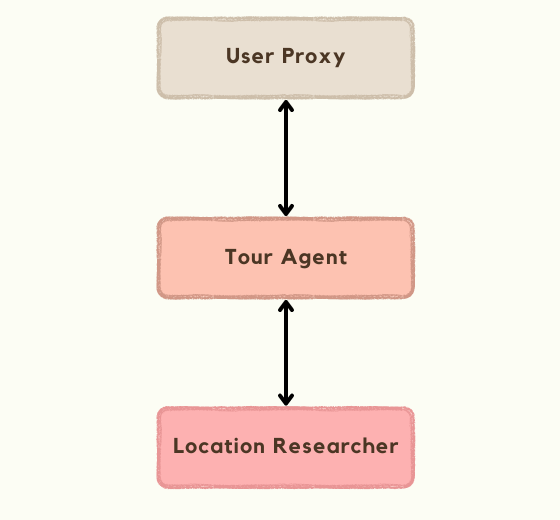
This system is going to be built with two Autogen Assistant Agents and one User Proxy Agent that communicate within a group chat. Each of these agents has the following responsibilities during a conversation.
- Tour Agent: The main agent that decides how to respond to a user query and the information it should gather before generating the final response to the user.
- Location Researcher: An assistant to Tour Agent who carries out location research with the help of function calls that query Google Maps via SERP API. It enables the agent to research attractions, restaurants, accommodations, etc. related to destinations on the user’s mind.
- User Proxy: A proxy to the user within the agent group chat.
Note: Since I’m relying on OpenAI and SERP API for this tutorial, you’ll need API keys for each service to try out this example as it is.
Autogen config
As the first step of the implementation, I’ll define a common configuration that will be used by all the agents in this system.
config_list = [{
    'model': 'gpt-3.5-turbo-1106',
    'api_key': os.getenv("OPENAI_API_KEY"),
}]
Assistant Agents
Then, I can create the two assistant agents: Tour Agent and Location Researcher.
Tour Agent is a simple Assistant Agent with a customized system prompt that describes its role and responsibilities. It specifies how the agent should add a TERMINATE to the end of its final answer intended for the user.
tour_agent = AssistantAgent(
    "tour_agent",
    human_input_mode="NEVER",
    llm_config={
        "config_list": config_list,
        "cache_seed": None
    },
    system_message="You are a Tour Agent who helps users plan a trip based on user requirements. You can get help from the Location Researcher to research and find details about a certain location, attractions, restaurants, accommodation, etc. You use those details a answer user questions, create trip itineraries, make recommendations with practical logistics according to the user's requirements. Report the final answer when you have finalized it. Add TERMINATE to the end of this report."
)
When creating the Location Researcher, on the other hand, I define a function it can call and execute for searching Google Maps. I’ll introduce the actual schema and implementation of the function in the next section. But for now, this code snippet shows how you can attach them to an Assistant Agent with a custom prompt.
location_researcher = AssistantAgent(
    "location_researcher",
    human_input_mode="NEVER",
    system_message="You are the location researcher who is helping the Tour Agent plan a trip according to user requirements. You can use the `search_google_maps` function to retrieve details about a certain location, attractions, restaurants, accommodation, etc. for your research. You process results from these functions and present your findings to the Tour Agent to help them with itinerary and trip planning.",
    llm_config={
        "config_list": config_list,
        "cache_seed": None,
        "functions": [
            SEARCH_GOOGLE_MAPS_SCHEMA,
        ]
    },
    function_map={
        "search_google_maps": search_google_maps
    }
)
User Proxy
Then, I can create the User Proxy. Even though the User Proxy doesn’t play an active role in this agent system, it’s crucial for accepting user messages and detecting when to end a reply sequence to a user query before sending the response to the user.
Here’s how I handle this.
def terminate_agent_at_reply(
        recipient: Agent,
        messages: Optional[List[Dict]] = None,
        sender: Optional[Agent] = None,
        config: Optional[Any] = None,
) -> Tuple[bool, Union[str, None]]:
    return True, None

user_proxy = UserProxyAgent(
    "user_proxy",
    is_termination_msg=lambda x: "TERMINATE" in x.get("content", ""),
    human_input_mode="NEVER",
    code_execution_config=False
)

user_proxy.register_reply([Agent, None], terminate_agent_at_reply)
I’ve registered a new reply function to the User Proxy that simply returns True, Noneas outputs. To understand how this ends the chat sequence, you have to understand how Autogen uses reply functions.
When it’s an agent’s turn to generate a reply, Autogen relies on a list of reply functions registered to the agent. It takes the first function in this list and if it can generate the final reply, returns True, reply. If it returns False, indicating the function cannot generate a reply, that chance passes on to the next function in the list.
This is how Autogen enables each agent to support different ways of replying, such as asking for human feedback, executing code, executing functions, or generating LLM replies.
When I register terminate_agent_at_reply as a reply function, it gets added to the beginning of this list and becomes the first reply function that gets called. Since it returns True, None by default, this prevents the User Proxy from sending auto replies or generating LLM replies using other reply functions. The use of None as the reply then stops the group chat from continuing more chat rounds.
What I’ve done here allows the group chat manager to stop the reply generation sequence whenever the User Proxy is selected as the next speaker.
Group chat
Finally, I’ll create the group chat and manager agent that allows all these agents to collaborate.
group_chat = GroupChat(
    agents=[self.user_proxy, self.location_researcher, self.tour_agent],
    messages=[],
    allow_repeat_speaker=False,
    max_round=20
)

group_chat_manager = GroupChatManager(
    self.group_chat,
    is_termination_msg=lambda x: "TERMINATE" in x.get("content", ""),
    llm_config={
        "config_list": config_list,
        "cache_seed": None
    }
)
Here, I allow the group chat to use the default speaker selection method, auto because none of the other supported options suits this use case. I also set the is_terminate_msgparameter of the chat manager to check whether TERMINATE is in the content of a message.
So, why am I setting another termination condition here when I already used the previous terminate_at_agent_reply function for User Proxy?
It’s supposed to work as a fail-safe in case the LLM chooses an agent other than the User Proxy as the next speaker after the Tour Agent’s final answer.
Put them all in a class
Now, I can put all these agent logic in a class. I also introduce a method to accept the user messages from the API and send the final reply after a reply sequence.
Here, every time the Agent Group receives a user message, User Proxy initiates a chat with the group manager with clear_history=False to preserve the history of previous reply sequences.
After the reply sequence ends, find_last_non_empty_message finds the last non-empty message the Tour Agent has sent from the chat history and sends it back as the answer. The function takes into account some inconsistency with agent replies and reply sequences when looking for the answer it should send back.
API endpoint
Now, I’ll create the API endpoint that accepts user queries using FastAPI.
Function calls
Finally, I’ll go back to handle something I left out in a previous step: the schema and implementation of the function call used by the Location Researcher.
search_google_maps function takes a search query submitted by the agent and sends it to SERP’s Google Maps API. Then, it retrieves more details about the top 10 places in the results using their place ID. Finally, it creates a simplified object with these details and sends it back.
Testing
It’s finally the time to run this application and see how it fairs out.
I’m trying an example where the user sends a request to plan an itinerary for a trip to Bali.
Create a week long itinerary to Ubud, Bali for myself for May 2024. I’m going solo and I love exploring nature and going on hikes and activities like that. I have a mid-level budget and I want the itinerary to be relaxing not too packed.
Tour Agent considers this request and contacts Location Researcher in several turns to retrieve details about attractions, restaurants, and accommodation options on the island.
Tour Agent provides the final answer based on this information. The user then gives more feedback on this answer and continues the same chat with more requests.
Further Improvements & Customizations
In the previous Tour Agent System, I managed to configure Autogen to fit better with an API-based application where internal agent communication is hidden from the user. However, it still comes with several shortcomings and unpredictable behaviors.
For example:
- I assume the Tour Agent has gathered all required details and completed the final answer to the user query when the User Proxy is selected as the next speaker. Considering the unpredictability of using the LLM to choose the next speaker, this may not always be the case.
- The order agents are selected as speakers is not always consistent. Sometimes, the Location Researcher is selected as the first speaker after a user query instead of the Tour Agent, etc.
Even though these shortcomings are not critical for a use case like this, it could be different for another scenario. These issues also become more pronounced as the number of agents in a group chat increases.
But if you want to bring more predictability and consistency to an agent group chat, there are still ways you can customize Autogen’s in-built behavior.
Modify the speaker selection prompt of the group chat
Autogen GroupChat class contains a select_speaker_msg method that you can override to specify how the speaker selection should be managed.
For reference, here’s the original prompt.
def select_speaker_msg(self, agents: List[Agent]) -> str:
        """Return the system message for selecting the next speaker. This is always the *first* message in the context."""
        return f"""You are in a role play game. The following roles are available:
{self._participant_roles(agents)}.

Read the following conversation.
Then select the next role from {[agent.name for agent in agents]} to play. Only return the role."""
You can update this to specifically mention which agent to pick under which circumstances to bring more consistency to speaker selection.
Enforce more rigid speaker transition paths using a graph model
This notebook shows how you can define all allowed speaker transition paths as a directed graph and override select_speaker method of GroupChat to enforce that behavior. For example, for this use case, you could create a simple graph like this.
These are only a few examples. Ultimately, the solution that works for you will depend on your specific requirements. You’ll also have to get creative with prompts and routing to make sure all agents behave exactly the way you want.
Wrapping Up
As you saw in this guide, Autogen is a powerful tool for building LLM-based multi-agent systems.
Even though integrating Autogen into a production-focused application comes with several challenges, it’s still worth pursuing considering the opportunities and potential it carries. So, I hope this article can convince you to experiment with that if you haven’t already.
If you’ve also had success with integrating Autogen into a production app, I’d love to hear what worked and didn’t work for you in the comments.


