
Handwriting number recognizer with Flutter and Tensorflow (part IV)
So happy to see you back for this new part of our series! 👨🏻💻
For those new to this series, you can find the first, second and third part of the series in the hyperlinks. It’s getting a pretty long series already 😅
In the last post we ended up having a box where we were able to draw with our finger. What we will do in this new article is to get an image from the box and finally input it in our machine learning model.
App 🧠
So let’s create the brain of our application, where the heavy processing is going to take place. Create a new file under our lib folder called brain.dart, and copy and paste the following in there:
import 'package:flutter/material.dart';
import 'dart:async';
import 'dart:typed_data';
import 'dart:ui' hide Image;
import 'package:flutter/services.dart';
import 'package:image/image.dart' as im;
import 'package:tflite/tflite.dart';
import 'package:handwritten_number_recognizer/constants.dart';

class AppBrain {

  Future loadModel() async {}

  Future<List> processCanvasPoints(List<Offset> points) {}

  Future predictImage(im.Image image) async {}

  Uint8List imageToByteListFloat32(im.Image image, int inputSize) {}

  double convertPixel(int color) {}

}
As you can see, we are only declaring the methods we are going to use in our app brain class, we will be filling them one by one and we will explain them in the process.
We will also have to add image: ^2.1.7 to our dependencies in pubspec.yaml.
The general idea is that we will use the list of points we have drawn in the canvas to create an image, which will be resized to fit 28x28 px (same size than the images we trained our model with). Then this image will be processed into a list of Uint8 in black and white, so we end up with a 28x28x1 data shape; exactly the same shape that our machine learning model uses (built in the first article of this series).
Entry points
Now we import our app brain in our scene at recognizer_screen.dart, and declare the calls to this brain class. First, import it and create a class property with an initialized app brain:
import 'package:handwritten_number_recognizer/brain.dart';...class _RecognizerScreen extends State<RecognizerScreen> {
List<Offset> points = List();
AppBrain brain = AppBrain();
...Then we will load the ML model onto our app, and for so, we are going to override the initState method of our _RecognizerScreen class. Right after declaring the brain variable, copy and paste the following:
@override
void initState() {
  super.initState();
  brain.loadModel();
}
And update the onPanEnd callback so we call on of the methods of our brain class when we finish drawing, so it looks as follows:
onPanEnd: (details) async {
  points.add(null);
  List predictions = await brain.processCanvasPoints(points);
  print(predictions);
  setState((){});
},
Loads of things going on in this call. If you are not familiar with the async/await keywords I recommend you to have a quick look at this video. In any case, we are going to return the prediction within the same proccessCanvasPoints call.
Loading the model
The first method we are going to fill in is the one for loading the model in our brain.dart file. It’s a really easy one, the only detail is that it is an asynchronous method.
Future loadModel() async {
  Tflite.close();
  try {
    await Tflite.loadModel(
      model: "assets/converted_mnist_model.tflite",
      labels: "assets/labels.txt",
    );
  } on PlatformException {
    print('Failed to load model.');
  }
}
The code really speaks for itself in this case. We are simply loading the tflite file and the labels we already had in our assets folder; and capturing an exception in case something goes wrong.
Processing canvas points
This function is totally the milestone of this post. The truth is that obtaining the right data shape to feed our model with from a real world object is one of the most complex parts within this process.
First we will create a couple of new constants in our constants.dart file:
const int kModelInputSize = 28;
const double kCanvasInnerOffset = 40.0;
Before continue, I think it’s time to make a quick pause and let me explain you about this kCanvasInnerOffset we just declared. Bear in mind this is a quite explicit way to hardcode this values and shouldn’t be taken as a reference of good practices, but it is ideal for me explaining the reason behind it.
As I mentioned in the previous articles, the MNIST dataset has a peculiarity in its data shape, and is that all the digits are centered in a 20x20 frame, with a 4px padding; and as a result, it returns a 28x28 pixels image (this value being defined as kModelInputSize in our constants file).
This is what we are trying to illustrate here. We have our canvas that is 200x200 pixels at the moment where we are allowed to draw at the edges with no fear of having a wrong prediction. Then we will add a 40 pixel padding and we will get in return a 280x280 pixels image. In a later step, we will resize this image 10 times smaller, obtaining that way our 28x28 pixels image.
I think you are already forming the right idea in your mind in how we will approach this, so let’s start digging into our processCanvasPoints function. I have created a gist as this one is a pretty long function. There are code comments to been able to follow it up, but don’t hesitate to drop comments for any questions.
Wow, that’s a big chunk of code to digest…
You will notice we are missing a few other constants, in particular, I have moved all paints to the constants file, so just add at the bottom:
const Color kBrushBlack = Colors.black;
const Color kBrushWhite = Colors.white;

final Paint kDrawingPaint = Paint()
  ..strokeCap = StrokeCap.square
  ..isAntiAlias = kIsAntiAlias
  ..color = kBrushBlack
  ..strokeWidth = kStrokeWidth;

final Paint kWhitePaint = Paint()
  ..strokeCap = StrokeCap.square
  ..isAntiAlias = kIsAntiAlias
  ..color = kBrushWhite
  ..strokeWidth = kStrokeWidth;

final kBackgroundPaint = Paint()..color = kBrushBlack;
You may as well replace drawingPaint by kDrawingPaint in the drawing_painter.dart file.
Predicting the image
This part is really easy compared to what we did previously. the predict image function looks as follow:
Future<List> predictImage(im.Image image) async {
  return await Tflite.runModelOnBinary(
    binary: imageToByteListFloat32(image, kModelInputSize),
  );
}
We are simply using the runModelOnBinary method available from the Tflite library we imported in one of the previous articles. The only real catch here is that we need to pass a binary, therefore we have a couple of auxiliary functions to make this possible.
I don’t expect anyone trying to understand the code behind this two functions, but I hope you get the idea behind them. Basically we are transforming all the pixels of the image into a list and, additionally, converting the rgb values into greyscale. Remember that the dataset we trained our model with was formed by 28x28 greyscale images. The fact that is greyscale means there is only one color channel, and therefore our output will be 28x28x1 into a list shape.
Uint8List imageToByteListFloat32(im.Image image, int inputSize) {
  var convertedBytes = Float32List(inputSize * inputSize);
  var buffer = Float32List.view(convertedBytes.buffer);
  int pixelIndex = 0;
  for (var i = 0; i < inputSize; i++) {
    for (var j = 0; j < inputSize; j++) {
      var pixel = image.getPixel(j, i);
      buffer[pixelIndex++] =
          (im.getRed(pixel) + im.getGreen(pixel) + im.getBlue(pixel)) /
              3 /
              255.0;
    }
  }
  return convertedBytes.buffer.asUint8List();
}

double convertPixel(int color) {
  return (255 -
          (((color >> 16) & 0xFF) * 0.299 +
              ((color >> 8) & 0xFF) * 0.587 +
              (color & 0xFF) * 0.114)) /
      255.0;
}
It is really common to find this kind type of methods in apps that uses machine learning, particularly when capturing images, so don’t be surprise to see similar things when checking out other mobile projects that combine machine learning. Actually, if you are planning in building your own app using machine learning, I would recommend to create a snippet of this two methods described above, believe me they will come in handy.
It is time to run the app
At this point, if you run the application an pay attention to the logs the emulator is giving you, you should be able to see the output of the print statement we have when trying to predict something. So if you draw a number 3, you should see something like this:
[{confidence: 1.0, index: 3, label: 3}]This means our model is 100% sure (confidence level 1.0) that what we draw is a number 3. The index is the output from our model and the label marks the element that corresponds with that index, in this case, as we trying to predict (or infere) numbers, those two values matches. If we were trying to predict if the image contains a dog or a cat, then our indexes would be values between 0 and 1 (two outputs) and our labels would be either 🐕 or 🐈, for instance.
We may also receive more values in the prediction array. Our model may not always be 100% sure that what we have drawn is X number, but will give us a list with what it believes is there. For instance, if we draw the top line of the number 7 (only the top horizontal line), our model output should look similar to this:
[{confidence: 0.5581846237182617, index: 2, label: 2}, {confidence: 0.4371589720249176, index: 7, label: 7}]Which translates in: “I am sure a 55.81% that what you draw is a 2; and I am sure in a 43.71% that is a 7.”
Delete button
As the last detail, you may have noticed that our canvas doesn’t get cleaned after typing on it. Where there are several ways of doing this, I am just going to add a floating button at the bottom right corner of the screen that will clean our canvas.
For doing so, we only need to create a FloatingActionButton at the bottom of our scene, so between the last container and before the scaffold widget finish, place this:
floatingActionButton: FloatingActionButton(
  onPressed: () {
    _cleanDrawing();
  },
  tooltip: 'Clean',
  child: Icon(Icons.delete),
),
There is a private function there (notice the underscore) for cleaning the canvas. Implementing that function is as easy as to set a new list to the points variable within our _RecognizerScreen class:
void _cleanDrawing() {
  setState(() {
    points = List();
  });
}
This is how the app should look after this last changes:
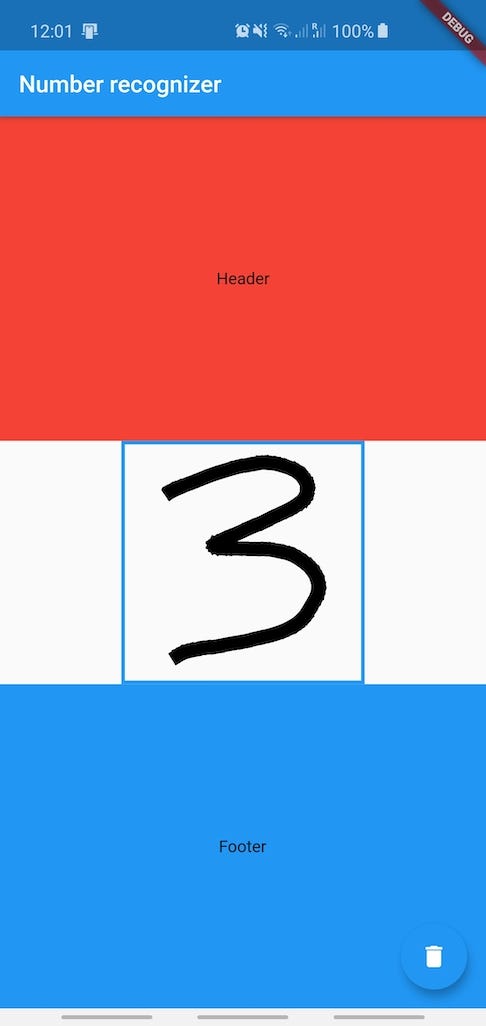
You made it again!
Phenomenal! You achieved it again 👏🏻 Let me say that our app is almost done at this point, we are really trying to predict what we are drawing.
What is left for the next and last article of this series is simply decoration, being able to show the user the number our model is returning us and adding a chart so we can see the confidence level of the predictions our model returns.
As usual, you can access all the code from this section here.
Looking forward to see you in the next section! 👋


