
Guide for building internal business applications
What is a business application?
Business applications are software programs designed to automate or streamline processes within businesses. They range from simple spreadsheets to complex ERP systems.
Business apps are essential for managing day-to-day tasks. They allow companies to save time and resources by automating repetitive processes. For example, a payroll system will enable employers to calculate wages and taxes automatically, saving them hours of manual labor each month.
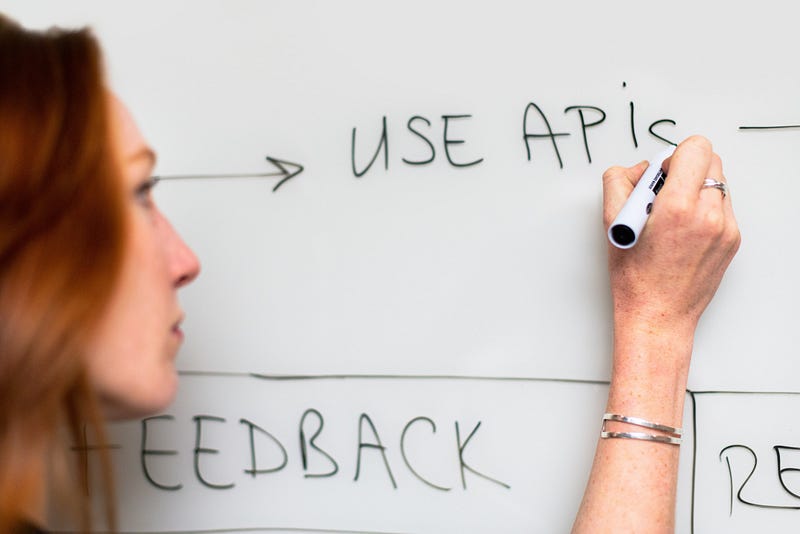
An internal business application connects to ERPs, e-commerce, data lakes, BI, CRM, PIM, DAM, WMS, and other major enterprise software to collect and inject data through APIs. Business logic is then implemented with a front-end web or mobile app, using a set of classical components like:
- Forms
- Tables
- Lists
- Buttons
- QR-Code and Bar-code scanners
- And a set of pre-built dashboards/charts/reporting templates
Some examples of internal business applications include:
- Custom-built CRM to support customer experiences
- HR policies applications
- Financial workflows automation
- Order management and fulfillment applications
Internal business applications must integrate an agile development cycle, delivering key features supporting business processes quickly, with minimum investment, due to rapid changes in policies and user needs.
Who are my business users, create a persona
The first step in launching new business applications is to define the target user group and create personas. This step is usually skipped for bad reasons.
A persona is an individualized representation of a typical user of an application or system. Personas help you understand who will use your product, what they need from it, how they work with it, and how they expect it to behave. They also provide insight into how people interact with each other during their work.
The persona is extremely important for the development and design process for the following reasons:
- The development team will understand the day-to-day life of their users (cashier serving 200 customers per day or a sales representative visiting 2 clients a week)
- Application usage context (desktop computer in an office vs mobile application usage in harsh weather conditions with gloves)
- The technical level of the audience (should you build a simple, step-by-step wizard with a lot of contextual help without the possibility of data corruption or you can offer a complex dashboard with advanced filters and multiple potentially critical actions without rollback)
Collect user’s pain points, define business goals
The second step is to define your application’s business goals by carefully analyzing users’ pain points. You should not ask users for features, but observe the way they work. This step is called user research.
User research is an important part of any software development process. It helps you understand what your customers need from your product and how you can best meet their needs.
Follow these steps to conduct proper user research:
- Observe your target users during their work on a particular business process
- Take notes on every single step and try to check the time taken for each.
- Regularly ask users questions about their work: why are they doing this specific step, on which criteria they selected the elements they are working, what are the rules to find the right item, etc.
- Most importantly, after each task completion ask users about their feelings (aka: are they frustrated, lost, or satisfied with that task).
- Finally take your users to a group session, where you’ll ask them more deep questions about how they work and their pain points.
Once you’ve completed the user research, you should be able to define Epics and the major goals of your future application.
An Epic user story is an example of a use case that describes how a particular feature will be used in order to achieve business value for the organization.
It might look like this:
- We need to automatically synchronize invoices from our e-commerce platform with our accounting system, to avoid around 145 man-hours of manual work and 34 human-inducted errors per month.
- We need to set up a simple payment validation process, which doesn’t require users to search for specific invoices, providing them with all the necessary information to validate and launch a payment. This should avoid us 200 man-hours per month and reduce our payment delays by 13 days on average.
To ensure that you achieve your app dev goals, you must first understand the difference between a “goal” and an “objective.” A “goal” represents the end result that you wish to achieve. An “objective” represent the steps you take towards achieving that end result.
Break those objectives down into “SMART” objectives:
- Specific (what exactly has to be done)
- Measurable (how time, money, or quality will be better)
- Achievable (you have the team, budget, and time to build that application)
- Realistic (no, you will not be able to meet amazon’s level of logistics with your application)
- Timely (this application must be in production within 2 months)
Define the user experiences and core features
So you have your Epics and goals set. It’s time to start to imagine how your future business application will work. You will need to start with user journeys.
User experience (UX) user journeys are visual representations that show how users interact with your product throughout its lifecycle. They help you understand what happens when people use your products and services.
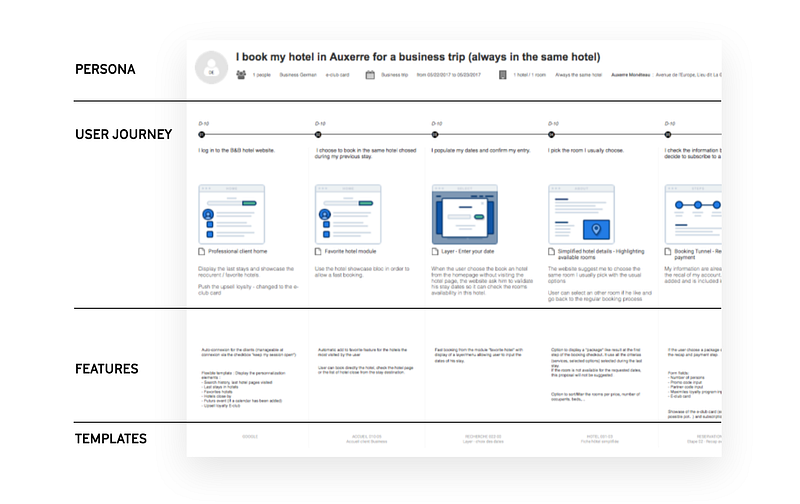
A user journey contains the following elements:
- One or multiple user journeys for each Epic
- Each step from the first interaction (login) to the last one (task completion)
- For each step, a very brief description of what happens (user sees a list of new orders), main features (As a user I can filter for order by amount), and a very high-level design of the user interface.
- Some technical details: what business objects are manipulated on that step (order, invoice, user…), what systems provide the data (API from e-commerce, file export form the ERP…) and what information should be stored locally (temporary order state, list of selected products…)
You should use the user stories format to describe what happens on each step of your user journey.
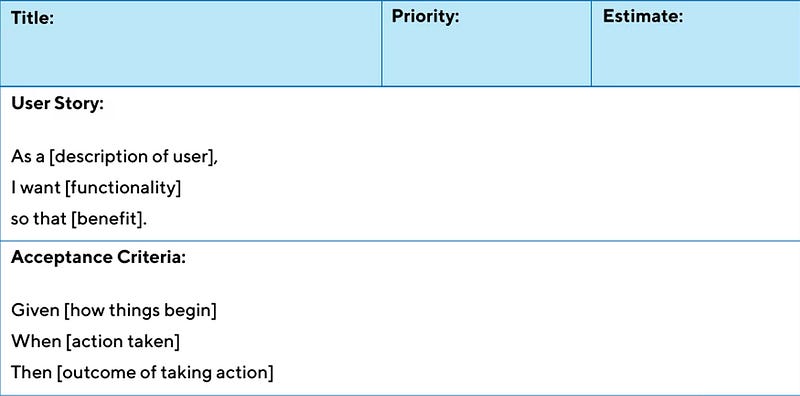
User stories are short descriptions of user goals that can be used for planning, prioritizing, estimating, and tracking work in software development projects. They are written using the “as a” format :
<Category>: As a <type of user>, I want <some objective>, so that <benefit>
Use stories must be independent, and atomic and you must assign a priority for each. We suggest classifying each user story with 3 priorities: Must, Should, and Nice-to-have. Make the effort to distribute your user stories priorities in order to have the 15–20% of Must, 20–30% of Should, and 50% or more of Nice-to-have.
All your user stories from all user journeys define your application backlog.
A product backlog is an ordered list of all features that will be included in a software release. This can include both new features and enhancements to existing functionality.
Must and Should ones define your minimum viable product or MVP.
A minimum viable product (MVP) is an early version of a new product that allows professional developers to test its viability for business solutions. An MVP should be simple enough for users to understand and use, but not so simplistic that they cannot learn how to use it effectively.
Select the right tool to support your business logic
At this stage, you have a clear understanding of:
- Who are your users
- What are the pain points and business objectives you want to solve
- How your application will work and what are the features you’ll need to create
It’s time to select the right tool to build your application. You can obviously hire professional developers to build your customer components, but we’re in 2022, you should first look for a low-code development platform to reduce the total cost and time to market to your application by several orders of magnitude.
Depending on your IT stack and usage we suggest looking at the following low-code platforms:
- Microsoft Power Apps
- Bubble io
- Retool
- Appsmith
Identify the back-end systems and their APIs
The final step before building your core functionality is to identify all the back-end systems your application will have to interact with: ERPs, e-commerce, CRM, OMS, WMS, PIM, DAM, BI, WCM, external SaaS systems, etc. For each you will have to clearly define:
- What business objects manipulate and store, as a single source of truth, a particular software
- Who is your technical point of contact
- How your business application will communicate with it (API calls, batch exports, what protocol, what direction)
- How you will handle authentication
- What will be the development experience (staging, deployments, documentation, support)
- How critical will be this particular integration for the business value
- Wanted performance and SLAs from each integration (API call should respond in less than 100ms or 24H delay is ok? Will your business collapse if the API is down for 1 hour? 1 day? 1 week?)
- Exchanged data volumes (10 lines per call? 1000 lines? 1.000.000 lines?)
Retool: the perfect match for rapid application development
We want now present you with a tool, we think is an absolute game-changer for building internal applications: Retool.
A complete set of powerful building blocks.
With Retool, you don’t need to hunt for the perfect component library; instead, you can use their prebuilt components right away. You won’t need to reinvent the wheel when creating your application because they’ve already done it for you.
Connect to anything
With Retool you can connect to t databases or REST, GraphQL, or gRPC APIs. Retool is a purely front-end platform that let you work with any back-end data, they store nothing, instead, you run queries, and the Retool backend proxies the request to your internal applications.
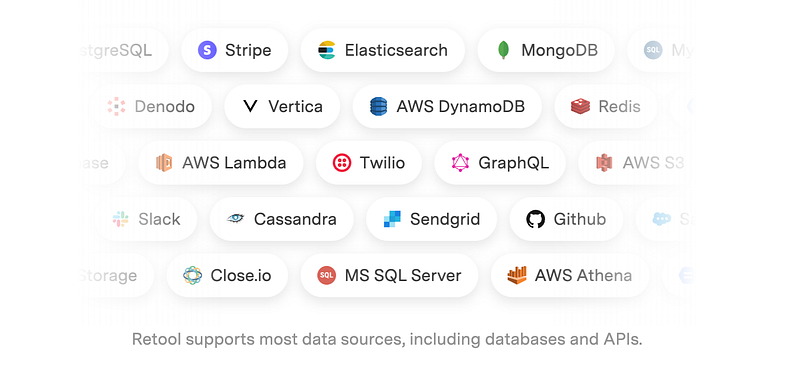
Retool integrates with almost any database, API, or application
Built for developers
Retool is highly customizable, so you’re never limited by what’s available out of the box. If you can write it with JavaScript and an API, you can build it in Retool. It’s a perfect replacement for Forest Admin, React Admin, and any custom-written React or Angular frameworks.
How to build a reporting dashboard with Retool?
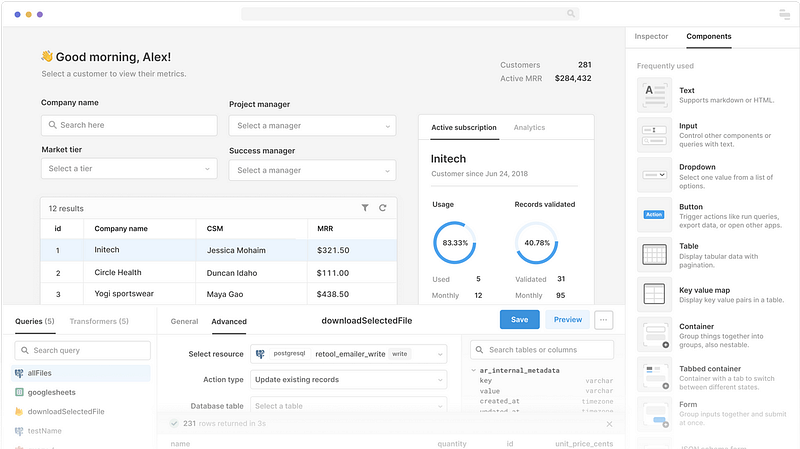
Imagine you want to build a dashboard listing Amazon orders, customer data, and statuses. Nothing is easier with Retool. You create a query to your database where your customers and orders are, then you’ll have to add a Table component and attach this component to the results of your query.
Retool will automatically populate data, set up columns, run the query, fetch the results and push the data inside your Table. You can then customize the way your Table works adding pagination, sorting, filters, editable columns, and actions on each row.
How to build a form sending data to an API with Retool?
As for the previous example, you’ll have to add a new REST or GraphQL query. Because your query modifies the state of the external software you connect to, we call it a mutation. Once you’ve written your query, you’ll need to simply connect it to a trigger in your interface: a button, a table row, a form.
Retool’s other major components
Retool comes with more than 90 reusable components let’s discover some of them:
Text inputs (collect text from users)
- Editable Text (show a text that the user can change)
- Editable Text Area (show a paragraph user can change)
- Password (protected input where text is replaced by *)
- Rich Text Editor (text with some formatting)
- Text Area (a big chunk of text)
- Text Input (single line of text)
Number inputs (prices, amounts, ranges)
- Editable Number (a number user can change)
- Number Input (ideal for prices or amounts)
- Range Slider (interactive component to define a range with a slider)
- Rating (5 stars rating)
- Slider (interactive component for a single number)
Select Inputs (ideal for invoices statutes, options, workflows, configurations)
- Button Group (several buttons interacting for a single domain)
- Cascader (hierarchical selection system)
- Checkbox (on/off check box)
- Checkbox Group (set of checkboxes grouped by domain)
- Checkbox Tree (like a cascader but with checkboxes)
- Listbox (a list of elements from which the user can select a single element)
- Multiselect (list of elements from which the user can select multiple elements)
- Multiselect Listbox (mix of the two)
- Radio Group (exclusive options)
- Segmented Control
- Select
- Switch (on/off buttons to activate / deactivate items)
- Switch Group (grouped by domain)
Calendar Inputs (ideal for a due date, or appointment time…)
- Calendar Input (select a date from a calendar)
- Date (select a date with MM/DD/YYYY format)
- Date Range (from / to)
- Date Time (date and time selection)
- Time (just time selection with HH:MM:SS format)
Special inputs (very diverse category for very special needs)
- Annotated Text (highlight words in a text)
- Bounding Box (highlight elements inside an image)
- Comment (comment on any object)
- Feature Flags (big component to manage / activate / deactivate features)
- File Button (click to upload a file)
- File Dropzone (drag-drop files to upload)
- File Input (select a path to a file)
- JSON Editor (edit JSON schemas)
- Microphone (record sounds)
- Query Builder (build a custom query to the back end)
- Scanner (scan QR-codes and Bar-codes)
- Signature Pad (let users sign with their fingers on their phone or iPad)
- Timer (count seconds)
Buttons (hope it’s clear enough)
- Button
- Dropdown Button
- Link (like a button but without borders)
- Link List
- Split Button
- Toggle Button (on/off)
- Toggle Link
Data (ideal to show a large volume of information)
- Chart (show graphics using data from a query)
- JSON Explorer (explore JSON for the more technical users)
- Key Value (an array)
- Table (complete table to show and interact with your data)
Presentation components (used to show things to your users)
- Alert (show a short living popup)
- Avatar (ideal to represent users or clients)
- Avatar Group
- Calendar (show dates and appointments)
- Divider (make things easier to visualize on complex interfaces)
- Icon (helps with immediate identification of inputs)
- Image (show photos of users or products)
- Image Grid (multiple images in a grid)
- PDF (show a PDF file)
- Progress Bar
- Progress Circle (like a bar but in a circle)
- Spacer (add space to avoid packed interfaces)
- Statistic (ideal for financial indicators)
- Tags
- Text
- Timeline
- Video
Containers and forms (to help you organize your components)
- Container (group elements together)
- Form (multiple inputs with the possibility to validate and submit data altogether)
- JSON Schema Form (a form generated from a JSON schema)
- List View (ideal to create repeatable components populated with data from a query)
- Modal (opens a modal pop-in with components inside)
- Wizard (step-by-step form)-
Navigation (in-app navigation system)
- Navigation (menu)
- Page Input (parameters received for a specific page)
- Pagination (multiple pages for lists and tables)
- Steps (to create complex apps like a checkout process)
- Tabs (group application components in groups using tabs)
Deployment options for Retool
Why Retool is the best platform for building internal applications from our point of view? Because of its amazingly flexible deployment options. You can either select their SaaS version, so your application will be hosted and run by them, or opt for on-premises options, where your application will be downloaded and run on your own cloud environment.
In that last option, you can store your application in a Git branch and deploy it as you would do with any classical React / Angular / Vue project.
Managing software versions with Retool
Retool provides versioning out of the box with an easy way to see who and when performed changes to your application. You can easily roll back to a previous version at any time with a simple click.
Examples of custom applications you can build with Retool
There is a large set of applications you can build with Retool. You need first to understand the limits of Retool:
- There is no backend. Your data must come from somewhere (database, API, or other software)
- You have limited customization capabilities. Retool is not like Webflow or Bubble, you will have to stick to their components and how their look. So Retool is not suited for B2C customer-facing applications (except for MVPs)
- Retool is not open-source, you will not be able to modify the way it works.
Said that you can build almost anything using Retool, some use cases:
- CRM fully custom CRM that really suits your specific industry niche and workflow
- Orders Management System: probably the best and cheapest way to build your own orders fulfillment system connected to your ERP / CRM / e-commerce. The price tags of commercial OMS systems are so high, building your own with Retool is probably a good idea.
- HR applications (anything from holidays booking, sick leaves management, recruitment, or HR portals)
- Business Process Management workflows
- Reporting and forecasting for sales or finance
- Niche ERPs for specific industry needs (Agriculture, Automotive, Oil, Healthcare)
- Support & ticketing systems (you don’t always need to pay Helpdesk)