
GraphQL with Python
Using Graphene to build a Django API
A few weeks ago I wrote an article discussing using GrahpQL. In that article, the stack used was JavaScript (Node Js and TypeScript) to develop the API. “I never had a chance” to get into details of the use case or the GraphQL concept per se.
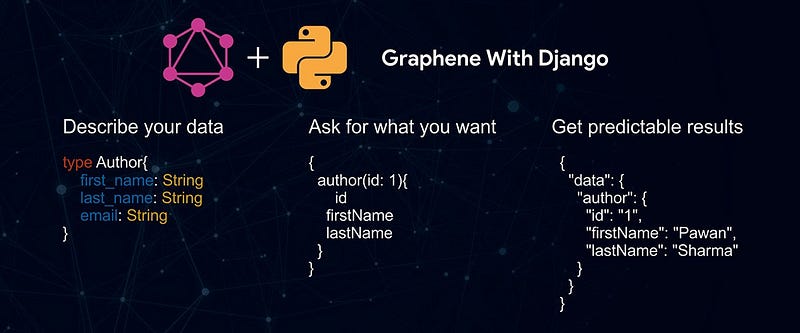
GraphQL is a query language developed by Facebook and went public in 2015. “GraphQL provides a complete and understandable description of the data in your API, gives clients the power to ask for exactly what they need and nothing more” — https://graphql.org/
It provides a standard way to:
1. describe data provided by a server in a statically typed Schema
2. request data in a Query which exactly describes your data requirements and
3. receive data in a Response containing only the data you requested.
In this article, I’m going to use Python’s framework Django and Graphene-Django, which is a library built on top of Graphene, a library for making GraphQL APIs in Python quickly.
Before anything, we’re going to see our scenario and why GraphQL can be a suitable replacement for RESTful API in this case. I’m not saying that GraphQL is better than REST, I’m just pointing out why in this scenario it can be a better option for us.
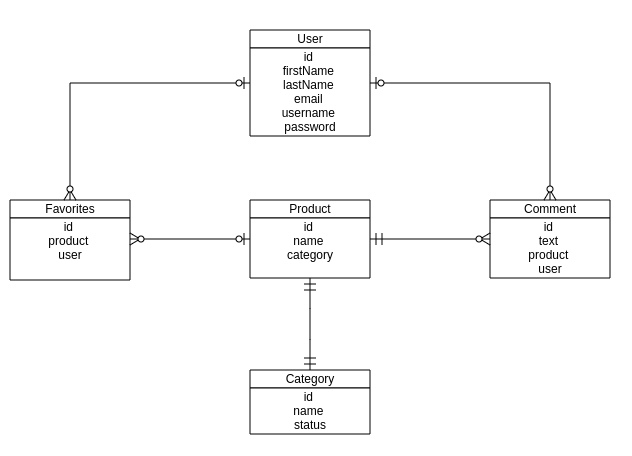
Let’s assume we have an API where we can create products, and users can add to their favorite list and can comment on our product.
Let’s take a close look at our Entity-Relationship model for our API.
Because GraphQL is based on the concept of Graph, where nodes are connected to each other by a line that we call edge, we can transform our ER into a graph:
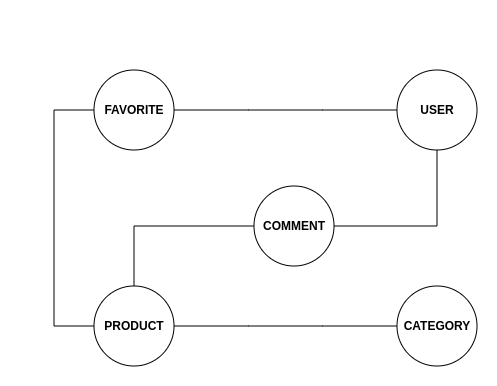
Each node is connected to another node via an edge, and Graphene uses this concept of “Edges” and “Nodes” to organize the relationships internally. When we make a query on a user for instance, and we try to get a user’s favorite list, we get an edge object out of the box which includes a list of nodes, each node representing a favorite item in the Data Base.
Now let’s imagine that we want to get a user favorite product. Based on our ER, we can think about some possible endpoints that we might want to have in a Rest based API to make it possible:
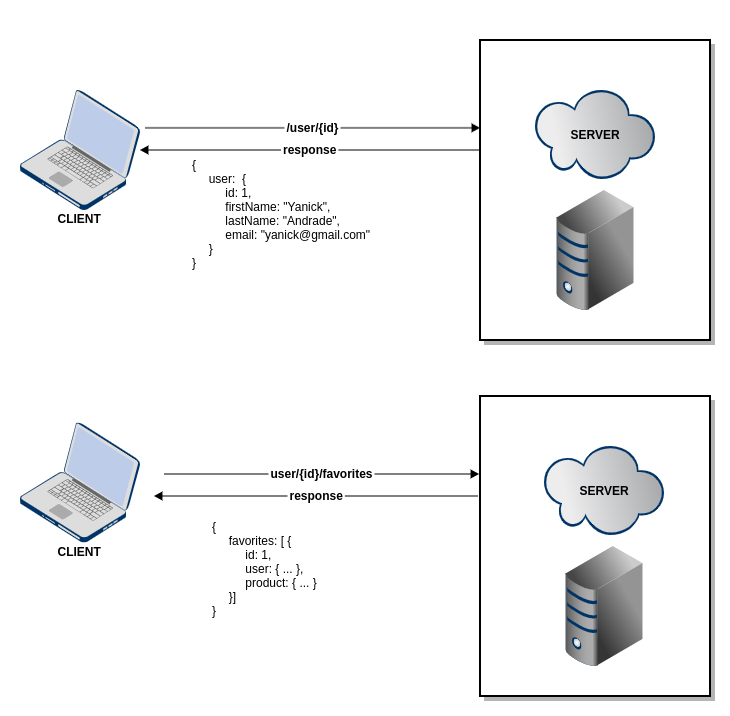
As we can see we have two endpoints, one that returns a list of users, and another one that returns a list of favorite products given a user’s Id. Now let’s see how we could do that using GraphQL:
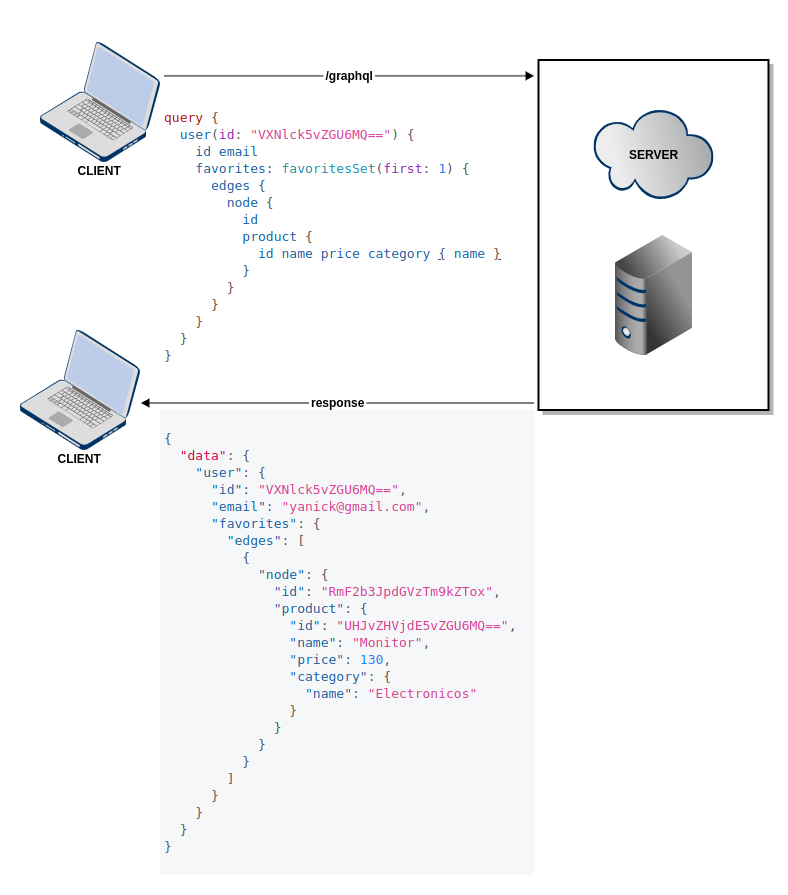
PS: Notice how we manage to fetch only the first 1 item in our favorite products. That is a built-in feature that comes with Graphene. Besides fetching the first x we can also fetch the last x.
Comparing the two APIs we can see that using GraphQL it was possible to bring the user’s information plus his/her favorite products all in a single request. Also, if we look closely we can also see that it was possible to bring product information including his category. But what if we wanted just the user’s information only? We don’t want his/her favorite products, just his/her personal information. In Rest, you might have to create another endpoint to facilitate this task, but with GraphQL you don’t have to do this, in the same endpoint we got all the previous information, we can get only the user’s information.
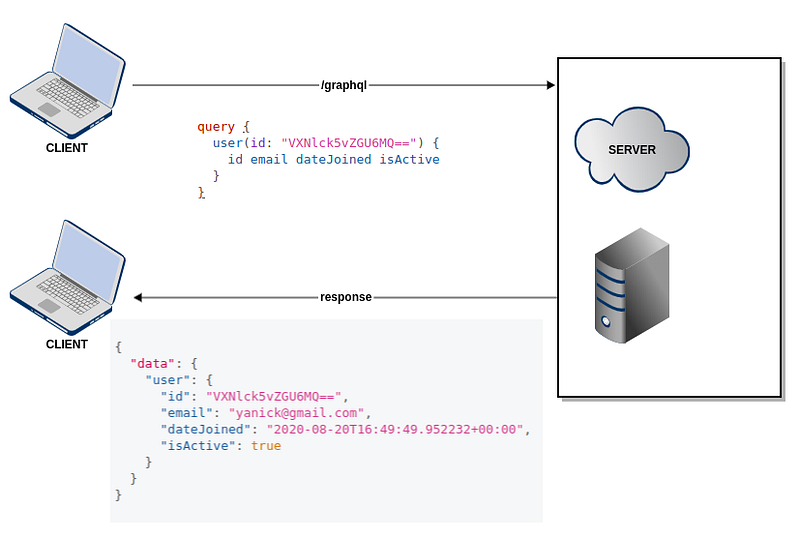
All those queries above have the same endpoint and the same code. We just are querying the data we need the way we need it. Do you know what the best part is? A single line of code.

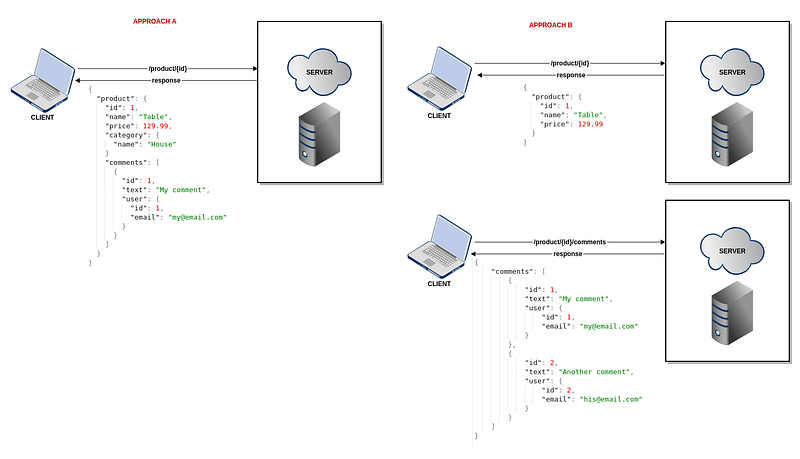
Let’s think about our products, we would like to get our products and list them somewhere, we might want to list only the product’s information or we might want to list a product’s information plus its comments. Using Rest the simple way to solve this would be to create an endpoint to get a product’s information including all comments related to the product, but we might have some use cases in which we don’t need a product’s comment list, we would still get all this information from the server for nothing.
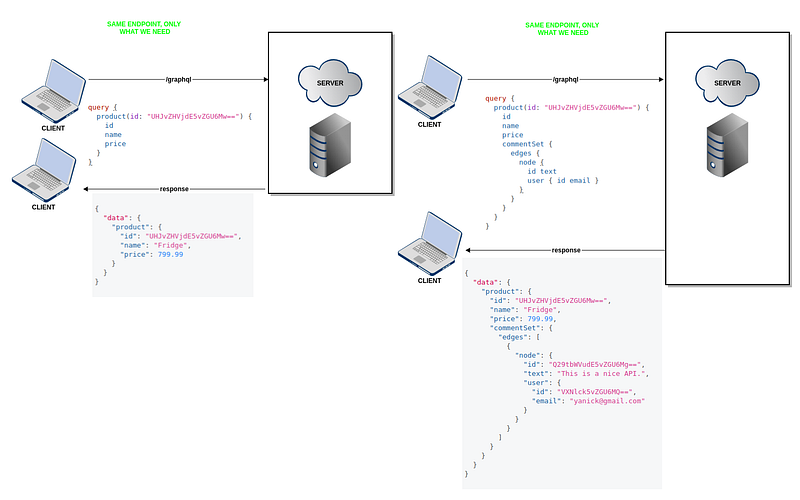
Another approach would be creating two endpoints: one to get only the product’s information and another one to bring its comments:
Imagine for every endpoint that you might want to make it simpler to only get the data you need for each situation you might encounter. It won’t be easy. First, because we don’t always know if we won’t have to build another component or view in our application that will use our data, second our code can become very complex if we add a new endpoint for every situation or if we make a code to return all related data just so we don’t have to create a new endpoint.
You shall fear nothing my friend, GraphQL is here to save the day.
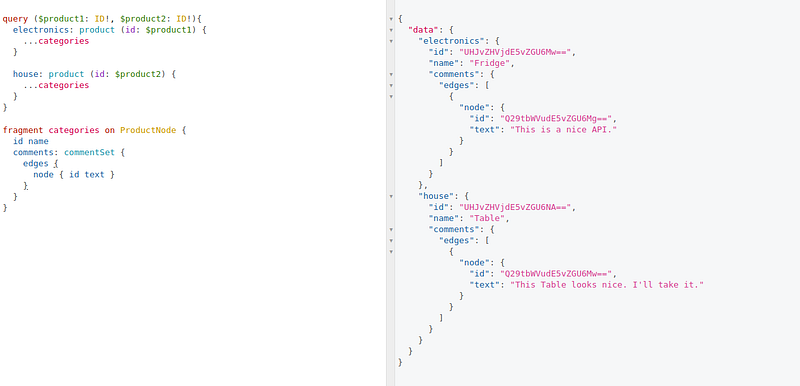
Now imagine that you have a screen to compare two users side-by-side, showing their attributes, maybe their favorite products, etc. GraphQL allows us to do this by using Fragments. Fragments are “reusable units” that you can include in your queries.
In our scenario we’re using fragments to compare two products by analyzing their comments:
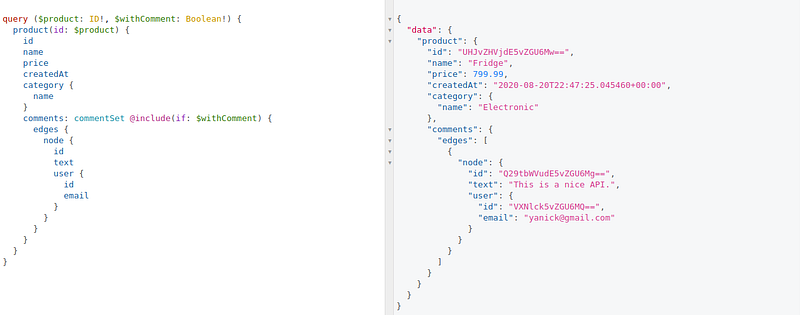
But imagine that we want to use this same function on our client side, but we have no interest in the comments. GraphQL has a feature named @Include that works just like a function, receiving an argument and only including the fields if the argument is True:
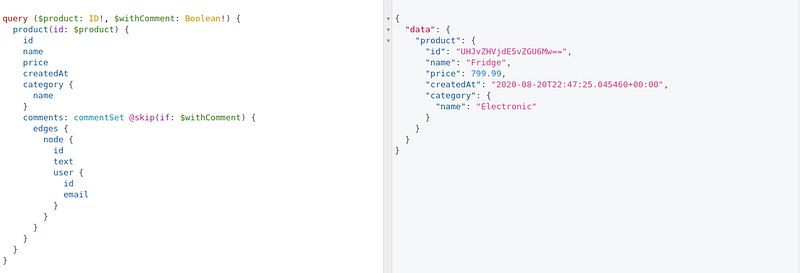
There is also that @Skip literally skips the fields if the argument is True. Take the example above where we use include, we might want to skip comments in certain views in our system, and we want to reuse our function, this can be easily achieved:
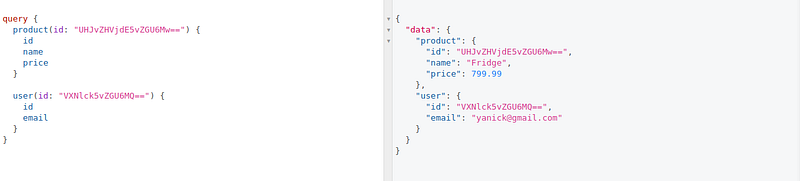
Another interesting feature is multiple queries in a single request. In some applications, you might have a view that displays multiple pieces of information from different entities. In Rest the two approaches that might occur are to create a single endpoint to fetch all this information or create multiple endpoints each one designed to return specific information. In GraphQL as long as you have your API returning data for your entities, you can design a query from the client side to fetch the data as needed for your entities in a single request to the API:
Coding Time

First, we have to set up our code environment by installing Python, Django, and virtualenv. The project can be found in my GitHub repository.
After installing everything, we can create our API and install the dependencies. To create a Django project go to your root folder or where you want the project to be stored and execute the following commands. The last command we’ll only execute after copying this requirements below into a requirements.txt file inside the project root folder:
Add the demo and graphene-django to INSTALLED_APPS in graphenedemo/settings.py:
Everything is OK, now let’s have some fun coding our API. First, we start with our models, inside your project you have a demo app folder, cd inside it and you will see a models.py file:
Super!! Now let’s create a new folder inside our app and name it gql. Inside this folder, we are going to write all the GraphQL logic.
With the folder created, cd into it and create a new file and name it node.py. Nodes are the GraphQL representation of our models in Django. Inside our node object we can define a dictionary filter that we would want to have in our queries:
The last function in the node.py file, get_node_id, is to get the object number Id. Because we’re using Graphene Relay Node, when we make a query we don’t get the object ID in digits, instead, we get an encoded Id to work with. And when we want to make any action on top of that object in our DB we need to decode the Id to get the digit representation. The assert is to make sure that the Id we’re decoding is indeed what we want.
We focus most of the article talking about how GraphQL is good for fetching data but we never said a word about creating data. In GraphQL writing, data is possible through Mutation. A mutation in Graphene is made by making all of our classes a subclass relay.ClientIDMutation. We will define our subclasses inside a gql/resolvers.py file:
Inside our resolvers.py we have the following subclasses:
- CreateProductCategory: Create a new category for products. It has 1 mandatory input — name (String)
- CreateProduct: Create a new product. It has 3 mandatory inputs: name (String), category (ID), and price (Float). Before creating a product we first have to decode the category’s ID using the defined function inside nodes.py — get_node_id. After decoding the ID we can filter to see if the category actually exists, if so, we create the Product.
- ManageFavorites: Add or Remove a product from the favorite list. It has 3 mandatory inputs: user (ID), product (ID), and action (Enum). We do the same thing we did with category ID in CreateProduct with input user and product, if everything is fine we check which action was requested and we either add a product to our favorite or remove it.
- Comment: Add a new user’s comment to a product. It receives two mandatory inputs: user (ID) and product (ID). It first checks if the user and product exist and then saves the comment.
Done that, now we can create our Query and Mutation object that we’ll later connect to our schema that will make them available in our API.
Query object is where all our “endpoints” functions for reading or fetching data will be. It’s very straightforward, in general, we will have two lines of code for each entity (i.e. product and products), one bringing all the data with possibilities to filter the way we want and another one receiving an ID as input and returning the matching data.
The DjangoFilterConnectionField we’re using allows us to make our queries (i.e. users) even more powerful enabling us to filter with multiple options besides the fields in our models and the returning result is a list of objects.
The graphene.relay.Node.Field allows us to make a query in a single object (i.e. user) by passing an ID as input.
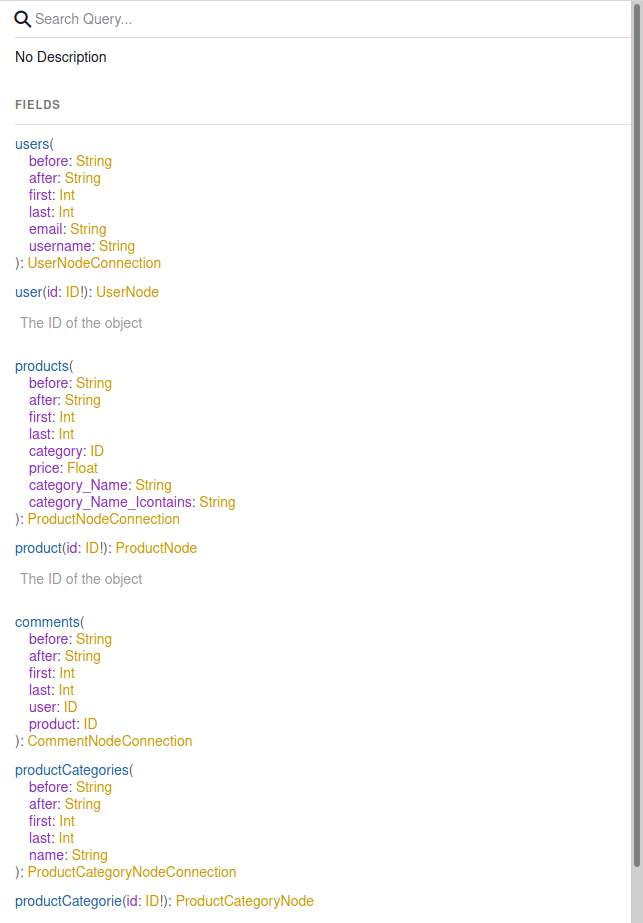
Mutation object is where we call our resolvers subclasses to write in our API. Just like the Query object, it’s very straightforward, it contains the endpoints for writing data.
Now we can pack everything into our Schema. Browse to the project root folder and enter the graphenedemo folder and create the schema.py file and paste the following code:
Now we can migrate our models to our Database. We will use SQLite, the default that comes with Django. We will also need to create a new superuser to test our API properly:
Configuring the URL. To enable the use of the GraphiQL playground we’re going to use GraphQLView object’s function as_view and enable it by setting graphiql parameter to True, the second parameter is our Schema object already defined (above):
And that’s all folks. Now we can go ahead and run our Django API by running this command: python mana.py runserver and if everything is fine you should see this in you http://127.0.0.1:8000/graphql/:
To avoid making this article very extensive I’ll include a screen record video of the API:
And with that, I “close” this article. Hope everyone enjoys it and I would like to hear from you.
PlainEnglish.io 🚀
Thank you for being a part of the In Plain English community! Before you go:
- Be sure to clap and follow the writer️
- Learn how you can also write for In Plain English️
- Follow us: X | LinkedIn | YouTube | Discord | Newsletter
- Visit our other platforms: Stackademic | CoFeed | Venture