
Google Translate API — Should you use V2 or V3? And what cool stuff are there in V3?

In this rapidly globalized world today, “translation” has become a key component in many of our applications today. Translating direct communications between users and the business is critical, especially for business that are going global and reaching new markets. Beyond direct communications, localizations is another key area for outreach, such as performing translations on your application content. For example, batch translating ecommerce menu item names once, and saving them as localized content for viewing in different languages.
While integrating translations is important, the challenge however is not just about building your own translation service. Rather, finding the right translation service to allow one to quickly scale up by building on top of such solutions. To that end, I’ve tried the use of Google Translate API to solve for simple translation needs.
Today, we’ll take a quick look at how to onboard to the simple version (V2) using Go, though the knowledge is easily translatable to other languages. We’ll also explore the advanced iteration of this translate API (V3), and discuss if it makes sense to use V3 or V2.
Getting started with Google Translate (V2 — simple use)
Getting started with V2 of Google Translate is really simple where most use cases will revolve around the two main use cases of translation needs — Detection and Translation.
Detection
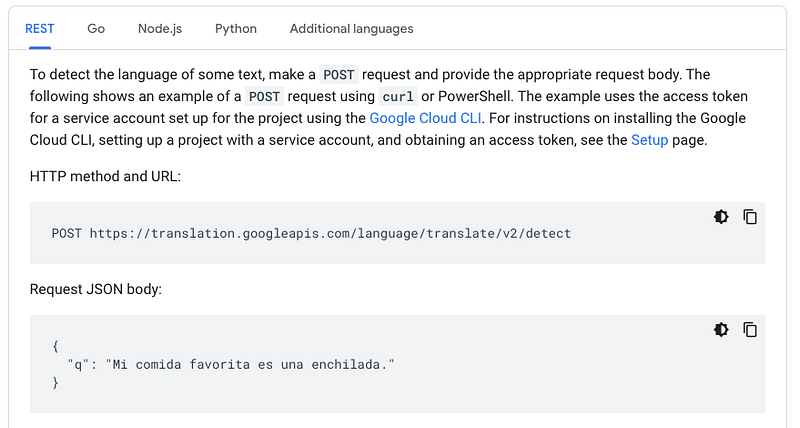
Starting with detection, as seen in the following image, usage is quite clear cut — provide a text string when calling the detection API, and you would be given a detection result. That’s it!
(Note that an API key is needed for calling this API, which you can create from this link here.)
- For usage in Go, make sure you add the following package first:
go get cloud.google.com/go/translate
2. Initialize the V2 translation client, which is needed for both detection and translation:
import (
  "context"

  "cloud.google.com/go/translate"
  "google.golang.org/api/option"
)

func InitTranslateV2Client(apiKey string) (*translate.Client, error) {
  ctx := context.Background()
  apiKeyOption := option.WithAPIKey(apiKey)

  client, err := translate.NewClient(ctx, apiKeyOption)
  if err != nil {
    return nil, err
  }

  return client, nil
}
3. And…use the initialised client to invoke the Detection API:
import (
"context"
"cloud.google.com/go/translate"
)
type TranslateV2Wrapper struct {
translateClient *translate.Client
}
func (t TranslateV2Wrapper) DetectionsFromText(ctx context.Context, text string) ([][]translate.Detection, error) {
googleDetections, err := t.translateClient.DetectLanguage(
ctx,
[]string{text},
)
if err != nil {
return [][]translate.Detection{}, err
}
// Change the return here if you want to
return googleDetections, nil
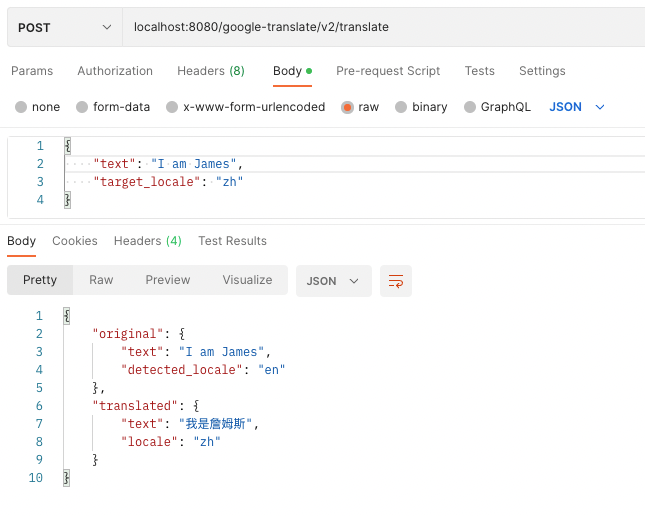
}4. Putting it behind your own API endpoint (e.g. for your frontend services), you can get something like the following:

For a fully fleshed out TranslateV2Wrapper and usage behind an API endpoint, see my sample project file here.
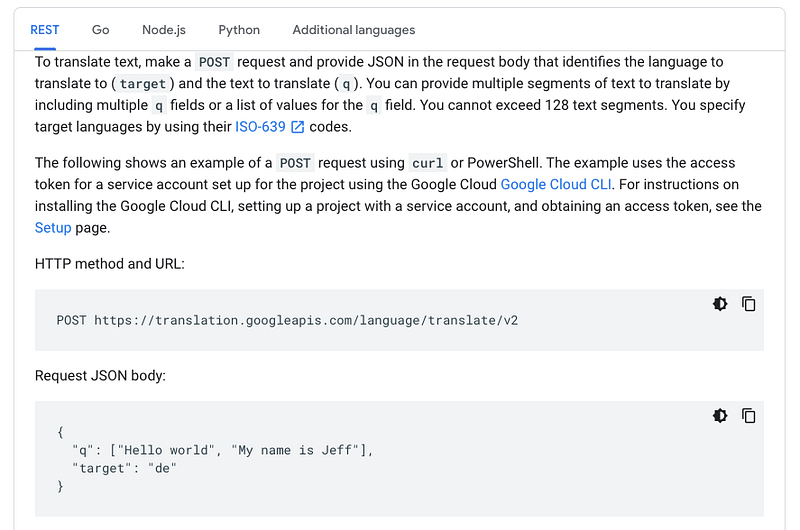
Translation
Moving on to the translation portion of the translation API 😬, again another relatively simple task. Simply provide some input text, in addition to some target language that you want the text to be translated to, and watch the magic take place!
(Note that the API key from detection can be used here too. If you have not yet created this API key, use this link here.)
- As for translating with Go, you need to have the same package for detection, as well as the same V2 translation client initialized before. Scroll back up to step 1–2 for detection steps above, before resuming setting up translation here.
- Simply use the initialized client to invoke the Translation API:
import (
  "context"

  "cloud.google.com/go/translate"
  "golang.org/x/text/language"
)

type TranslateV2Wrapper struct {
  translateClient *translate.Client
}

func (t TranslateV2Wrapper) TranslationsFromText(ctx context.Context, text string, targetLocale string) ([]translate.Translation, error) {
  targetLangTag, err := language.Parse(targetLocale)
  if err != nil {
    return []translate.Translation{}, err
  }

  googleTranslations, err := t.translateClient.Translate(
    ctx,
    []string{text},
    targetLangTag,
    &translate.Options{},
  )
  if err != nil {
    return []translate.Translation{}, err
  }

  // Change the return here if you want to

  return googleTranslations, nil
}
Special note on the above that you have to use the language package as a parameter for the Translate API, hence the need to invoke language.Parse and dealing with erroneous inputs.
3. Putting it behind your own API endpoint again (e.g. for your frontend services), you can get something like the following:
Once again, for a fully fleshed out TranslateV2Wrapper and usage behind an API endpoint, but for translate this time, see the usage in the sample project file here.
And Viola! That’s translation and detection using V2 of Google Translate’s API!
Should I use to Google Translate V3 (advanced) instead of V2 (simple)?
The million dollar question of this discussion. So far, we have covered the basic use of the Translate API, otherwise known as “V2”, and solved for our needs to “detect” and “translate” content. What’s the push to migrate to V3, or even building with V3 instead of V2 from the start?
Google Cloud does describe the differences of V2 and V3 of their translation APIs, as seen here:
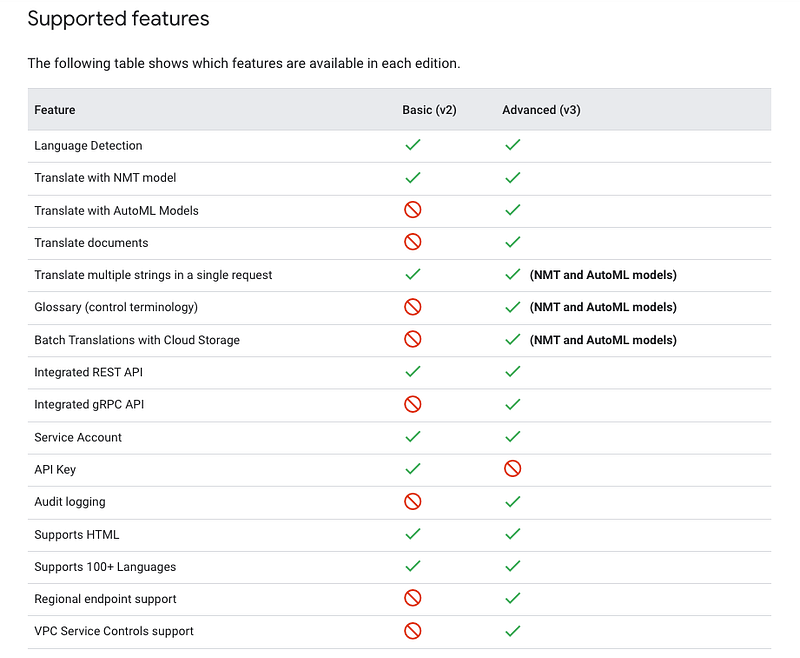
From the above, we know that the V3 API practically does almost everything that the V2 API can do.
However, what does the above points for V3 actually mean? What is “Batch Translation with Cloud Storage”? Or what is “Glossary” even? And what does it mean for us that the V3 API does not allow for API key usage?
Let’s explore in the following:
Notables Points #1 — Glossary is pretty neat
Firstly, let’s start with Glossary. Glossary is a new feature of V3’s translate API, where you can use to control specific terminologies in certain translations and ensure that it remains consistent. One example of such a use case, is using for branding purposes.
For example, using “Grab”, I would like to translate a statement on getting food together with my friends:

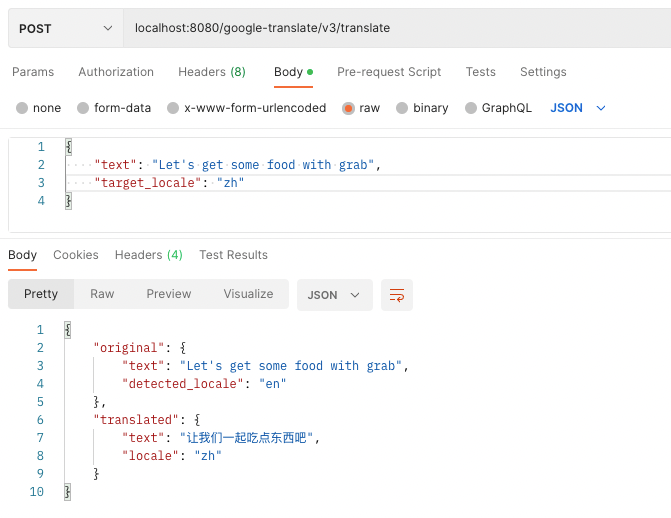
See that in the above, the word “grab” has been translated away. In one scenario, the translated word “抢” is used instead, which is essentially the literal translation of the English word “grab” or “snatch”, and not the brand, losing the intention of the original translation.


By using the “Glossary” feature in the above, an alternate glossary translation is provided. The alternate translation actually serves the branding better here, retaining the branding even in the translation.
Pretty cool huh.
Notables Points #2 — Batch translation is kinda correct, but also kinda wrong
One of the primary sources of motivation for me to think about using V3 instead of V2 of the translate API, is that it offers “batch translation”…or does it really?

In my cursory read of the documentation as seen above, I was under the impression that “Batch translate text” is simply the batch translate variant of the translate API. And this could not be more wrong than what I assumed:
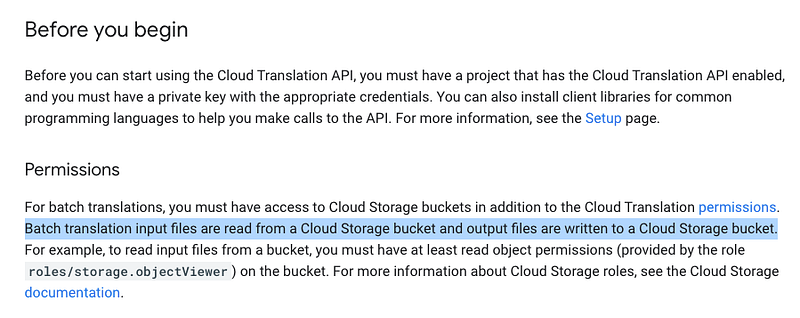
As seen in the highlighted text above, batch translations makes use of Google Cloud Storage to store text that you want to translate. While it make sense to build batching APIs in this manner and there’s definitely new use cases for this manner of operation, any direct usage of this batch translation API would be asynchronous in nature by default, different from the use case of the synchronous translation API :(
Notables Points #3 — No API Key doesn’t mean no access control, but being aligned to use service accounts, convenient if you are using Google Cloud
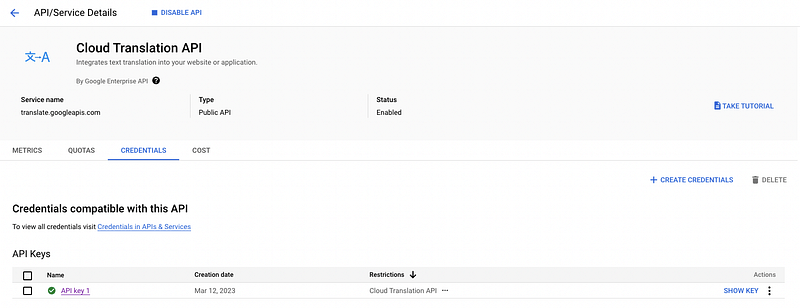
From V2 of the translation APIs, you need to create an API key in order to authorise your use of the API endpoints, as seen in the following:
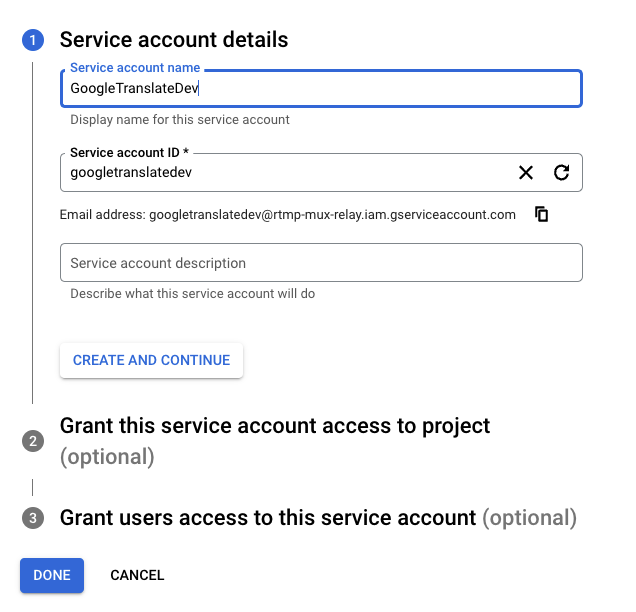
An alternative method for V2 and V3 involves creating a service account instead, and then assigning the related permissions for the translation APIs to the service account:

Once the service account is created, you can download the credential file for the service account for use in your local dev environment. (By pointing to the location of the credential file using the GOOGLE_APPLICATION_CREDENTIALS environment variable):

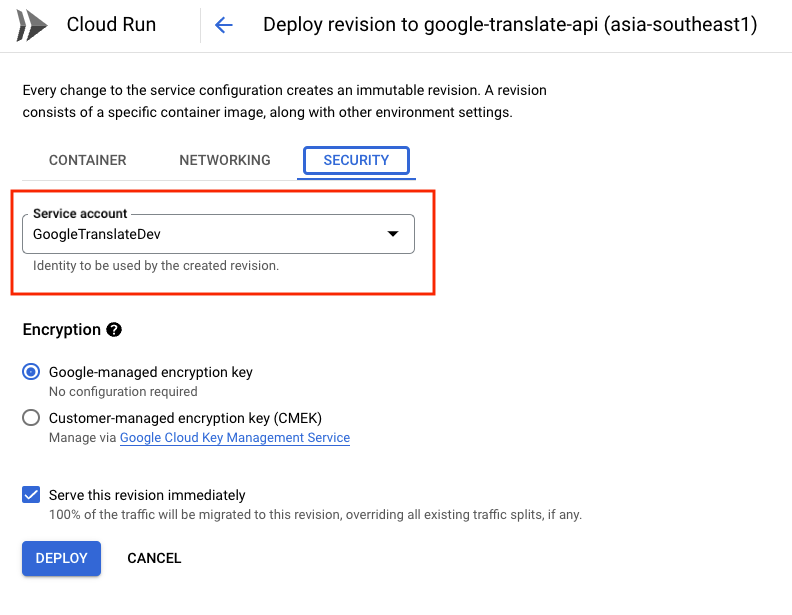
As for your production environment, like using a serverless environment such as Cloud Run, you can simply attach the service account from the web interface (or configure from the CLI as seen here), eliminating the hassle of dealing with the API keys and secrets directly:
The mechanism at play here is essentially Application Default Credentials, to create seamless access to Google Cloud API usage, when using tools in the same ecosystem.
Notables Points #4 — Migrating is easy-ish, and my take on backwards compatibility
For new users of this translation API, using V3 directly doesn’t present too much issues when building from scratch. But what about those who are currently using the detection and translation APIs from the V2 variant? Would it be easy to migrate? And is it backward compatible?
I’ve experimented with both V2 and V3 variants of the API, and I would say with 0.99 confidence that both variants can be used almost in the same exact way. Don’t believe me? Take a look at the following wrapper method I created to differentiate between V2 and V3 translation, both used within the same API endpoint and selected with a boolean flag:

The code above is available here for tracing or testing. Alternatively, you could create a common interface for both V3 and V2 API wrappers, to ensure that you return the consistent results as you migrate to V3.
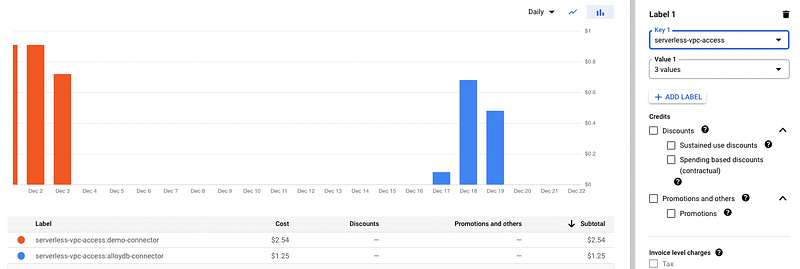
Notables Points #5 — V3 API also supports labelling, which makes tracking usage and billing across teams easier
One awesome inclusion to V3, is that labelling your usage is now allowed!
Long story short, using the billing dashboard, you can understand precisely how you are using each product. For example, if more than one service is using the translation API for different use cases, labels can be used to better understand trends and total cost of each use case:
All in all…
…V3 provides more functionality like Glossary use and Batch translation with files, and also slightly more performance (with gRPC endpoints). There’s also other features that I’ve yet to explore, like using your own AutoML models for the translation, to provide context for better translations in your own use case. V2, however, has the advantage on barriers to entry, easier to onboard in IMO, with its simpler examples and limited use cases, more relevant to generic use case for translating and detecting content. As for pricing, it is the same regardless of the version used.
If you are using Google Translate for the first time, and want to maintain its use for the long term, I would definitely recommend using V3 instead of V2. But if you are thinking of using this feature very quickly, like in a hackathon, V2 is probably sufficient to get started quickly.
As for potential migration effort to users between V2 and V3, if there’s no immediate need to make use the new and attractive features, migration may not be necessary. That said, as I have shared, it is quite easy to do so. You might want to consider migrating eventually, to better guard against deprecation in the future.
Using Google Translate (v3 — advanced use)
Ah, so I see that you have decided that V3 for Google Translate is suitable for your use. Here’s how I implemented detection, translation, and also the new glossary endpoints:
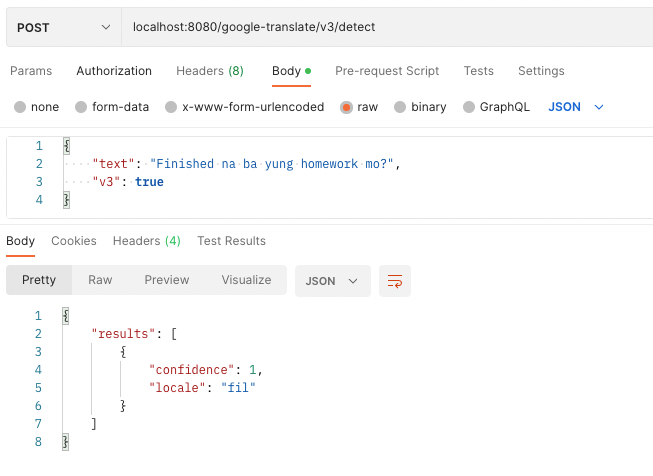
Detection
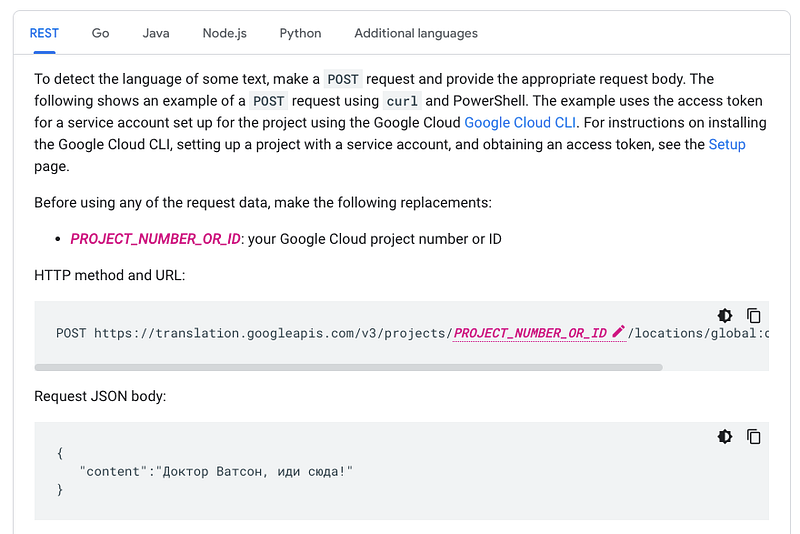
Alright, let’s start again by reviewing the detection API for V3. As seen below, nothing special, but do note the differences in request body and response:
As for the “API Key”, since we can’t use that with V3, what you want to do is to create a service account and download the credential file. A quick link to create a service account can be found here.
As explained before, if you are using this service account in your development environment (especially if your environment is containerized), simply place the credential file in your environment and point to it using GOOGLE_APPLICATION_CREDENTIALS .
Moving forward to implement in Go, follow these steps:
- Add the following package for the V3 variant of the API:
go get cloud.google.com/go/translate/apiv3
2. Same as before, make sure you initialise the translate client:
import (
"context"
translatev3 "cloud.google.com/go/translate/apiv3"
)
func InitTranslateV3Client() (*translatev3.TranslationClient, error) {
ctx := context.Background()
client, err := translatev3.NewTranslationClient(ctx)
if err != nil {
return nil, err
}
return client, nil
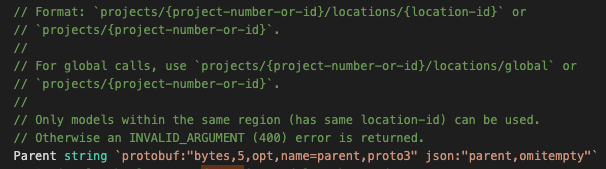
}3. Unlike detection from V2 before, you need to also create a “Parent” key for use with the V3 detection endpoint. This is needed in identifying the Google Cloud project where assets will be used from, like the AutoML models, and required even if you don’t need that at the moment.
The following image shows the comments in the framework, depicting the required format:
4. As for detection usage in Go for V3, include the parent key from the last step to invoke the API:
import (
  "context"

  translate "cloud.google.com/go/translate/apiv3"
  translatepb "cloud.google.com/go/translate/apiv3/translatepb"
)

type TranslateV3Wrapper struct {
  translateClient *translate.TranslationClient
  parentKey       string
}

func (t TranslateV3Wrapper) DetectionsFromText(ctx context.Context, text string) (*translatepb.DetectLanguageResponse, error) {
  req := &translatepb.DetectLanguageRequest{
    Parent:   t.parentKey, // Required
    MimeType: "text/plain",
    Source: &translatepb.DetectLanguageRequest_Content{
      Content: text,
    },
  }

  googleDetectionResponse, err := t.translateClient.DetectLanguage(
    ctx,
    req,
  )

  if err != nil {
    return nil, err
  }

  return googleDetectionResponse, err
}
5. Similar to V2, you can put use your own API endpoint as well for the same effect of delivering the detection results:
For a fully fleshed out TranslateV3Wrapper for detection, and usage behind an API endpoint, see my sample project file here.
Translation
Moving back again to Translations! This time for V3!
Taking a look at the calling the API directly — again it is quite straightforward, but bear in mind the differences against translation for V2 in request inputs and response outputs when you are using the API.

Getting the application credentials is the exact same as detection for V3 above, so I won’t go through the same content again :)
As for usage in Go, let’s study the following steps:
- Follow the same steps for V3 detection API, from 1 to 3 above to initialise your translation client, before resuming on the next step here.
- Using the initialised translate client for V3 APIs, invoke the translate API:
import (
  "context"

  translate "cloud.google.com/go/translate/apiv3"
  translatepb "cloud.google.com/go/translate/apiv3/translatepb"
)

type TranslateV3Wrapper struct {
  translateClient *translate.TranslationClient
  parentKey       string
}

func (t TranslateV3Wrapper) TranslateText(ctx context.Context, text, targetLocale string) (*translatepb.TranslateTextResponse, error) {
  req := &translatepb.TranslateTextRequest{
    Parent:             t.parentKey, // Required
    MimeType:           "text/plain",
    Contents:           []string{text},
    TargetLanguageCode: targetLocale,
  }

  googleTranslationResponse, err := t.translateClient.TranslateText(
    ctx,
    req,
  )

  if err != nil {
    return nil, err
  }

  return googleTranslationResponse, nil
}
3. Again, placing behind your server’s API endpoint for a similar translation response as your V2 endpoint:

For the full example of the translation wrapper and methods, see this link here.
(New!) Glossary
So far, we have created 4 endpoints to encompass the detection and translate endpoints across the V2 and V3 variants. I’ve also created 2 sample endpoints that combines both the V2 and V3 variants together, but separated by a boolean flag:

As we move on to the “Glossary” endpoints, note that you will need at least 3 other endpoints for creating and updating the glossary configurations for the V3 translate API — List, Create and Delete. These endpoints should also be enclosed for private/admin use only.

We’ll focus on the Create endpoint, and examine how it intertwines with the V3 translation endpoint. See how we can create a Glossary using the same V3 wrapper in the following:
import (
  "context"

  translate "cloud.google.com/go/translate/apiv3"
  translatepb "cloud.google.com/go/translate/apiv3/translatepb"
)

type TranslateV3Wrapper struct {
  translateClient *translate.TranslationClient
  parentKey       string
}

func (t TranslateV3Wrapper) CreateGlossary(ctx context.Context, id, gcsSource, sourceLocale, targetLocale string) error {
  glossary := &translatepb.Glossary{
    Name:        id,
    DisplayName: id,
    InputConfig: &translatepb.GlossaryInputConfig{
      Source: &translatepb.GlossaryInputConfig_GcsSource{
        GcsSource: &translatepb.GcsSource{
          InputUri: gcsSource,
        },
      },
    },
    Languages: &translatepb.Glossary_LanguagePair{
      LanguagePair: &translatepb.Glossary_LanguageCodePair{
        SourceLanguageCode: sourceLocale,
        TargetLanguageCode: targetLocale,
      },
    },
  }
  req := &translatepb.CreateGlossaryRequest{
    Parent:   t.parentKey, // Required
    Glossary: glossary,
  }

  _, err := t.translateClient.CreateGlossary(
    ctx,
    req,
  )
  if err != nil {
    return err
  }

  return nil
}
Translating to our API endpoint, the input values look something like the following, including configurations like the glossary configuration that I uploaded to my cloud storage bucket:
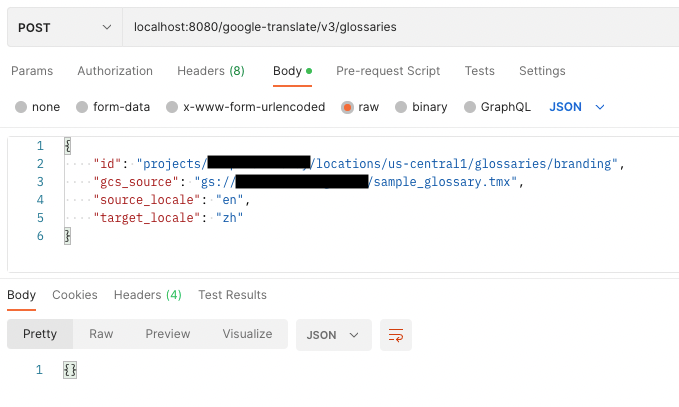
(Note: A sample to this glossary configuration in the bucket can be found here)
Next, we will need invoke the translation V3 endpoint, this time with extra glossary configuration, to get more the new translated content:
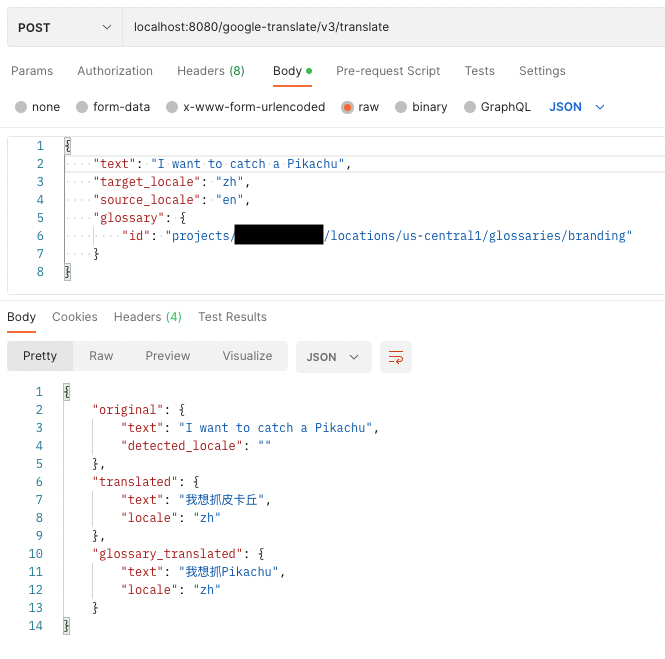
Viola! With the glossary indicating “Pikachu” is a word that we don’t want to translate, I would be able to derive translations with that keyword untouched!
Also, I’m intentionally skipping the changes required for including glossary as a body parameter for V3 translation API to simplify the use case above — but if you are looking for implementation details, see the highlighted LOC changes here.
Before ending this discussion here, check out the full project where I implemented both the V2 and V3 Detect and Translate APIs, along with testing out with Glossary, and also using in Cloud Run: https://github.com/Weiyuan-Lane/google-translate-api
A sample postman collection is also added here, if you want to run the server locally and test the implemented endpoints.
Do check it out if you want to use it to quickly ramp up on your use in Google Cloud Translation API. Have fun!


