
Google Cloud vs. Fly.io as Heroku Alternatives
Comparison of free-tier Docker deployments

With the end of Heroku's free tier era, I was scrambling to find an alternative to host my web application. My previous article on deploying Docker using Heroku certainly did not age well.
There are many Heroku alternatives for various workflows, but in my case, it was specifically for the deployment of web applications using Docker images. Therefore I need a service that can build docker images and host docker containers, which Google Cloud Platform (GCP) and Fly.io are promising alternatives.
This article briefly explains the deployment process using GCP and Fly.io, and comparisons will be made on the end-user experience with both platforms, focusing on the free custom domain name, ease of deployment, ease of maintainability, pricing differences, cold starts, and more.
Admittedly, I am not well-versed in docker and platform-specific (GCP, Fly.io) knowledge, I may point out issues that have a solution or workaround. Feel free to share your expertise in the comments!
Table of Contents
- Deploying using Google Cloud
- Deploying using Fly.io
- Ease of Deployment
- Ease of Maintenance (CICD)
- Free Custom Domain Name Comparison
- Billing Comparison
- Startup Time Comparison
- Environment Variables and Secrets Comparison
Note: As this is my hobby project, my concern is to keep costs as low as possible, but it may not be entirely free, unfortunately. I will elaborate on what are the free tier features and limitations and how will cost be incurred depending on the deployment settings.
Deploying using Google Cloud
To deploy Docker workflows using Google Cloud Console, these are the main services you will tap on and their purposes,
- Cloud Run: Specify build settings, deploy Docker container
- Cloud Build: Set rules to trigger Cloud Run, enables Continuous Integration Continuous Deployment (CICD)
- Container Registry or Artifact Registry: Store container images, Artifact Registry is around 4x costlier than Container Registry with slightly more (but maybe unnecessary) features
- IAM & Admin: Manage project permissions
There are other services you may require based on your use case, such as the Secret Manager for managing secrets which will be elaborated on in the last section of this article.
As this article aims to do a comparison, I will not focus on the step-by-step guide on GCP deployment. If you are interested, I recommend this guide on Google Cloud deployment.
Deploying using Fly.io
Fly.io uses flyctl which is a command-line utility and most of the initial setup is done using the command line. The main steps involved in the setup are,
- Register for Fly.io: Install
flyctland sign up for Fly.io - Register for Docker Hub (optional): If you are running Docker locally to test your application (I highly recommend this), you would need a Docker Hub account to push to the docker registry and Fly.io will deploy your docker image from there. Otherwise, Fly.io’s internal registries will be used.
- Launch application: This is a one-time setup to create the configuration for your application
- Deploy application: This is completed with one line of command!
The documentation for setup can be found in Fly.io hands-on tutorial.
Ease of Deployment
Winner: Fly.io for greater transparency
A huge difference in deployment is that Google Cloud Console allows users to deploy while interfacing a web page, as opposed to Fly.io which requires users to run command-line operations.
Although using a web page is more user-friendly, I feel that deploying on Google Cloud has a steeper learning curve due to all the offerings that Google has. This is evident in the amount of Google services that are used (Cloud Run, Cloud Build, etc.).
Fly.io is more transparent and straightforward in terms of its services and you will not be charged for services that you do not know you are using (more on this in the next sections)!
Ease of Maintenance (CICD)
Winner: Google Cloud if you know what you are doing, if not there can be costs that come as a shock
I would split maintenance into 3 categories, redeployment, scaling, and handling old builds.
Redeployment
As part of the Continuous Integration Continuous Deployment (CICD) best practice, Google Cloud comes with Cloud Build which triggers Cloud Run redeployments upon repository branch update. You can also manually retrigger a deployment on Cloud Run if you want to change the deployment settings such as the number of CPUs.
This is not as straightforward in Fly.io where retriggering has to be done using the command-line terminal. Alternatively, you can set up GitHub Actions with Fly.io to redeploy upon repository branch update, which is an additional step compared to Google Cloud, but still gets the job done.
Scaling
One important aspect of Cloud hosting is the ability to scale up and down instances (CPU and memory) on-the-fly and also enable auto-scaling (number of instances). Both platforms have scaling and auto-scaling but are implemented in different ways.
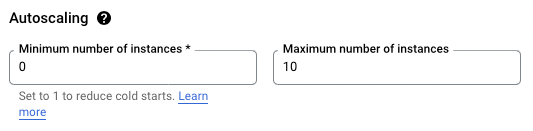
Google Cloud scaling can be done by modifying the build settings to push a new revision, while autoscaling depends on the minimum and the maximum number of instances (Fig 1). All these changes can be done on Google Cloud Console easily.
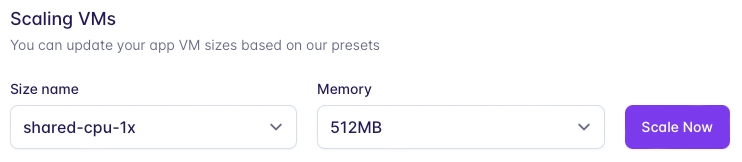
In Fly.io, scaling is done on the Fly dashboard (Fig 2) and a new revision is pushed immediately, whereas specifying the number of instances and enabling autoscaling can only be done using the command line. I find this troublesome as I cannot change my number of instances on the go and can only do so on my laptop that has flyctl installed.
Handling Old Builds
In Heroku, the old builds are visible and users can roll back to previous versions easily, which was something I appreciated. Rollbacks can also be done in Google Cloud Console on Cloud Run where users can specify Container Image URL from Container Registry or Artifact Registry.
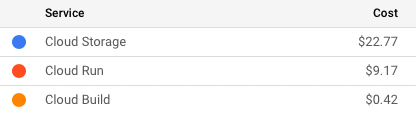
This brings me to my next point, Container Registry or Artifact Registry stores ALL your previous container images — and this storage comes at a cost. I took it for granted that it would be free like Heroku until I had the shock of my life (Fig 3). Additionally, Google Cloud Console does not have any option that allows users to delete old builds automatically — this deletion has to be done manually.
If you are storing container images on Container Registry or Artifact Registry, remember to purge old builds often!
In Fly.io, old builds are discarded and only the existing build can be viewed on the Fly dashboard. This means that rollbacks cannot be done.
All things considered, I find maintaining my web application is easier on Google Cloud — only if you know what you are doing.
Free Custom Domain Name Comparison
Winner: Fly.io hands down
As mentioned at the start of the article I am keeping costs low, I did not get myself a custom domain name and relied on the free custom domain name given by the platform provider.
Google Cloud's default domain name has the format <app-name>-<random-string>.a.run.app which frankly is not easy to remember, and does not look good nor look like a URL. For example, my web application has the link kayjan-634i2gf6lq-as.a.run.app (this link may not be valid).
Fly.io has a friendlier, cooler, and easier-to-remember domain name, with the format <app-name>.fly.dev, and my web application has the link kayjan.fly.dev. This is a major plus point for Fly.io!
Billing Comparison
Winner: Fly.io for more control over maximum cost
As with major cloud services, Google Cloud charges based on usage. For low usage, it can potentially be free but with high usage, there is no guarantee of the maximum cost since it auto-scales your application.
Fly.io provides more control over costs as it charges based on the setup (not usage), and the free tier has 3x CPU and 256MB memory allowance. Upgraded setup will be charged accordingly according to the Fly.io pricing guide. Unless auto-scaling is enabled, the web application will just be unresponsive if the resource is exceeded and you will also receive an email on the crash.
If you prefer auto-scaling for high availability, Google Cloud and Fly.io provide the same uncertainty on the maximum cost that will be incurred. However, if you do not care about high availability, limiting the resources can be a good way to control costs.
Startup Time Comparison
Winner: Fly.io if you want to keep it strictly free
To reduce cold starts, we can set the minimum instance to 1 on Google Cloud Run. However, I realized that resource is being consumed and I am continuously charged for the usage (or lack thereof) so I set the minimum instance to 0 for a somewhat ‘free’ tier. The cold starts for my web application take around 5–10s to load.
As mentioned in the previous section, Fly.io charges based on setup and not usage, and its free tier has 3x CPU and 256MB memory. This means that Fly.io service is always available and there will never be cold starts even for the free tier!
Environment Variables and Secrets Comparison
Winner: Google Cloud for secrets management, but comes at a cost
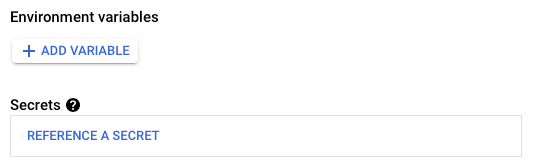
For my web application, I have API keys that I set as environment variables in my code. Google Cloud Console allows me to define environment variables and secrets in Cloud Run (Fig 4). One caveat is that this requires Secrets Manager, another Google Cloud service, and access operations are chargeable. Fly.io also allows users to set secrets, but without additional costs.
If access control and security are the topmost concerns for your application, Google Cloud has stricter and customizable IAM policies. Otherwise, Fly.io's implementation of secrets is sufficient at zero cost.
Hope you have gained a better understanding of deployment using Google Cloud vs. Fly.io and learnt from my costly mistakes. As I have recently switched over from Heroku, I am not sure which platform is more costly in the long term, taking into account my web application usage and the different billing frameworks for GCP vs. Fly.io.
I do have a preference for Fly.io as the free custom domain name and fast startup timings are huge deciding factors for me. What are your deciding factors in choosing a web hosting service? I would be happy to hear your thoughts!
Related Links
- My web application (Fly.io): https://kayjan.fly.dev


