
Google Cloud Platform (GCP): Data Ingestion Pipeline from Local Machine to GCP Storage

Google Cloud Platform (GCP) is one of the leading Cloud Computing platforms globally, offering a wide range of robust services and tools to assist businesses in managing and developing their applications and data in a scalable and secure manner. By leveraging Google’s global infrastructure, GCP enables companies to deploy applications, store and analyze data, and harness advanced features such as AI and machine learning.
In this series of blog, we will delve into the details of Google Cloud Platform, examine its key features, understand how it can be used to meet current and future business requirements, and discover best practices to optimize performance and minimize costs. Through practical examples and step-by-step guides, we will explore how to fully leverage the services offered by GCP to achieve specific business objectives, ensuring a smooth transition to a modern and efficient cloud environment.
In this blog, we will first creating a service account on GCP, then setting the SDK, create a Google Cloud Storage Bucket, and transfer data from a local location to a GCP Bucket.
- Creating a service account
Creating a service account in Google Cloud Platform involves several steps that allow you to create and manage access to resources securely. Below is a general guide on how to create a service account:
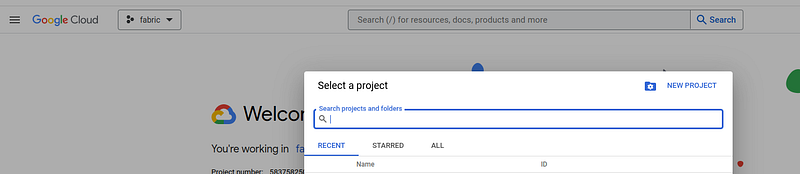
- Access the Google Cloud Console
Once the connection to the console is established, you need to create a project by giving it a name.
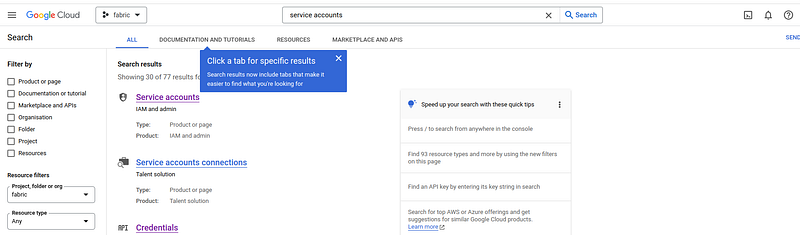
- Service account:
You need to search by typing ‘Service accounts’ and then click on ‘Service accounts’.
We will now see the existing service accounts for the chosen project.
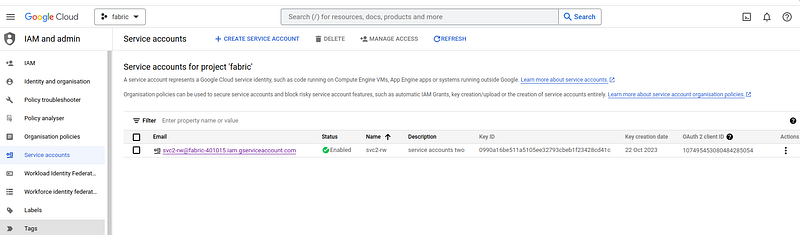
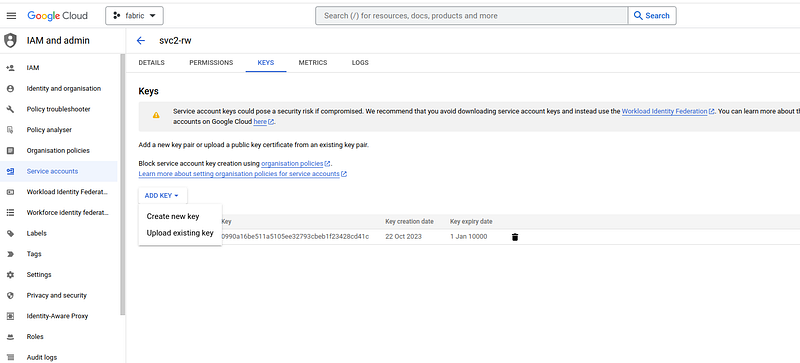
To create a new service account, you need to click on “create” and follow the different steps.
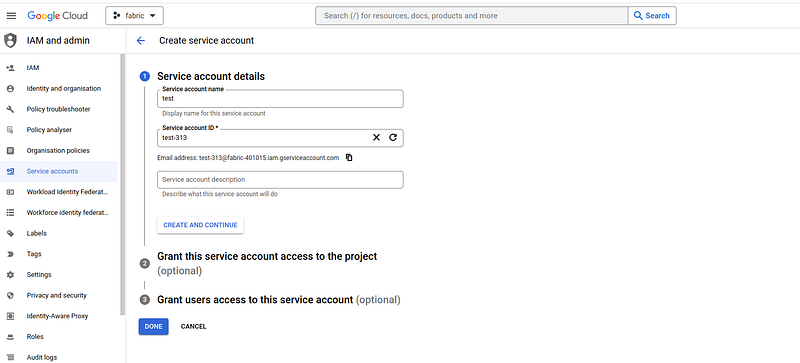
Once the service account is created, it is necessary to generate a key and download the key associated with this service account. The key associated with this service account will be downloaded locally (for example: fabric-401015–0990a16be511.json) and this key will allow us to connect to the service account.
2. Configuration of the GCP SDK
The configuration of the Google Cloud Platform (GCP) SDK will allow us to access and manage our cloud resources via the command line. Here is a guide to set up the GCP SDK :https://cloud.google.com/sdk/docs/install-sdk?hl=fr#deb
- Installing Google Cloud SDK with Ubuntu
sudo apt-get update
# Install apt-transport
sudo apt-get install apt-transport-https ca-certificates gnupg curl sudo
# Import the public key
curl https://packages.cloud.google.com/apt/doc/apt-key.gpg | sudo tee /usr/share/keyrings/cloud.google.asc# Update and install the gcloud CLI
sudo apt-get update && sudo apt-get install google-cloud-cliOnce the installation is complete, you need to configure the service account with the Google Cloud SDK using the key fabric-401015–0990a16be511.json. To do this, you have to execute these two command lines in the shell.
## GOOGLE_APPLICATION_CREDENTIALS
export GOOGLE_APPLICATION_CREDENTIALS="/home/../fabric-401015-0990a16be511.json"

## Activating services
gcloud auth activate-service-account [email protected] --
key-file=/home/../fabric-401015-0990a16be511.json --project=fabric-401015
To finalize the configuration and SDK installation, you need to execute the following code.
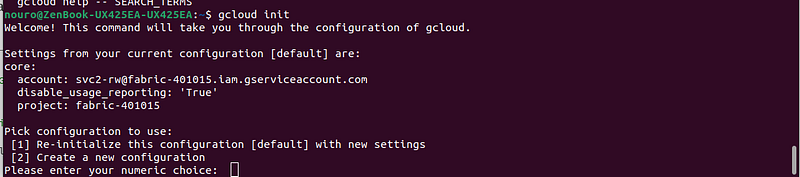
gcloud init
Then follow the different steps displayed on the command-line interface (CLI).
3. Transfer data from a local location to a GCP Bucket.
For our example, we will use data in JSON format from this website: https://www.yelp.com/dataset/download.
Before transferring the data to the GCS buckets, it is necessary to create the buckets.
- Display the list of existing buckets
gsutil ls
- Creating new GCS buckets ( with name gcs-bigdata-bucketbis)
gsutil mb gs://gcs-bigdata-bucketbis

- Transfer the data from the local repository to this bucket (gcs-bigdata-bucketbis)
# Go to the folder where the files are located.
cd ./yelpDataSet/
# Transfer the file to the gcs-bigdata-bucketbis bucket in GCP.
gsutil cp yelp_academic_dataset_business.json gs://gcs-bigdata-bucketbis/data/
# Display the transferred files in GCP
gsutil ls gs://gcs-bigdata-bucketbis/data/
To transfer all .json files located locally to the repository, use the following script :
gsutil -m cp *.json gs://gcs-bigdata-bucketbis/data/4. Transform data using dataflow
- Creating Batch Dataflow jobs
To do this, we will use the file “dataflow_batch_test.py”. In this file, we will specify the SCHEMA for the output table in BigQuery. We have also created the pipeline using Apache Beam and a ParseMessage function as data processing for data from Google storage bukets . You can review the code in detail to understand.
# -*- coding: utf-8 -*-


"""An Apache Beam batch pipeline example.
It reads JSON encoded messages from GCS file, transforms the message data and
writes the results to BigQuery.
"""

import argparse
import json
import logging
#import time
from apache_beam.io.gcp.bigquery_tools import RetryStrategy
import apache_beam as beam
from apache_beam.options.pipeline_options import PipelineOptions
#from apache_beam.options.pipeline_options import SetupOptions
#import apache_beam.transforms.window as window

# Defines the BigQuery schema for the output table.
REVIEW_SCHEMA = ','.join([
    'review_id:STRING',
    'user_id:STRING',
    'business_id:STRING',
    'stars:INT64',
    'date:STRING',
    'text:STRING',
    'useful:INT64',
    'funny:INT64',
    'cool:INT64',
])

ERROR_SCHEMA = ','.join([
    'error:STRING',
])

review_schema = {
    'fields': [{
        'name': 'review_id', 'type': 'STRING', 'mode': 'REQUIRED'
    }, {
        'name': 'user_id', 'type': 'STRING', 'mode': 'REQUIRED'
    },
    {
        'name': 'business_id', 'type': 'STRING', 'mode': 'REQUIRED'
    }, {
        'name': 'stars', 'type': 'FLOAT64', 'mode': 'NULLABLE'
    },
     {
        'name': 'date', 'type': 'STRING', 'mode': 'NULLABLE'
    }, {
        'name': 'text', 'type': 'STRING', 'mode': 'NULLABLE'
    },
    {
        'name': 'useful', 'type': 'INT64', 'mode': 'NULLABLE'
    }, {
        'name': 'funny', 'type': 'INT64', 'mode': 'NULLABLE'
    },
     {
        'name': 'cool', 'type': 'INT64', 'mode': 'NULLABLE'
    }]
}

business_schema1 = {
    'fields': [{
        'name': 'business_id', 'type': 'STRING', 'mode': 'REQUIRED'
    }]}

business_schema = {
    'fields': [{
        'name': 'business_id', 'type': 'STRING', 'mode': 'REQUIRED'
    }, {
        'name': 'name', 'type': 'STRING', 'mode': 'NULLABLE'
    },
    {
        'name': 'address', 'type': 'STRING', 'mode': 'NULLABLE'
    }, {
        'name': 'city', 'type': 'STRING', 'mode': 'NULLABLE'
    },
     {
        'name': 'state', 'type': 'STRING', 'mode': 'NULLABLE'
    }, {
        'name': 'postal_code', 'type': 'STRING', 'mode': 'NULLABLE'
    },
    {
        'name': 'latitude', 'type': 'FLOAT64', 'mode': 'NULLABLE'
    }, {
        'name': 'longitude', 'type': 'FLOAT64', 'mode': 'NULLABLE'
    },
     {
        'name': 'stars', 'type': 'FLOAT64', 'mode': 'NULLABLE'
    },
    {
        'name': 'review_count', 'type': 'INT64', 'mode': 'NULLABLE'
    },
     {
        'name': 'is_open', 'type': 'INT64', 'mode': 'NULLABLE'
    },
    {
        'name': 'categories', 'type': 'STRING', 'mode': 'NULLABLE'
    }
     ,{
        'name': 'hours', 'type': 'RECORD', 'mode': 'NULLABLE',"fields": [
            {
                "name": "Monday",
                "type": "STRING"
            },
            {
                "name": "Tuesday",
                "type": "STRING"
            },
            {
                "name": "Friday",
                "type": "STRING"
           },
            {
                "name": "Wednesday",
                "type": "STRING"
            },
            {
               "name": "Thursday",
                "type": "STRING"
           },
           {
               "name": "Sunday",
                "type": "STRING"
            },
            {
                "name": "Saturday",
                "type": "STRING"
            }
        ]
    }
    ]
}


class ParseMessage(beam.DoFn):
    OUTPUT_BUSINESS_TAG = 'business'
    OUTPUT_ERROR_TAG = 'error'
    def process(self, element,table):
        """
        Extracts fields from json message
        :param element: file metadata message returned from reading files at input path.
        :return: have two outputs:
            - reviews: parsed review data
            - business: parsed business data
        """
        try:
            line = json.loads(element)
            print(line)
            logging.info(line)
            if 'review' in table:
                review = {
                        'review_id': line['review_id'],
                        'user_id': line['user_id'],
                        'business_id': line['business_id'],
                        'stars': line['stars'],
                        'date': line['date'],
                        'text': line['text'],
                        'useful': line['useful'],
                        'funny': line['funny'],
                        'cool': line['cool']
                        }
                print(review)
                logging.info(review)

                yield review
            else:
                business =  {
                        'business_id': line['business_id'],
                        'name': line['name'] ,
                        'address': line['address'] ,
                        'city': line['city'] ,
                        'state': line['state'] ,
                        'postal_code': line['postal_code'] ,
                        'latitude': line['latitude'],
                        'longitude': line['longitude'],
                        'stars': line['stars'],
                        'review_count': line['review_count'],
                        'is_open': line['is_open'],
                        'categories': line['categories'],
                        'hours': line['hours']
                        }
                print(business)
                logging.info(business)
                #yield beam.pvalue.TaggedOutput(self.OUTPUT_BUSINESS_TAG, business)
                yield business
        except Exception as error:
            print("error")
            logging.info(str(error))
            error_row = { 'error': str(error) }
            yield beam.pvalue.TaggedOutput(self.OUTPUT_ERROR_TAG, error_row)

class DataflowOptions(PipelineOptions):

    @classmethod
    def _add_argparse_args(cls, parser):
        parser.add_argument(
        '--input_path', required=True,
        help='Input GCS path from where files will be read.')
        parser.add_argument(
            '--table', required=True,
            help='Output BigQuery table for file specified as: PROJECT:DATASET.TABLE or DATASET.TABLE.')
        parser.add_argument(
            '--error_table', required=True,
            help='Output BigQuery table for error as: PROJECT:DATASET.TABLE or DATASET.TABLE.')
    '''@classmethod
    def _add_argparse_args(cls, parser):
        parser.add_value_provider_argument(
        '--input_path', type=str,default='gs://gcp-file-source/data1/*',
        help='Input GCS path from where files will be read.')
        parser.add_value_provider_argument(
            '--table', type=str,default='test.business',
            help='Output BigQuery table for file specified as: PROJECT:DATASET.TABLE or DATASET.TABLE.')
        parser.add_value_provider_argument(
            '--error_table', type=str,default='test.error',
            help='Output BigQuery table for error as: PROJECT:DATASET.TABLE or DATASET.TABLE.')
        '''
def run(argv=None):
    """Build and run the pipeline."""
    parser = argparse.ArgumentParser(argv)
    known_args, pipeline_args = parser.parse_known_args()
    options = PipelineOptions(pipeline_args, save_main_session=True)
    dataflow_options = options.view_as(DataflowOptions)
    with beam.Pipeline(options=options) as pipeline:
        rows, error = (
            pipeline
            | beam.io.ReadFromText(dataflow_options.input_path)
            | 'Parse JSON messages' >> beam.ParDo(ParseMessage(),dataflow_options.table).with_outputs(ParseMessage.OUTPUT_ERROR_TAG,
                                                                                main='rows')
             )

        # Output the results into BigQuery table.
        _ = (rows | 'Write rows to BigQuery'
             >> beam.io.WriteToBigQuery(table=dataflow_options.table,
                                        schema=lambda table: (business_schema
                                                              if 'business' in table
                                                              else review_schema),
                                        create_disposition=beam.io.BigQueryDisposition.CREATE_IF_NEEDED,
                                        write_disposition=beam.io.BigQueryDisposition.WRITE_APPEND,
                                        #insert_retry_strategy=RetryStrategy.RETRY_ON_TRANSIENT_ERROR
                                        )
             )

        _ = (error | 'Write error to BigQuery'
             >> beam.io.WriteToBigQuery(table=dataflow_options.error_table,
                                        schema=ERROR_SCHEMA,
                                        create_disposition=beam.io.BigQueryDisposition.CREATE_IF_NEEDED,
                                        write_disposition=beam.io.BigQueryDisposition.WRITE_APPEND,
                                        #insert_retry_strategy=RetryStrategy.RETRY_ON_TRANSIENT_ERROR
                                        )
             )


if __name__ == '__main__':
    logging.getLogger().setLevel(logging.INFO)
    run()
To launch the Dataflow jobs in Batch, we will follow the following steps:
- connect to the GCP services using the command line.
## activating services
gcloud auth activate-service-account [email protected] --key-file=/home/../Data\ Engineer/GCP/fabric-401015-0990a16be511.json --project=fabric-401015

## specify credentials for services account
export GOOGLE_APPLICATION_CREDENTIALS="/home/../Data Engineer/GCP/fabric-401015-0990a16be511.json"- Launch the following Batch DataFlow job:
Note that you need to create a dataset in BigQuery named “test” and using as input the data tranfered in our bucket “gcs-bigdata-bucketbis/data/” and replace the input_path by this bucket. You also need to replace the output table(bigquery) and the service_account_email with their corresponding values. The name of the Dataflow job will be “test-stream-bq”
python3 /home/nouro/Data\ Engineer/GCP/scripts/dataflow_batch_test.py \
--input_path=gs://gcs-bigdata-bucketbis/data/* \
--table=test.business --error_table=test.error \
--runner DataflowRunner --project fabric-401015 \
--region us-west1 --service_account_email [email protected] \
--staging_location gs://gcs-bigdata-bucketbis/dataflow/staging --temp_location gs://gcs-bigdata-bucketbis/dataflow/temp --job_name test-batch-bq --num_workers 1 --max_num_workers 4
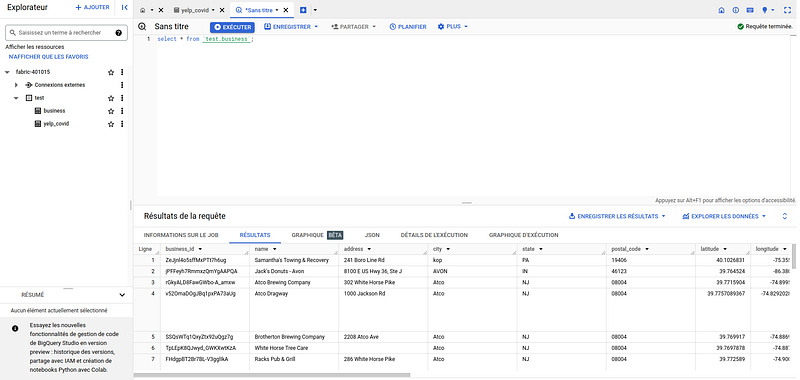
Once this job (pipeline) is launched, our messages or data will be processed and stored in BigQuery. Here is an example of queries on the business table.
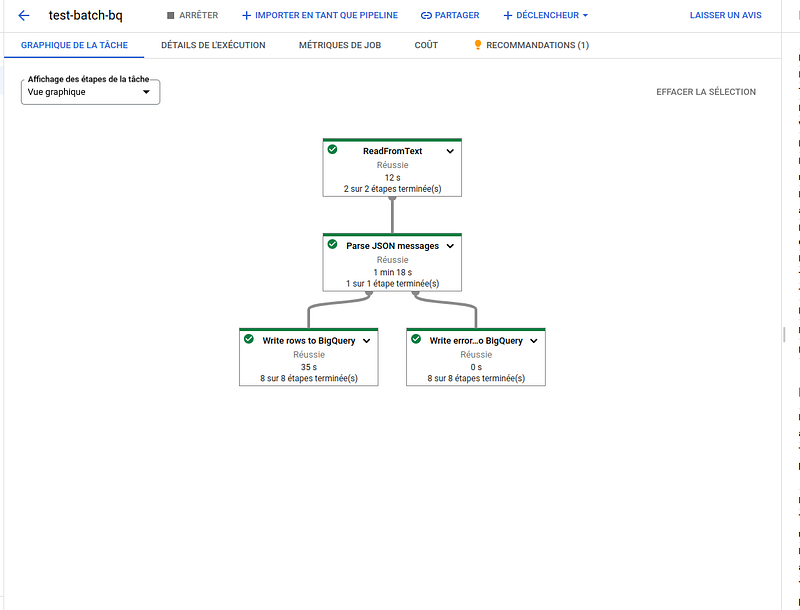
The below pipeline diagram showing the different parts of the pipeline with Batch DataFlow jobs.
Conclusion
In conclusion, this blog has explored the key steps to establish a robust connection with Google Cloud Platform (GCP), focusing on creating a service account, configuring the SDK, and securely transferring data from a local repository to a Google Cloud Storage (GCS) Bucket.
By creating a service account, we ensured secure permission management, allowing precise control over access to GCP resources. The SDK configuration facilitated access and management of cloud resources from the command line, providing increased flexibility in handling GCP services.
The transfer of data from the local repository to a Google Cloud Storage Bucket demonstrated how to leverage the robust infrastructure of GCP to store and manage data in a scalable and reliable manner.
By following these key steps, readers can now use Google Cloud Platform effectively and securely, leveraging its advanced features to meet the growing needs of their projects and businesses. By continuing to explore the various features and services offered by GCP, users will be able to fully harness the potential of this powerful Cloud Computing tool, paving the way for innovative solutions and sustained growth.


