avatarYash Prakash

Free AI web copilot to create summaries, insights and extended knowledge, download it at here

4128

Abstract

d="123f">Here’s how to set it up:</p><ol><li>Make sure you have your go paths set up: go open up your bash or zsh profile file and include the following lines there:</li></ol><div id="e7f4"><pre><span class="hljs-meta"># <span class="hljs-keyword">if</span> using zsh</span> open ~/.zshrc</pre></div><div id="1bd3"><pre><span class="hljs-comment"># include these lines at the bottom of the file</span> <span class="hljs-built_in">export</span> <span class="hljs-attribute">GOPATH</span>=<span class="hljs-variable">HOME</span>/go <span class="hljs-built_in">export</span> <span class="hljs-attribute">PATH</span>=<span class="hljs-variable">PATH</span>:GOROOT/bin:GOPATH/bin <span class="hljs-built_in">export</span> <span class="hljs-attribute">PATH</span>=<span class="hljs-variable">PATH</span>:(go env GOPATH)/bin</pre></div><p id="4757">2. Install air in your project directory:</p><div id="3180"><pre>go install github.com/cosmtrek/<span class="hljs-keyword">air</span>@latest</pre></div><p id="a7eb">3. Use air:</p><div id="b420"><pre>air <span class="hljs-keyword">init</span></pre></div><p id="8ff9">This will create a new <code><b>.air.toml</b></code> file in your project’s root directory. Then enter:</p><div id="cf29"><pre><span class="hljs-attribute">air</span></pre></div><p id="2f5a">And it will start watching for changes in your project!</p><p id="fb7f">For example, if we were making a REST API with the <b>Gin </b>web framework, we’ll see something of the sort in our terminal:</p><figure id="3b65"><img src="https://cdn-images-1.readmedium.com/v2/resize:fit:800/1*0v3_j14Z3G_37zB90QnV1g.png"><figcaption></figcaption></figure><p id="cdcc">The verbose output you see here can all be configured using the <code><b>.air.toml </b></code>config file for <b>air</b>.</p><p id="71d9">Looks very neat, doesn’t it?</p><h1 id="8f1c">How to use environment variables in a Go project</h1><p id="e733">Using the Go package <a href="https://github.com/joho/godotenv"><b>GoDotEnv</b></a>, we can read and access key value pairs of secrets such as Database URL, username and password, server directory paths, SSH keys, etc from <code>.env</code> files in our project.</p><p id="f9d2">The first step is to install this package:</p><div id="8536"><pre>go install github.com<span class="hljs-regexp">/joho/</span>godotenv<span class="hljs-regexp">/cmd/</span>godotenv<span class="hljs-meta">@latest</span></pre></div><p id="2e33">Now, make a .env file in your project folder and save your secrets there.</p><p id="b63a">For access in our project, in our main.go file, we can simply do:</p><div id="f9af"><pre><span class="hljs-keyword">import</span> ( <span class="hljs-string">"log"</span> <span class="hljs-string">"os"</span>

<span class="hljs-string">"github.com/joho/godotenv"</span>

)</pre></div><div id="68a4"><pre><span class="hljs-function"><span class="hljs-keyword">func</span> <span class="hljs-title">init</span><span class="hljs-params">()</span></span>{ err := godotenv.Load() <span class="hljs-keyword">if</span> err != <span class="hljs-literal">nil</span> { log.Fatal(<span class="hljs-string">"Error loading .env file"</span>) } }</pre></div><p id="dd48">Running it inside the <b>init</b> function makes sure it gets called before the <b>main</b> function.</p><p id="3d10">Getting any secret will then be possible by using:</p><div id="4922"><pre>mySecretKey := os.<span class="hljs-built_in">Getenv</span>(<span class="hljs-string">"MY_SECRET_KEY"</span>)</pre></div><h1 id="e288">Using Taskfile for auto executing commands</h1><p id="a2a5">A good development practise is to keep a list of commands to execute defined in a Makefile, which we can easily reference later on and execute with simple make commands.</p><p id="d6c8"><b>Taskfile</b> is a slightly more contextually verbose and human readable alternative to Makefile. Install it on your local machine with the instructions mentioned here: <a href="https://taskfile.dev/installation/">https://taskfile.dev/installation/</a></p><p id="ce90">Now, in the root of your project directory, just make a new Taskfile:<

Options

/p><div id="27ad"><pre><span class="hljs-built_in">touch</span> Taskfile.yml</pre></div><p id="dec6">Now we can simply define a list of commands as follows:</p><div id="16de"><pre>version: <span class="hljs-string">"3"</span>

tasks: build: desc: Build the app cmds: - GOFLAGS=-<span class="hljs-built_in">mod</span>=<span class="hljs-built_in">mod</span> <span class="hljs-built_in">go</span> build -o bin/<span class="hljs-built_in">go</span>-<span class="hljs-built_in">rest</span>-api internal/main.<span class="hljs-built_in">go</span>

run: 
    desc: Run the app
    cmds:
    - GOFLAGS=-<span class="hljs-built_in">mod</span>=<span class="hljs-built_in">mod</span> <span class="hljs-built_in">go</span> run internal/main.<span class="hljs-built_in">go</span></pre></div><p id="5afd">and so on.</p><p id="a47a">Quite handy for executing a bunch of complicated terminal command with short and simple, easy to type and remember notations.</p><h1 id="cfba">Bonus: Awesome list of Go Packages</h1><p id="6555">If you’re searching for a library for a specific use case in your project, it is much better to look through this GitHub repository and find a package that suits your purposes.</p><p id="4099">There are tools ranging from simple debugging for your Go programs all the way to Natural language processing libraries! Here is the repo link: <a href="https://github.com/avelino/awesome-go">https://github.com/avelino/awesome-go</a></p><h1 id="fd04">A few parting words</h1><p id="a463">So there you a few of the utilities that are so very crucial to be aware of for writing Go software. I personally had to sift through a vast number of websites when I was learning them, so curating these tasks and tools here in one place is a great way to reduce that giant inconvenience!</p><p id="60f2">I just saved ya’ll a few hours of frustration over conflicting StackOverflow answers. See you next time!</p><p id="6f68">If you want to read more from me, you should subscribe here:</p><div id="eb88" class="link-block">
      <a href="https://ipom.medium.com/membership">
        <div>
          <div>
            <h2>Join Medium with my referral link - Yash Prakash</h2>
            <div><h3>Read every story from Yash Prakash (and thousands of other writers on Medium). Your membership fee directly supports…</h3></div>
            <div><p>ipom.medium.com</p></div>
          </div>
          <div>
            <div style="background-image: url(https://miro.readmedium.com/v2/resize:fit:320/0*X0oHVVGUAd0rlobJ)"></div>
          </div>
        </div>
      </a>
    </div><p id="e79c"><b>A couple other articles from me that may strike your fancy:</b></p><div id="1adb" class="link-block">
      <a href="https://towardsdatascience.com/the-easy-python-ci-cd-pipeline-using-docker-compose-and-github-actions-80498f47b341">
        <div>
          <div>
            <h2>The Easy Python CI/CD Pipeline Using Docker Compose and GitHub Actions</h2>
            <div><h3>Continuously deploy a real world project on a VPS</h3></div>
            <div><p>towardsdatascience.com</p></div>
          </div>
          <div>
            <div style="background-image: url(https://miro.readmedium.com/v2/resize:fit:320/0*jTbFhBlhQf99WvyL)"></div>
          </div>
        </div>
      </a>
    </div><div id="dce2" class="link-block">
      <a href="https://betterprogramming.pub/the-easy-python-auto-code-formatting-guide-e8300c82797b">
        <div>
          <div>
            <h2>The Easy Python Auto-code Formatting Guide</h2>
            <div><h3>Set them up just once and write and auto-format your code upon commits — hassle-free with these tools.</h3></div>
            <div><p>betterprogramming.pub</p></div>
          </div>
          <div>
            <div style="background-image: url(https://miro.readmedium.com/v2/resize:fit:320/0*OHB1gLmQ0WkRpApw)"></div>
          </div>
        </div>
      </a>
    </div></article></body>

Golang Development Utilities You Should Know

How to easily make use of simple yet meaningful development tools in your Go projects

go logo

Install a specific version of Go— if you do not have an existing one

The documentation page for this step: https://go.dev/doc/install

Go to your specific operating system and follow the steps.

Installing a specific version of Go — if you do have an existing older version installed

The documentation page for this step is again: https://go.dev/doc/install

For this, you need to perform a few extra steps.

Go to your terminal and enter:

$ go version
go version go1.16.7 darwin/amd64
$ which go
/usr/local/go/bin/go

First you need to remove the existing installation:

sudo rm -rf usr/local/go

Now type:

$ which go
No go version found
$ go version
go not installed

Great, now follow the steps here to install a newer version: https://go.dev/doc/install

If you installed a newer go version in the middle of your project…

and you do not have any existing packages installed

The cleanest way to switch your project’s go.mod file to the latest Go version is by following these couple of steps:

  1. Remove the line: go 1.16 or whatever versison you have from your go.mod file.
  2. In the terminal, run: go mod tidy. This will bring your Go project to the latest version.

If you convert your existing project to another go version…

and you have existing packages installed

Follow these two steps:

  1. Enter the following command:
go mod edit -go <new-go-version>
# for example
go mod edit -go 1.19.1

2. Then:

go mod tidy

Active compiling on save in a project

Air is a great utility Go package that helps rebuild and execute the project’s main.go on save or virtually any files on save (as we want it) without us typing it out to run it every single time.

So there’s no need to do: go run main.go every time we make a change in our project. Simple saving the file we were working on will reload it.

It’s a very handy when developing larger projects and saves quite a lot of development time too.

Here’s how to set it up:

  1. Make sure you have your go paths set up: go open up your bash or zsh profile file and include the following lines there:
# if using zsh
open ~/.zshrc
# include these lines at the bottom of the file
export GOPATH=$HOME/go
export PATH=$PATH:$GOROOT/bin:$GOPATH/bin
export PATH=$PATH:$(go env GOPATH)/bin

2. Install air in your project directory:

go install github.com/cosmtrek/air@latest

3. Use air:

air init

This will create a new .air.toml file in your project’s root directory. Then enter:

air

And it will start watching for changes in your project!

For example, if we were making a REST API with the Gin web framework, we’ll see something of the sort in our terminal:

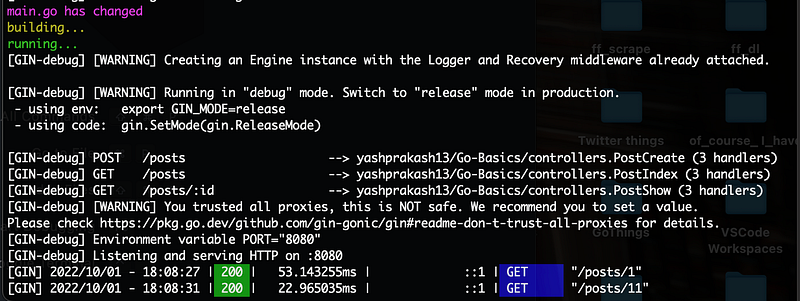
The verbose output you see here can all be configured using the .air.toml config file for air.

Looks very neat, doesn’t it?

How to use environment variables in a Go project

Using the Go package GoDotEnv, we can read and access key value pairs of secrets such as Database URL, username and password, server directory paths, SSH keys, etc from .env files in our project.

The first step is to install this package:

go install github.com/joho/godotenv/cmd/godotenv@latest

Now, make a .env file in your project folder and save your secrets there.

For access in our project, in our main.go file, we can simply do:

import (
    "log"
    "os"

    "github.com/joho/godotenv"
)
func init(){
    err := godotenv.Load()
    if err != nil {
        log.Fatal("Error loading .env file")
    }
}

Running it inside the init function makes sure it gets called before the main function.

Getting any secret will then be possible by using:

mySecretKey := os.Getenv("MY_SECRET_KEY")

Using Taskfile for auto executing commands

A good development practise is to keep a list of commands to execute defined in a Makefile, which we can easily reference later on and execute with simple make commands.

Taskfile is a slightly more contextually verbose and human readable alternative to Makefile. Install it on your local machine with the instructions mentioned here: https://taskfile.dev/installation/

Now, in the root of your project directory, just make a new Taskfile:

touch Taskfile.yml

Now we can simply define a list of commands as follows:

version: "3"

tasks:
    build:
        desc: Build the app
        cmds:
        - GOFLAGS=-mod=mod go build -o bin/go-rest-api internal/main.go 

    run: 
        desc: Run the app
        cmds:
        - GOFLAGS=-mod=mod go run internal/main.go

and so on.

Quite handy for executing a bunch of complicated terminal command with short and simple, easy to type and remember notations.

Bonus: Awesome list of Go Packages

If you’re searching for a library for a specific use case in your project, it is much better to look through this GitHub repository and find a package that suits your purposes.

There are tools ranging from simple debugging for your Go programs all the way to Natural language processing libraries! Here is the repo link: https://github.com/avelino/awesome-go

A few parting words

So there you a few of the utilities that are so very crucial to be aware of for writing Go software. I personally had to sift through a vast number of websites when I was learning them, so curating these tasks and tools here in one place is a great way to reduce that giant inconvenience!

I just saved ya’ll a few hours of frustration over conflicting StackOverflow answers. See you next time!

If you want to read more from me, you should subscribe here:

A couple other articles from me that may strike your fancy:

Golang
Programming
Technology
Github
Coding
Recommended from ReadMedium