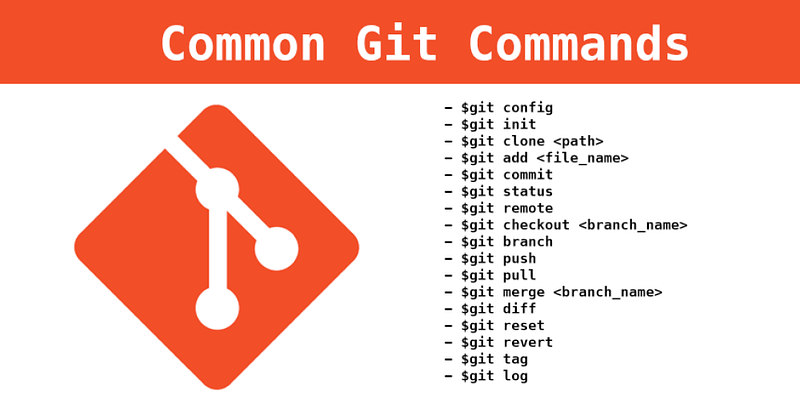
Git basics: a step-by-step tutorial
A gentle beginner’s tutorial on how to use Git
What is Git?
Git is distributed version control system. It allows for multiple programmers to work on the same project.
If you intend to work in data science, quantitative analysis, or any role that requires programmers or coders collaborating, you will probably have to cross paths with it. At first Git can be quite intimidating to learn. It can also be quite confusing. This gentle tutorial will hopefully alleviate you from some of these fears.

Setting up Git
First, you can download Git from the website below.
Launch Git bash after installing it. Firstly, check the version of Git you have. Mine is shown below.
git --version
Set local configuration variables
git config --global user.name "Name"
git config --global user.email "[email protected]"
git config --list
At any time you can ask for help by typing the --help command in Git bash. For instance, if you wanted help on the config verb, you could type the following:
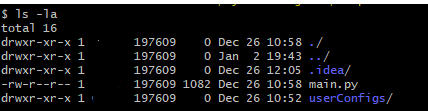
git config --helpInitialize a repository from existing code. Here I have a simple folder where I have a Python script called main.py and a few other folders. Yours obviously would be different. Let’s track this generic project with Git.
To initialize, we type the command:
git init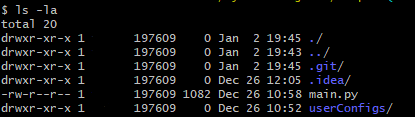
You will realize that the git init command has created a .git file in the directory.
If for some reason you want to remove from the code repository, you can type:
rm -rf .gitThis will remove the .git file from the directory. Of course, don’t do this just yet. We have a lot more to do!
Before we commit to anything we can check the status of our project.
git status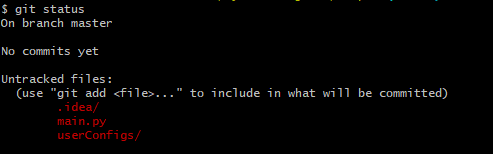
As you can see, there are no commits yet. This is because we haven’t committed anything yet!
Now say the .idea file and userConfigs are files/folders that you might not want to track changes on. You can use a simple “gitignore” text file list all the files you want Git to ignore. You can do this by:
touch .gitignoreAnd then go and edit that file. For instance, I did this in notepad.

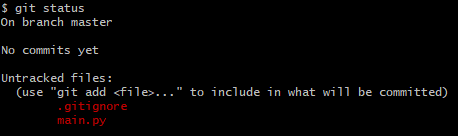
Now if you run git status again, you will notice that the .idea and userConfigs are not longer there anymore. Great!
Some Git Theory
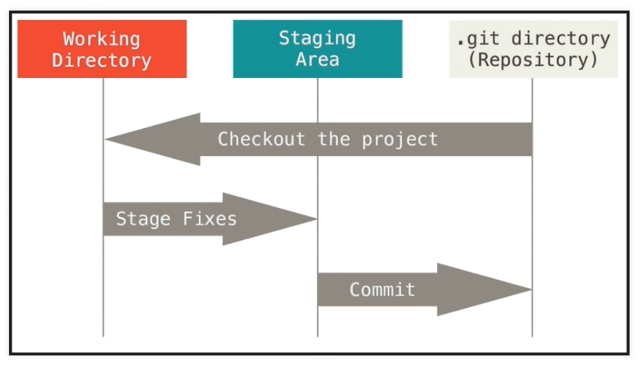
There are three states in Git that we need to know about.
- Working Directory
- Staging Area — this is where we organize what we want to be committed to the repository
- Repository — this is our local repo
This visual will hopefully give you an idea of the relationship between each stage.
So far, we’ve simply been playing at the working directory stage. Next we need to know how to add files to the staging area, ready to be committed to the local repository.
Add files to the Staging Area
As you can see both files are currently just sitting in our working directory untracked.
We need to move them into the Staging Area.
Say we want to add main.py we can run
git add main.pyThen if we run git status again:
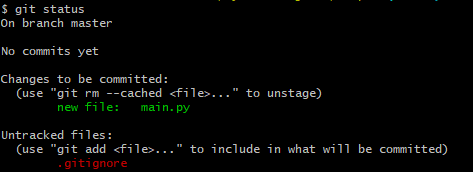
You can now see that main.py is now pushed into the staging area ready to be committed. Furthermore, you can see that .gitignore is still currently untracked.
Add all files to the staging area:
git add -A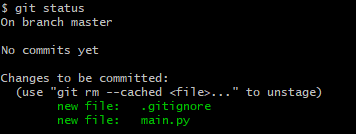
Perfect! Now both files have been added to the staging area.
Removing files from the Staging Area
If you want to remove files from the staging area, you can use the git reset command. For instance, if you want to remove main.py from the staging area:
git reset main.pyIf you want to remove all files from the staging area, you can simply type:
git resetCommit from Staging Area to the Repository
Now that we have the files we need in the staging area, we are going to commit them to the repository.
We commit by typing:
git commit -m "type a message here"Make sure your message makes sense for future reference. It is good to be precise on exactly what changes you have made.
This is our first commit.
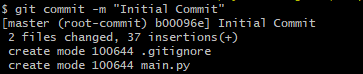
Now when we run git status we find there is now nothing in the staging area.

We can also check the commits we have made by looking at the log.
git logSometimes Windows Explorer doesn’t show the .git folder. If that is the case for you, you need to set it so that you are able to see hidden files. You can do this by following the instructions in the link below.
So far, we have explored all three Git states on our local repository. Often we work in teams of more than one. Next we need to know how to copy a remote repository. This is what the next section is all about.
Cloning a Remote Repository
In real life, when you’re working in a team, you will need to clone an remote repository onto your local machine. You can do this with the following command:
git clone <url or directory>If you’re simply starting out, you might not have a remote repository to clone from. So this is what we’re going to do instead.
You’re going to create another folder in your drive called clone/
And you’re going to clone from one directory to another. In my case:

This is because my original repo was in a folder called ‘sample’. Yours would be different of course.
Now you should be able to see a clone of your ‘not so remote’ repository.
If you type in the following command:
git remote -vThis will give you information on your local repository. Furthermore,
git branch -aThis will list all the branches, locally and remotely for this project.
Making a Change
Let us now make a change to a file in the clone repository. After making a change to a file, you can run:
git diffThis is list all the changes to the existing files you have made.
If you add a new file to the cloned repo, you can run the below to see new files and modified files.
git statusNow we need to add them to the staging area by running:
git add -AThen we can run something like this to commit from the staging area:
git commit -m "newChange file added"
Ok, so now that we have made the changes locally, we’re going to push these changes up to the remote repository so others can see.
Pushing it Back up to the Remote Repository
Before we push things up to the remote repository, we need to pull from it to make sure that during the time we’ve been working on our own changes, there hasn’t been any changes in the remote repository that we cloned from.
git pull origin master
If things are good, we will get a reply that everything is already up to date. Now we can push.
git push origin masterNow you have pushed your changes back up to the remote repository!
Branching
Often when you’re working on a large project, different aspects of the project can be worked on it different branches. Different users can also work on different branches. Branches can later be merged.
To check the branches you currently have:
git branchMost likely, you will only have the master branch.
To add a new branch you can simply type:
git branch newBranch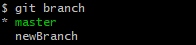
The one with the asterisk on is the one that you’re currently working in.
If you want to switch branches you can see the checkout verb.
git checkout newBranch
This will switch you to the new branch!
Now you can go ahead and make some changes to your files. You can see the changes you made by git status .
After making some changes, you can commit to your new branch
git add -A
git commit -m "changes to new branch ... blah"
After we have done that, we can push our new branch into our remote repository.
git push -u origin newBranchNow if we run git branch -a , we can see all the branches (local and remote):
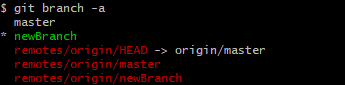
You can see that our local newBranch has been pushed up to the remote repository.
The idea of this is that others can review the changes you have made in the branch, run unit testing etc. Once everything is OK, you can merge the newBranch to the master. In the next section, we will be talking about merging branches.
Merge Branches
To merge branches, you first have to merge your branch locally with your local master. Then you can push this up to the remote repository.
So first, you need to be in your local master:
git checkout master
git pull origin master
Then you can merge your branch into the master:
git merge newBranch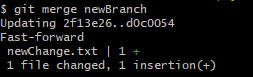
Then finally, you can push up to the remote repository:
git push origin masterDeleting Branches
Once we have pushed our changes from the branch to the master, we can delete our branch local:
git branch -d newBranch
We can also delete the branch from the remote repository:
git push origin --delete newBranchWe can check the branches left by:
git branch -aPutting it all together
- Create a new branch to work on a new feature
git branch newFeature
git checkout newFeature
2. Work on code for the new feature
3. Check modifications we have made, add to staging directory and commit locally
git status
git add -A
git commit -m "New Features"
4. Push to remote repository
git push -u origin newFeature5. Once everything is ok, merge to local master
git checkout master
git pull origin master
git merge newFeature
6. Push to remote repository
git push origin masterAll done!