
Getting Started with the OpenAI API with Postman
OpenAI has been in the headlines since it launched tools such as DALL·E 2, Jukebox, and ChatGPT. OpenAI tools have a web interface but also an API that can be used to integrate these tools into your own applications. In this blog post, we will look at how to use the OpenAI API in Postman, a popular API development and testing tool.
Last update: March 2023
Getting an API key for OpenAI
OpenAI is a research laboratory focusing on creating and promoting friendly artificial intelligence. The company has an API (Application Programming Interface) that allows developers to access and utilize the power of its AI models in their own applications.
To create an OpenAI API key, you will need to have an OpenAI account. Here is the process for creating an OpenAI API key:
Step 1. Go to the OpenAI website and sign up for an account: https://platform.openai.com/
Step 2. After you have created an account, log in to your OpenAI account.
Step 3. In the top right corner of the screen, click on your account name and then select “API Keys” from the drop-down menu.
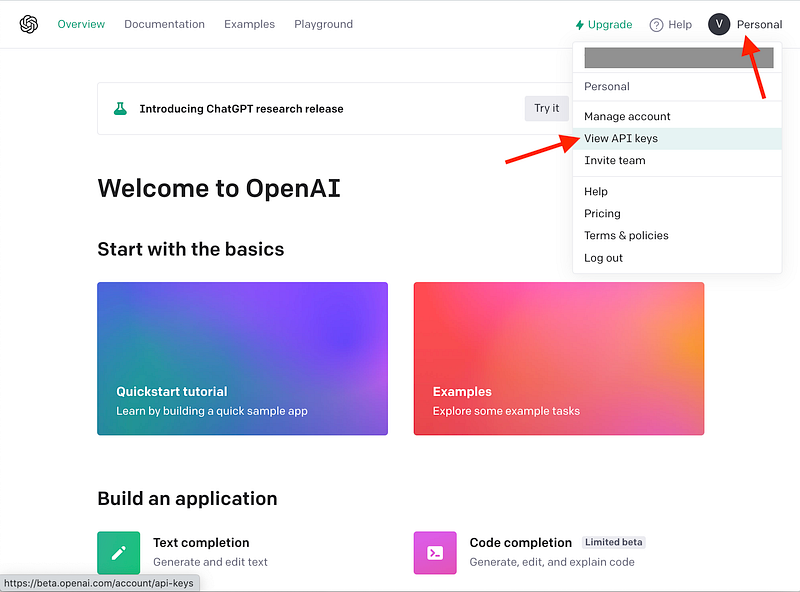
Step 4. On the API Keys page, click the “Create new secret key” button.

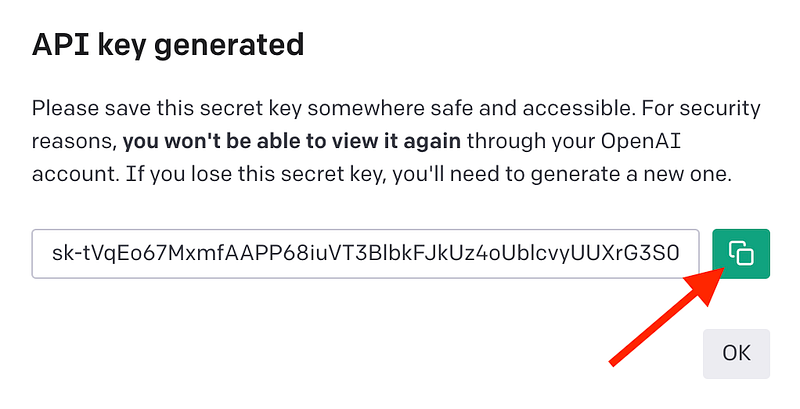
Step 5. The API key will be displayed on the screen. Make sure to copy the key and store it in a secure location, as it will not be shown again. You can also leave this page open for now.
Once you have an API key, you can start using the API in Postman.
Accessing the OpenAI API from Postman
To ensure everything is working fine, let’s first run a very simple request from Postman: let’s try and get a list of all available models in OpenAI.
Step 1. Open Postman and create a new request. You can do this by clicking on the “New” button in the top left corner of the Postman window.
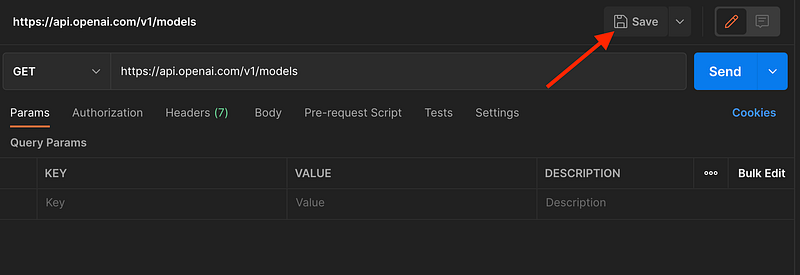
Step 2. In the “New Request” dialog, make sure the “GET” method is selected and enter the following URL:
https://api.openai.com/v1/models

Step 3. To save this request in a collection in Postman, click the “Save” button in the top right corner of the request window.
In the “Save Request” window that appears, click on “New Collection”.

Create a new collection named “OpenAI”. You can enter a name for the collection in the field that appears.

Name the request “List models”. When you are finished, click the “Save” button to save the request to the selected collection.

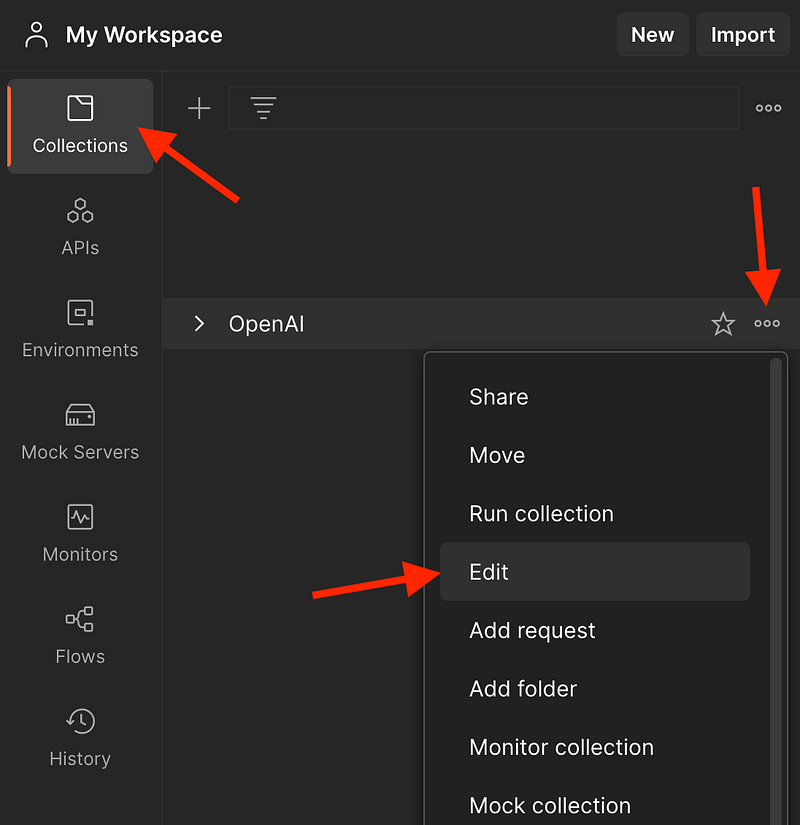
The request will now be saved in the selected collection and can be accessed from the “Collections” tab on the left side of the Postman window.
Step 4. Locate the collection, open the context menu and click on “Edit”.
Step 5. Click on the “Authorization” tab, and from Type, select “Bearer Token”.
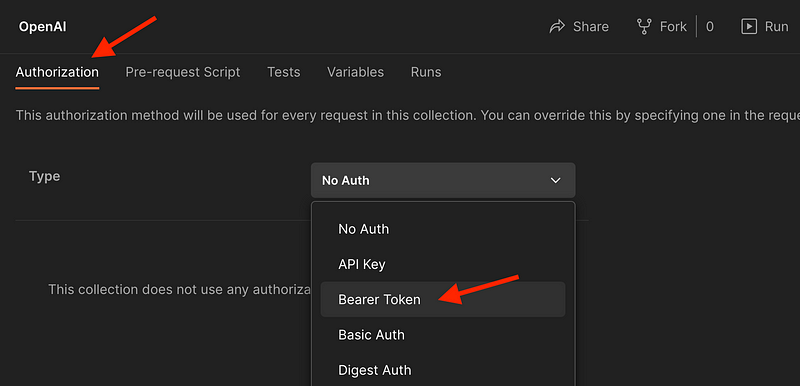
In the “Token” field, paste the OpenAI API key you have previously generated.

Step 6. Select the token value, and you should see the dialog “Set as variable” appearing.

Select “Set as a new variable” and name the variable openAIToken. Select the “Collection” scope and click on “Set variable”.

Finally, save all changes in the collection by clicking on “Save”.

Step 7. Go back to the “List models request and click the “Send” button to send the request to the OpenAI API. The response from the API will be displayed in the “Response” section of Postman. The response status code should be 200 OK.

Creating well-researched and to-the-point content requires a lot of time and energy. If this was helpful and you wish to support me, please leave a comment, share, and press that 👏 a few times (up to 50 times). And consider subscribing to Medium.
You can now use Postman to make requests to the OpenAI API and use its various models and functions.
Remember to save any new requests in the OpenAI collection so that they can inherit the authentication information that is configured in the collection.
Using the Completions API from OpenAI
You can use the Completions API to get answers that are somewhat similar to the ChatGPT using the text-davinci-003 model. Let me show you how.
To use the Completion API from OpenAI in Postman, you will need to have a valid API key. If you haven’t done this yet, follow the steps above. Once you have an API key, you can use it to make requests to the Completion API using Postman. To do this, follow these steps:
Step 1. In Postman, click the “New” button to create a new request.
Step 2. In the “New Request” window, select “POST” as the HTTP method and enter the following URL: https://api.openai.com/v1/completions

Step 3. Save the request as “Create completion” inside the OpenAI collection. To do this, click on the “Save” button, select the OpenAI collection and rename the request. Finally, click on Save. This step is essential as the API key is stored only in the OpenAI collection.
Step 4. In the “Body” tab, select the “raw” option and enter the following JSON payload in the text area:
{
  "model": "text-davinci-003",
  "prompt": "What gifts should I buy for Christmas?",
  "max_tokens": 64,
  "temperature": 0.5
}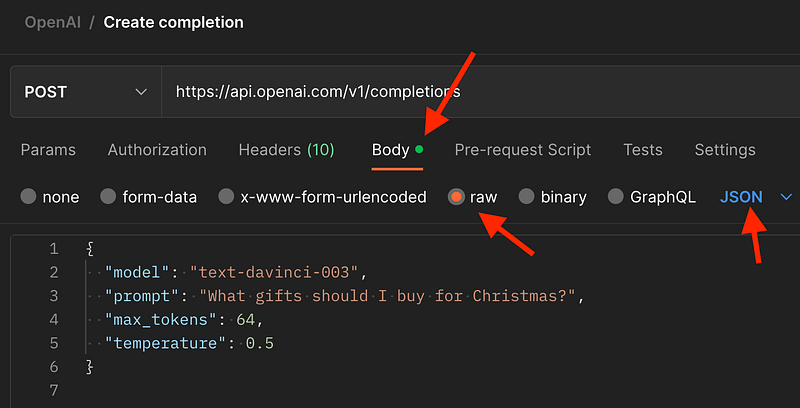
Step 5. Click the “Send” button to send the request to the OpenAI API. The response from the API will be displayed in the “Response” section of Postman, and the body should contain gift ideas.

If you want to learn how to use Postman for API testing, I have created an online course that starts with the basics of Postman and helps you understand the fundamentals of API testing. Learn more about the course.
A quick overview of OpenAI-specific terms and concepts
Now that the request works let’s clarify a few technical aspects. If you are new to AI, you are probably wondering about the parameters we have submitted in the request. Let’s briefly explain what this means.
Model
The text-davinci-003 model is a language generation model developed by OpenAI. It is capable of generating human-like text in a variety of styles and formats, including news articles, stories, and poems.
The text-davinci-003 model is based on the GPT-3 (Generative Pre-training Transformer 3) architecture, which uses transformer layers to process and generate text. It is trained on a massive dataset of internet text, including books, articles, and websites, and has been fine-tuned on specific tasks such as translation, question answering, and language modeling.
The text-davinci-003 model is one of the most advanced and powerful language generation models currently available and is capable of generating coherent and expressive text. It can be used for a variety of applications, including content creation, language translation, and conversational AI.
Prompt
A prompt is a piece of text or a set of instructions that is used as input to a language generation model. The model uses the prompt as a starting point to generate text based on the content and style of the prompt.
When making a request to the API, you can specify a prompt in the request payload, along with other parameters, such as the length and style of the generated text. The API will then use the prompt to generate text and return the result in the API response.
Token
In the context of natural language processing and language generation, a token is a unit of text that is used by a model to represent language input and output. Tokens can be words, punctuation, or other types of symbols, depending on the model and the task at hand.
Tokens are often used in language generation models to process and generate text. For example, a model might take a sequence of tokens as input and generate a new sequence of tokens as output. The model can use the tokens to represent the meaning and structure of the input and output text and to manipulate it in various ways.
I know this sounds a bit confusing, so allow me to give a practical example from the OpenAI documentation. A token is about 4 characters in English. If we scale it up a bit, 100 tokens are 75 words. This information is relevant to the cost of using the API. [2]
If you look closely at the response body in the previous example, you will see how many tokens have been used in the process.

So the property max_tokens is a way to control the output size and the associated cost. Each model also has a limit of tokens it can output, typically between 2048 and 4096 tokens.
Temperature
The temperature setting has nothing to do with the temperature of the CPU or GPU running the AI or the weather outside. It is actually an abbreviation for temperature sampling. As Ben Mann explains, “Temperature sampling is inspired by statistical thermodynamics, where high temperature means low energy states are more likely encountered.” [3]
Temperature is a value that is typically set between 0 and 1, with higher values indicating more random and creative output and lower values indicating more predictable and conservative output.
For example, a model with a high temperature might generate more diverse and unpredictable text, while a model with a low temperature might generate more repetitive and predictable text.
Is OpenAI free?
OpenAI seems like a free service, but it is not. OpenAI offers a fair, pay-as-you-go pricing model. You essentially need to buy tokens. For the Davinci model, 1,000 tokens cost around US $0.02.
However, when you create a new account, you get $18 in credits you can start using any OpenAI products in the first three months. [4]
Explore more endpoints
In this tutorial, we have just covered the basics of using the OpenAI API. If you look over the OpenAI API reference, you will see that there is so much more to be done. Let me know by posting a response below which topics or endpoints I should cover next.
Conclusion
I hope this tutorial helped you get started with the OpenAI API in Postman. Leave a comment in the section below if you have any questions. I would love to hear from you!
Thank you for sticking with this article until the end. If you enjoyed it, please leave a comment, share, and press that 👏 a few times (up to 50 times). It will help others discover this information, and maybe it will help someone else as well.
Follow me on Medium and YouTube if you’re interested in more tutorials like this.
References
- [1] (n.d.). API Reference. OpenAI. Retrieved December 18, 2022, from https://beta.openai.com/docs/api-reference/
- [2] Khan, T. (n.d.). What are tokens and how to count them? OpenAI Help. Retrieved December 18, 2022, from https://help.openai.com/en/articles/4936856-what-are-tokens-and-how-to-count-them
- [3] Mann, B. (2019, May 25). How to sample from language models. Towards Data Science. Retrieved December 18, 2022, from https://towardsdatascience.com/how-to-sample-from-language-models-682bceb97277
- [4] (n.d.). Pricing. OpenAI.com. Retrieved December 18, 2022, from https://openai.com/api/pricing/


