
TECH BASICS, CODEX
Getting Started with Service Mesh and Istio
Part-1: Communication
If you are in modern software design field, you might have heard of service mesh architectures primarily in the context of Microservices. In this post my target is to give you basic understanding of Service Mesh and a popular Service Mesh solution Istio.
Let’s get started now. In all computing services, systems interact with each other to perform specific function or job. This communication may have certain specifications like encryption, protocol, ports, load balancing etc. This creates a sort of architectural challenge, that how all these components interact with each other and how should they communicate ? And the most prominent one, how we are going to manage this ? This gets pretty complex if you put Microservices or SOA (Service Oriented Architecture) based architecture in between.
Part-2: Monolithic Applications
Monolithic applications followed 3 tiered architecture and all components tend to tightly coupled with each other. Most of the time you will find all modules are packaged together as a single deployable unit of execution. These systems start small but tend to grow over time to meet business needs and eventually becoming very huge. Single package deployment, tightly coupled components etc create huge overload on Application Build, Management, Maintenance and DevOps cycle. To sort these issues modern systems have started looking at Microservices based Architecture. The system with multiple smaller components allowed IT Teams to handle requirements more gracefully.
Part-3: Microservices based Architecture
Large monolith applications are being decomposed into number of individual services to adapt Microservices based architecture, more suitable for modern deployment.
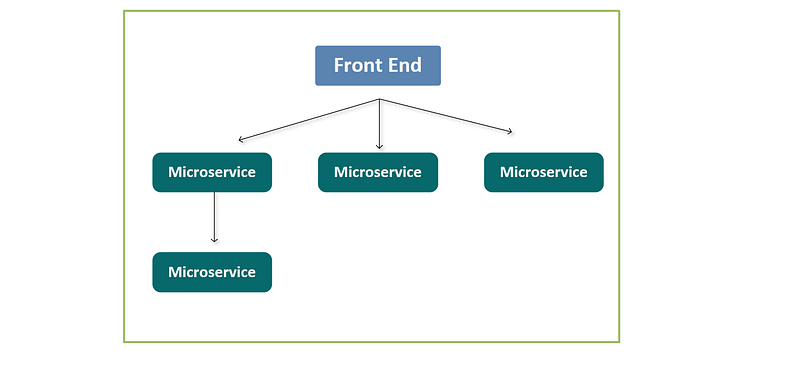
It creates network of services, each performing a specific business function. In order to execute its function, one service might need to request data from several other services. Microservices are built independently, communicate with each other, and can individually fail without escalating into an application-wide outage. The exponential growth in Microservices create challenges like routing between multiple services/versions, authentication, authorization, encryption, and load balancing etc within a Kubernetes cluster. At the end, this operational overhead has ability to sink the Microservices ship as well.
Part-4: Service Mesh
Before we proceed let’s ask few questions first ?
Who has helped to manage Microservices deployment workload ? What Service Mesh is doing in Microservices based deployment ?
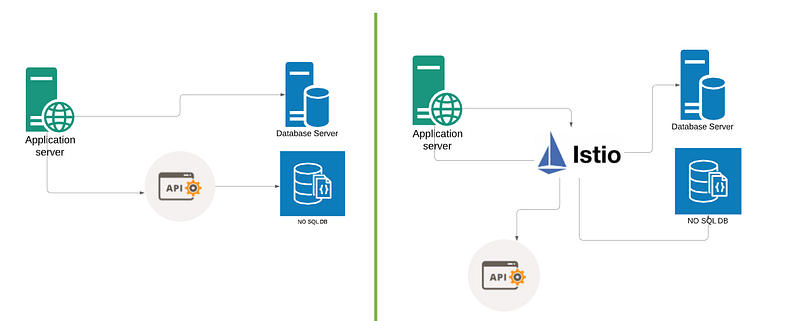
Containers/Container Orchestrator became the primary way to handle Microservices workload and Service Mesh sorted the inter-process communications challenges. In simple statement, Service Mesh manages the network traffic between services. Think of Service Mesh as a courier service who handles shipment for components. Now replace components with PODs and shipment with Data Packets.
Service mesh is the component or architecture pattern which separates this communication from components and abstracts it to a layer of infrastructure. Service mesh was born to improve agility in Microservices and are designed to solve the many challenges faced by Developers/DevOps. Service mesh has gained popularity since 2017, and it is still evolving.
How Service Mesh can help:
- Traffic Management
- Security — Authentication/Auth Encryption
- Monitoring
We can view service mesh as a decoupling agent. E.g.: Consider a situation, where there are multiple services which have to interact with each other. All communication need to be secure and encrypted. In this scenario, instead of Developer writing lines of code to work on SSL or identity, you can implement all of it using Service Mesh. So OPs can handle the security /identity part and Dev can work on other features. This is pretty common scenario in cloud-native deployments.
Doubt !
In Kubernetes, Service object provide similar kind of features like service to service communication out of the box, then why we need Service Mesh ?
Explanation
Actually Service Object in Kubernetes is kind of basic Service Mesh with limited capabilities. It has few features which can help in small deployments but we can not solely depend on K8s Service object for large scale deployments.
Part-5: Istio
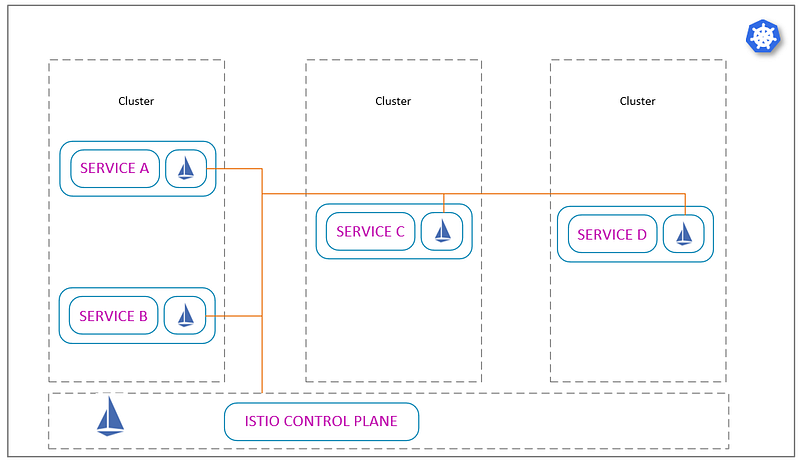
Istio is an open source service mesh designed to help in maintaining reliable service-to-service connections. Istio is by far the most popular service mesh that works with Kubernetes very well.
- Open Source
- first release in 2017
- platform agnostic
Part-6: Istio Architecture
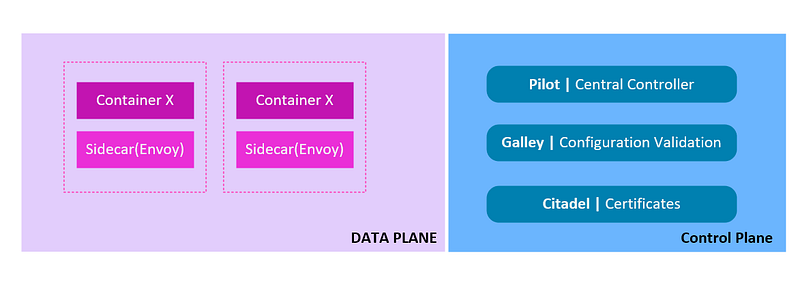
An Istio service mesh can be logically split into two components, a data plane and a control plane.
- Data Plane — The Istio data plane is typically composed of Envoy proxies that are deployed as sidecars within each container on the Kubernetes pod.
- Control plane — The control plane manages and configures the proxies to route traffic. It also stores and manages the Istio configuration.
Istio has 2 core component -
- Envoy- Proxy Component, deployed as sidecar to interact with interact with data plane traffic.
- Istiod- Istiod converts high level routing rules that control traffic behaviour into Envoy-specific configurations and propagates them to the sidecars at runtime.
> — — — — — — Control Plane Components— — — — — -<
The control plane is shipped as a single binary Istiod and made of three components: Pilot, Citadel, and Galley.
Pilot Istio’s component that is responsible for configuring the data plane is called Pilot. It is responsible for communicating with the Envoy sidecars.
Citadel Citadel is the component that allows developers to build zero-trust environments based on service identity rather than network controls. It helps you in securing communication between k8s components.
Galley Galley provides configuration management services for Istio. It’s the interface for the underlying APIs with which the Istio control plane interacts. If new policies come in picture then Galley validates, process and deploy them.
You would have heard about Mixer component as well. Mixer has been deprecated now. The functionality provided by Mixer has been moved into the Envoy proxies. Use of Mixer with Istio will only be supported through the 1.7 release of Istio.
> — — — — — — Data Plane Components — — — — — -<
Istio Data plane components are made of Envoy Proxies. These are layer 7 proxy. All traffic moves through these Envoy proxies. Istio provides few addons for monitoring and visualising this data. Responsible for :
- Service Discovery
- Health Checks
- Routing
- Load balancing
- Authentication
- Authorisation
- Observability
Part-7: Istio Installation
Before you move on, I assume you have clear understanding of following concepts:
- Kubernetes
- Operators
- Kubernetes Objetcs
Installation of Istio can be achieved via multiple ways. I will cover it using istioctl utility. I assume you have working kubernetes cluster and cluster-admin privileges available with the user.
Download and install the Istio istioctl client binary. This binary will take care rest of the configuration deployment for you. This library will be on client machine and can help you to manage Istio cluster.
istioctl utility deploys Istio operator in Kubernetes cluster. This operator will help you to manage Istio components.
arun@ubuntu:~/istio$ ISTIO_VERSION=1.7.3
arun@ubuntu:~/istio$
arun@ubuntu:~/istio$ curl -sL "https://github.com/istio/istio/releases/download/$ISTIO_VERSION/istioctl-$ISTIO_VERSION-linux-amd64.tar.gz" | tar xz
arun@ubuntu:~/istio$ sudo mv ./istioctl /usr/local/bin/istioctl
arun@ubuntu:~/istio$ sudo chmod +x /usr/local/bin/istioctl
arun@ubuntu:~/istio$
Once you have downloaded this istioctl, initialise it.
Doubt !
How istioctl is connecting to Kubernetes Cluster ?
Explanation !
By default it is using kubeconfig file on your default location. You can pass custom config details as well. Refer the documentation.
arun@ubuntu:~/istio$ istioctl operator init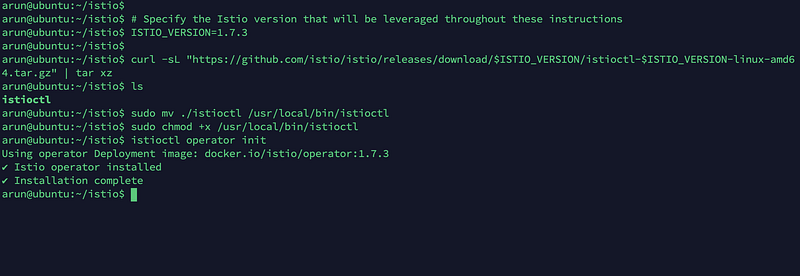
Once done, lets check the detail in kubernetes cluster. This utility will create required objects and operators in kubernetes to run Istio Service Mesh. Istio Operator is installed into the istio-operator namespace.
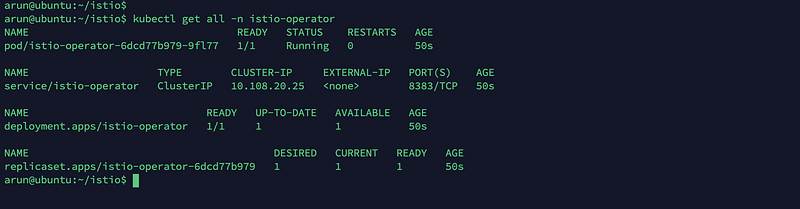
Now Operator is ready to manage/deploy Istio !
Istio components Deployment
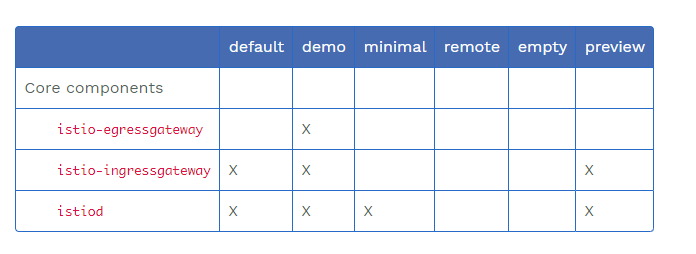
Istio comes up with built-in configuration profiles that can be used while deploying Istio components.
- default
- demo
- minimal:
- remote:
- empty:
- preview:
For more details on profiles, visit Istio documentation. We will use default profile.
If you want to list what profiles are available, run following command;
arun@ubuntu:~/istio$ istioctl profile listIf you want to view the configuration for default profile, you can dump is using following command.
arun@ubuntu:~/istio$ istioctl profile dump default > profile.yamlLet’s install default profile. Do you know we can customise the profile as well. We can customise what addons we want to install, configuration etc.
Create a file with following customisation details. [https://istio.io/latest/docs/reference/config/istio.operator.v1alpha1/]
(IstioOperatorSpec defines the desired installed state of Istio components. Optionally you can install add-ons as well.)
#istio_default.yaml
apiVersion: install.istio.io/v1alpha1
kind: IstioOperator
metadata:
  name: istio-cp
spec:
  profile: default
  addonComponents:
    grafana:
      enabled: true
    prometheus:
      enabled: true
    tracing:
      enabled: true
    kiali:
      enabled: true
  values:
    kiali:
      dashboard:
        auth:
          strategy: anonymous
Once you are ready with the file, apply it via using kubectl utility.
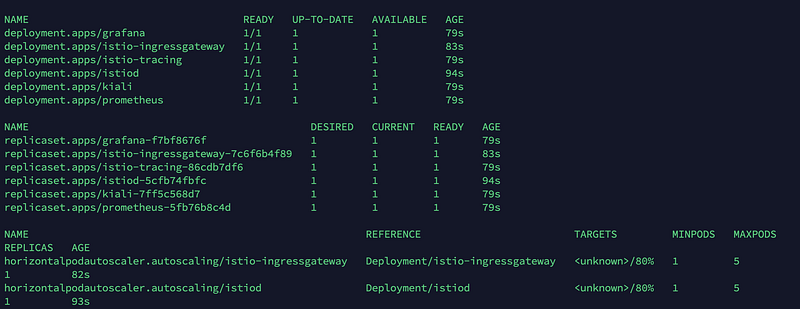
arun@ubuntu:~/istio$ kubectl create ns istio-systemarun@ubuntu:~/istio$ kubectl apply -f istio_default.yaml -n istio-systemIt will start deploying Istio components. Once it is done, you are ready with Istio ! You can list all deployments in namespace istio-system.
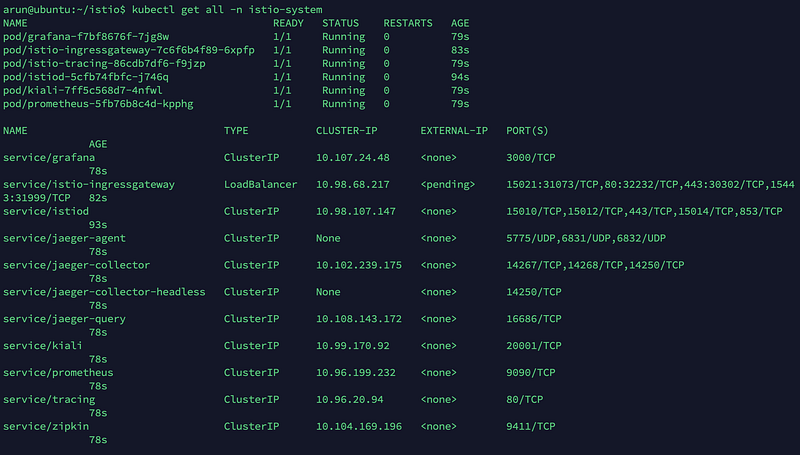
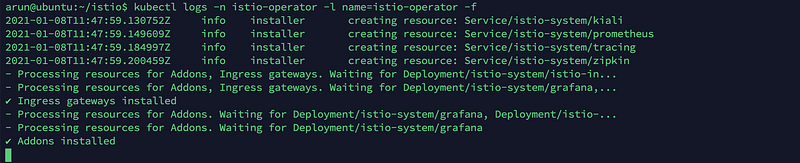
You should verify logs as well.
To access the addons which we deployed (remember the config file) use istioctl utility. Let’s test grafana dashboard.
arun@ubuntu:~/istio$ istioctl dashboard grafana
Utility will port-forward the connection to dashboard on 3000. You can access it now on localhost.

This is the way, you can access other add-on as well. The next step will be to deploy your application and manage communication via Istio, that I will cover in upcoming posts.
If you want to remove everything :-
kubectl delete istiooperator istio-cp -n istio-system
istioctl operator remove
kubectl delete ns istio-system
kubectl delete ns istio-operator
Keep learning ! Stay safe.