Getting Started With .NET 8: Seamless Setup With DevContainers
Find out how to take it for a test run!

The relentless march of the .NET release schedule continues at an impressive pace! Even though the gloss on version 7 hasn’t had a chance to fade, version 8 stands on our doorstep, poised for release in November 2023. The .NET team has announced a wealth of new features to pique our curiosity. And to make sure we are all paying attention, they have already rolled out five preview versions.
I usually enjoy getting hands-on with new tools and technologies before they’re officially released, and .NET 8 is no different. However, this can lead to an accumulation of installed SDK versions, cluttering my development machine. To avoid this, I lean on DevContainers, which help me keep my dev environment clean and organized. In this post, I’ll walk you through this approach, illustrating how to use a DevContainer to explore all of the new features in .NET 8 while keeping your machine clutter-free.
As with all of my previous DevContainer posts, the prerequisites are:
- Docker
- Visual Studio Code
- The ‘Remote Containers’ extension for VSCode
All of the code is available here, but I’d encourage you to work through the process yourself to get a better understanding of what is going on.
Let’s dive right in!
What is a DevContainer?
Before we get started, let’s have a quick recap. A DevContainer, short for Development Container, is a fully functional and isolated development environment encapsulated within a Docker container. This means that the developer environment is configured in code and moves with the repo. There is a bit of a setup hurdle to overcome, but once set up, anyone can spin up the exact same environment quickly and reliably, eliminating the notorious “it works on my machine” problem. This makes onboarding new team members or switching between projects hassle-free, providing a consistent, reproducible, and easy-to-manage coding environment.
It also makes it really easy to test out preview versions without polluting your existing dev environment, which we will now demonstrate!
Getting Started

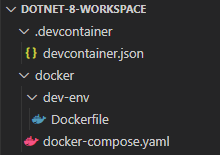
Start by creating a new empty folder for the project, and then build up the folder structure, and all the files you need. The folder structure should look like this:
You can do this manually, or use the following script in either bash or PowerShell:
mkdir -p .devcontainer \
&& mkdir -p docker/dev-env \
&& touch .devcontainer/devcontainer.json \
&& touch docker/docker-compose.yaml \
&& touch docker/dev-env/Dockerfile
New-Item -ItemType Directory -Path .\.devcontainer -Force New-Item -ItemType Directory -Path .\docker\dev-env -Force New-Item -ItemType File -Path .\.devcontainer\devcontainer.json -Force New-Item -ItemType File -Path .\docker\docker-compose.yaml -Force New-Item -ItemType File -Path .\docker\dev-env\Dockerfile -Force
Configure the DevContainer
I have deliberately set this up in a sightly more complex way, to allow some flexibility. I’ve used docker compose, even though I am only configuring one container. This setup makes it very easy to add anything else you may require, such as a container for a database, and so I think the additional complexity is worth it.
We’ll also install some useful extensions to help with developing and testing .NET applications.
Start with the devcontainer.json file. Copy in the following code:
{
    "name": ".NET 8 playground",
    "dockerComposeFile": ["../docker/docker-compose.yaml"],
    "service": "dev-env",
    "workspaceFolder": "/workspace",
    "customizations": {
        "vscode": {
            "extensions": [
                "ms-dotnettools.csharp",
                "shardulm94.trailing-spaces",
                "mikestead.dotenv",
                "fernandoescolar.vscode-solution-explorer",
                "jmrog.vscode-nuget-package-manager",
                "patcx.vscode-nuget-gallery",
                "pkief.material-icon-theme",
                "formulahendry.dotnet-test-explorer",
                "ms-dotnettools.vscode-dotnet-runtime"
                ]
          }
    },
    "remoteUser": "root"
}
The above is a DevContainer configuration file sets up a development environment called “.NET 8 playground” in a Docker container. It uses the Docker Compose file located at ‘../docker/docker-compose.yaml’ to define the container’s services and settings. The configuration also includes a list of Visual Studio Code extensions to be installed in the container, and sets the workspace folder path within the container to ‘/workspace’. It specifies that the user inside the container is ‘root’, which gives admin privileges.
Configure the Docker Compose
Next, add the compose file. This is really simple, but can be extended depending on what experiments you are running with .NET 8. Copy the following code into the docker-compose.yaml folder:
version: '3.4'
services:
  dev-env:
    container_name: dev-env
    build:
      context: ./dev-env
    volumes:
      - "..:/workspace"
    stdin_open: true # docker run -i
    tty: true # docker run -t
This Docker Compose file defines a single service named “dev-env”, builds it from a Dockerfile located in the ./dev-env context, and names the resulting container as "dev-env". It mounts the parent directory of the Docker Compose file into the container at /workspace. The stdin_open: true and tty: true settings ensure the container's terminal remains interactive, similar to running a Docker container with the -i and -t flags.
Configure the dev-env Dockerfile
The final step is to configure the docker file. Copy the following into the Dockerfile in the dev-env folder.
# [Choice] .NET version: 7.0, 6.0, 5.0, 3.1, 6.0-bullseye, 5.0-bullseye, 3.1-bullseye, 6.0-focal, 5.0-focal, 3.1-focal
ARG VARIANT="7.0"
FROM mcr.microsoft.com/vscode/devcontainers/dotnet:0-${VARIANT}
# [Choice] Node.js version: none, lts/*, 16, 14, 12, 10
ARG NODE_VERSION="none"
RUN if [ "${NODE_VERSION}" != "none" ]; then su vscode -c "umask 0002 && . /usr/local/share/nvm/nvm.sh && nvm install ${NODE_VERSION} 2>&1"; fi
# [Optional] Uncomment this section to install additional OS packages.
RUN apt-get update && \
    export DEBIAN_FRONTEND=noninteractive && \
    apt-get -qy full-upgrade && \
    apt-get install -qy curl && \
    apt-get -y install --no-install-recommends vim && \
    curl -sSL https://get.docker.com/ | sh

RUN wget -O dotnet.tar.gz https://download.visualstudio.microsoft.com/download/pr/07b027f8-4ef8-48cb-becc-132652c625bb/441ef662adfe931013745df24d53b26d/dotnet-sdk-8.0.100-preview.5.23303.2-linux-x64.tar.gz \
    && dotnet_sha512='dfe2085a92854a5cee84cb7be9344368f5dcb6333c4ca215375a34b862f3a3ee66c953b9957f7b46f6cd710992ee038f6b4c2bd16464b4a216a1785868e86f7c' \
    && echo "$dotnet_sha512 dotnet.tar.gz" | sha512sum -c - \
    && mkdir -p /usr/share/dotnet \
    && tar -zxf dotnet.tar.gz -C /usr/share/dotnet \
    && rm dotnet.tar.gz
This Dockerfile begins with a .NET version 7 image as its foundation, indicated by the first line. Then, .NET 8 is added to this base image through the final RUN command. Consequently, the constructed container houses both .NET 7 and 8, facilitating a seamless transition between the two versions for comparison or development purposes.
The above should be easy to modify for different preview versions of .NET 8, or indeed .NET 9 when that starts to appear next year. You can either replace the url / sha for the version above, or copy/paste the configuration to add multiple different preview versions.
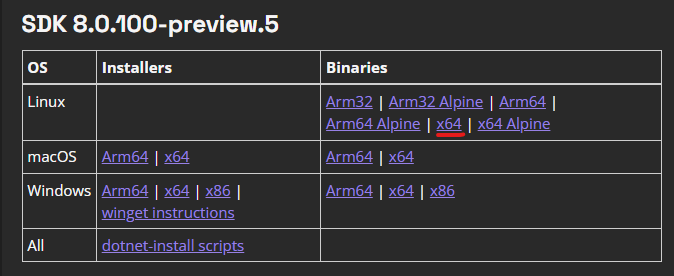
You can get the download links and the SHA for whatever version you want by following this link. I have used the Linux x64 version in this tutorial.
That is all the setup that is required, now it’s time to have a play with .NET 8!
Run and test the DevContainer
Start the container running by hitting F1, and selecting the Rebuild and Reopen in Container command. This takes a minute the first time that you do it, but is quicker in subsequent starts. You will know that you’re in the container environment because VSCode will show this in the bottom left corner:

Open a terminal, and you’ll see that you are in a Linux environment. You can check the dotnet version and also list the available SDK versions with
dotnet --version

dotnet --list-sdks
You should see the following:
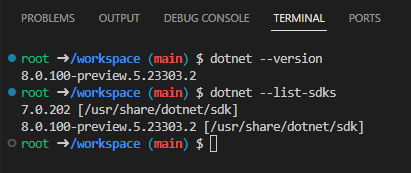
This shows that as we have planned, we have both version 7.0.200, and 8.0.100-preview.5 installed. It also shows that the default version is V8, meaning that we can get stuck straight in.
You could (for example) start a console app with:
dotnet new console -n dotnet-8-console-appIf you execute the above, and to into the csproj file you’ll see that we are indeed using .NET v8:
<Project Sdk="Microsoft.NET.Sdk">

  <PropertyGroup>
    <OutputType>Exe</OutputType>
    <TargetFramework>net8.0</TargetFramework>
    <RootNamespace>dotnet_8_console_app</RootNamespace>
    <ImplicitUsings>enable</ImplicitUsings>
    <Nullable>enable</Nullable>
  </PropertyGroup>

</Project>
At this point, we have a blank canvas to work with. We have achieved our goal of setting up a dev environment inside a container, so I think this is a good place to stop with this tutorial. I’m not done with this yet though — I am planning on using this to illustrate a few of the new features that I think are interesting. Watch this space for more .NET 8 content!
Conclusion
In this post, we have set up a DevContainer that allows us to play around with the new features in .NET 8 preview 5. I hope that someone out there finds this useful! I am planning to use this myself to investigate and understand the new features of .NET 8, so let me know in the comments if you would like to see anything particular!
Happy coding!