
Getting Started With AWS Cloud Development Kit (CDK)
How to deploy a simple Lambda & S3 app using CDK

The more I’ve been using AWS CDK the more I like it. I’ve always found raw CloudFormation to be both tedious and verbose, and CDK feels like a quicker and easier way to define and manage your infrastructure.
In this story, I’ll explain how to get started with CDK and how to use it to deploy a small application in your AWS account.
Why CDK?
AWS Cloud Development Kit (CDK) is a framework that allows engineers to define their infrastructure as code (IaC) in a familiar programming language instead of having to manage their infrastructure manually or write raw CloudFormation.
Even though I generally prefer writing Python, I’ve been writing my CDK in Typescript. I don’t have very strong reasons for that; it was the language that I was first introduced to CDK in. It’s also CDK’s native language, and between its strong typing and VSCode’s autocompletion, it makes writing CDK a breeze.
Our Application
For this example, we’re going to build a simple application that consists of two S3 buckets (a source and a destination) and a Lambda that’s going to read the source file, modify it, and write it to the destination bucket.
Obviously, this is a simple and contrived example, but we’ll need to have CDK written to:
- Define two S3 buckets
- Define our Lambda function
- Manage the permissions
- Give us an endpoint to invoke our Lambda
Getting Started
This guide assumes that you have the AWS CLI and Node.js installed. If you don’t, please check out AWS’s official documentation for getting your environment set up.
Otherwise, we’ll create a new directory (this command needs to be run in an empty directory, otherwise you’ll get an error) mkdir CDKDemo, cdinto it and run:
cdk init app --language typescript
This will create a lot of files and also initialize a new git repository in your directory.
Creating our Non-CDK Files
We have a couple of files to create that aren’t related to CDK.
The Text File
We’re going to be uploading a file to S3, so let’s go ahead and define that file. It’s just a simple txt file named hello.txt , and we’ll put make a new directory assets/ to store it in:
Hello World!
The Python Function
This is the Python file that’s going to run in Lambda to move our file between buckets. In this example, we’ll create this file as hello.py in the lambda/ directory:
import datetime
import os

import boto3

FILE_NAME = "hello.txt"
s3 = boto3.resource("s3")


def copy_file_to_destination():
    new_file_name = f"{FILE_NAME.split('.')[0]}_updated.txt"
    s3.Bucket(os.environ["DESTINATION_BUCKET"]).upload_file(
        f"/tmp/{FILE_NAME}", new_file_name
    )


def fetch_file_from_source():
    s3.Bucket(os.environ["SOURCE_BUCKET"]).download_file(FILE_NAME, f"/tmp/{FILE_NAME}")


def update_file():
    with open(f"/tmp/{FILE_NAME}", "a") as f:
        my_str = f"\nI read this file at {datetime.datetime.now()}!"
        f.write(my_str)


def handler(event, context):
    fetch_file_from_source()
    update_file()
    copy_file_to_destination()
Note that this function does 3 simple tasks:
- Using the boto3 library, it fetches the file from our
SOURCE_BUCKETand stores it in the/tmpdirectory. - It then appends a new line to the file announcing when you read the file.
- Again using boto3, it uploads the updated file to the
DESTINATION_BUCKETwith “_updated” appended to the name.
Creating our Stack
After running the above command, you should open the ts file inside of the lib dir. The name of this file will depend on what your working directory is called, and there will be some boilerplate code in place. This is where we can start defining our stack!
S3
We need a source and a destination bucket for this demo. We don’t need to have any public access to these buckets, so we’re going to block it, and we’re going to go ahead and let s3 manage the server-side encryption.
For this example, we also want to set removalPolicy to DESTROY , and make it so that the items in our buckets are automatically deleted when we destroy the stack. Note that you probably don’t want this behavior in a real-world app, but otherwise, we’d be left with these orphaned buckets that we’ll need to clean up manually when we’re done.
import * as s3 from "aws-cdk-lib/aws-s3";

//S3 Buckets
const sourceBucket = new s3.Bucket(this, "sourceBucket", {
  blockPublicAccess: s3.BlockPublicAccess.BLOCK_ALL,
  encryption: s3.BucketEncryption.S3_MANAGED,
  removalPolicy: cdk.RemovalPolicy.DESTROY,
  autoDeleteObjects: true,
});

const destinationBucket = new s3.Bucket(this, "destinationBucket", {
  blockPublicAccess: s3.BlockPublicAccess.BLOCK_ALL,
  encryption: s3.BucketEncryption.S3_MANAGED,
  removalPolicy: cdk.RemovalPolicy.DESTROY,
  autoDeleteObjects: true,
});
Upload our Text File
Since our example is using a pre-defined hello.txt , let’s go ahead and upload it to the source bucket as part of our deployment. Remember that our text file is located in ./assets :
import * as s3deploy from "aws-cdk-lib/aws-s3-deployment";

// Upload hello.txt to sourceBucket
const deployment = new s3deploy.BucketDeployment(this, "DeployHello", {
  sources: [s3deploy.Source.asset("./assets")],
  destinationBucket: sourceBucket,
});
Lambda
The Lambda’s definition is probably the most complicated. Note that because I’m building a lambda that uses Python, I’m going to import and install the aws-lambda-python-alpha package as well. While not strictly needed in this example, it makes packaging dependencies easier, so I’ve gotten into the habit of using it.
As this isn’t bundled with aws-cdk-lib , you’ll probably need to install it separately, using the command:
npm install "@aws-cdk/aws-lambda-python-alpha"We also need to tell this lambda to use Python 3.9, where to find our hello.py file, and how to run it: handler . If you refer back to to the Python file above, you’ll also notice that we need to set two environment variables: the names of our buckets. We can access the name using the sourceBucket and destinationBucket variables we assigned to our S3 buckets.
Finally, we add an unauthenticated function URL that will allow us to invoke our lambda.
import * as lambda from "aws-cdk-lib/aws-lambda";
import * as pyLambda from "@aws-cdk/aws-lambda-python-alpha";

//Lambda
const fileTransferLambda = new pyLambda.PythonFunction(
  this,
  "fileTransferLambda",
  {
    runtime: lambda.Runtime.PYTHON_3_9,
    entry: "./lambda",
    index: "hello.py",
    handler: "handler",
    environment: {
      SOURCE_BUCKET: sourceBucket.bucketName,
      DESTINATION_BUCKET: destinationBucket.bucketName,
    },
  }
);

//Lambda URL
const fileTransferLambdaUrl = fileTransferLambda.addFunctionUrl({
  authType: lambda.FunctionUrlAuthType.NONE,
});
IAM Policies
While we’ve defined our lambda and our buckets, they currently don’t have permission to interact with one another. For this, we need to define some IAM policies.
We only need to GET from the source bucket and PUT to the destination bucket, so we only add the minimum permissions needed.
Once we have these policies defined, we must then attach them to our lambda’s security role.
import * as iam from "aws-cdk-lib/aws-iam";

//IAM
const getFromSourcePolicy = new iam.Policy(this, "getFromSourcePolicy", {
  document: new iam.PolicyDocument({
    statements: [
      new iam.PolicyStatement({
        actions: ["s3:Get*"],
        resources: [sourceBucket.arnForObjects("*")],
      }),
    ],
  }),
});

const putInDestinationPolicy = new iam.Policy(
  this,
  "putInDestinationPolicy",
  {
    document: new iam.PolicyDocument({
      statements: [
        new iam.PolicyStatement({
          actions: ["s3:Put*"],
          resources: [destinationBucket.arnForObjects("*")],
        }),
      ],
    }),
  }
);

// Attach IAM Policies to Lambda
const fileTransferLambdaRole = fileTransferLambda.role;
fileTransferLambdaRole?.attachInlinePolicy(getFromSourcePolicy);
fileTransferLambdaRole?.attachInlinePolicy(putInDestinationPolicy);
Please note that defining the policies like this is actually overkill for this simple application! We could have simply used grantRead and grantWrite on the S3 buckets, but this gives an example of what a custom IAM policy might look like.
Output
Finally, we want CDK to tell us the value of our lambda’s URL for ease of use, so we define that as a CfnOutput at the end:
// Output
new cdk.CfnOutput(this, "fileTransferLambdaUrl", {
  value: fileTransferLambdaUrl.url,
});
The Whole File
That’s it! For easy reference, the whole file is found below. Note that we were able to define our entire infrastructure in less than 90 lines of code!
import * as cdk from "aws-cdk-lib";
import * as s3 from "aws-cdk-lib/aws-s3";
import * as s3deploy from "aws-cdk-lib/aws-s3-deployment";
import * as iam from "aws-cdk-lib/aws-iam";
import * as lambda from "aws-cdk-lib/aws-lambda";
import * as pyLambda from "@aws-cdk/aws-lambda-python-alpha";
import { Construct } from "constructs";

export class CdkDemoStack extends cdk.Stack {
  constructor(scope: Construct, id: string, props?: cdk.StackProps) {
    super(scope, id, props);

    //S3 Buckets
    const sourceBucket = new s3.Bucket(this, "sourceBucket", {
      blockPublicAccess: s3.BlockPublicAccess.BLOCK_ALL,
      encryption: s3.BucketEncryption.S3_MANAGED,
    });

    const destinationBucket = new s3.Bucket(this, "destinationBucket", {
      blockPublicAccess: s3.BlockPublicAccess.BLOCK_ALL,
      encryption: s3.BucketEncryption.S3_MANAGED,
    });

    // Upload hello.txt to sourceBucket
    const deployment = new s3deploy.BucketDeployment(this, "DeployHello", {
      sources: [s3deploy.Source.asset("./assets")],
      destinationBucket: sourceBucket,
    });

    //Lambda
    const fileTransferLambda = new pyLambda.PythonFunction(
      this,
      "fileTransferLambda",
      {
        runtime: lambda.Runtime.PYTHON_3_9,
        entry: "./lambda",
        index: "hello.py",
        handler: "handler",
        environment: {
          SOURCE_BUCKET: sourceBucket.bucketName,
          DESTINATION_BUCKET: destinationBucket.bucketName,
        },
      }
    );

    //Lambda URL
    const fileTransferLambdaUrl = fileTransferLambda.addFunctionUrl({
      authType: lambda.FunctionUrlAuthType.NONE,
    });

    //IAM
    const getFromSourcePolicy = new iam.Policy(this, "getFromSourcePolicy", {
      document: new iam.PolicyDocument({
        statements: [
          new iam.PolicyStatement({
            actions: ["s3:Get*"],
            resources: [sourceBucket.arnForObjects("*")],
          }),
        ],
      }),
    });

    const putInDestinationPolicy = new iam.Policy(
      this,
      "putInDestinationPolicy",
      {
        document: new iam.PolicyDocument({
          statements: [
            new iam.PolicyStatement({
              actions: ["s3:Put*"],
              resources: [destinationBucket.arnForObjects("*")],
            }),
          ],
        }),
      }
    );

    // Attach IAM Policies to Lambda
    const fileTransferLambdaRole = fileTransferLambda.role;
    fileTransferLambdaRole?.attachInlinePolicy(getFromSourcePolicy);
    fileTransferLambdaRole?.attachInlinePolicy(putInDestinationPolicy);

    // Output
    new cdk.CfnOutput(this, "fileTransferLambdaUrl", {
      value: fileTransferLambdaUrl.url,
    });
  }
}
Trying it Out
Now that we have our files in order, it's time to test our application!
Synth
The first thing I typically do when I create a new CDK stack (or make large changes) is to run cdk synth . This command outputs the CloudFormation template that will run behind the scenes, and it’s a good way to make sure that you don’t have any errors in your CDK that will keep it from synthesizing.
Deployment
Finally, it’s time to deploy our code to AWS! This is as simple as cdk deploy , although depending on your AWS configuration you may also need to specify which profile to use (e.g. --profile personal ).
Since everything in the stack is new to begin with, this will take a couple of minutes to run the first time, but will generally take less time (< 1 min) for future updates. However, don’t wander away after hitting enter — you may need to approve some of the changes being deployed, especially the security and permissions-related changes.

After you accept these changes, the rest of the stack will deploy. If everything deploys successfully, you’ll get the output that you asked for at the end:
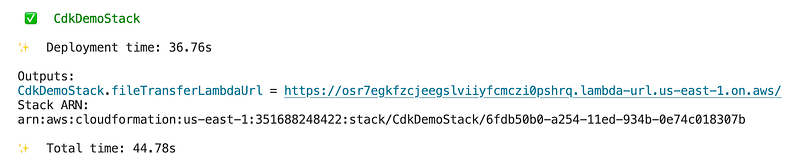
Testing
Now, before you click on that link and run your lambda, you might go ahead and log in to the AWS console to investigate what everything looks like, now that it has deployed.
If you navigate to CloudFormation, you’ll see your stack and its status:

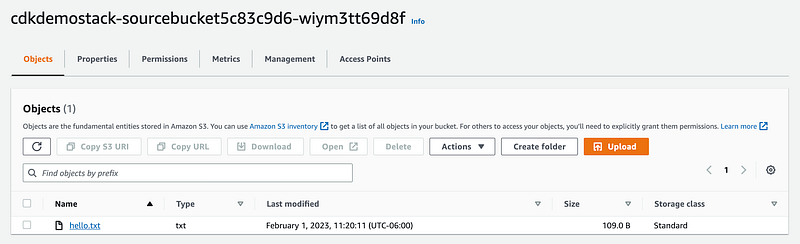
You can also check on the buckets that were created in S3:

And ensure that our hello.txt is in the source bucket like it’s supposed to be:
Finally, let’s visit the fileTransferLambdaUrl — clicking it will bring up a page that says null , since we didn’t tell the Lambda to actually output anything, but now we can check our destination bucket. We should have a new updated text file!
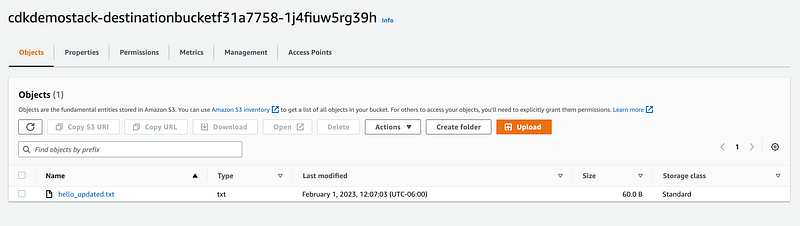
If you open the new hello_updated.txt , you’ll find that it’s been updated with the line we appended in our lambda function:

Diff
Note that if you need to make changes to your stack and redeploy your application, the cdk diff command is also worth a quick callout here. It will show you the changes deploying will introduce.
Cleanup
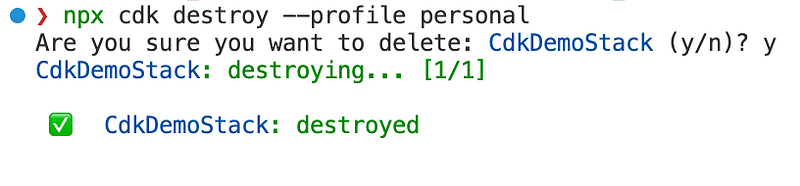
Now that we’ve successfully tested our application, don’t forget to tear down your stack!
Tearing everything down is as easy as running cdk destroy .
Final Notes
As I mentioned above, this is obviously a contrived example (and not a completely relevant use case, as S3 Object Lambda exists), but hopefully it gives you an idea of how quick and easy it is to get started writing IaC in AWS CDK.
Other Resources
Here are a few other resources that may come in handy when working with AWS CDK:
- The official AWS Reference contains documentation on all the constructs
- Construct Hub contains other open-source constructs
- Also, please check another article I wrote on CDK: Managing Secrets With AWS Cloud Development Kit (CDK)
I hope you found this guide helpful, and I’d be happy to hear any suggestions or comments you may have. Happy programming!
Level Up Coding
Thanks for being a part of our community! Before you go:
- 👏 Clap for the story and follow the author 👉
- 📰 View more content in the Level Up Coding publication
- 🔔 Follow us: Twitter | LinkedIn | Newsletter
🚀👉 Join the Level Up talent collective and find an amazing job