
Getting Started with Arduino: A Step-by-Step Guide to Setting Up and Programming a Temperature Sensor
Introduction:
Have you ever wondered how signals generate data and how electronic devices process and interpret this information? The concept of signal processing can seem overwhelming, especially for those who are new to electronics. This is where Arduino comes in. Arduino is a powerful platform that can help you understand the fundamentals of signal processing and how electronic devices generate, interpret, and utilize data. With Arduino, you can learn how to create and control electronic devices and projects, from simple temperature sensors to complex robots. In this guide, we will take you through the process of setting up Arduino and using it to create a simple project using a temperature sensor, helping you to gain a better understanding of signal processing and its practical applications.
Step 1: Purchase Arduino from Inventr.io
The first step to getting started with Arduino is to purchase the board from a reliable source. Inventr.io is a trusted online store that sells authentic Arduino boards and kits. You can visit the website and browse through the different types of boards available, and select the one that best suits your needs. Once you have made your purchase, you will receive your Arduino board along with a few sensors in a few days.
Step 2: Install the Arduino software
After receiving your Arduino board, the next step is to install the software on your computer. The software is available for download from the Arduino website and is compatible with Windows, Mac, and Linux operating systems. Once you have downloaded the software, follow the installation instructions and complete the setup process.
https://docs.arduino.cc/software/ide-v1
Step 3: Connect the Arduino board to your computer
Connect your Arduino board to your computer using a USB cable. The USB cable will power the board and allow you to program it using the Arduino software.
Step 4: Test the Arduino board
Before proceeding to the next step, it is essential to test the Arduino board to ensure that it is working correctly. Launch the Arduino software, and select the appropriate board and serial port from the Tools menu. Then, upload the blink sketch to the board and check if the onboard LED blinks. If it does, then your Arduino board is working correctly.

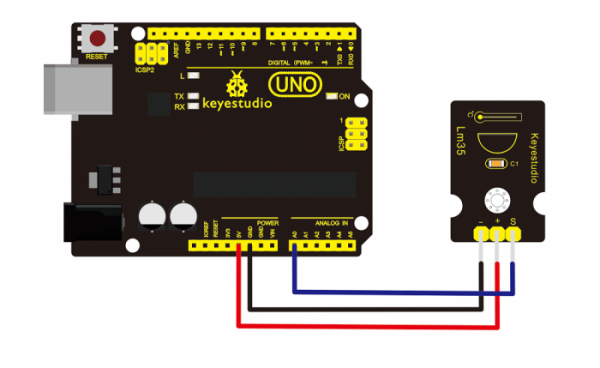
Step 5: Connect the temperature sensor
Now that you have tested your Arduino board, the next step is to connect the temperature sensor (as shown in the diagram below). The temperature sensor has three pins: VCC (V), GND (G), and SIGNAL (S). Connect the V pin to the 5V pin on the Arduino board, the G pin to the GND pin, and the S pin to analog pin A0.
Step 6: Write the program
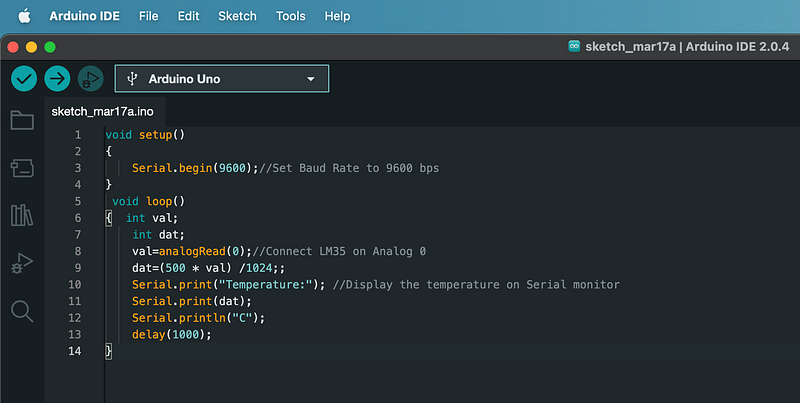
The final step is to write the program that will read the temperature from the sensor and display it on the serial monitor. Open the Arduino software and create a new sketch. Copy and paste the following code into the sketch window:
void setup()
{
    Serial.begin(9600);//Set Baud Rate to 9600 bps
}
void loop()
{
    int val;
    int dat;
    val = analogRead(0); // Read the analog value from the LM35 temperature sensor connected to analog pin 0
    dat = (500 * val) / 1024; // Convert the analog value to a temperature value in Celsius using the LM35 temperature sensor's output voltage formula
    Serial.print("Temperature:"); // Display the text "Temperature:" on the Serial Monitor
    Serial.print(dat); // Display the temperature value in Celsius on the Serial Monitor
    Serial.println("C"); // Display the text "C" (for Celsius) on the Serial Monitor and move to a new line
    delay(1000); // Wait for 1 second before taking another temperature reading
}
This program reads the analog value from the temperature sensor and converts it to temperature in degrees Celsius. It then displays the temperature on the serial monitor.
Step 7: Upload the program to the Arduino board
Connect your Arduino board to your computer using the USB cable and select the appropriate board and serial port from the Tools menu. Then, click the Upload button to upload the program to the board.
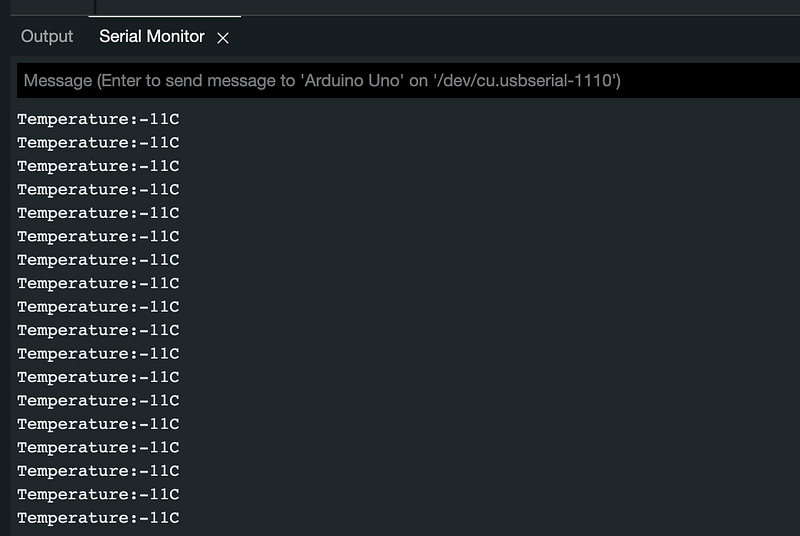
Step 8: Monitor the temperature
Once the program has been uploaded, open the serial monitor from the Tools menu. You should see the temperature readings displayed on the monitor, which will update every second. You can test the sensor by heating it up or cooling it down and observing the changes in the readings.
Conclusion
Congratulations, you have successfully set up the Arduino software, connected a temperature sensor to the board, and written a program to display temperature readings on the serial monitor. This is just the beginning of what you can do with Arduino. With its vast array of sensors, actuators, and other components, you can create a variety of exciting projects, from robotics to home automation. The possibilities are endless, and with Arduino, you can bring your ideas to life. So go ahead, explore, experiment, and have fun!
Thanks for Reading!
If you like my work and want to support me…


