
Get started with the Visual Studio template OnionAPI to scaffold ASP.NET WebAPI project for .NET 7

I’ve enhanced the template to accommodate .NET 8. For detailed instructions and additional information, see Get started with the Visual Studio template OnionAPI to scaffold ASP.NET WebAPI project for .NET 8.
Fuji Nguyen 12/4/2023
Introduction
If you’re looking for a recipe for building advanced REST APIs, look no further than the OnionAPI template. It’s packed with all sorts of handy features and best practices to help you get up and running in no time. In fact, compared to starting a REST API project from scratch, the OnionAPI template can save you at least 40 hours of coding time. That’s a lot of time you can spend on other important tasks (like go out and enjoy a bowl of Vietnamse Pho noodle soup). — Fuji Nguyen, Author of OnionAPI Template
NET 7 has been officially released on November 8, 2022, replacing the previous version of NET 6. Developers can use the new release of Visual Studio template OnionAPI v7 to scaffold NET 7 REST API projects based on the Clean Architecture pattern as described in Figure 1.
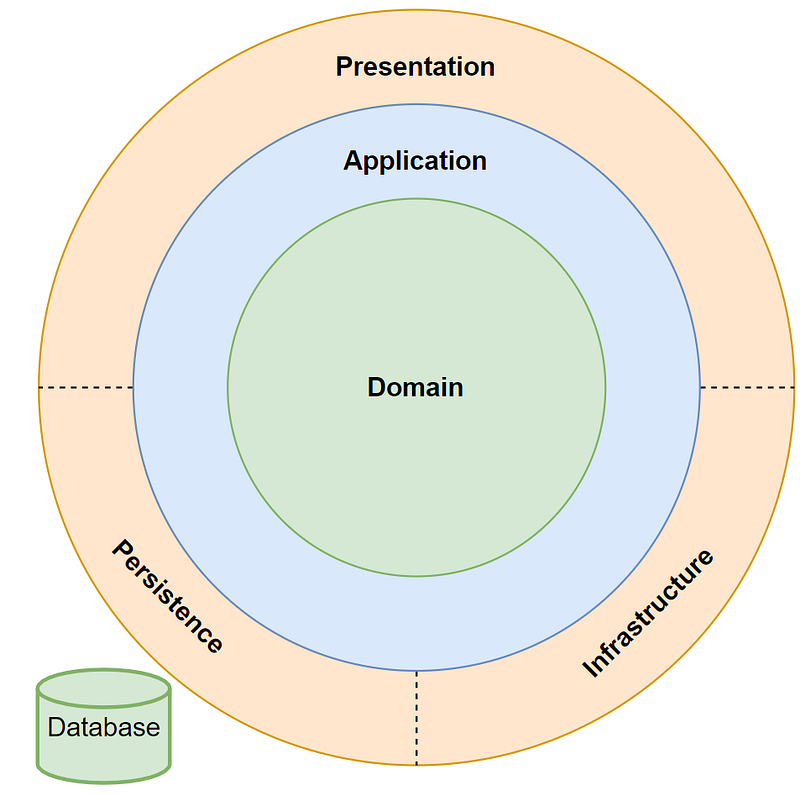
When you use the OnionAPI template to create a new project in Visual Studio, it will generate a solution with five projects inside. Each project is prefixed with the project name and has its own customizable namespace in the source code. Here’s what each project is for:
- Domain: This project contains entities and common models.
- Application: This project includes interfaces, CQRS features, exceptions, and behaviors.
- Infrastructure.Persistence: This project is home to the data access API, which is based on Entity Framework.
- Infrastructure.Shared: This project includes common services like the Mail Service, Date Time Service, Mock, and more.
- WebApi: This project is where you’ll find API controllers to expose REST API resources and endpoints that are accessible via Swagger.
Content
The tutorial contains 4 parts:
Part 1: Download and install the template In this part, you’ll learn how to download and install the OnionAPI template for Visual Studio.
Part 2: Scaffold a new Web API project In this part, you’ll use the OnionAPI template to create a new ASP.NET CORE Web API project running on .NET v7.
Part 3: Get familiar with the generated source code In this part, you’ll take a closer look at the source code that was generated by the template.
Part 4: Test run the Web API project In this final part, you’ll test out the Web API project to make sure everything is working correctly.
Prerequisites
- Latest Net Core 7 SDK
- Visual Studio 2022 Community — free code editor for C#
Part 1: Download and install the template
To download and install a Visual Studio template from the Visual Studio Marketplace, follow these steps:
- Open Visual Studio 2022 and go to the “Extensions” menu.
- Select “Manage Extensions” from the menu.
- In the “Manage Extensions” window, select the “Online” tab on the left side.
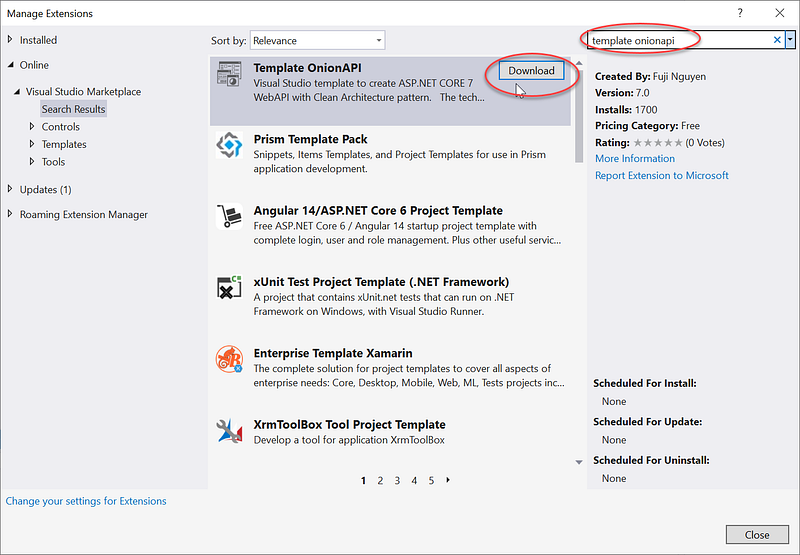
- Use the search bar to find the template you want to download. Search for “template onionapi”. See Figure 2 for visual aids.
- When you find the template, click the “Download” button.
- Visual Studio will download and install the template. You may need to restart Visual Studio for the template to be available.
Part 2: Scaffold a new Web API project
To use the Visual Studio template to scaffold a new Web API project, follow these steps:
- Open Visual Studio and select Create a new project from the start page or the File menu.
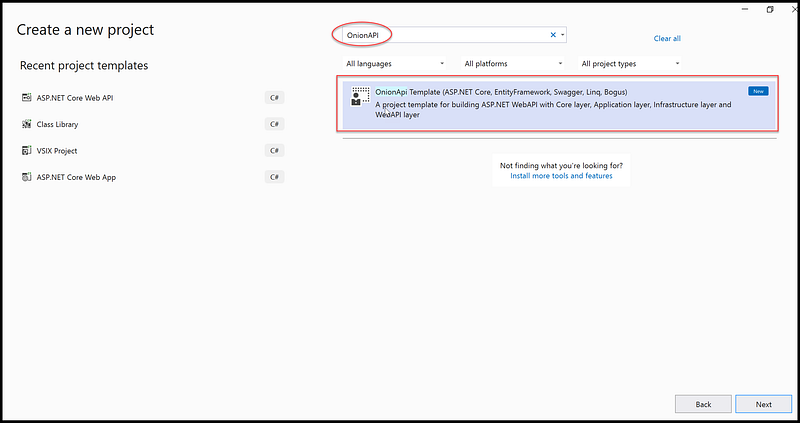
- In the Create a new project dialog, search and select the OnionAPI Template template and click Next. See Figure 3 for visual aids
- In the Configure your new project dialog, enter a name for your project (ex. MyNetcore7WebAPI) and select a location to save it. Then, click Create.
- The template for Onion API will create a new ASP.NET Core Web API project that follows the Clean Architecture.
Part 3: Get familiar with the generated source code
Figure 4 contains a screenshot of the source code scaffolded by the OnionAPI template for the sample project MyNetcore7WebAPI. The screenshot depicts the organization of 5 projects, grouped into 3 folders Core, Infrastructure, and Presentation, which are corresponding to the layers described in the Clean Architecture pattern.
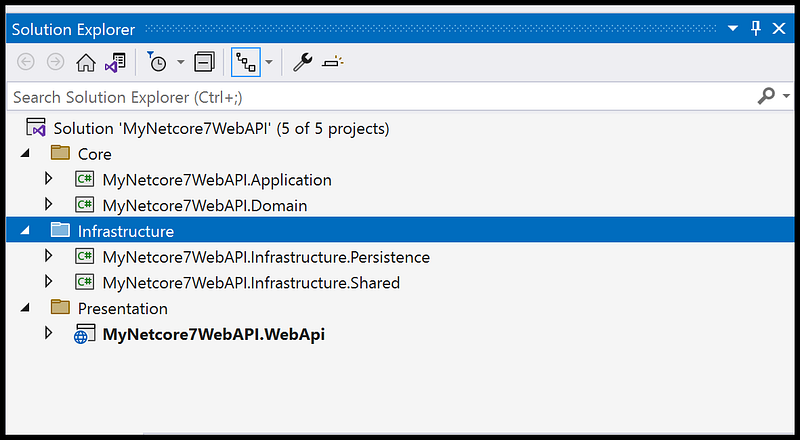
It can be a bit overwhelming at first, with all those separate projects and layers of dependencies. Don’t worry. Below is the quick Google map navigation (LOL) to help you find your way.
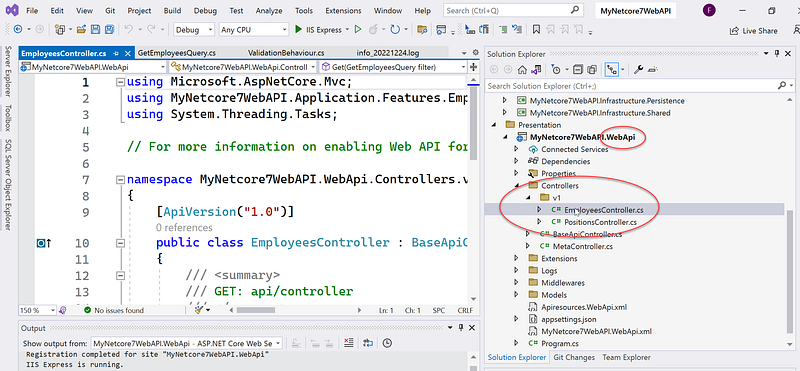
- Are you wondering where all the API controllers are located? They’re nestled snugly in the Controllers folder inside the WebAPI project. Need a visual aid? Just check out Figure 5 for some guidance. But don’t think the controllers are doing all the work on their own — oh no! We’ve got a clever little CQRS pattern in place, where the controllers simply acknowledge the requests and then hand them off to the Handlers for some serious processing.
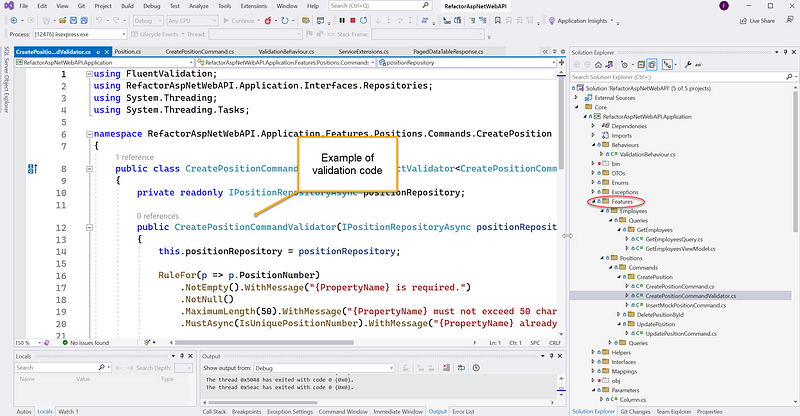
- Wondering where the Handlers are hiding? Look no further than the Features folder inside the Application project. Consult Figure 6 for visual guidance. So what exactly do the Handlers do, you might ask? They handle the business logic of an application, and if necessary, call on the trusty DB repository to retrieve or save some data. And if you’re worried about any rogue data sneaking through, fear not — the Fluent Validation is wired in and is responsible for keeping everything validated.
- Ready to hunt down the DB repositories? Look no further than the Repositories folder inside the Persistence project. Check out Figure 7 for some visual guidance. But what exactly is a repository, you might ask? It’s a design pattern that provides a consistent way to work with data sources like databases, web services, and APIs. In other words, it helps to keep the data access logic separate from the business logic of an application.

Part 4: Test Run the Web API project
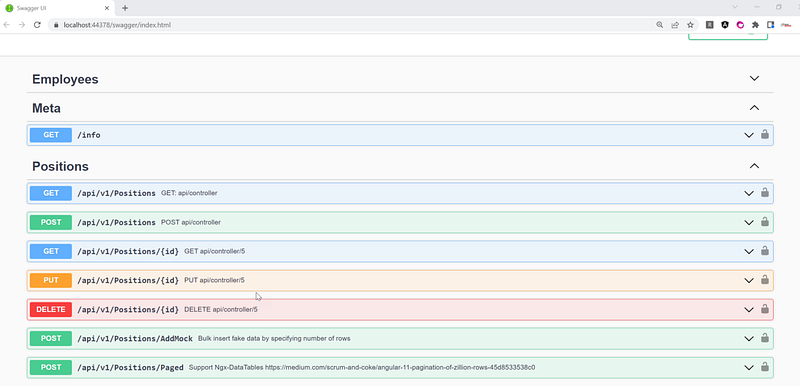
The OnionAPI template creates two REST resources for your convenience. First up, we’ve got the Employees resource, which is a mock API where the data is generated dynamically by the Bogus library at runtime. Want to learn more about Bogus? Just check out the link in the References section later on.
But that’s not all — the OnionAPI template also creates a Positions resource, which gets its data from an actual database table. And just to make things extra convenient, that table is automatically seeded with 1,000 rows of fake data the first time the project runs.
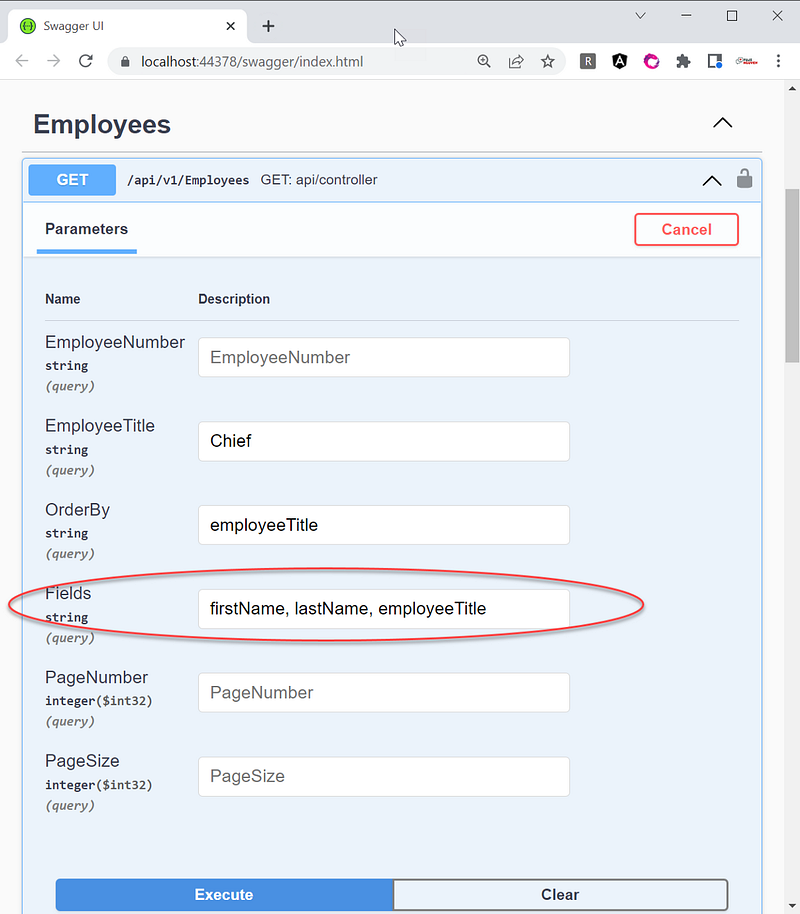
Ready to try out the REST API in Swagger? Here’s how to get started:
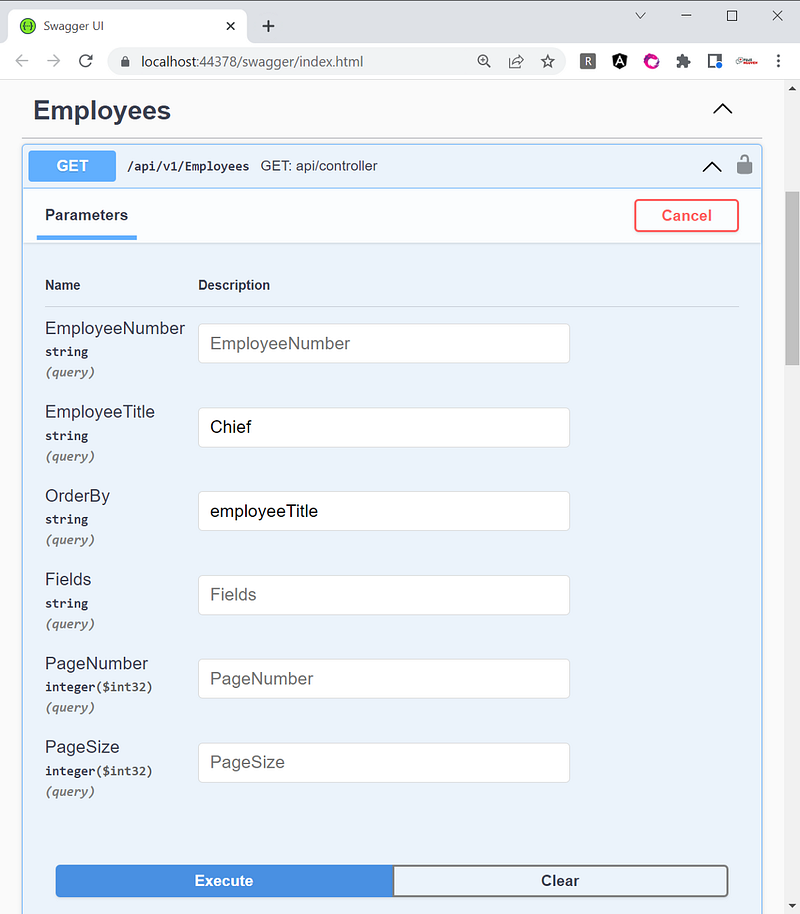
- Click on the Employees > GET option to expand the screen.
- Click on the Try it out button.
- Enter any desired parameters. For example, search for the word Chief in the employeeTitle field.
- Specify the order by column name. For example, enter employeeTitle in the OrderBy field.
- Click on the Execute button.
- Review the JSON output and marvel at the power of the REST API.
And if you need a little extra guidance along the way, just consult Figure 8 for visual aid.
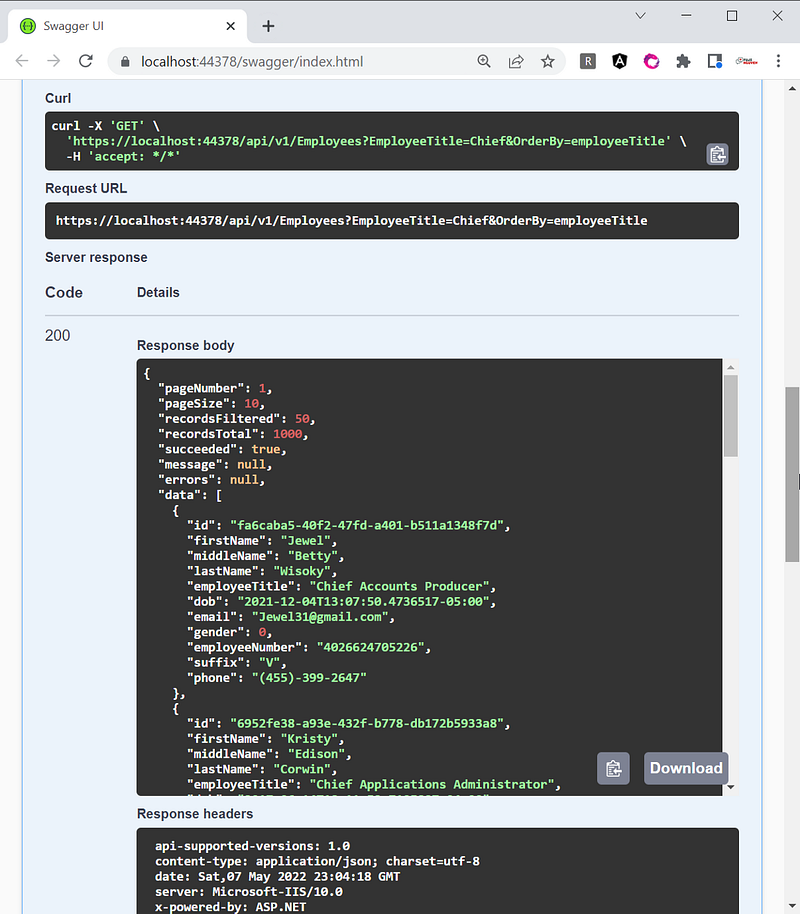
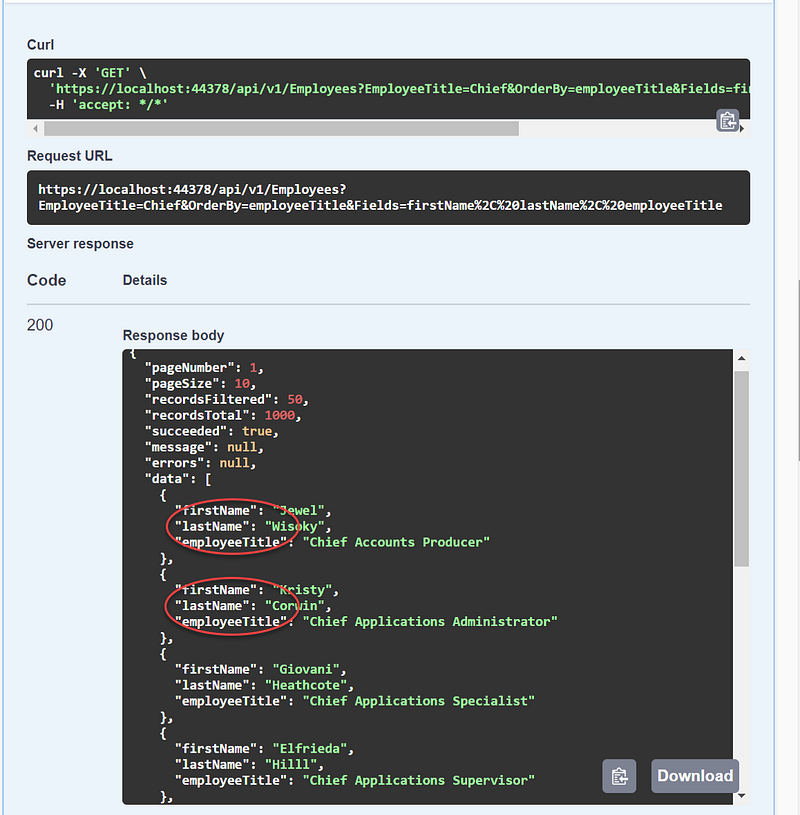
Need a little help understanding the JSON output? Let’s take a closer look at Figure 9, which is an example screenshot. As you can see, we’re using server-side paging for performance reasons. And if you look at the response body, you’ll notice that it includes a “wrapper” with some friendly data that’s easy for the frontend app to consume. Here’s what all those fields mean:
- pageNumber: This is the pagination index, such as 1, 2, 3, etc. The default is page 1.
- pageSize: This is the number of records per page. The default is 10.
- recordsFiltered: This is the number of records that match the search criteria. In this example, the search criteria is “Chief”.
- recordsTotal: This is the total number of employees in the database.
- succeeded: This is a boolean value (true/false) indicating the status of the webapi response.
- message: This is a friendly error message, if any.
- errors: This is a system error, if any.
- data: This is the response data, in JSON format.
So there you have it, a breakdown of all the key fields in the JSON output.
As you can see in Figure 9, the data response consists of eleven columns. But what if you want to shape the response with fewer columns to minimize the amount of data sent over the network? No problem! Just input the column names you want in the Fields area, as shown in Figure 10. For example, if the frontend app only needs the firstName, lastName, and employeeTitle columns, you can specify those and the JSON response will contain only those three columns in the “Data” section, as shown in Figure 11.
So there you have it, a simple way to shape the JSON response to fit your apps.
The scaffolded source code is a real treasure trove of useful features, and that includes data modification example code for the Positions resource. Just take a look at Figure 12 and you’ll see all sorts of handy methods like POST, GET, PUT, and DELETE to support CRUD (create, read, update, and delete) operations.
So there you have it, everything you need to get started with data modification using the Positions resource as a point of reference.
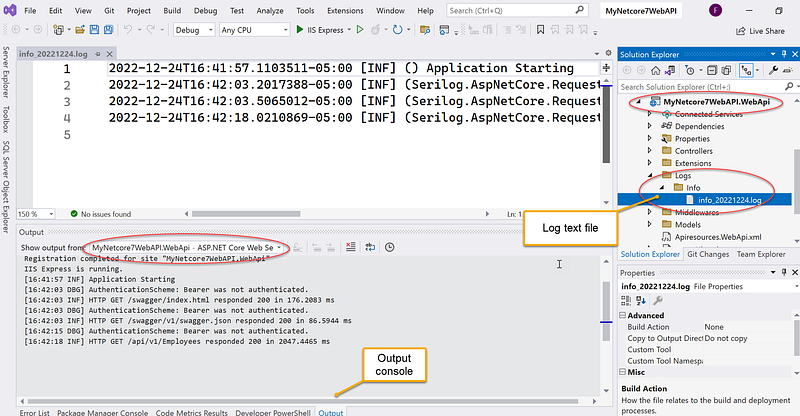
Serilog is integrated into the template to help us keep track of all those pesky WebAPI requests and error events. And the best part? You can see all those structured log events in both the output console and text files. Just consult Figure 13 for a little visual guidance on where to find them. So go ahead, take a peek at those logs and see what secrets they hold. And remember, with Serilog on our side, we’ll always know exactly what’s going on in our codebase.
Screencast
This video demonstrates how to create a new ASP.NET Web API project using the Visual Studio template OnionAPI and access the API endpoints using the Swagger UI after running the project.
OnionAPI Template in Action
I’m excited to announce the launch of my blog series focused on creating dynamic and user-friendly web applications using Single Page Application (SPA) architecture and modern tools such as Angular 15, Bootstrap 5, and .NET 7 API. The series features a comprehensive project demo and multipart blog posts that delve into full-stack components in detail, providing the most up-to-date tools and techniques in the industry.
To make things even more exciting, the WebAPI layer in this blog series is generated with the powerful OnionAPI template. I’ll provide you with an in-depth explanation of the generated source code, so you can truly grasp its awesomeness. Give it a try!
Recommended Contents
- Fullstack Angular 15, Bootstrap 5 & NET 7 API: Project Demo and Tutorial ♥
- Server-Side Pagination, Sorting, Filtering, and Modal Detail Display
- In-depth Guide to REST API from Design to Implementation
- EF Core Pagination for 2 Million Rows, Performance Tune-up, and Lessons Learned
- Creating Realistic Test Data with Bogus Library: Fake It Till You Make It!
- Guide to CRUD Operations with CQRS and Mediator Pattern in REST API
- Migrating EntityFramework Core from MS SQL to Oracle database vendor
- What is Serilog?
- Explore Serilog and AutoWrapper to handle errors in .NET Core 7 WebAPI
- What is FluentValidation?
- How MediatR and AutoMapper are used together to support CQRS?
- Bogus Library for Fake Data In ASP.NET Core WebAPI
Summary
If you’re involved in managing development, you know how challenging it can be to keep everything running smoothly. Governance can be a real pain, and it can be hard to find tools that help improve processes and add value. That’s where the OnionAPI template comes in. It’s designed to increase consistency and decrease delivery time, making your life just a little bit easier.
But wait, there’s more! The OnionAPI also provides boilerplate code for all sorts of advanced REST API features, like data filtering, sorting, shaping, paging, and CRUD. And the best part is, these features are written as base classes, so you can easily inherit and extend them to meet the specific needs of your project. So don’t struggle with messy code and complex processes any longer — give the OnionAPI template a try and see how it can transform your development experience.
Thanks for reading! Hope you found it useful. Want more? Hit the “Follow” button below my profile. With your support, I’ll keep creating awesome content for you. Have a great day ahead! — Fuji Nguyen


