

Minimalist Guide to Flutter Hooks
Maximize your code reuse with Flutter Hooks
What is Hooks?
Hooks are a new kind of object that manages a Widget life-cycles. They exist for one reason: increase the code-sharing between widgets by removing duplicates.
In this article, I’ll show you how to reduce your boilerplate code using flutter_hooks.
Why this package exists?
StatefulWidget suffers from a big problem: it is very difficult to reuse the logic of say initState or dispose.
The most exciting thing about this package. when you use hooks, you don’t need to worry about like initState and dispose methods in your widget lifecycle. the package will handle them like a boss instead of you.
If you used any controller before, you understand better the pain we suffer.
Motivation
Examples
I think It will be more effective If I explain this package with examples.
Before I start to explain, don’t forget this package has lots of hooks out of the box. (List of Existing Hooks) I will explain only the most common hooks to make you to better understand the concept. If none of them meet your needs, you can make your own hook, but in this article, I won’t cover that to don’t make things complicated. If you’d like to learn custom hooks please let me know in the comment section
1. State vs useState
HookWidget is an alternative to StatefulWidget. So you don't need to use StatefulWidget’s boilerplate code. Just make your StatelessWidget to HookWidget and that's it. You’re ready to use hooks.
If you want to use state in your hook, just use useState method in the build method.
like this:
class ClassName extends HookWidget { // change this
  @override
  Widget build(BuildContext context) {
    final stateName = useState(initialValue); // add this
    print(stateName.value); // example usage
    ...
  }
}
You can use all kinds of hook like this.
Before
After
2. StatefulWidget’s Lifecycle vs useEffect
useEffect is called synchronously on every build, unless keys is specified. In which case useEffect is called again only if any value inside keys has changed.
You can use lifecycle in HookWidget using useEffect
Before
After
3. FutureBuilder vs useFuture & useMemoized
When you want to use useFuture method, you will need also useMemoized method as well. Because if you don’t, useFuture will call the future method constantly.
useMemoized store the result on the first call and when rebuild the widget useMemoized returns the previously created instance without call future function again. and the problem solves with like this.
Also useFuture handle FutureBuilder itself for us and gives us snapshots to use.
I won’t show you useStream usage because it’s the same with useFuture
Before
After
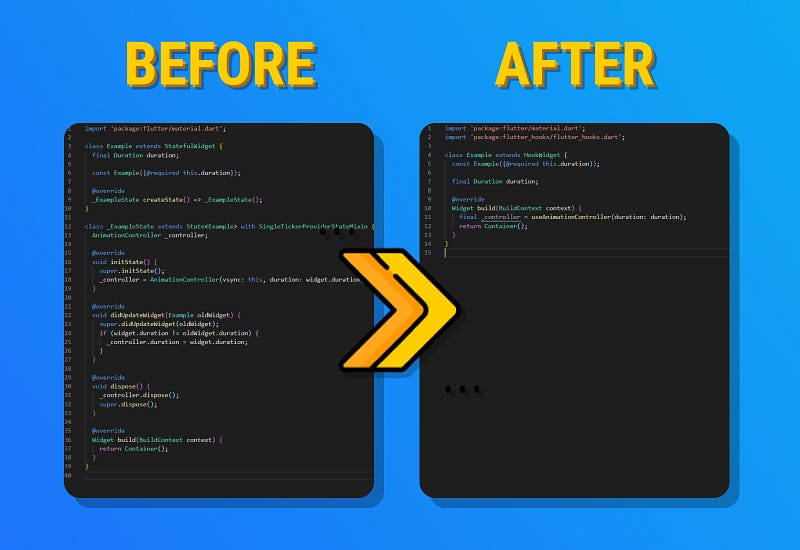
4. AnimationController vs useAnimationController
flutter_hooks shines the most when you need to use AnimationController. Because AnimationControllerneeds initState and dispose methods. Also, the controller needs SingleTickerProviderStateMixin , and of course, you need to make your widget stateful. BUT with useAnimationController method. you don’t need any of them. Just using useAnimationController will give you all the power on it. You will only need to give it the duration and drink your coffee before getting cold. the hook will handle every bothering work for you.
Before
After
5. TabController vs useTabController
Logic is the same. use useTabController instead of TabController and lean back and rest.
Before
After
This one was the last example of hooks. I think you get the idea, and you’re ready to use the hooks now.
Thank you for reading!
I tried to explain as simply as possible. Hope you like it.
If you liked this article, click on the 👏 button (did you know you could go up to 50?)


