
Generating Class Diagrams for .Net Core
Use PlantUML directly in the Visual Studio Code

UML Class Diagrams are a very great way to document your system, inspect and understand the relationships between the classes and plan refactorings and disseminate knowledge inside the team.
Although having class diagrams brings many benefits, generating them manually is a painful and arduous task, fortunately, we can use tools to generate them automatically
Visual Studio Class Designer
The Visual Studio Class Designer is a great and very flexible tool to generate class diagrams, it allows drag and drops on a single or in multiple .cs files directly to the diagram, and it automatically syncs changes both in the .cs files or in the diagram.
As we can see, using the Class Designer has many advantages but unfortunately, it does not exist in the Visual Studio Code and even in the Visual Studio, it does not support .Net Core.
PlantUML
PlantUML is an open-source tool that allows generating many types of UML diagrams from plain text, it uses a specific language and you can learn and start creating your diagrams in many different editors.
Fortunately exists many extensions and add-ons that automatically generate PlantUML from source code, in the next section I will show how to generate the PlantUML and the diagrams using C#.Net Core directly in Visual Studio Code.
Creating the example classes
In order to generate the diagrams, I will create a few components like classes, interfaces, enum, public and private properties, constructors, and constants.
I am creating these components just to exemplify how the generating diagram tool works, so please do not pay attention to the classes and their content.
Base classes, interface, and enum:

Derived classes and folder structure:

Generating PlantUml from the code
We can generate the PlantUml from the code using the PlantUml Diagram Generator tool.
First, install the tool via Nuget Package running the command dotnet tool install --global PlantUmlClassDiagramGenerator --version 1.2.4
Next, execute the command to search the .cs files inside the folders and generate the .puml files running dotnet puml-gen Entities generatedPuml -dir -execludePaths bin,obj,Properties -createAssociation -AllInOne these command parameters are very simple and can be checked on the tool documentation.
The command will generate a folder in the root with all the .puml individual files and the include.puml file with putting all of them together.

Or you can use Visual Studio Code to generate the files without customizing the generation process.

Reading the PlantUML files
To read the PlantUML files we will need to use the vscode/plantuml extension, once installed it will provide some options in the IDE for exporting .puml files to images.
To install it, search the extension in the Visual Studio Code Marketplace:

Then, reload the IDE and select the PlanUml: Export Workspace Diagramsoption. It will open a dialog asking for the image format you want to use before generating an output folder with all the exported diagrams images:


As we can see, it was generated an ./out folder with one diagram for each individual class and a big one with all the classes together in one single image file.
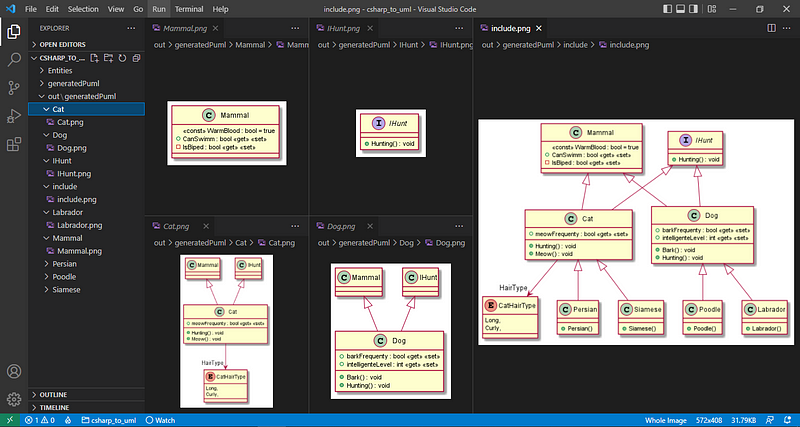
There are many other options to explore that I am not covering here, you can check the tools documentation and explore all the other available features.
Remember we do not need to limit this only to C# code, the PlantUML is an open-source initiative, so other implementations already exist to support it for other languages.
I hope this article can help you and your team to generate nice and useful class diagrams, thank you for reading, and see you next time.


