
Generate SRT File (Subtitles) using Google Cloud’s Speech-to-Text API
The code used in this article can be found here.
Watched a movie/series with subtitles and been amazed over how they magically pop up? Or wondered how can you add subtitles to your own videos? Follow-through and by the end of this article, you’ll be able to generate subtitles programmatically.
First Things First — Why prefer SRT File Format for Subtitles?
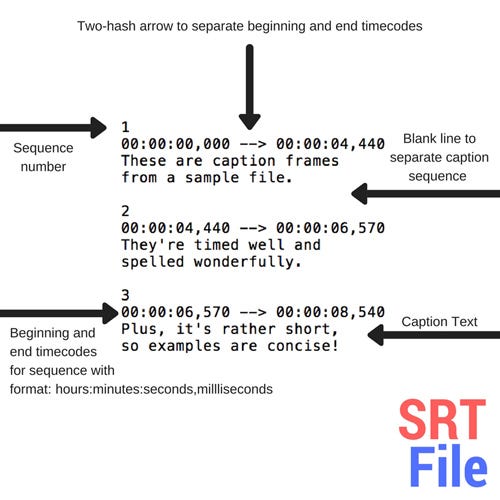
SRT is a widely accepted format for subtitles, compatible with most of the media players out there, and has immense SEO benefits. Blog — Understanding and Creating SRT Files not only explains SRT files and their benefits pretty well but also explains how to add them to your videos on various platforms such as — YouTube, Facebook, etc.
If you followed the mentioned blog, you would realize that in the age of automation, creating an SRT file involves a lot of manual labor. Can we somehow minimize these efforts?

There are two ways to do this —
- Train your own ML model — This requires a lot of data, manual labor to annotate the data (Irony), time, and frankly, a lot of money. This ain’t worth it for small scale applications/organizations.
- Use pre-trained APIs — Now there are multiple pre-trained APIs that can do this job efficiently. Added benefits are — they require less time to set up, easy to learn, and are cost-efficient. We will use one such API to generate subtitles — Google Cloud’s Speech-to-Text API.
Let’s Get Started!
Pre-requisites
- You need to have Git, Python 3.7 and ffmpeg installed on your system.
- You need to have a Google Cloud project with billing enabled. Follow Creating and managing projects to set this up.
- Also, a service account with the right to use Speech-to-Text API. Download the service account credentials as credentials.json. Follow Creating and managing service accounts to set this up.
Setting Up the Environment
Enable the Speech-to-Text API in your Google Cloud Project. From the navigation bar, go to APIs & Services > Library > Cloud Speech-to-Text API and Click on Enable.
Now, run below commands from your Terminal
- Clone the repository —
git clone [email protected]:darshan-majithiya/Generate-SRT-File-using-Google-Cloud-s-Speech-to-Text-API.git- Install the requirements —
cd Generate-SRT-File-using-Google-Cloud-s-Speech-to-Text-API
pip install -r requirements.txt- Move your credentials.json here and then export the credentials —
export GOOGLE_APPLICATION_CREDENTIALS="credentials.json"Data Preparation
I’m a Suits fan so I’ll use this video for the demonstration. Feel free to use any other video.
I’ll download this video using the pytube3 module.
Now, that the video is downloaded, let’s move ahead and get the various attributes of this video.
Getting the Number of Channels, Bit Rate, and Sample Rate of the Video
We need these attribute values to transform video to audio which will later be used by Speech-to-Text API.
- Channels — it’s the passage or communication channel in which a sound signal is transported.
- Sampling Rate — defines how many times per second a sound is sampled.
- Bit Rate — is the number of bits encoded per second or number of bits transmitted/received per second. Higher the bit rate with a higher sampling rate implies good quality audio.
I’ve used pydub module to extract these attributes.
Converting Video to Audio & Upload to GCS
Transform the video to audio to be used by Speech-to-Text API and storing it on GCS because for audio > 1 min and size ≥ 10 MB, API requires the audio to be stored in the bucket.
Transcribing the Audio
Configuration
Before diving into transcribing the audio, let’s talk about the configuration required.
config = {
        "language_code": "en-US",
        "sample_rate_hertz": int(sample_rate),
        "encoding": enums.RecognitionConfig.AudioEncoding.LINEAR16,
        "audio_channel_count": int(channels),
        "enable_word_time_offsets": True,
        "model": "video",
        "enable_automatic_punctuation":True
}- language_code — The language used in your video/audio. You can check all the supported languages here.
- sample_rate_hertz — Sample rate of the video/audio which we extracted using pydub module.
- encoding — Speech-to-Text API only supports a specific type of audio encodings. You can find all the supported encodings here.
- audio_channel_count — The number of channels used by video/audio.
- enable_word_time_offsets — If True, gives start time and end time of each word.
- model — The model that will be used by API for transcription. Our original Source is a Video, so we’ve used a “video” model. But there are various other models available, you can check them here.
- enable_automatic_punctuation — If True, it also tries to detect the punctuations.
Other then all these, there are many other features available such as Speaker Diarization, Word level confidence, Separate Transcription for each channel, etc. Speech-to-Text API also supports transcription for live streaming.
Transcribe
The below long_running_recongnize function transcribes the video file and returns response object which contents transcripts, confidence, words, start_time & end_time for each word.
SRT File Generation
For the generation of SRT File, I’ve used srt module. Below code converts the response object from Speech-to-Text API into SRT format string. The code looks a bit complicated and it is because each variable is required to display subtitles in sync with the audio when using it in a media player.
The IndexError exception handling helps with the results for the time period in audio when there’s a long silence.
You can then save the subtitles as—
with open("subtitles.srt", "w") as f:
    f.write(subtitles)
The entire code for this article can be found on Github.
Conclusion
Whether you want to perform Speaker Diarization Or want to transcribe customer calls for performance analysis of your employees Or maybe generate subtitles for your live streaming for viewers — You can rely on Google Cloud’s Speech-to-Text API to do it for you in an efficient way with minimum efforts.
If you want to read about many more such amazing use-cases, Stay tuned to Searce Engineering Blog!
If you enjoyed this article, feel free to clap many times (you know you want to!) and share it with a friend. You can also leave a comment to ask a question or tell me how to improve. 😄
Hello, I’m a Data Scientist — Analytics and Machine Learning at Searce Inc. and also a Google Cloud Certified Associate Cloud Engineer. I believe Data and memorable User Experience are two of the most important pillars of any intelligent product. Connect with me on LinkedIn or say hi on Twitter.


