Generate Cloud Least Privilege Permissions Automatically
for the big three cloud providers, AWS, GCP and Azure

For security reasons, Identity and Access Management (IAM) permissions granted to users and services should be of the least privilege. This means that we only grant the permissions required to complete a task. However, it can be very time-consuming to generate this, especially if this permission is used to launch large infrastructure stacks. When time and security conflict, it is not uncommon for security to be compromised.
The rise of ChatGPT and other LLM models has made permissions generation much easier. However, there are still limits to both the accuracy of the answers and the potential exposure of your cloud execution scripts if you were to send them as inputs to these models.
iamlive
iamlive, created by Ian Mckay is a simple but popular tool that can auto-generate least privilege policies if you are using the cloud provider’s CLI, SDK, or third-party tools that use the above, e.g. terraform. It first started to support only AWS, but now also onboarded Azure and GCP.
It works by creating a local proxy server that intercepts the traffic when you run your cloud provisioning scripts and then uses a mapping logic to translate and generate the least permissions policy.
Installation
To install, you can either go to download the installer from its GitHub releases page or use brew if you are using MacOS.
brew install iann0036/iamlive/iamlive

# check version
brew info iamlive
Demo Code
I would expect the most interested users generating the least permissions will be those who use Infrastructure-as-code (IaC), which is currently dominated by Terraform. Hence, for this demonstration, we will use a simple Terraform script as shown below, which creates an AWS Elastic Container Registry (ECR) repository and lifecycle policy. It also stores the Terraform state and lock in S3 and DynamoDB respectively.
terraform {
  backend "s3" {
    region         = "ap-southeast-1"
    bucket         = "s3-jake-terraform-state-store"
    key            = "jake/test/deploy_project/state"
    dynamodb_table = "ddb-jake-terraform-lock"
  }
  required_providers {
    aws = {
      source  = "hashicorp/aws"
      version = "~> 5.42.0"
    }
  }
  required_version = ">= 1.4.5"
}


# ============================

resource "aws_ecr_repository" "this" {
  name = "ecr-test"
}

resource "aws_ecr_lifecycle_policy" "this" {
  repository = aws_ecr_repository.this.name
  policy     = <<EOF
{
    "rules": [
        {
            "rulePriority": 1,
            "description": "Expire images older than 7 days",
            "selection": {
                "tagStatus": "untagged",
                "countType": "sinceImagePushed",
                "countUnit": "days",
                "countNumber": 7
            },
            "action": {
                "type": "expire"
            }
        }
    ]
}
EOF
}
Commands
You will need to open two terminals, one for running the proxy server, and another to run the IaC scripts.
Terminal 1
iamlive --set-ini --mode=proxy --output-file=policy.json
Enter the above command. Nothing will appear till you run your Terraform script in Terminal 2. For the full list of arguments and examples, refer to its GitHub page.
Terminal 2
export HTTP_PROXY=http://127.0.0.1:10080
export HTTPS_PROXY=http://127.0.0.1:10080
export AWS_CA_BUNDLE=~/.iamlive/ca.pem
Add the stated proxy server variables if u are using AWS. For terraform, do remember to terraform init before entering these variables. After which, you can run the Terraform commands like terraform plan or terraform apply etc.
Demonstration
Below is a series of screenshots using the earlier Terraform script with iamlive.

After terraform init, we can enter the proxy variables, and then launch iamlive in the opposite terminal.
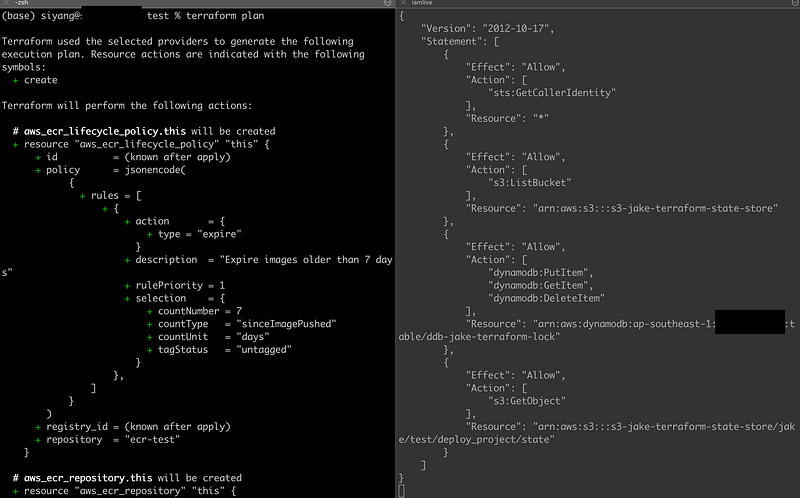
You can see that when we execute terraform plan, the right terminal will automatically create a policy that accesses the terraform state and lock in S3 bucket and DynamoDB.
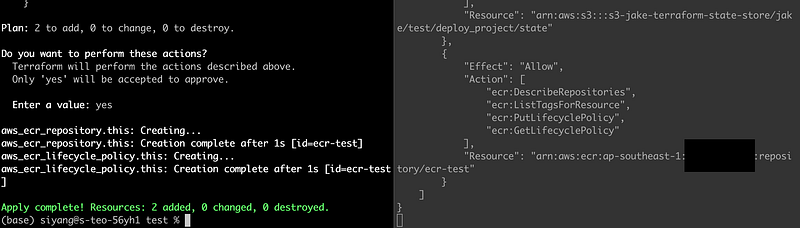
Then, we proceed to terraform apply. You see on the right screen that new permissions were added that allow the creation of ECRs.
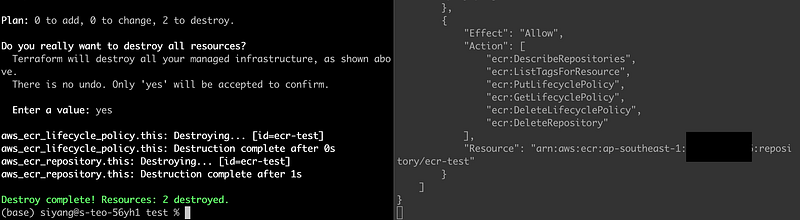
Then after using terraform destroy, the various delete permissions are added on the right.
To end, in the right terminal, just CTRL + C and we will be able to see that the policy shown earlier is saved as a file called policy.json as indicated in the iamlive command earlier.
When you are done with the policy generation, remove the environment variables, or else you will encounter some errors with subsequent executions.
unset HTTP_PROXY; unset HTTPS_PROXY; unset AWS_CA_BUNDLESummary
This tool is, to my best knowledge, the easiest to generate the least permission policy for the stated cloud providers. There will be some mistakes made by the tool occasionally due to its outdated mapping translations, so do review the code as appropriate. Also, it is recommended to include the Sid to indicate the use of each set of permissions for easier interpretation.
Still, the time savings could be in the hours or even days if you have a large infrastructure to secure.


