
Framing the Worm’s House
Is there treasure or trash in this worm-eaten scrap of wood…
This is my second story for the new Woodworkers of the World Unite!!! publication, lightly edited from a previous submission. I hope to see your stories here as well.
1. Once upon a time…
My wood supplier gifted me with a bunch of scrap wood so I could practice my new-found woodworking craft.
One particular scrap of wood was worm-eaten and rotten throughout. Perfect for the fireplace or the compost. You could see that it was cut away from a larger board because it was so obviously defective and unappealing. You could also imagine how the rest of the board might have been a majestic piece of wood fit for a King’s chest of drawers or armoire.
This is the story of that peasant’s scrap of wood.

2. There was a very hungry little worm…
The worms (actually probably a species of beetle larvae) had made quite a meal of this piece of wood. You could see their tracks throughout, spongy sinuous lacunae that made the board look like part of a scroll with rounded Chinese or Persian font. It also had a big piece of bark inclusion stuck in one end.
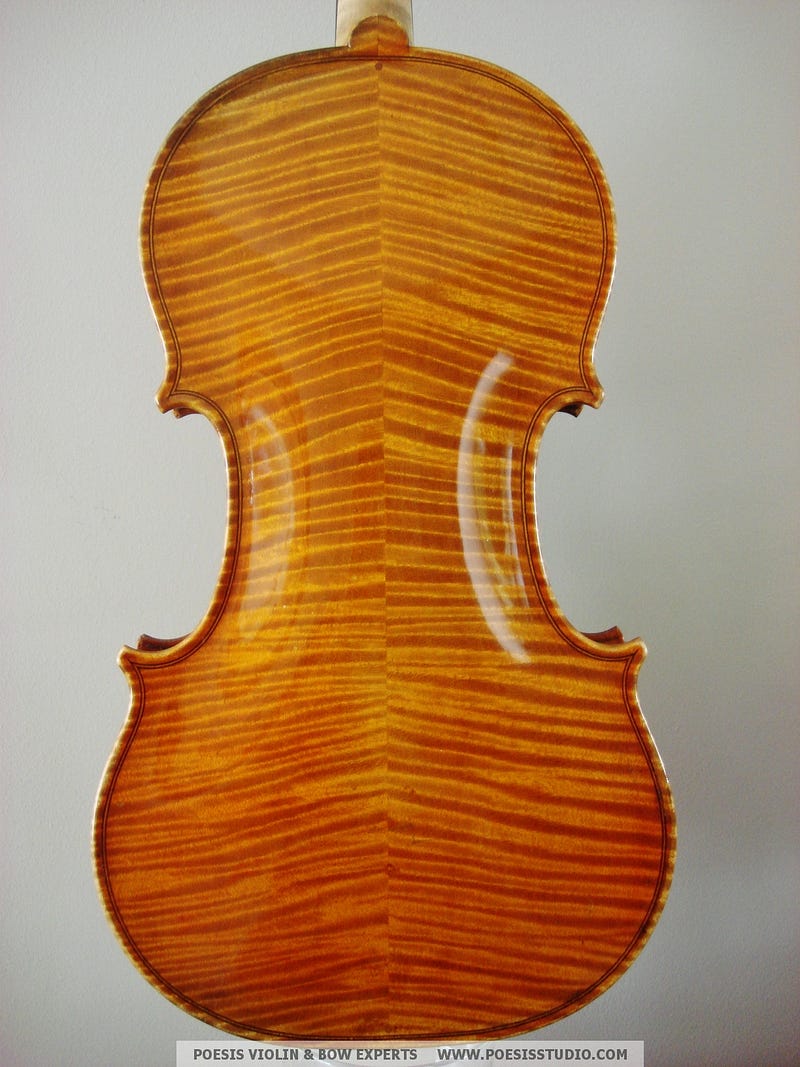
But I thought the scrap wood was interesting because I could see hints of a tiger-striped pattern. That tiger-stripe goes by various names in woodworking lingo: flame, curly, ripple, fiddleback, figure… The most beautiful examples are used in the finest musical instruments:
So, curiosity drove me to see what I might find if I worked this scrap board. It could end up a pile of sawdust, or it could be something interesting.
I had no ideas at the time what I might make, but I thought if I wanted to make something out of this tiny board, I should maximize the material if possible.
I resawed the board (cut it through its thickness, so I could open it up like butterfly wings, and possibly get some stunning symmetry effects — or at the least double my material).
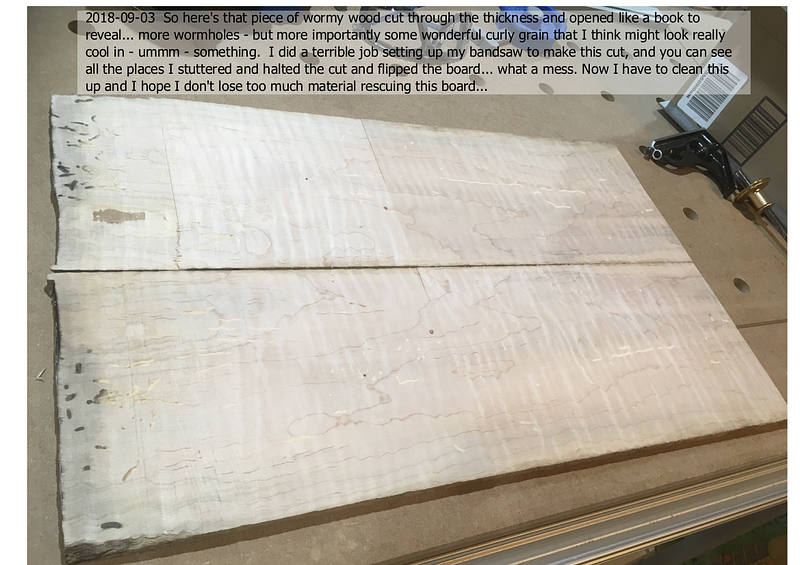
Resawing wood can be a finicky operation, at least as far as setting up your bandsaw. Instead of setting the board onto the bandsaw table flat face down, and cutting across the thickness of the board, to resaw you set the board on its edge and cut through the thickness. The finished board will be about half the thickness of the original (less the saw kerf).
I screwed up the setup and the resawing, and had coarse chatter marks in the board which I fixed with brute force and lots of sanding.
And I sanded and sanded…
I mentioned my predilection for punishment and hand-sanding in my previous story about my piano bench here:
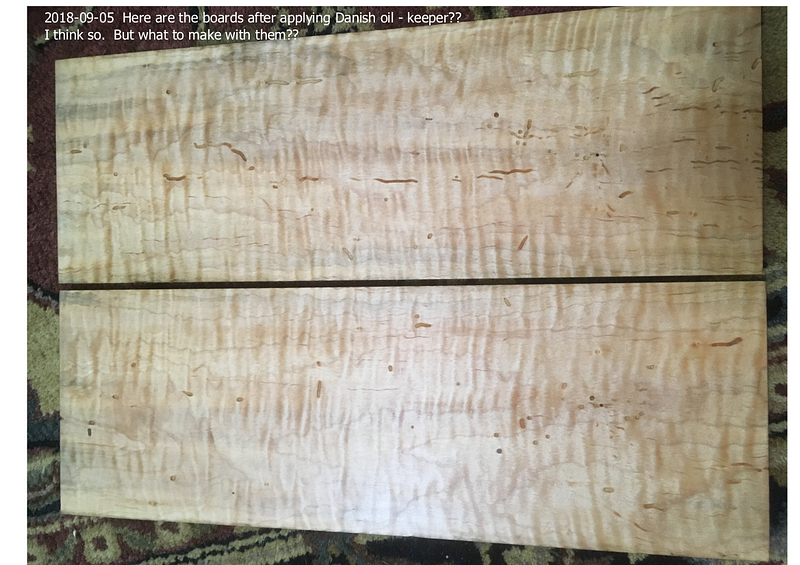
But I enjoy the manual work for the satisfaction of seeing what my labor yields if all goes well. And I was quite pleased with how dramatic the curly grain looked, even with the hieroglyphs of worm-speak recorded in the wood.
As a kid I avoided work like the plague. I was a fundamentally lazy kid. But as I grew older, I slowly realized the benefits of work, both for the results, and for the inherent pleasures of zenning out.
3. The worm wanted a house…
So, I decided to build a frame around the panels. I had no idea what I was going to build, if anything. But at the least, I could frame the treasure as if it were a painting, or a window, or a home for the worms.
I’m an engineer, and it is drilled into me that a project is driven from the end goals clearly in mind. This project, though, was driven with curiosity and serendipity foremost in mind, each result suggesting the next step, like a rivulet working its way down a rocky slope.
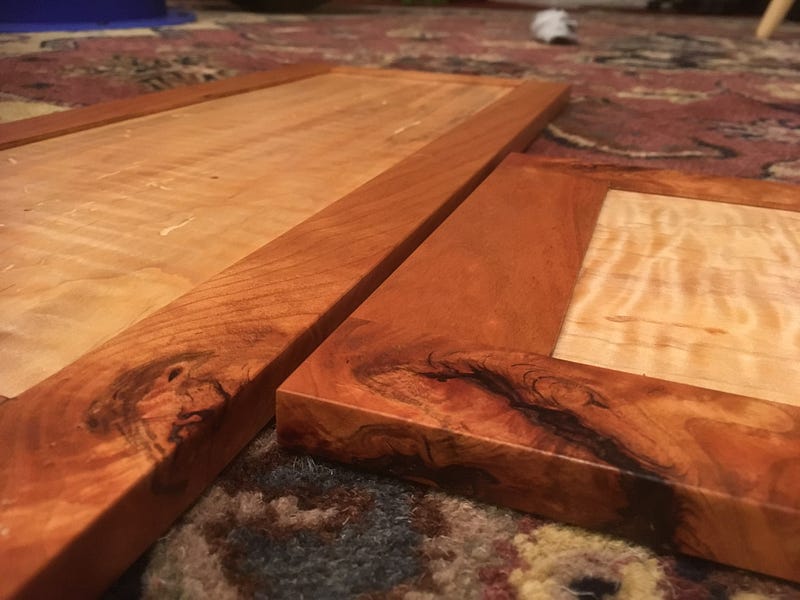
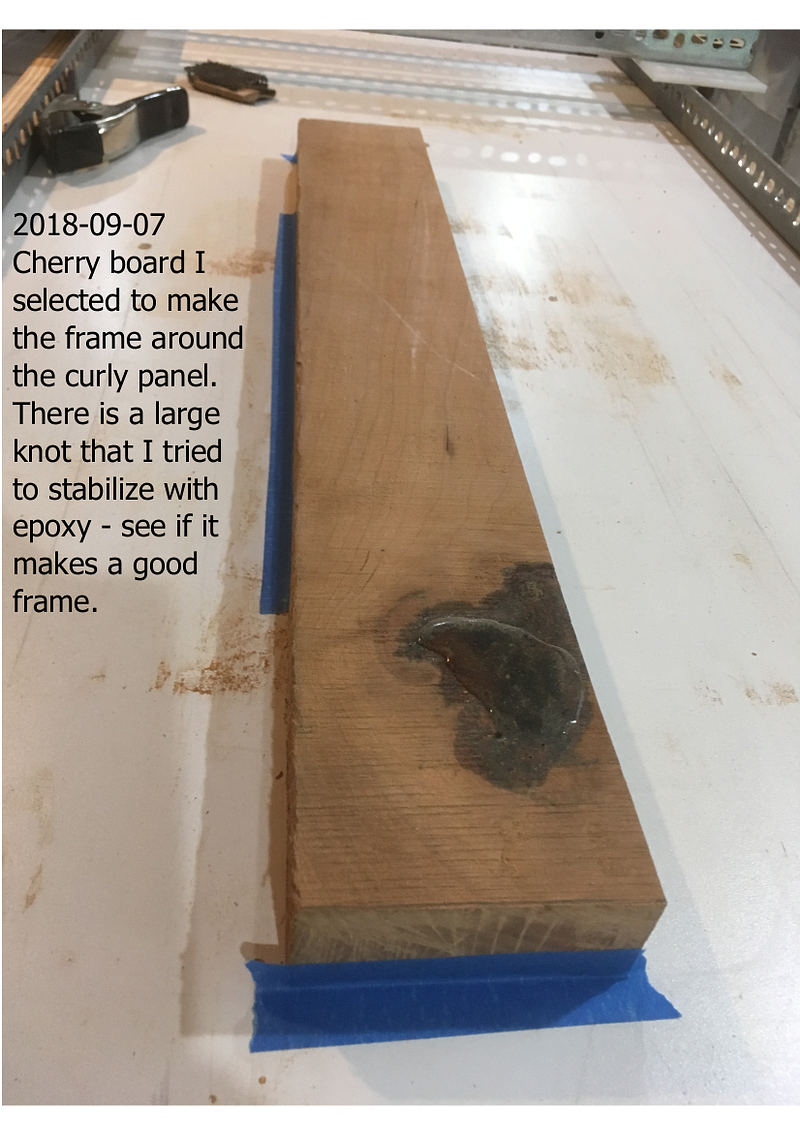
The panels wanted a frame. I did not know what kind of wood the scrap was, but it was a light-colored wood, perhaps maple or birch. I thought it would be nice to have a darker wood for a frame. And cherry is one of my favorite woods. So cherry it was.
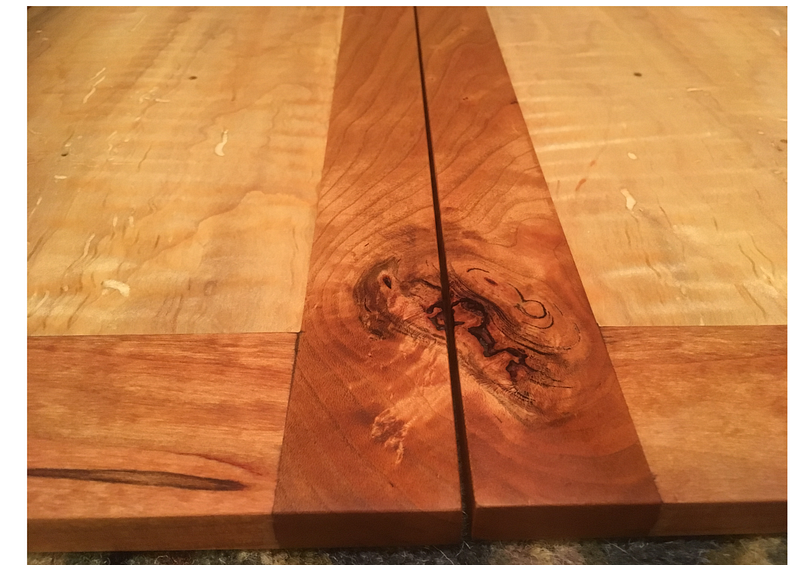
I picked a remnant of a cherry board that had a large knot. I’ve noticed that knots are associated with some interesting grain patterns. Knots pose all kinds of problems for woodworking. The tree grows around a branch, and the stresses in the wood results in the wood-grain drama. Dramatic grain is my muse.
Knots are considered defects in the wood and lower the grading of lumber. Often the knot is very hard since its grain is perpendicular to the surrounding wood. That perpendicular grain also causes more shrinkage than the surrounding wood and knots can fall out later as a result.
Since knots cause trouble, and often have gaps or cracks around them, I fill and stabilize them with epoxy before I start to process the wood.
The next photo shows the big blob of epoxy that I poured into the wood in and around the knot.
I have taped the cherry board to a fixture that I use to router-plane and thickness boards (I don’t have the equipment that most real woodworkers use to do these tasks).
Next, I cut the flattened board to the approximate thickness needed for the frames. The next image shows the boards cut from the raw lumber.
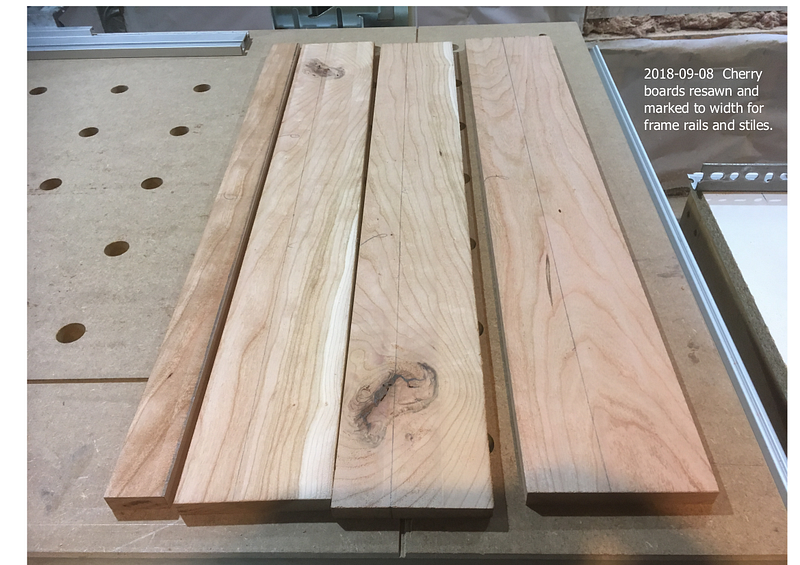
I wanted to show the knot in the frame, to make it a visual element. So, I planned the next cuts accordingly. As you can see from the raw cherry lumber that I selected, there was not a lot of choice as far as locating the knot. It is at one end of the lumber. That original lumber was long enough that I could have cut it out of the frame pieces, but I wanted it in the frame.
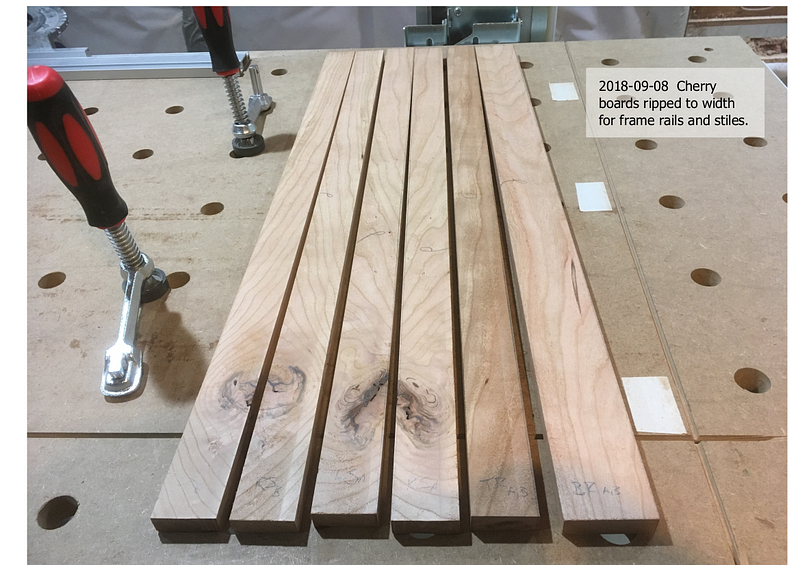
The next image shows the final width and thickness dimensions of the frame components.
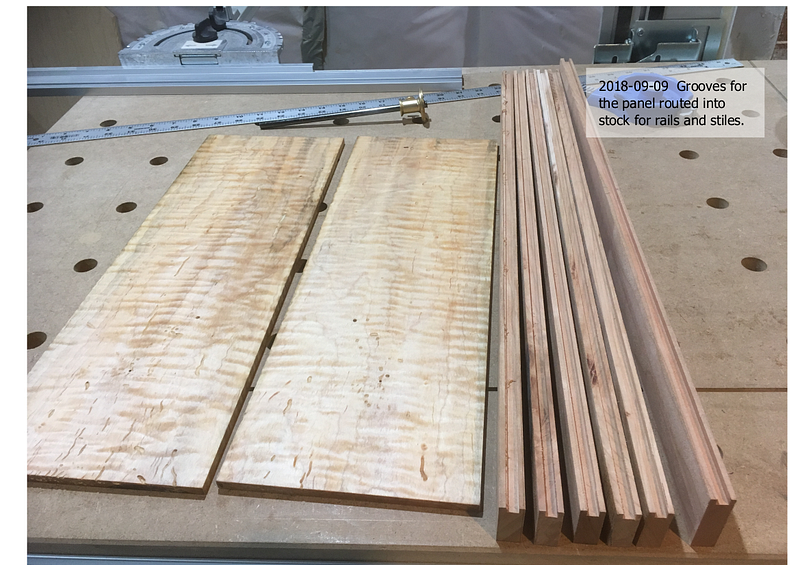
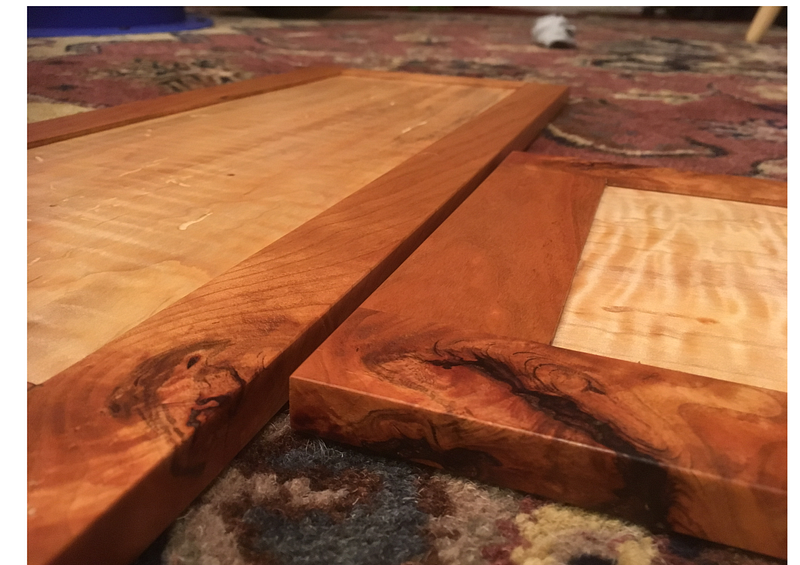
Next, I had to cut a groove into the edge of the frame components so that the panels had a place to sit. The image below shows the panels next to the frame parts with the grooves.
The vertical pieces in a frame are called the stiles, and the horizontal pieces are called the rails.
I wanted the bottom rail to be the widest boards, the top rail to be narrower, and the stiles to be the narrowest of the frame parts.
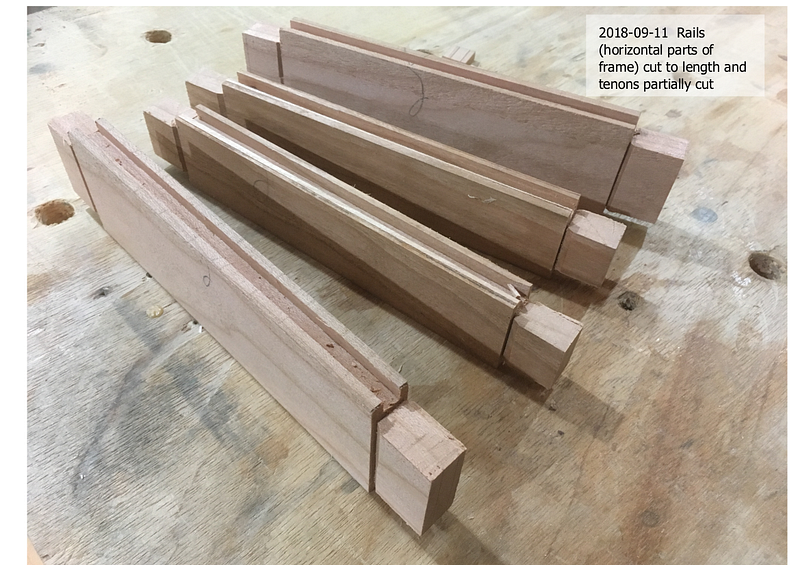
One of the joinery methods I am practicing here is a strong design called a mortise and tenon joint. A mortise is a hole, and a tenon is a peg that fits into that hole. For my frame, the tenons will be smaller rectangular cross-sections than the rail or stile. The mortises will be the same dimension across as the groove’s width. The next image shows the tenons partially cut in the rails. The stiles will have the mortises.
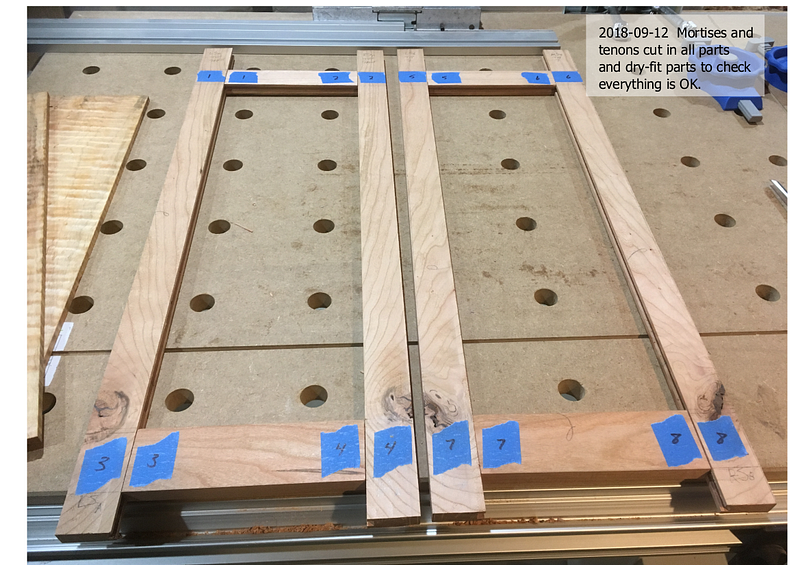
Once the mortise and tenons are prepared, it is time to dry-fit the pieces together (meaning no glue) to check their fit and that the full assembly will go together and remain square.
Notice the tape with numbers on each of the pieces?
The tape is the behavioral scar left by the trauma of the errors in building my piano bench — which you can relive vicariously here:
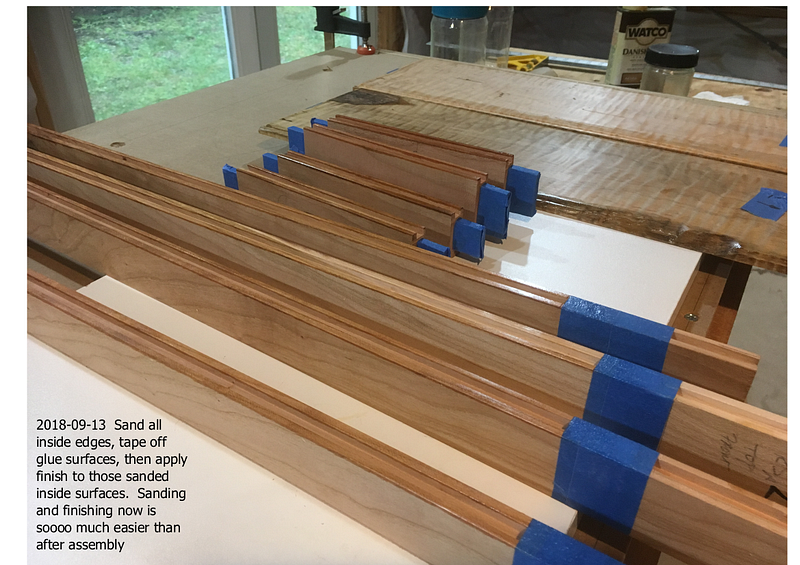
One aspect of finishing parts that I have never figured out is how to sand inside edges and corners. So I try to do that sanding and finishing before assembly.
Another problem for me is making joints on a flush assembly so that the parts are truly flush and don’t require finishing. When I glue up the frame parts, although they look flush in the dry-fit image above, my frames always have a step between parts that require planing and sanding to get truly flush. For this reason, I don’t finish the faces of the frame — only the inside edges and corners — as you’ll see in the image below.
4. The worm-house was looking cozy…
The parts and pieces of the frames and panels assembled together nicely. Now was the traumatic moment of truth. Gluing has always been stressful for me. Part of it is the limited working time of glues.
Glues remain liquid for a short time before they begin to set. This means there is no time to dally or get distracted or lose track of parts or forget the order of assembly.
And some joints are irreversible once they go together — see my story of the piano bench for a great example of an irreversible joint. My frame has a mortise and tenon joint, similar to the joints I used on the piano bench. A big difference is that the piano bench has to hold people, so I wanted to maximize the strength of the joint — so I used a wedged mortise and tenon.
The frame and panel construction for this project was not a load-bearing structure. I didn’t even need a mortise and tenon joint. I could have settled for some variation of a mitered joint. But I elected to leave out the wedges for the frame’s mortise and tenons.
After the piano bench fiasco, I worried about what mistakes I was going to make this time — one error I particularly feared was forgetting to insert the panel before gluing the final frame part into place — or gluing the frame in the wrong order so the last piece couldn’t be assembled.
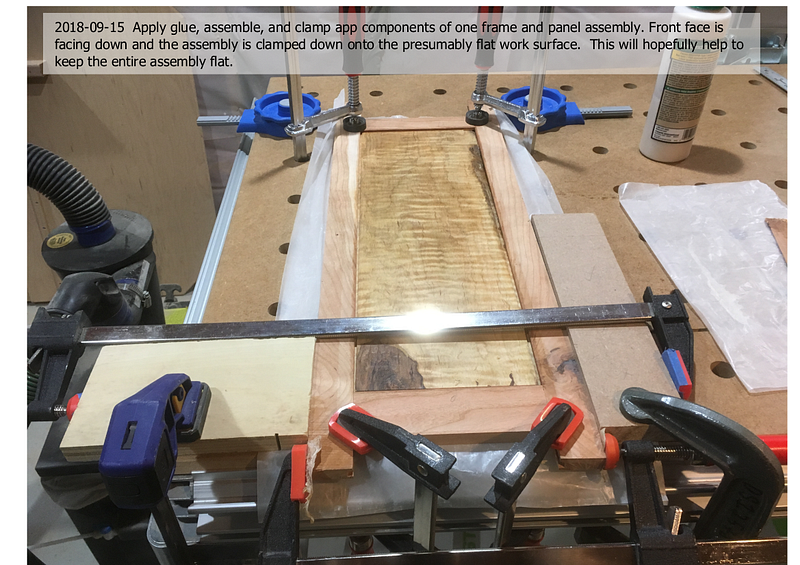
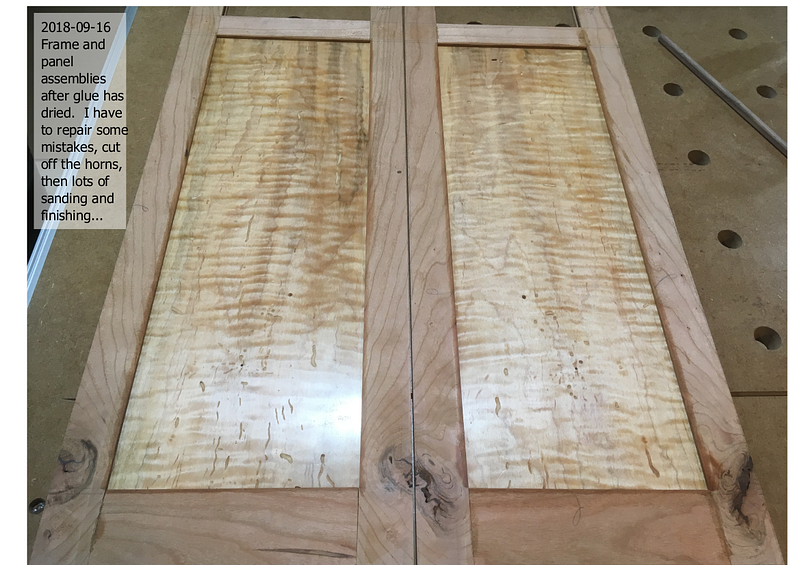
The next image shows the frame during the glue-up. Notice the crazy number of clamps and fixtures to try and distribute the clamping force.
In the end, my worrying and putting together a checklist and labeling the parts was worth it. This assembly (admittedly simpler than a piano bench) went together without the drama of earlier projects.
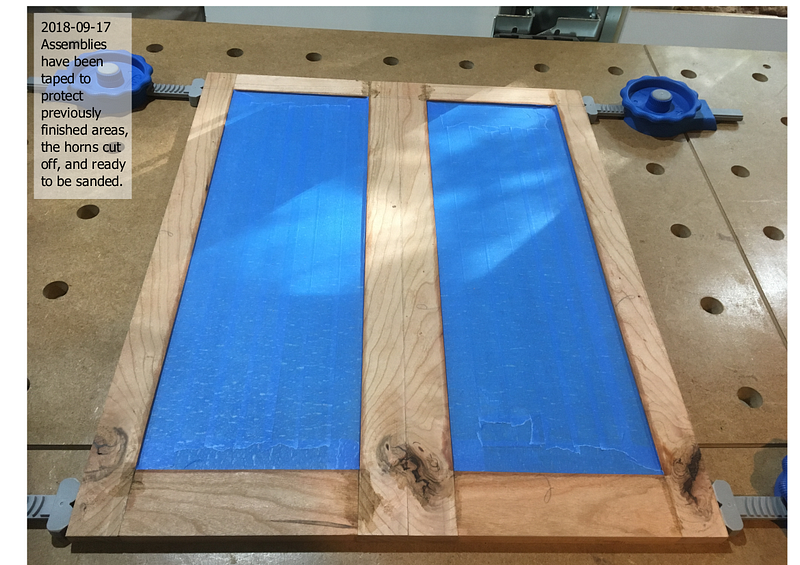
Now I needed to clean up the faces of the frame since there were minute steps at the joints between each part — it was not truly flush. And I would have to do a lot of sanding as well. I needed to protect the already-finished areas: the panels, and the inside edges and corners of the frame.
So I taped over those entire areas, as you can see in the next image.
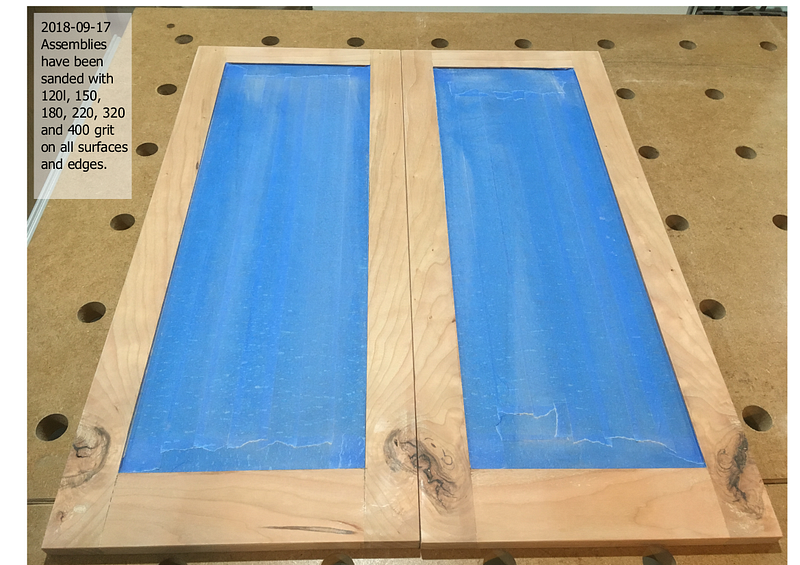
The next steps were the zen activities of manually sanding through the incrementally finer grits of sandpaper.

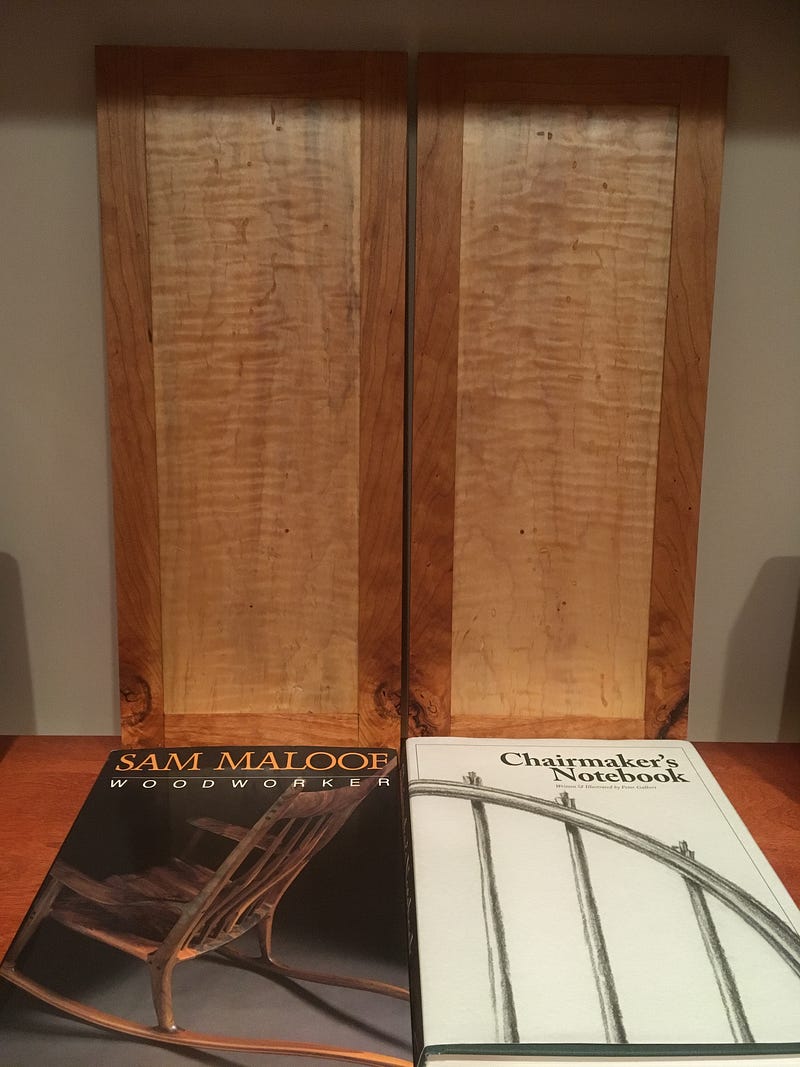
You can see from the books that I have aspirations far beyond my meager skills. Like a kid with crayons gazing at a Michelangelo. Maloof’s chairs are sculptures of wood as you can see from the book cover. James Krenov’s cabinets are a philosophy of wood, as are his writings. Nakashima’s benches are poetry in wood. Their works are so inspirational, they are painful to behold.
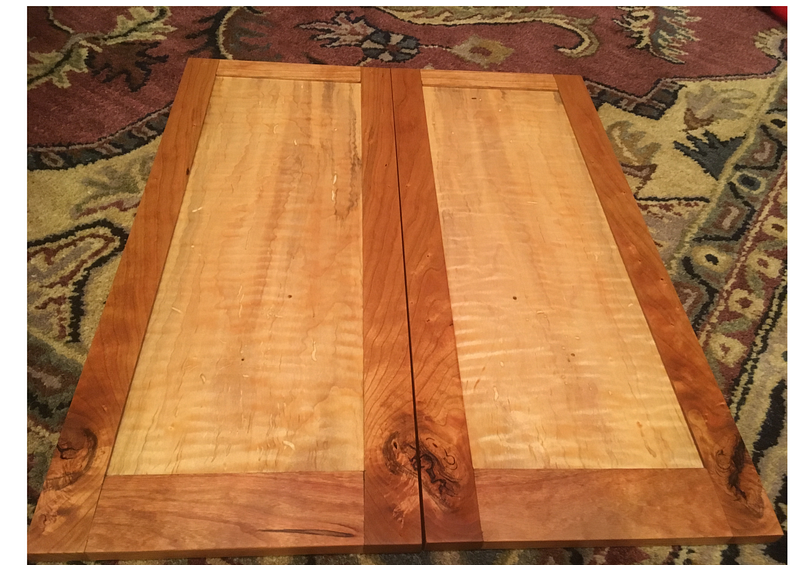
I never did figure out what I was going to make with that little piece of scrap wood. I thought about a small cabinet. Those frame and panel assemblies could be the doors.
But in the end, I just left them as they were, sitting on my shelf, enjoying themselves in the sun, whispering wormy hieroglyphs to each other.