
CODEX
Flutter Perfect SetUp
The perfect flutter SDK and project setup for both intermediate and flutter beginning developers!
I am going to show you a superior flutter project setup including flutter SDK that gets you started right away coding no matter if you are a beginning flutter developer or an intermediate flutter developer. It’s somewhat a longer article but I have some free stuff along with that is linked in this article.
And yes, this gets remixed, expanded, and finally released as part of a flutter development book I will self-publish in the summer of 2021. As I gear up for these longer articles, you get the benefit of getting free code. This time around you get a free flutter_setup app code template that has everything set up and some added basics such as a flexible semi-automated workflow to make flutter app development and learning about flutter somewhat easier. Before I get into the meat-of-the-article I have to explain about the edition of flutter I amusing, ie whether it’s stable, beta, dev, or master.
Flutter Release Channels
Flutter comes in the following release channel editions of stable, beta, dev, or master. Of course, every SDK team of every framework ever created has always stated that you should use the stable release for production application development. But, we are dealing with a fast-changing framework. And, in that case, actually using the beta release channel instead has some benefits of: 1. You get a heads-up on upcoming features. In my case of writing several flutter development books this year, it helps me get ready to explain those new features to my audience, namely you. 2. It helps you weed-out all the flutter plugins that are not updating and keeping up with the flutter framework releases. And, often introduces you to an easier way to do something. An example is that instead of using the hard gherkin-BDD which requires knowing the gherkin step language I can instead use just test unit groups and dart all because the dart gherkin plugins are not keeping up with flutter framework changes.
In other words, think of it as you get to see things early from 2 months ahead when you view my sample flutter app code. Now, let’s get to the pre-requirements.
Pre-Requirements
The reason why I am repeating how to install the flutter and dart SDKs and the mobile SDKs and IDEs is that I see so many open and closed issues in the flutter GitHub pertaining to the in-precise details of who to install them in the first place. I feel that if I give exact details then it prevents you from running around in circles after installing them improperly.
Flutter SDK And Dart SDK
You are in luck as the dart SDK is included with the flutter SDK. But, there are some tricks. First, if on MS Windows then you cannot and should not install the Flutter SDK in the Program Files directory or any other MS Windows directory that can be locked-out via the folder change prevention setting, and that generally means the Program Files, Program Files(86), AppData, and ProgramData directories.
No matter what OS-platform you will install the Flutter SDK in a folder that does not have spaces in the name. Then open up your virus program’s setting and make sure to set an exclusion on virus scanning for that folder you installed the flutter SDK into. Now we are into the setting of environmental variables and path settings.
Env Variables And Path Settings For The Flutter SDK
Now let’s get down to setting the env variables and the path settings for the flutter-and-dart SDK combination. The only env variable you have to set is for the integration testing VM-URL setting, ie:
VM_SERVICE_URL http://127.0.0.1:8888/Now for the path settings:
D:\fluttersdk\myfluttersdk\flutter\bin
D:\fluttersdk\myfluttersdk\flutter\.pub-cache\bin
That does two things. It set’s the path both to the dart executable and the flutter executable in the bin sub-folder. Two, it sets the path for the dart executable’s so that we do not have to type such things as flutter pub DartExecutableName. For example, instead of typing:
flutter pub run dcdgI just instead type:
dcdgto generate UML diagrams.
SIDE NOTE: When installing the flutter SDK and mobile SDK's if you are making-do with a laptop with only 8 gigs of RAM then you should adjust your virtual page file size to 4 times your actual RAM, ie 32 gigs as that in most cases with that cheap laptop will end up putting the actual location of the virtual page file on the n2d non-boot HD that the typical cheap laptop has which improves the launch times of the android emulator and Android Studio.
Now let’s deal with the easy way to get at least one front-end platform SDK, in this case at least one mobile SDK.
Mobile SDK’s
The easiest way to get at least one of the mobile SDK frameworks is to download and install the IDE associated with the mobile SDK framework. Let’s deal with Mac first.
If you are on Mac let’s get XCode so that we have the iOS SDK:
Keep in mind in early 2021 that the iOS simulator on m1 macs is not supported just yet and you will need a physical ios device(firebase labs for example ). And do a print env command to make sure your SDKROOT is set with this in the terminal:
$ prtinenv $SDKROOTMake sure to configure XCode via this in your terminal:
$ sudo xcode-select --switch /Applications/Xcode.app/Contents/Developer
$ sudo xcodebuild -runFirstLaunch
$ sudo xcodebuild -license
Do this command so the simulator opens up to verify it’s a 64bit simulator:
$ open -a SimulatorNow let’s deal with the other mobile SDK, Android SDK download along with android studio at the android studio download. You want the left beta build as that keeps up with the emulator updates and the new android releases each year:
https://developer.android.com/studio/preview
The Android Studio will let you download the latest Android SDK release. Typically, the flutter SDK team supports the same android SDK's as native android(right now that means android 8.1, 9,10,11,12). At some point, you should download them via the project settings(appearance->system settings->sdk) but no need to do that right now.
The plugins you will need() are: 1. PlantUML 2. Flutter(it will prompt you to install dart as well) 3. markdown Now let’s set the env variable and the path settings for the Android SDK:
VM_SERVICE_URL http://127.0.0.1:8888/ env varD:\androidstuff\androidsdk\platforms
D:\androidstuff\androidsdk\tools
D:\androidstuff\androidsdk\platform-toolsAnd the last step is if you will be using VSCode to download and configure it with the plugins: If you are on the Mac M1 machines then you want the insider edition which is at:
https://code.visualstudio.com/insiders/
And the plugins you need are: 1. flutter and dart 2. ios emulator 3. android emulator 4. terminal
Now let’s run the tool flutter doctor in the terminal with:
flutter doctor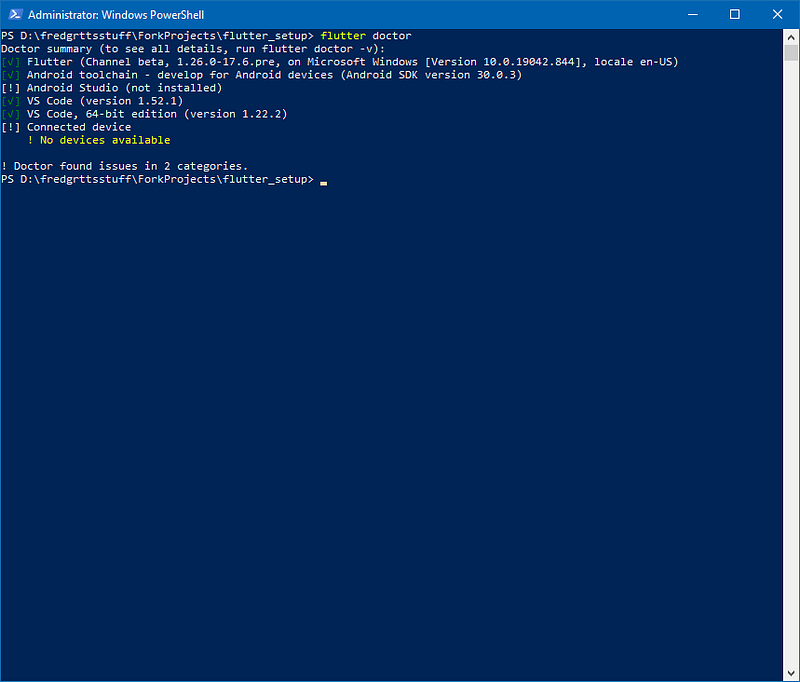
Now we are at the part where we can install the rest of the dependencies to the flutter perfect setup app template. Namely, LCOV, JUNIT2HTML, PLANTUML, and the dart binary tools we will be using. I am calling my flutter app template flutter_setup and you will get that resource to download at the end of this article.
Flutter SetUp Dependencies
Let’s take care of the non-dart binary tool dependencies first. Code coverage is outputted in the LCOV info file format so we need a processing tool to convert that info file output to a human-readable HTML output. The set of Perl scripts are nicknamed LCOV. If you are on Mac or Linux or Unix then you get those Perl scripts by downloading the normal devtools compiling set and most of the time that is somewhat automatic. But, on MS Windows we have to manually find it and install it.
MS Windows LCOV
The Linux Test Project distributes a windows version of the LCOV set of Perl scripts that have the right processing of MS-Windows paths. It can be downloaded and installed via Chocolatey:
https://chocolatey.org/packages/lcov
and the choco terminal command to install is:
choco install lcovAnd the last step is to set up an env variable that points to the path to the genhtml script that is part of the lcov on windows install which is usually at:
GENHTM C:\ProgramData\chocolatey\lib\lcov\tools\bin\genhtmlIf on Mac, Unix, or Linux then find where lcov was installed as you need to set that GENHTML env variable.
Let’s verify it to make sure it works, download this brief info file:
Save it as lcov.info an open your terminal and type:
perl %GENHTML% -o html lcov.infoand you should get an HTML folder with a nice HTML report in it.
Next up is to install Python and Junit2html.
Junit2html
Junit2Html is somewhat different as it cannot be installed via Operating System package managers and it does have a python dependency. For those on Mac and Linux in your favorite package manager, you are searching for the python3 package to install. If on MS Windows then it can be installed via chocolatey:
https://chocolatey.org/packages/python/3.9.1
and the command is:
choco install pythonAnd then you will use the python package manager pip to install the junit2html python script no matter which OS-platform you are on:
pip junit2htmlNow for my secret developer powers, we are going to verify that it’s working!
Here is a simple test unit XML file directly from my flutter_setup project repo:
save is as flutter_setup-test.xml and open your terminal and type:
junit2html flutter_setup-test.xml flutter-setup-test.htmland you should see an HTML report file outputted.
Now we have that PlantUML jar to download, install, and configure.
PlantUML
The PlatnUML jar download can be found at:
Save the jar in a sub-folder, and then you will set your env var:
PLATNUML D:\myOpt\plantuml\plantuml.jarWe are now at the step of installing the dart binary tools we will use.
Dart Binary Tool Dependencies
All these dart binary tool dependencies are part of the workflow in how I use the flutter_setup app template. They are: 1. Derry 2. DCDG 3. JUNITREPORT 4. DART CODE METRICS 5. DARTDOC and DHTTPD
Now let’s do this in just one swift batch install:
flutter pub global activate derry
flutter pub global activate dcdg
flutter pub global activate junitreport
flutter pub global activate dart_code_metrics
flutter pub global activate dartdoc
flutter pub global activate dhttpd
We are missing one thing, you should install devtools, via the terminal it’s:
flutter pub global activate devtoolsKeep in mind since you have pub on your path these tools only need their executable name to be launched, ie:
derry    for derry
dcdg      for dcdg
tounit    for junitreport
metrics   for dart code metrics
dartdoc    for dartdoc
dhttpd     for dhttpd to view the api docs so that the js search tool works correctly in the search box
devtools   for devtools
Google flutter and dart docs still in places has this incorrectly stating that you need to type this prefix:
pub global runThat is not needed and is a hold-over of when the dart SDK was separate from the flutter SDK with dart being in the 1.x version range and flutter being in the 1.x version range.
Guess what step we are at? We are at the step where now you can actually use that flutter-setup app template!
Flutter_Setup App Template
Let me state first that this is my first pass at this which means at this time there still is a portion of manual setup. And, you just saw the tool dependencies that one has to set-up. But, the goal is worth it in that you have a set of tools to make flutter app development and flutter app development learning somewhat easier as you get the feedback to see if you are on the right path or not right away as you write each code line.
The flutter_setup project repo is at:
https://gitlab.com/fred.grott/flutter_setup
Download it and unzip it into a sub-folder. Let’s do an easy sequence of replacing and adding to a new flutter project you create:
flutter createHere is our sequence: 1. pubspec 2. gitignore 3. skinparam.iuml 4. derry.yaml 5. dartdoc_options.yaml 6. analysis_options.yaml 7. files in lib folder 8. files in test_driver folder 9. files in test 10. files in integration_test 11. If using Android Studio than copy the .run folder and files
When you get to the code file replacement and additions it’s easier if you delete the imports as than your IDE whether Android Studio or MS VSCode will suggest the correct import and you will be all set. Keep in mind that it’s linked to the Flutter Beta release channel and so there is one small change in the fluter_test_config.dart from main to testExecutable and that is marked in the comments to that file. There is also one small work-around change in the main.dart file as I get a null-safety error on a dependency somewhere although it’s not the 3rd-party dependencies so I do a null check on the widget.title. Once everything moves to null-safety that check will no longer have to be there for tests to pass.
Keep in mind that you need to change the hard links in derry.yaml to the names for unit test output report names you want and their respective locations. It’s not too bad at a few minutes of copy, pasting, small line changes, and then doing some test run builds and tests to verify that it’s all working.
Also, keep in mind that on MS Windows you have to run the integration test via the terminal after you have started the app on the emulator. It’s already set up via derry, read the comments in the derry.yaml to see how to use it as you no longer have to type that long terminal line, just a short one instead.
Conclusion
Is this perfect? No, but it’s a good start in that once the dependencies are set-up and the manual file copying completed we have a workflow we can rely upon when we code flutter mobile apps.
By having a somewhat dependable tool-set including a properly setup app template base you spend significantly less time having to track down error messages and other hick-ups. This is a plus when doing a self-learning sprint into flutter app development.
Resources
Specific resources for the article:
flutter_setup app project template https://gitlab.com/fred.grott/flutter_setup
Note about recommend use flutter beta on Apple M1 Silicon https://github.com/flutter/flutter/wiki/Developing-with-Flutter-on-Apple-Silicon
DevtTools Docs https://flutter.dev/docs/development/tools/devtools
[email protected] https://pub.dev/packages/dartdoc
[email protected] https://pub.dev/packages/derry
[email protected] https://pub.dev/packages/junitreport
[email protected] https://pub.dev/packages/dcdg
PlantUML https://plantuml.com/
flutter_test_library api https://api.flutter.dev/flutter/flutter_test/flutter_test-library.html
flutter [email protected] https://pub.dev/packages/test
lcov for [email protected] https://chocolatey.org/packages/lcov
Python for [email protected] https://chocolatey.org/packages/python/3.9.2
Junit2html python script@github https://github.com/inorton/junit2html
General Flutter and Dart resources:
Flutter Community Resources https://flutter.dev/community Flutter SDK https://flutter.dev/docs/get-started/install Android Studio IDE https://developer.android.com/studio MS’s Visual Studio Code https://code.visualstudio.com/ Flutter Docs https://flutter.dev/docs Dart Docs https://dart.dev/guides Google Firebase Mobile Device TestLab https://firebase.google.com/docs/test-lab
Trademark Notice
Google LLC owns the following trademarks; Dart, Flutter, Android, Roboto, Noto. Apple Inc owns the trademarks iOS, MacOSX, Swift, and Objective-C. Apple Inc owns trademarks to their fonts of SF Pro, Sf Compact, SF mono, and New York. JetBeans Inc owns the trademarks to JetBeans, IntelliJ, and Kotlin. Oracle Inc owns the Java trademark. Microsoft Inc owns the trademarks of MS Windows OS and Powershell. Gradle is a trademark of Gradle Inc. The Git Project owns the trademark to Git. Linux Foundation owns the trademark of Linux. SmartPhone OME’s own trademarks to their mobile phone product names. To the best of my ability, I follow the brand and usage guidelines with the above-mentioned trademarks.
About Fred Grott
I’m the crazy SOB who as a former android mobile developer is starting to write about flutter mobile app development, design, and life(see Eff COVID and GOP https://fredgrott.medium.com/eff-covid-and-the-gop-e912db0548b8). Will I reach the pivotal One Million Medium monthly viewers mark? Sit back and watch it happen. Find me on these social platforms:


