avatarVolodymyr Babenko

Free AI web copilot to create summaries, insights and extended knowledge, download it at here

2160

Abstract

li></ul><p id="d355">Let’s create a simple application in which we will visually consider methods for obtaining a vital state:</p><p id="3d32"><b>Step 1</b>. Create a new application. The main screen in which will be <i>StatefulWidget. </i>Which should implement the <i>WidgetsBindingObserver</i> interface. Next, we get the instance of <i>WidgetBinding</i> and add an observer to it.</p><div id="88b3"><pre><span class="hljs-class"><span class="hljs-keyword">class</span> <span class="hljs-title">MyApp</span> <span class="hljs-keyword">extends</span> <span class="hljs-title">StatelessWidget</span> </span>{ <span class="hljs-meta">@override</span> <span class="hljs-type">Widget</span> build(<span class="hljs-type">BuildContext</span> context) { <span class="hljs-keyword">return</span> <span class="hljs-type">MaterialApp</span>( title: '<span class="hljs-type">Flutter</span> <span class="hljs-type">Demo</span>', theme: <span class="hljs-type">ThemeData</span>( primarySwatch: <span class="hljs-type">Colors</span>.blue, ), home: <span class="hljs-type">MyHomePage</span>(), ); } }

<span class="hljs-class"><span class="hljs-keyword">class</span> <span class="hljs-title">MyHomePage</span> <span class="hljs-keyword">extends</span> <span class="hljs-title">StatefulWidget</span> </span>{ <span class="hljs-meta">@override</span> _MyHomePageState createState() => _MyHomePageState(); }

<span class="hljs-class"><span class="hljs-keyword">class</span> <span class="hljs-title">_MyHomePageState</span> <span class="hljs-keyword">extends</span> <span class="hljs-title">State<MyHomePage></span> <span class="hljs-keyword">with</span> <span class="hljs-title">WidgetsBindingObserver</span> </span>{ <span class="hljs-meta">@override</span> void initState() { <span class="hljs-type">WidgetsBinding</span>.instance.addObserver(<span class="hljs-keyword">this</span>); <span class="hljs-keyword">super</span>.initState(); }

<span class="hljs-meta">@override</span> void dispose() { <span class="hljs-type">WidgetsBinding</span>.instance.removeObserver(<span class="hljs-keywor

Options

d">this</span>); <span class="hljs-keyword">super</span>.dispose(); }

<span class="hljs-meta">@override</span> <span class="hljs-type">Widget</span> build(<span class="hljs-type">BuildContext</span> context) { <span class="hljs-keyword">return</span> <span class="hljs-type">Scaffold</span>( appBar: <span class="hljs-type">AppBar</span>( title: <span class="hljs-type">Text</span>('<span class="hljs-type">Flutter</span> <span class="hljs-type">Tutorial</span> <span class="hljs-type">Lifecycle</span>'), ), body: <span class="hljs-type">Center</span>(), ); } }</pre></div><p id="c523"><b>Step 2.</b> Now we have the <i>didChangeAppLifecycleState</i> method available. In this example, we simply print a state change to the thermal.</p><div id="144d"><pre>@override void didChangeAppLifecycleState(AppLifecycleState <span class="hljs-keyword">state</span>) { print('<span class="hljs-keyword">state</span> = <span class="hljs-variable">$state</span>'); }</pre></div><p id="7c42">Coming out and going back into the application, we get the following results:</p><figure id="9200"><img src="https://cdn-images-1.readmedium.com/v2/resize:fit:800/1*eki0KVDCxbRZE64tVj1kOg.png"><figcaption></figcaption></figure><p id="6245">At first glance, the topic covered in this article is not very complicated, but I think it can be useful!</p><p id="c72a">An example of the application you can find on the link below:</p><div id="7fe6" class="link-block"> <a href="https://github.com/PharosProduction/tutorial-flutter-lifecycle"> <div> <div> <h2>PharosProduction/tutorial-flutter-lifecycle</h2> <div><h3>Tutorial project on how to get application lifecycle in Flutter. - PharosProduction/tutorial-flutter-lifecycle</h3></div> <div><p>github.com</p></div> </div> <div> <div style="background-image: url(https://miro.readmedium.com/v2/resize:fit:320/0*dJujzjkaBWlwbbvF)"></div> </div> </div> </a> </div><p id="05e9">Thanks for reading!</p></article></body>

Flutter App Lifecycle

Mobile Apps Development A-Z Guide.
Give us a message if you’re interested in Blockchain and FinTech software development or just say Hi at Pharos Production Inc.

Or follow us on Youtube to know more about Software Architecture, Distributed Systems, Blockchain, High-load Systems, Microservices, and Enterprise Design Patterns.

Pharos Production Youtube channel

In this article, I would like to raise the issue of listening to the events of the life cycle. Flutter handles the life cycle so to speak under the hood. Only a small selection of application life cycle events is available to the developer. If you need to observe the lifecycle to acquire or release any native resources, you should likely be doing it from the native side, at any rate.

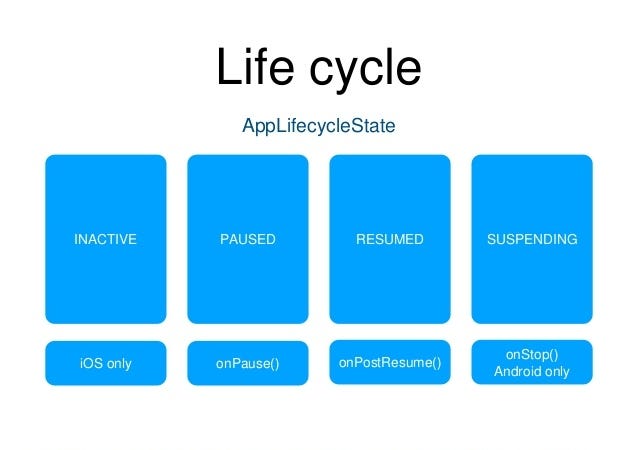
The state in which the application can be described is the enum class AppLifecycleState.

The observable lifecycle events are:

  • inactive — The application is in an inactive state and is not receiving user input. This event only works on iOS, as there is no equivalent event to map to on Android
  • paused — The application is not currently visible to the user, not responding to user input, and running in the background. This is equivalent to onPause() in Android
  • resumed — The application is visible and responding to user input. This is equivalent to onPostResume() in Android
  • suspending — The application is suspended momentarily. This is equivalent to onStop in Android; it is not triggered on iOS as there is no equivalent event to map to on iOS

Let’s create a simple application in which we will visually consider methods for obtaining a vital state:

Step 1. Create a new application. The main screen in which will be StatefulWidget. Which should implement the WidgetsBindingObserver interface. Next, we get the instance of WidgetBinding and add an observer to it.

class MyApp extends StatelessWidget {
  @override
  Widget build(BuildContext context) {
    return MaterialApp(
      title: 'Flutter Demo',
      theme: ThemeData(
        primarySwatch: Colors.blue,
      ),
      home: MyHomePage(),
    );
  }
}

class MyHomePage extends StatefulWidget {
  @override
  _MyHomePageState createState() => _MyHomePageState();
}

class _MyHomePageState extends State<MyHomePage> with WidgetsBindingObserver {
  @override
  void initState() {
    WidgetsBinding.instance.addObserver(this);
    super.initState();
  }

  @override
  void dispose() {
    WidgetsBinding.instance.removeObserver(this);
    super.dispose();
  }

  @override
  Widget build(BuildContext context) {
    return Scaffold(
      appBar: AppBar(
        title: Text('Flutter Tutorial Lifecycle'),
      ),
      body: Center(),
    );
  }
}

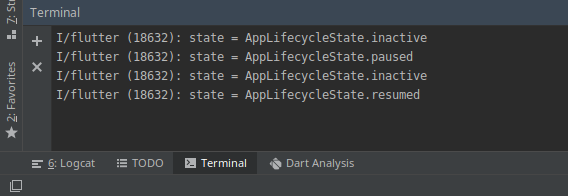
Step 2. Now we have the didChangeAppLifecycleState method available. In this example, we simply print a state change to the thermal.

@override
void didChangeAppLifecycleState(AppLifecycleState state) {
  print('state = $state');
}

Coming out and going back into the application, we get the following results:
At first glance, the topic covered in this article is not very complicated, but I think it can be useful!

An example of the application you can find on the link below:

Thanks for reading!

Flutter
Mobile App Development
Lifecycle Management
Android
iOS
Recommended from ReadMedium