
Figma Constraints & Auto Layout for web developers
TL;DR all Constraints and Auto Layout code examples
Constraints & Auto Layout are Figma features used by designers to ensure structure and re-usability in our mockups.
This guide is targeted at developers who use Figma’s developer handoff features and aims at explaining where to find, how to decode, and how to understand the decisions designers have made and encoded into Figma’s toolset.
Explanations will be translated to CSS-equivalent vocabulary. The goal here is not to prescribe implementation but rather to describe behavior. How you achieve the effect may depend on your own implementation.
Constraints
Constraints are added to a child object to specify how it behaves when its parent is resized. There are 4 types of constraints: 1. “Top, Right, Bottom, Left” 2. “Center” 3. “Left & Right, Top & Bottom” 4. “Stretch” Each Figma layer can have 2 constraints; one per axis (X and Y).
Where to find Constraints information in Developer Handoff
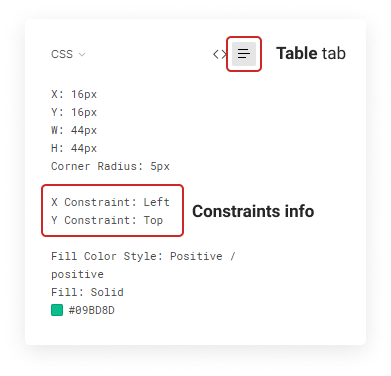
Constraints are specified on the right-hand side of the Figma interface, under the Table tab of the Code Property inspector.
Translating Contraints to CSS
1. Top, Right, Bottom, and Left
Top, Right, Bottom, and Left constraints mean that the child is “glued” to its position on the constrained edge of the parent.
Position
Top & Left: this is how HTML defaults to laying out the DOM. No action is required in CSS.
Bottom: Setting the parent to display: flex; and the child to align-self: flex-end;.
Right: Setting the parent to display: flex; justify-content: flex-end; and the child to align-self: flex-end;.
Size
Child width and height are independent from their parent’s when dealing with a Top, Right, Bottom, or Left constraint.
2. Center
Center constraints lock the size of the child, and keep its distance relative to the center constant. It’s most commonly used to center children vertically and horizontally. Any other usecases are a bit weird and unwieldy.
Position
Center (x-axis): For perfect centering, set the parent to display: flex; justify-content: center;. If you need to then offset the children, add a transform: translateX([distance from center]).
Center (y-axis): Repeat the above instructions but with flipped axes.
3. Left & Right and Top & Bottom
Different than Top, Left, Bottom, Right, Left & Right and Top & Bottom constraints mean that the child’s margins are fixed to the parent’s edge (per axis) and that it will occupy all remaining space.
Left & Right: Set the parent to display: flex; and the child to width: 100%; margin: #px;. Where # is the child’s distance from the edge of its parent.
Top & bottom: Setting the parent to display: flex; flex-direction: column; and the child to height: 100%; margin: #px;. Where # is the child’s distance from the edge of its parent.
4. Scale
Scale constraints set the position and size of a child to a percentage of its parent’s.
Scale (x-axis): Set the child to position: relative; left: n%; width: n%;.
Scale (y-axis): Set the child to position: relative; top: n%; height: n%;.
Auto Layout
Auto Layout has two major jobs: adapting a parent’s size to that of its children, and creating lists. It does the job of flexbox and also exposes some nice features that only came out with CSS grid, such as grid-gap. For the purpose of this article, the examples will be expressed in flexbox, since Figma’s handoff converts Auto Layout compositions to flexbox.
Where to find Auto Layout information in Developer Handoff
Parent Frames
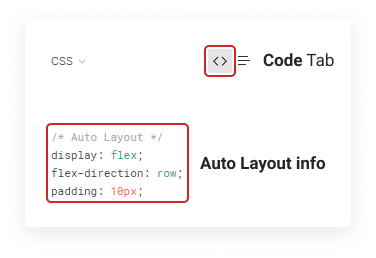
Under the Code tab, a Frame with Auto-Layout will show the comment
/* Auto Layout */ .
Child frames
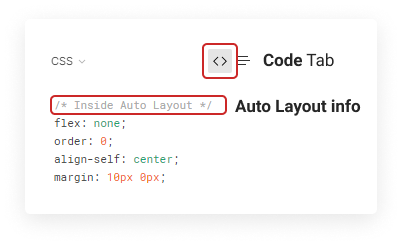
Child Frames of an Auto-Layout parent can only be identified in the Code tab with the comment /* Inside Auto Layout */.
Children of Auto Layout Frames have yet another property to keep track of: alignment within that parent.
The possible alignments are: Top, Center, Bottom, and Stretch. These correspond to flexbox child node’s align-self.
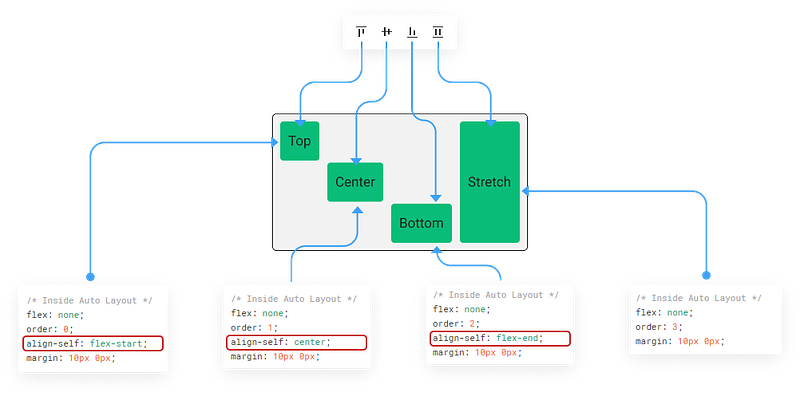
*In order to achieve the Stretch in CSS, set the cross-axis size to auto.
All the examples!
You can find all the examples presented in this article in a single Codepen collection:
Figma Contraints & Auto-Layout - a Collection by Alexis Morin on CodePen
Edit description
codepen.io
About the Author: Alexis Morin is an Interaction Designer graduated from the Umeå Institute of Design. He is a Co-Chair for the Interaction 21 conference, Local Leader for IxDA Montreal, and currently works as a Senior UX Designer at Ubisoft. You can connect with him via Twitter, LinkedIn, or Github.


