
Frontend Development Beyond React: Svelte (1/3)
Delving into Svelte, Solid, and Qwik

Introduction
This article is part of a series that I will focus on studying frontend development outside of React. The series of studies starts with Svelte.
This article will serve as a reference summarizing the important points about Svelte both theoretically and practically.
As a React developer, I have tried to find the equivalent of features that have proven effective, such as windowing technique, lazy loading of components and routes, asynchronous loading of data and images, and dynamic loading of local resources.
I will share with you all that I have learned through my study.
I hope you find this article helpful and that it will help you effortlessly begin with Svelte.
The menu I suggest is: · Core Concepts Guide ∘ Main features ∘ Life cycle · Practical Guide ∘ Project structure ∘ Reusing styles ∘ Calling child and passing data ∘ Http Requests ∘ Component States ∘ Conditional Rendering ∘ Lists ∘ Reactive Statements ∘ Reactive State “Store” ∘ Navigation ∘ Transitions and Animations · Optimization Guide ∘ Handling large data sources ∘ Handling of large applications ∘ Image lazy loading ∘ Loading local files asynchronously · Ecosystem Guide ∘ Development Kits ∘ Devtools ∘ UI libraries ∘ Application testing ∘ Documentation · Summary · Conclusion
If you are motivated to follow me, fasten your belts. We will start immediately! 🚀
Core Concepts Guide
Main features
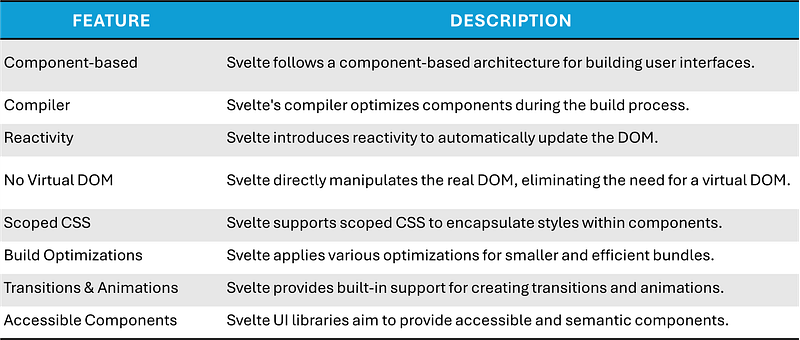
☑️ Compiler: Svelte works by shifting much of the work from the browser to the build step. It uses a compiler to transform components written in its syntax into efficient JavaScript code during the build process. This code is optimized for runtime performance and minimal bundle size.
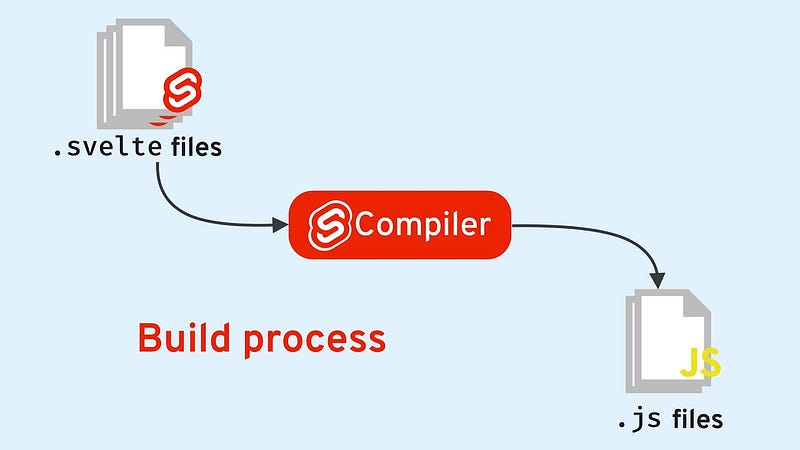
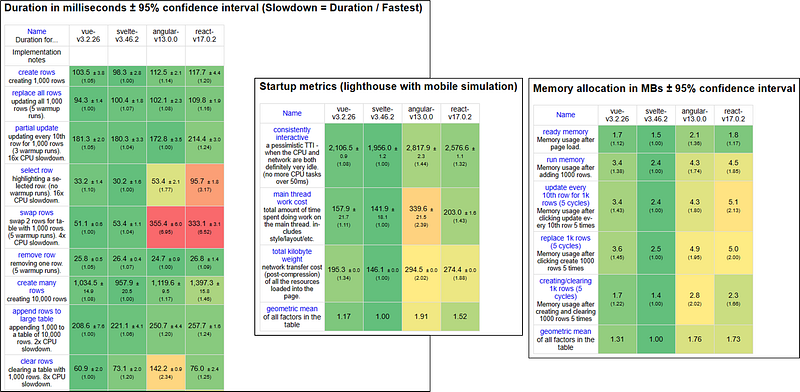
☑️ Build Optimizations: Svelte applies various build optimizations such as dead code elimination, bundle splitting, and minification to generate highly optimized and efficient JavaScript bundles.
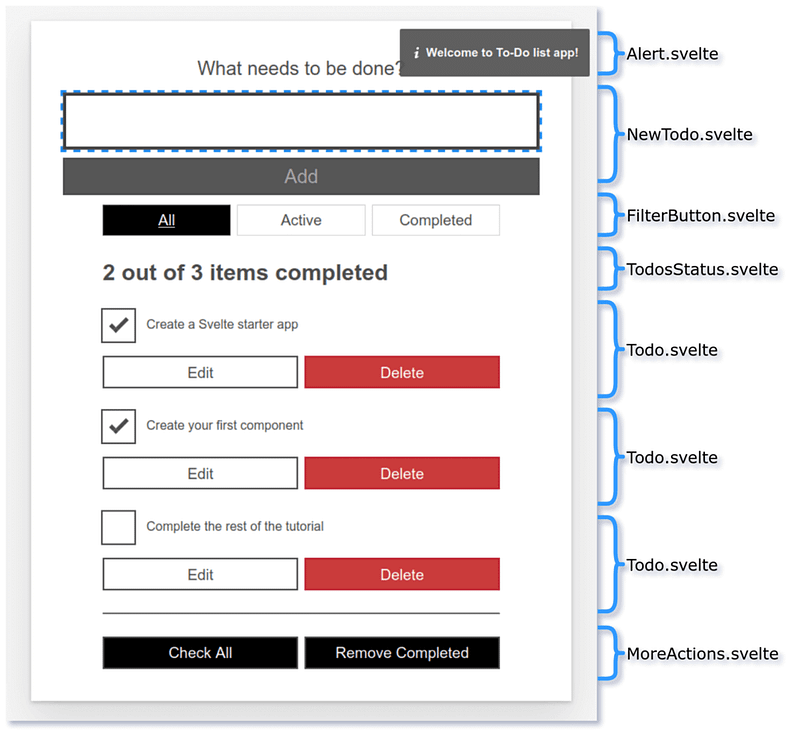
☑️ Component-based Architecture: Svelte follows a component-based architecture where the user interface is composed of reusable components. Each component encapsulates its HTML structure, CSS styles, and JavaScript logic.
☑️ Reactivity: Reactivity is a programming paradigm where changes in certain data automatically trigger updates in dependent data. Angular facilitates reactive programming through RxJS and observables, while Vue.js uses computed properties to enable reactive recalculations. Svelte, on the other hand, employs a less common JavaScript feature known as labels to create reactive declarations and statements, allowing specific values to be automatically recalculated when related values change.
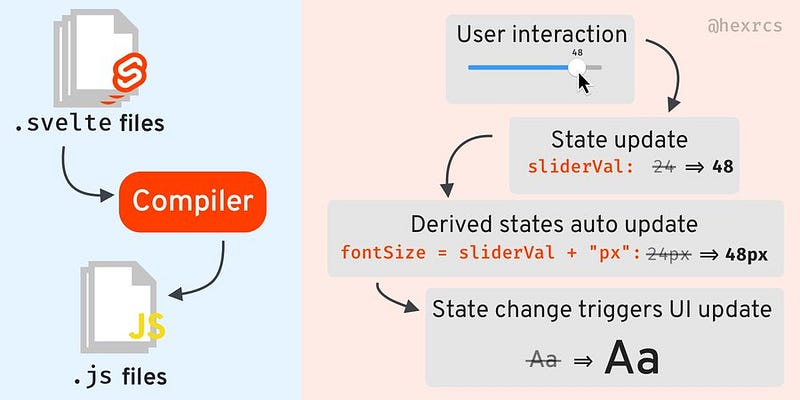
☑️ No Virtual DOM: Unlike frameworks like React or Vue, Svelte does not use a virtual DOM. Instead, it directly manipulates the real DOM based on the changes detected during the compilation phase.
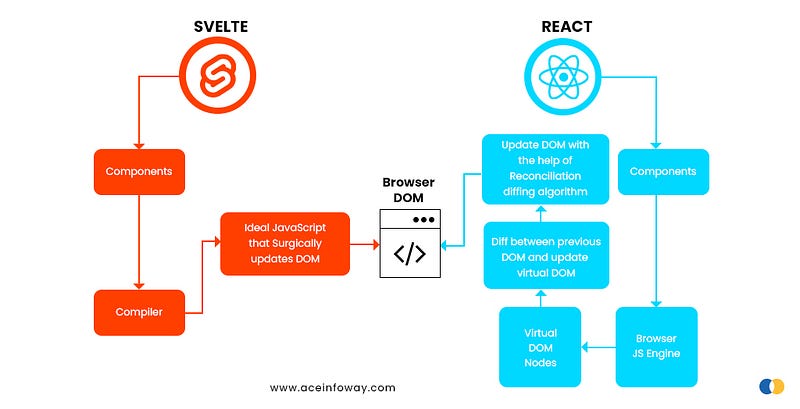
☑️ Efficient DOM Updates: Svelte updates the necessary sections of the DOM when the value of a reactive variable changes.
☑️ Scoped CSS: Svelte provides scoped CSS support, allowing styles defined within a component to be scoped to that component only. This prevents style conflicts and promotes better encapsulation.
☑️ Built-in Transitions and Animations: Svelte includes built-in support for creating smooth transitions and animations, making it easy to add visual effects to components.
Life cycle
Svelte components have a lifecycle that consists of several key stages:
onMountused to run code when a component is added to the DOM.beforeUpdateused to run code before every component update.afterUpdateused to run code after every component update.onDestroyused to run code when a component is removed from the DOM.tick() is a function used to wait for the next DOM update cycle. It returns a Promise that resolves immediately after the DOM has been updated. It is often used in combination withbeforeUpdate()to ensure that certain actions occur after the component has been updated in the DOM.
Now that we’ve grasped how Svelte operates, let’s move on to practice. 💻
Practical Guide
Project structure
☑️ A typical Svelte project structure might look like this:
☑️ The index.html file in a Svelte project is the main HTML file that serves as the entry point for the web application:
☑️ The index.js file is typically the entry point of the application where we initialize the Svelte app and mount it to the DOM. Here's a basic example of what the index.js file might look like:
☑️ To declare routes in a Svelte application, we can use a routing library like svelte-routing :
☑️ Then, we create separate Svelte components for each route:
☑️ When we write Svelte components, we use a combination of HTML-like syntax (markup), JavaScript (logic), and CSS (styles) within a single .svelte file:
☑️ FakeComponent.svelte can be used as follows:
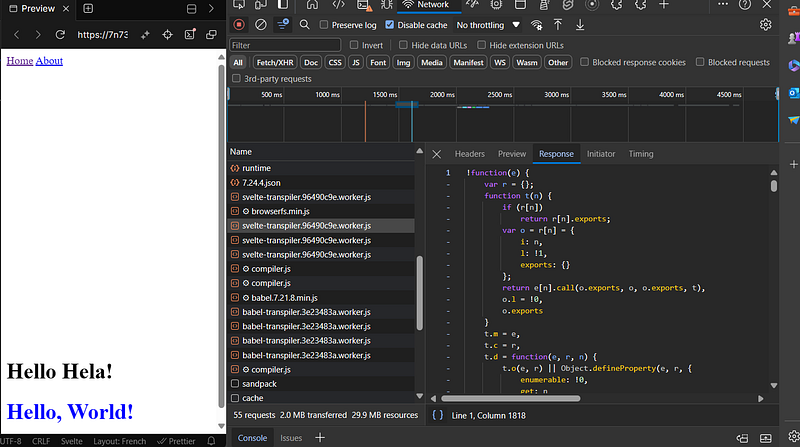
<FakeComponent />☑️ However, this code is not directly interpreted by the browser. Instead, the Svelte compiler translates it into JavaScript functions that create and update the DOM elements when the component is rendered in a web application.
Reusing styles
☑️ Styles can be separated into a different file. To achieve this, create a CSS file and import it into the Svelte component:
☑️ Afterward, import the CSS file into the Svelte component file (App.svelte or any other component):
<!-- FakeComponent.svelte -->

<!-- External CSS file -->
<style src="./FakeComponent.css"></style>

<!-- Markup -->
<div class="container">
  <h1>Hello, World!</h1>
</div>
💡 By doing this, we can keep our CSS styles distinct from the markup of the Svelte component, simplifying the organization and management of the project’s styles.
Calling child and passing data
☑️ The parent component can pass data down to the child component through props in Svelte.
Parent component (Parent.svelte):
<!-- Parent.svelte -->
<script>
  // Import the child component
  import Child from './Child.svelte';

  // Define data in the parent component
  let parentData = 'Data from parent';
</script>

<!-- Render the child component and pass the parentData as a prop -->
<Child parentData={parentData} />
Child component (Child.svelte):
<!-- Child.svelte -->
<script>
  // Declare a prop to receive data from the parent
  export let parentData;
</script>

<!-- Use the parentData prop in the child component -->
<p>This is the child component. Parent data received: {parentData}</p>
Http Requests
☑️ HTTP requests in a Svelte project are typically handled using JavaScript libraries like axios, fetch, or other similar libraries. These libraries allow us to make requests to external APIs or endpoints and handle the responses in the Svelte components:
☑️ It’s also possible to organize the HTTP request logic into a separate file. For this, we should create a JavaScript module that exports a function responsible for fetching the data:
☑️ Then, in the Svelte component file (App.svelte or any other component), we can import the fetchData function from api.js and use it to fetch the data:
Component States
☑️ State variables are typically declared using the let keyword within the <script> tag of a Svelte component.
In the below example, we defined variables to store form data (username, email, password, confirmPassword) and validation errors (errors):
- The
handleSubmitfunction is called when the form is submitted. It performs validation checks and sets validation errors accordingly. - The form inputs are bound to their respective variables using Svelte’s
bind:valuedirective.
☑️ The dispatch function in Svelte is used to emit custom events from a component. It allows a component to communicate with its parent or other components by triggering events that can be listened to and handled elsewhere in the application.
Child component (Child.svelte):
Parent component (Parent.svelte):
- The child component dispatches a
submitevent with the form data. - The parent component listens for the
submitevent and handles it by making an HTTP POST request using Axios to a signup API endpoint. - The form data (username, email, password) is extracted from the event detail and sent in the request body.
Conditional Rendering
☑️ Conditional rendering in Svelte allows to conditionally display content based on certain conditions.
Here’s an example of conditional rendering in Svelte:
<script>
  // Define a variable to track the user's login status
  let loggedIn = true; // Assume the user is logged in
</script>

{#if loggedIn}
  <!-- Display a welcome message if the user is logged in -->
  <p>Welcome, user!</p>
{:else}
  <!-- Display a message prompting the user to log in if they are not logged in -->
  <p>Please log in to continue.</p>
{/if}
☑️ Then, in Svelte, #await is a special syntax used for handling promises and asynchronous operations directly in the markup. It allows to display different content based on the status of the promise (pending, resolved, or rejected) without having to use JavaScript conditionals.
<script>
  // Import the fetchData function from the api.js file
  import { fetchData } from './api';
  // Call the fetchData function and store the returned promise
  let promise = fetchData(); // Assume fetchData() returns a Promise
</script>

{#await promise}
  <!-- Display a loading message while the promise is pending -->
  <p>Loading...</p>
{:then data}
  <!-- Display the resolved data when the promise is resolved -->
  <p>{JSON.stringify(data)}</p>
{:catch error}
  <!-- Display an error message when the promise is rejected -->
  <p>Error: {error.message}</p>
{/await}
💡 Using #await simplifies asynchronous rendering in Svelte components and provides a clean way to manage asynchronous operations directly in the markup.
Lists
☑️ To display a list in Svelte, we can use the {#each} block to iterate over an array and render elements dynamically. Here's a basic example:
<script>
  // Define an array of items
  let items = ['Apple', 'Banana', 'Orange'];
</script>

<!-- Use the #each block to iterate over the items array -->
{#each items as item}
  <!-- Display each item in a separate div -->
  <div>{item}</div>
{/each}
☑️ We can also use index to access the index of the current item within the loop:
{#each items as item, index}
  <div>{index + 1}: {item}</div>
{/each}
☑️ Additionally, we can use key attribute to help Svelte efficiently update the DOM when the list changes:
{#each items as item (item)}
  <div>{item}</div>
{/each}
💡By specifying (item) after the loop, Svelte will use the item value as the unique identifier for each element in the list.
☑️ To call a child component inside a loop in Svelte, we can simply import the child component and use it within the {#each} block.
Suppose we have a child component called ChildComponent.svelte:
<!-- ChildComponent.svelte -->
<script>
  export let item;
</script>

<div>{item}</div>
Now, in the parent component, we can import ChildComponent and use it inside the loop:
<script>
  import ChildComponent from './ChildComponent.svelte';
  // Define an array of items
  let items = ['Apple', 'Banana', 'Orange'];
</script>

{#each items as item}
  <!-- Call ChildComponent inside the loop and pass the current item as a prop -->
  <ChildComponent item={item} />
{/each}
Reactive Statements
☑️ Reactive statements allow to declare dependencies and automatically update the UI when those dependencies change:
<script>
  // Define a reactive variable to track the count
  let count = 0;

  // Reactive statement that doubles the count value
  $: doubledCount = count * 2;

  // Function to increment the count
  function increment() {
    count += 1;
  }
</script>

<!-- Button to increment the count when clicked -->
<button on:click={increment}>
  Increment Count
</button>

<!-- Display the current count -->
<p>Count: {count}</p>

<!-- Display the doubled count (calculated using the reactive statement) -->
<p>Doubled Count: {doubledCount}</p>
In this example, the $: syntax is used to create a reactive statement that computes the doubledCount value based on the count variable. Whenever count changes, Svelte automatically updates doubledCount, and the corresponding UI element reflects the updated value. Awesome!
Reactive State “Store”
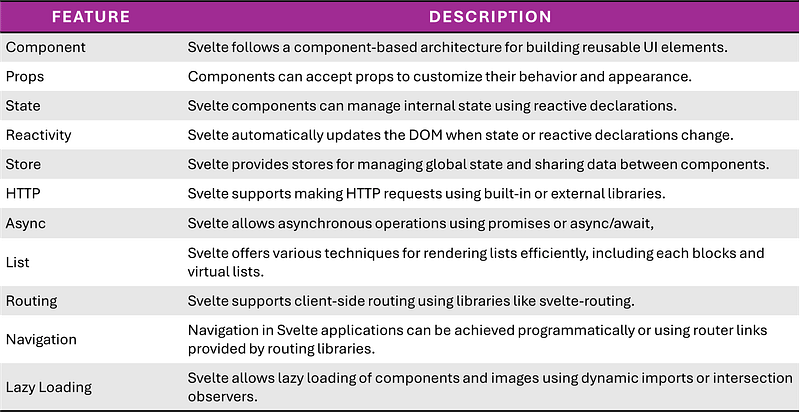
The use case of a reactive state store in Svelte is to manage and share state across different components within the application. If you are a React developer like me, you probably know Redux. Svelte Store is somewhat like Redux. We can use it for global state management, communication between components, asynchronous state management, or application configuration.
☑️ Let’s see some code and create a store named counterStore.js:
// counterStore.js

import { writable } from 'svelte/store';

// Create a writable store to hold the counter value
export const counter = writable(0);

// Function to increment the counter value
export function increment() {
    counter.update(n => n + 1);
}

// Function to decrement the counter value
export function decrement() {
    counter.update(n => n - 1);
}
Now, let’s create a component CounterDisplay.svelte to display the current counter value:
<!-- CounterDisplay.svelte -->

<script>
    // Import the counter store
    import { counter } from './counterStore';
</script>

<!-- Display the current counter value -->
<h1>Counter: {$counter}</h1>
Next, let’s create another component CounterButtons.svelte to provide buttons for incrementing and decrementing the counter:
<!-- CounterButtons.svelte -->

<script>
    // Import the increment and decrement functions from the counter store
    import { increment, decrement } from './counterStore';
</script>

<!-- Buttons to increment and decrement the counter -->
<button on:click={increment}>Increment</button>
<button on:click={decrement}>Decrement</button>
Now, let’s use these components in our main App.svelte:
<!-- App.svelte -->

<script>
    // Import the CounterDisplay and CounterButtons components
    import CounterDisplay from './CounterDisplay.svelte';
    import CounterButtons from './CounterButtons.svelte';
</script>

<!-- Display the counter value -->
<CounterDisplay />

<!-- Provide buttons to manipulate the counter -->
<CounterButtons />
In this example, CounterDisplay.svelte reads the counter value from the store and automatically updates whenever the value changes. CounterButtons.svelte updates the counter value by calling the increment and decrement functions from the store. All components share the same counter value stored in the reactive state store, ensuring synchronization across the application, easy-peasy!
☑️ Let’s create an example demonstrating the usage of asynchronous state in a Svelte application. Suppose we want to fetch and display some data from an API.
First, let’s create a store to manage our asynchronous state. We’ll call it dataStore.js:
// dataStore.js

import { writable } from 'svelte/store';

// Create a writable store to hold the data
export const data = writable({
  status: 'loading', // initial status
  error: null,
  value: null
});

// Function to fetch data from an API
export async function fetchData() {
  try {
    const response = await fetch('https://api.example.com/data');
    if (!response.ok) {
      throw new Error('Failed to fetch data');
    }
    const data = await response.json();
    // Update the store with the fetched data
    data.set({ status: 'success', error: null, value: data });
  } catch (error) {
    // Handle errors and update the store accordingly
    data.set({ status: 'error', error: error.message, value: null });
  }
}
Now, let’s create a component called DataDisplay.svelte to display the data:
<!-- DataDisplay.svelte -->

<script>
  // Import the data store and fetchData function
  import { data, fetchData } from './dataStore';

  // Subscribe to changes in the data store
  let unsubscribe = data.subscribe(value => {
    // Update the local variables when the store changes
    status = value.status;
    error = value.error;
    value = value.value;
  });

  // Initialize local variables
  let status, error, value;

  // Fetch data when the component mounts
  onMount(fetchData);
</script>

{#if status === 'loading'}
  <p>Loading...</p>
{:else if status === 'error'}
  <p>Error: {error}</p>
{:else if status === 'success'}
  <div>
    <!-- Display the fetched data -->
    <pre>{JSON.stringify(value, null, 2)}</pre>
  </div>
{/if}
Finally, let’s use the DataDisplay component in our App.svelte:
<!-- App.svelte -->

<script>
  // Import the DataDisplay component
  import DataDisplay from './DataDisplay.svelte';
</script>

<!-- Display the data using the DataDisplay component -->
<DataDisplay />
In this example, the dataStore.js module defines a writable store called data, which holds the asynchronous state of fetching data from an API. The fetchData function asynchronously fetches data from the API and updates the store accordingly. The DataDisplay.svelte component subscribes to changes in the store and displays the loading state, error message, or fetched data based on the store's status. Finally, the App.svelte component uses the DataDisplay component to render the data.
Navigation
To programmatically navigate between pages, we can use the navigate function provided by Svelte Routing:
<script>
  import { onMount } from 'svelte';
  import { navigate } from 'svelte-routing';

  const goToAboutPage = () => {
    navigate('/about', options);
  };
</script>

<button on:click={goToAboutPage}>Go to About Page</button>
The first argument is a string denoting where to navigate to, and the second argument is an object with a replace, state and preserveScroll properties equivalent to those in the Link component.
Transitions and Animations
Here are a few examples of transitions and animations in Svelte:
<script>
 import { fade } from 'svelte/transition';
</script>

{#if condition}
 <div transition:fade={{ delay: 250, duration: 300 }}>fades in and out</div>
{/if}<script>
import { slide } from 'svelte/transition';
import { quintOut } from 'svelte/easing';
</script>
{#if condition}
<div transition:slide={{ delay: 250, duration: 300, easing: quintOut, axis: 'x' }}>
slides in and out horizontally
</div>
{/if}🌟 Scale:
<script>
 import { scale } from 'svelte/transition';
 import { quintOut } from 'svelte/easing';
</script>

{#if condition}
 <div transition:scale={{ duration: 500, delay: 500, opacity: 0.5, start: 0.5, easing: quintOut }}>
  scales in and out
 </div>
{/if}
Svelte provides a variety of built-in transitions and animations, and we can also create custom ones to suit our needs.
💡Svelte’s out-of-the-box tools, such as reactive stores and lifecycle methods, enable the creation of powerful and responsive applications with minimal overhead. This native approach contributes to the simplicity and elegance of Svelte’s development experience.
Optimization Guide
Handling large data sources
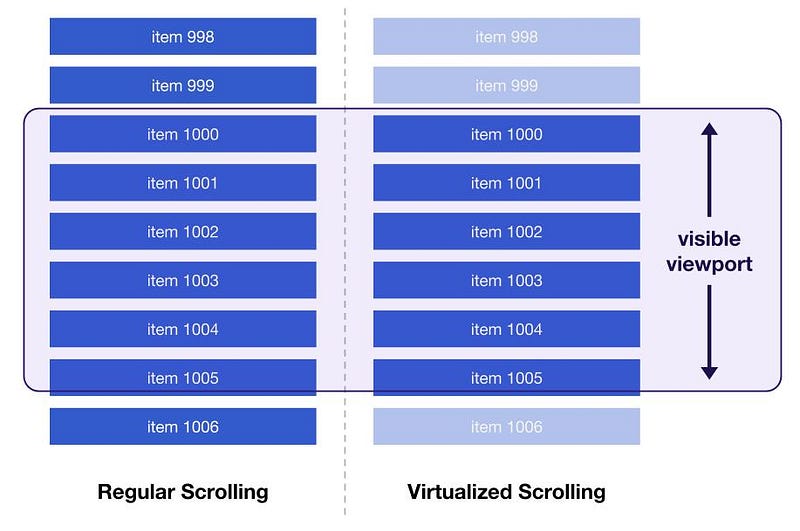
Within the realm of React, a highly efficient method for presenting extensive lists is through list virtualization, often referred to as ‘windowing’.
This technique involves rendering solely the content visible to the user. As the user scrolls down the list, DOM nodes that move out of view are either reused or promptly substituted with newer elements. Consequently, the number of rendered elements remains tailored to the window’s dimensions, optimizing performance and resource usage.
Additionally, there exist numerous React libraries adept at efficient windowing, such as react-window and react-virtualized.
Combining react-window with react-window-infinite-loader facilitates the implementation of lazy loading, allowing items to be loaded dynamically as the user scrolls.
If virtualization isn’t feasible, conventional alternatives like ‘load more’ buttons or pagination can be considered.
Let’s revisit Svelte and explore its approaches for optimizing large lists, considering its non-usage of a virtual DOM.
I came across the library svelte-virtual-list, but it appears to be immature and plagued with various issues. Additionally, it seems that the library is no longer actively maintained. Some of the concerns that caught my attention include:
- It doesn’t seem to work with Semantic HTML · Issue #66 · sveltejs/svelte-virtual-list (github.com)
- Is this still updated? · Issue #62 · sveltejs/svelte-virtual-list (github.com)
- List is not accessible · Issue #47 · sveltejs/svelte-virtual-list (github.com)
These issues raise doubts about the reliability and stability of the library, prompting caution when considering its use for virtualized lists in Svelte applications.
Hence, the remaining options are either to manually implement the solution using IntersectionObserver or to resort to a traditional approach by incorporating a “load more” button.
Indeed, for beginners in Svelte, tackling these alternatives may pose a challenge. Implementing IntersectionObserver or managing “load more” functionality requires a deeper understanding of JavaScript and Svelte’s reactive principles.
Adopting one of these techniques is crucial not only for addressing slowness but also for mitigating potential memory issues. As highlighted in this GitHub discussions, the presence of extensive lists in Svelte applications can result in performance slowdowns and memory issues.
Handling of large applications
When dealing with large applications, some optimization techniques that can prove beneficial include using ‘lazy routes’ and ‘lazy components’.
Here’s how we can declare a lazy route with Svelte:
<!-- App.svelte -->
<script>
  import { Router, Route } from 'svelte-routing';

  // Define lazy-loaded components
  // Lazily load the Home component
  const Home = () => import('./Home.svelte');
  // Lazily load the About component
  const About = () => import('./About.svelte');
</script>

<Router>
  <!-- Render the Home component when the route matches '/' -->
  <Route path="/" component={Home} />
  <!-- Render the About component when the route matches '/about' -->
  <Route path="/about" component={About} />
</Router>
This code implements lazy loading of routes using dynamic imports (import()). The Home and About components are loaded lazily, meaning they are fetched and rendered only when their respective routes are visited.
And here’s how we can declare a lazy component with Svelte:
<!-- App.svelte -->

<script>
  // Define a variable to hold the lazy-loaded component
  let LazyLoadedComponent;

  // Function to load the component asynchronously
  const loadComponent = async () => {
    // Dynamically import the component using import()
    const module = await import('./LazyLoadedComponent.svelte');
    // Set the component to the imported module
    LazyLoadedComponent = module.default;
  };
</script>

<!-- Button to trigger loading of the lazy component -->
<button on:click={loadComponent}>Load Lazy Component</button>

<!-- Render the lazy-loaded component if it's available -->
{#if LazyLoadedComponent}
  <LazyLoadedComponent />
{/if}
I encountered another library named svelte-loadable, which bears similarity to the react-loadable library commonly used in React applications.
Image lazy loading
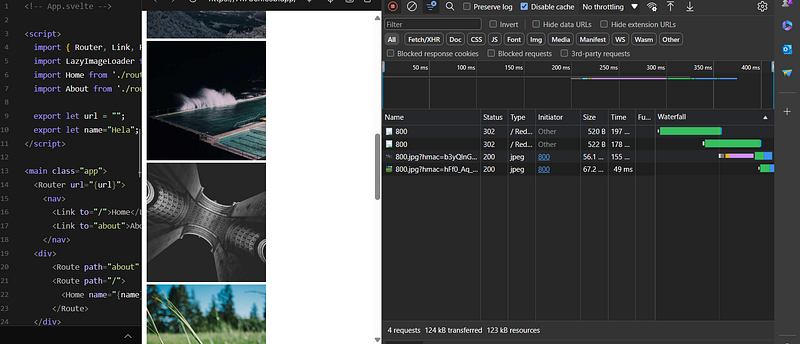
Currently, Svelte doesn’t offer a built-in solution for asynchronous and lazy loading of images. However, we can achieve this by utilizing the IntersectionObserver API. We can refer to this example for inspiration.
Let’s start by creating an IntersectionObserverHandler.svelte file:
<!-- IntersectionObserverHandler.svelte -->

<script>
    import { onMount } from 'svelte';
    export let once = false;
    export let top = 0;
    export let bottom = 0;
    export let left = 0;
    export let right = 0;
    let intersecting = false;

    let container;
    onMount(() => {
        if (typeof IntersectionObserver !== 'undefined') {
            const rootMargin = `${bottom}px ${left}px ${top}px ${right}px`;
            const observer = new IntersectionObserver(entries => {
                intersecting = entries[0].isIntersecting;
                if (intersecting && once) {
                    observer.unobserve(container);
                }
            }, {
                rootMargin
            });
            observer.observe(container);
            return () => observer.unobserve(container);
        }
    });
</script>

<style>
    div {
        width: 100%;
        height: 100%;
    }
</style>

<div bind:this={container}>
    <slot {intersecting}></slot>
</div>
Next, we’ll create the core component, LazyImage.svelte, responsible for loading and rendering the image with lazy loading:
<!-- LazyImage.svelte -->

<script>
  // Props for image attributes
  export let src;
  export let alt;
  export let height;
  export let width;

  // Import necessary modules
  import { onMount } from 'svelte';

  // Initialize flag for image loading state
  let loaded = false;

  // Initialize variable to reference the image element
  let thisImage;

  // Event handler for when the image is loaded
  onMount(() => {
    thisImage.onload = () => {
      loaded = true;
    };
  });
</script>

<style>
  /* CSS for image transition */
  img {
    opacity: 0;
    transition: opacity 1200ms ease-out;
  }
  img.loaded {
    opacity: 1;
  }
</style>

<!-- Render the image with lazy loading -->
<img {src} {alt} class:loaded style="width: {width}; height: {height};" bind:this={thisImage} loading="lazy" />
Next, we create the LazyImageLoader.svelte component that will only download images only when they’re needed, which would be when they enter the viewport:
<!--
  LazyImageLoader.svelte
-->
<script>
  // Props for image attributes
  export let src;
  export let alt;
  export let height;
  export let width;

  // Import necessary modules
  import { onMount } from 'svelte';
  import IntersectionObserverHandler from './IntersectionObserverHandler.svelte';
  import Image from './Image.svelte';

  // Initialize flag for native loading
  let nativeLoading = false;
</script>

<!-- Use IntersectionObserverHandler to lazily load the image -->
<IntersectionObserverHandler once={true} let:intersecting={intersecting}>
  {#if intersecting || nativeLoading}
    <!-- Render the image when it's in the viewport or native loading is enabled -->
    <Image {alt} {src} {width} {height} />
  {/if}
</IntersectionObserverHandler>
Now we can use it as follows:
<LazyImageLoader src={`https://picsum.photos/seed/10}/800/800`} width="200px" height="200px"/>
<LazyImageLoader src={`https://picsum.photos/seed/11}/800/800`} width="200px" height="200px"/>
<LazyImageLoader src={`https://picsum.photos/seed/12}/800/800`}  width="200px" height="200px"/>
<LazyImageLoader src={`https://picsum.photos/seed/13}/800/800`} width="200px" height="200px" />
<LazyImageLoader src={`https://picsum.photos/seed/14}/800/800`} width="200px" height="200px"/>
<LazyImageLoader src={`https://picsum.photos/seed/15}/800/800`} width="200px" height="200px"/>
<LazyImageLoader src={`https://picsum.photos/seed/16}/800/800`} width="200px" height="200px"/>
<LazyImageLoader src={`https://picsum.photos/seed/17}/800/800`} width="200px" height="200px"/>
<LazyImageLoader src={`https://picsum.photos/seed/18}/800/800`} width="200px" height="200px"/>
<LazyImageLoader src={`https://picsum.photos/seed/19}/800/800`} width="200px" height="200px"/>
💡 The src attribute can contain either a remote URL or a local URL.
Loading local files asynchronously
For instance, we can use dynamic imports to load a local JSON file asynchronously:
<!-- LazyJsonLoader.svelte -->
<script>
  // Data fetched from the JSON file
  let jsonData;

  // Function to fetch and load the JSON file asynchronously
  const loadJson = async () => {
    try {
      // Dynamically import the JSON file
      const response = await import('./data.json');
      // Assign the imported JSON data to the jsonData variable
      jsonData = response.default;
    } catch (error) {
      console.error('Error loading JSON file:', error);
    }
  };

  // Load the JSON file when the component mounts
  import { onMount } from 'svelte';
  onMount(loadJson);
</script>

<!-- Display the JSON data -->
{#if jsonData}
  <pre>{JSON.stringify(jsonData, null, 2)}</pre>
{:else}
  <p>Loading JSON data...</p>
{/if}
Now, let’s talk about the ecosystem and look at what Svelte offers as a development kit, devtools, and other libraries (UI, unit tests, etc.).
Ecosystem Guide
Development Kits
1️⃣ Interactive Svelte playground.
2️⃣ SvelteKit.
SvelteKit is a framework for rapidly developing robust, performant web applications using Svelte. If you’re coming from React, SvelteKit is similar to Next. If you’re coming from Vue, SvelteKit is similar to Nuxt.
It offers everything from basic functionalities — like a router that updates your UI when a link is clicked — to more advanced capabilities. Its extensive list of features includes build optimizations to load only the minimal required code; offline support; preloading pages before user navigation; configurable rendering to handle different parts of your app on the server via SSR, in the browser through client-side rendering, or at build-time with prerendering; image optimization; and much more. Building an app with all the modern best practices is fiendishly complicated, but SvelteKit does all the boring stuff for you so that you can get on with the creative part.
It reflects changes to your code in the browser instantly to provide a lightning-fast and feature-rich development experience by leveraging Vite with a Svelte plugin to do Hot Module Replacement (HMR). — Introduction • Docs • SvelteKit
Having such a development kit is comforting!
Devtools
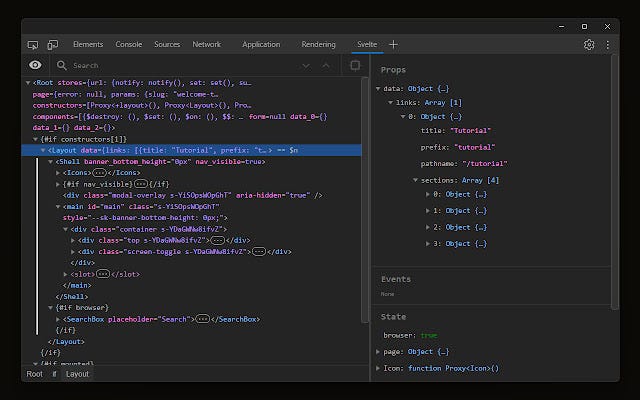
Svelte DevTools is a browser extension designed for the Svelte framework. It enables to examine the Svelte state and component hierarchies within the Developer Tools.
- sveltejs/svelte-devtools: A browser extension to inspect Svelte application by extending your browser devtools capabilities (github.com)
- Svelte DevTools (google.com)
- Svelte Devtools — Get this Extension for 🦊 Firefox (en-US) (mozilla.org)
UI libraries
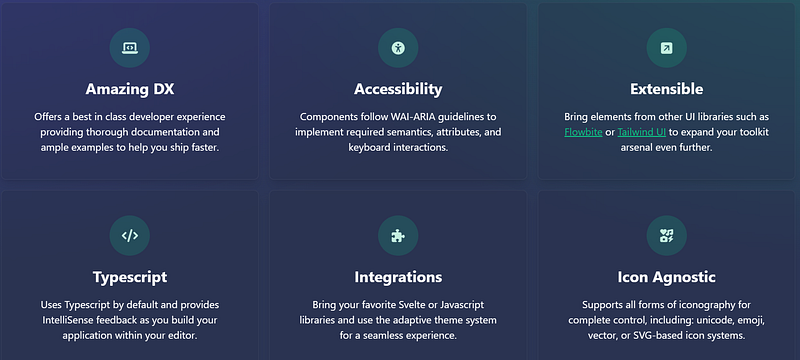
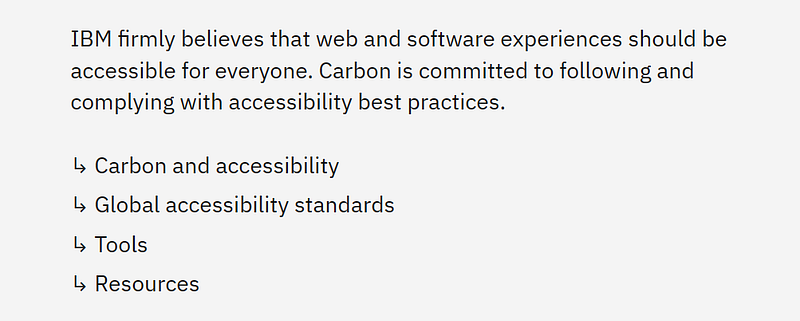
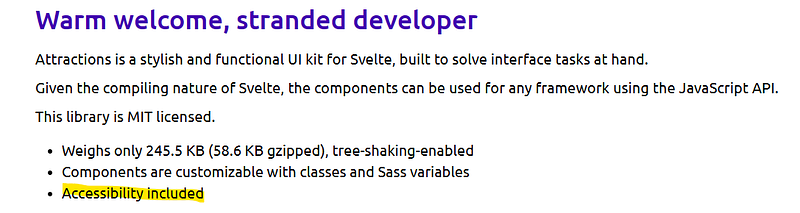
Guaranteeing accessibility and semantic HTML is pivotal for fostering inclusive and user-friendly web applications. While every UI library for Svelte aims to deliver accessible components, their level of support and adherence to accessibility standards may vary.
Here are the libraries I kept after selection:
✳️ Skeleton — UI Toolkit for Svelte + Tailwind
✳️ Carbon Components Svelte (carbondesignsystem.com)
✳️ Home — Attractions (illright.github.io)

✴️ A final consideration about the use of the css-in-js technique.
It’s important to note that most CSS-in-JS libraries have a runtime library, and many don’t support statically extracting styles out into a separate
.cssfile at build time (which is essential for the best performance). You should therefore only use CSS-in-JS if it's necessary for your application! — Using CSS-in-JS with Svelte
Application testing
A Svelte application will typically have three different types of tests: Unit, Component, and End-to-End (E2E).
Unit Tests: Focus on testing business logic in isolation. When creating a new SvelteKit project, you will be asked whether you would like to setup Vitest for unit testing. There are a number of other test runners that could be used as well.
Component Tests: Validating that a Svelte component mounts and interacts as expected throughout its lifecycle requires a tool that provides a Document Object Model (DOM). Tools for component testing range from an in-memory implementation like jsdom paired with a test runner like Vitest to solutions that leverage an actual browser to provide a visual testing capability such as Playwright or Cypress.
End-to-End Tests: When creating a new SvelteKit project, you will be asked whether you would like to setup Playwright for end-to-end testing. There are many other E2E test libraries available for use as well.
Documentation
- Introduction / Welcome to Svelte • Svelte Tutorial
- Introduction • Docs • Svelte
- SvelteKit • Web development, streamlined
- Hello world • Svelte Examples
Summary
That concludes our exploration of the Svelte universe at this stage. I hope you’ve enjoyed the journey as much as I have! 🌟
Conclusion
Svelte, a contemporary JavaScript framework, has garnered attention due to its innovative methodology in web application development.
This article focused on its primary features, concepts, advantages, drawbacks, trade-offs, ecosystem, and recommended practices.
I found almost everything I previously used in React. Overall, I was happy with the performance and experience with Svelte.
At the same time, I noticed a certain lack of maturity in external libraries, but Svelte remains very promising.
Until we meet again in a new article and a fresh adventure! ❤️
Thank you for reading my article.
Want to Connect?
You can find me at GitHub: https://github.com/helabenkhalfallah


