
Export Data From Snowflake To S3.
Another intriguing subject is connected to the most well-known cloud object storage (AWS S3) and renowned cloud database(Snowflake).
This article is the step-by-step guide for unloading data from a Snowflake’s Table into the S3 bucket.
Step 1: Create IAM Role for accessing the S3 bucket from Snowflake.
From AWS side, We need a role which allow other AWS account to read and write the CSV files into the S3 bucket.
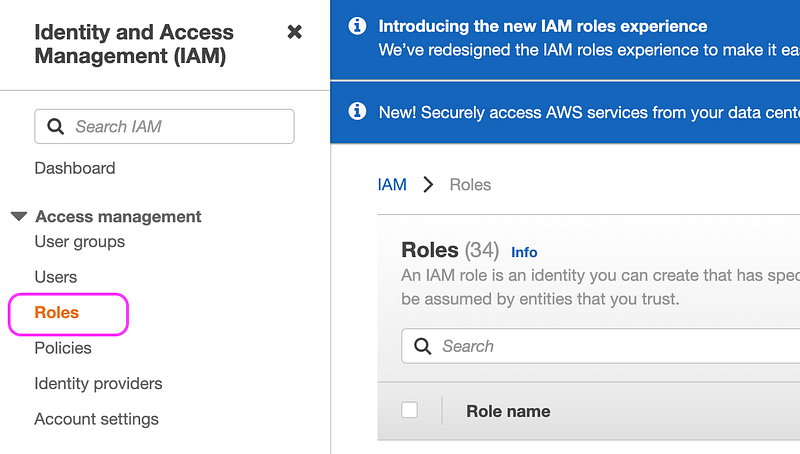
1.1 Open AWS console and search for IAM service. Select Roles From Access Management.
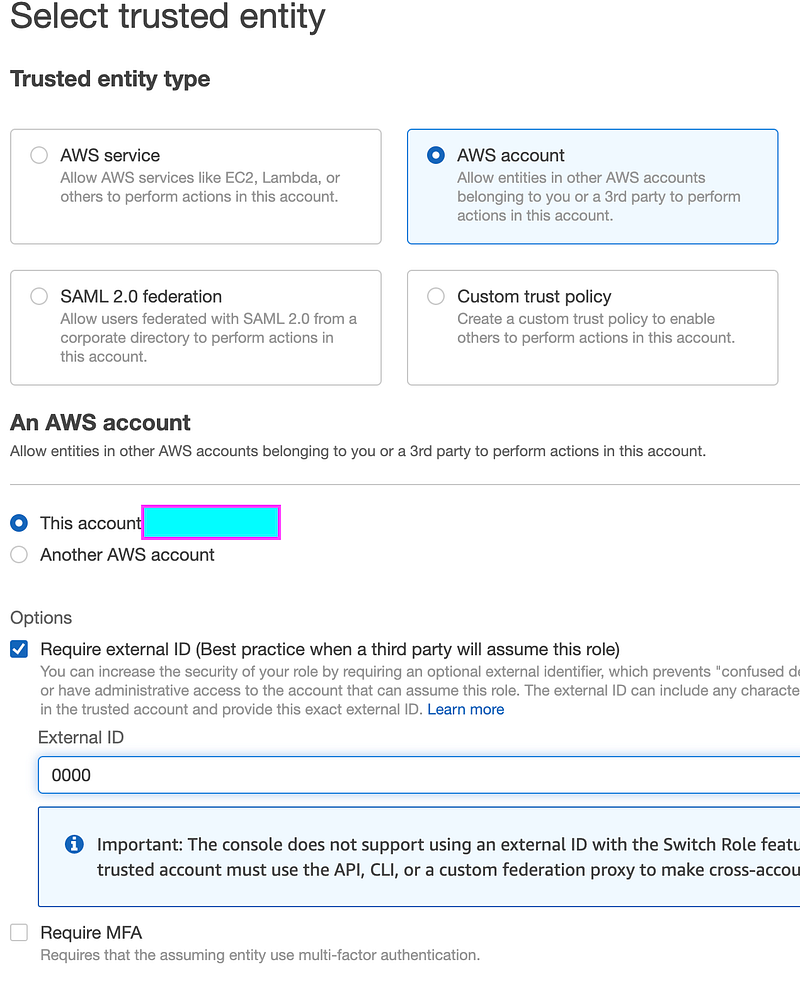
1.2 Click on Create Role and select trusted entity as AWS account. Tick mark the option Require external ID and provide some dummy value like 0000 as of now.
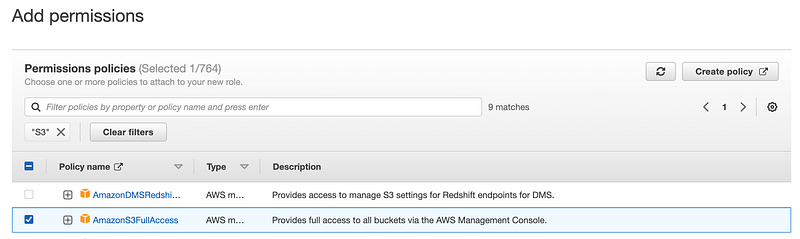
1.3 On the next page(Policy Page), Search for S3 and select the AmazonS3FullAccess. This policy grants full access on S3 storage for this role. If you want to select specific permission then you can create the new policy based on your requirements and select it here.
1.4 On the next page give the role name and hit the Create role button at the bottom.
1.5 Now search for your recently created role under Roles in IAM service. Select the role and copy the ARN. We need this ARN for creating a STORAGE INTEGRATION Snowflake.
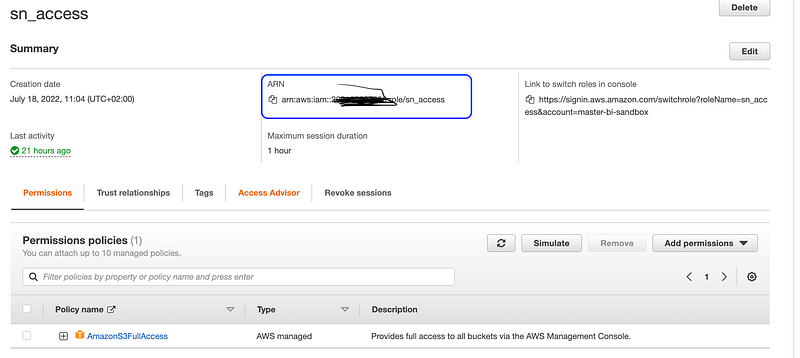
Step 2: Create a STORAGE INTEGRATION Snowflake
STORAGE INTEGRATIONis a Snowflake object which stores a generated identity and access management (IAM ) entity along with some other properties for external cloud storage. In our case, it is AWS S3.
The syntax for creating STORAGE INTEGRATION.
CREATE [ OR REPLACE ] STORAGE INTEGRATION [IF NOT EXISTS]
  <name>
  TYPE = EXTERNAL_STAGE
  cloudProviderParams
  ENABLED = { TRUE | FALSE }
  STORAGE_ALLOWED_LOCATIONS = ('<cloud>://<bucket>/<path>/', '<cloud>://<bucket>/<path>/')
  [ STORAGE_BLOCKED_LOCATIONS = ('<cloud>://<bucket>/<path>/', '<cloud>://<bucket>/<path>/') ]
  [ COMMENT = '<string_literal>' ]
2.1 Create a STORAGE INTEGRATION with name load_to_s3 as below
CREATE STORAGE INTEGRATION load_to_s3
  type = external_stage
  storage_provider = s3
  storage_aws_role_arn = 'arn:aws:iam::XXXXXX:role/sn_access'  -- Use the copied ARN from the Role created in the step 1
  enabled = true
  storage_allowed_locations = ('s3://db-ap-test/'); --bucket url
2.2 Describe the recently created STORAGE INTEGRATION as DESC STORAGE INTEGRATION load_to_s3;.
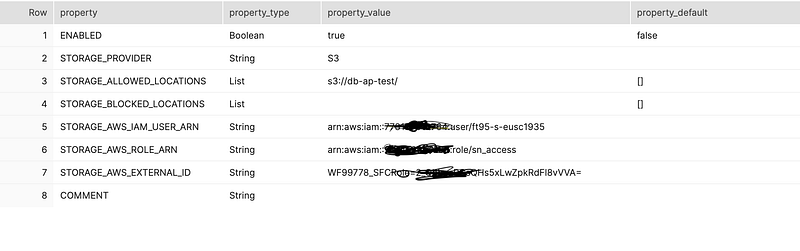
2.3 Copy STORAGE_AWS_IAM_USER_ARN and STORAGE_AWS_EXTERNAL_ID from the output of the describe command. We need to add these two entries to the role which we have created in Step 1.
2.4 Open the AWS console, Select IAM -> Roles. Search for the role created in step 1. Open the Role and click on Trust relationship then Edit trust policy.
Add copied STORAGE_AWS_IAM_USER_ARN and STORAGE_AWS_EXTERNAL_ID from snowflake into the Edit trust policy.
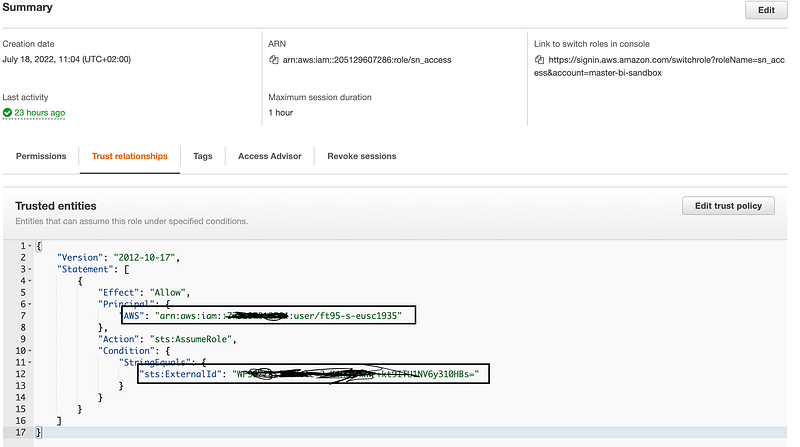
Now finally we have set up the communication between Snowflake and AWS account.
Step 3: Create an EXTERNAL STAGE. Snowflake stages are used to store the data in a specific format along with some additional information about the external cloud storage.
CREATE OR REPLACE STAGE unload_csv url='s3://db-ap-test/'
storage_integration = load_to_s3 --storage integration
file_format = (type = 'CSV' field_delimiter = ',' skip_header = 0);
Step 4: Use COPY INTO to dump the data on S3 from Snowflake.
/*After stage name Use backslash(/) and folder name to create the folder in the bucket and store the result in that folder*/
COPY INTO @unload_csv/sample FROM
    (SELECT * FROM ANALYTICAL.FACT_COUNTRY_AMOUNT_DAILY );
Summary In this article, We have seen how to unload the data from a Snowflake table into AWS S3, If you think that this article is informative and helped you with what you are looking then give a clap and follow my medium account( datageeks.medium.com ) and feel free to write in the comments if you have any doubts about this topic.
By signing up as a member (https://datageeks.medium.com/membership), you can read every story and help the authors on Medium.


