
Expand Your Mind — How to Grow Psychedelic Mushrooms Using Uncle Ben’s Rice
Anyone can do it with time, patience, and a lot of love.
Disclaimer: psychedelic mushrooms, are illegal in most countries. Excepting Denver, Colorado and Oakland and Santa Cruz, California, possession of psilocybin and psilocin is illegal in all of the United States.
The selling of mushroom spores is legal except in California, Idaho and Georgia, but for the purpose of growing psychedelic mushrooms is also illegal.
This article is for information and harm reduction purposes only. The publisher and author of this article do not condone the purchase, possession, sale, or consumption of any illegal substances.
Introduction
This is a guide to grow psychedelic mushrooms from the safety of your own home in the easiest way possible. All this can be done in a small space in your home, such as a bedroom closet, in approx 3–6 weeks for around $180.
It is recommended that you read this guide from start to finish. However, feel free to skip straight to the instructions below.
There are many ways to grow mushrooms. For the sake of clarity, this guide is focussed on simply the easiest way possible.
This process is broken down into three stages.
- Innoculation
- Fruiting
- Cultivation
Why grow mushrooms?
Maybe you are looking for a new hobby under lockdown? Maybe you want to grow your own mushrooms for personal consumption, or because you plan to microdose?
Mushrooms are the easiest psychedelic to grow yourself. There is also the undeniable pleasure of growing your own and the chance to learn new skills.
Nothing beats the satisfaction of a successful grow.
But for $180, could I not just get some truffles?
Yes, that’s for a one time experience. With just one successful grow, not only will you learn all about cultivating and caring for mushrooms. The fruits of your labour can be dried and stored for years. You can also grind your dried mushrooms and fill capsules for microdosing.
Why use psychedelics?
Psychedelics when used in the correct ‘set’ and ‘setting’ are fascinating compounds. The variety of doses, compounds and experiences — individual or in groups, leaves a lot of room for exploration.
Psychedelics have even been responsible for some of mankind biggest discoveries such as Francis Crick, the Nobel Prize winner who discovered the double-helix structure of DNA thanks to LSD. In our ongoing worldwide Coronavirus pandemic, Covid-19 testing relies on a technique invented by Kary Mullis as a result of an LSD trip for which he also was also awarded a Nobel Prize.
Many of their purported benefits include their potential in treating migraines, inflammation, anxiety and depression. There are ongoing studies looking at use cases such as the treatment of PTSD, depression, end-of-life anxiety and addiction.
There is an ongoing battle against the war on drugs, led by the relaxing of prohibitive cannabis laws and regulation on cannabis. Psychedelics may not be far behind. Oregan, for example, is currently pushing to legalise mushrooms for therapeutic use.
It’s becoming increasingly ‘normal’, to hear about friends and colleagues who are experimenting with psychedelics. This is true particularly in the world of startups. Whether that means they have recently been on an Ayahuasca retreat, or they have started microdosing — regularly taking small sub-perceptual doses of psychedelics to improve ‘performance’, psychedelic experiences are becoming more common.
If using psychedelics, you can even contribute to ongoing university research at the same time, anonymously and without stigma. I recently revisited psychedelics, taking mushrooms for guidance and clarity.
In a society currently on lockdown and even before that, experiencing a mental-health epidemic, there are communities of self experimenters turning to psychedelics and mushrooms for guidance.

There are two main ways of using psychedelics.
- Macrodoses. One-time high strength (1g+) experiences, usually assisted by a guide or ‘sitter’. This is the typical mind-altering experience where the user is likely to experience hallucinations or altered states of consciousness
- Microdoses. Regular (commonly every three days) small doses (0.1g is a good starting point) of mushrooms. Usually for long-term improvement of mental-health, creativity, clarity of thought. Sub perceptual, the user shouldn’t feel high but notice ‘performance’ improvements on reflection. Popular in the tech world.
Internet forums such as Reddit and shroomery.org are providing valuable and vital support to those passionate about their right to use compounds which evidence suggests have been vital for Humans for thousands of years. I recommend watching the brilliant Fantastic Funghi for more context on the wonderful world of mushrooms.
This article will guide the user through a safe way to grow their own psychedelic mushrooms in their closet at home, in the easiest way possible and would not be possible without the open knowledge and expertise of the online community.
Methodology
Growing your own mushrooms is not much different to any type of gardening and brings you closer to nature. There are many methods or ‘teks’ as they are more commonly known. These include the popular PF tek which involves the use of pressure cookers to sterilise grains. All tek’s have their pro’s and con’s, all that matters is that the end product is mushrooms.
This method will draw heavily on Uncle Ben’s tek — using pre-cooked rice grains to kick start a grow. Once you have built up experience you can then switch to more sophisticated methods to improve yields.
Why rice bags?
Microwavable rice bags contain parboiled (pre-cooked) rice in a vacuum-sealed in a bag. This means the environment within the bags is sterile and enables you to avoid contamination — the biggest threat to the growing of mushrooms.
Other ‘tek’s require the use of pressure cookers to sterilise grains — that is not necessary with pre-cooked bags of rice.
Note on sourcing
This guide assumes you have obtained mushroom spores from vendors readily available on google or via appropriate spore trading subreddits.
Any variety of psilocybe cubensis is fine for mushrooms — ‘B+’ and ‘golden teachers’ seem to be the most popular but any is fine.
Stage 1. Innoculation (uncle ben’s tek)
Step one of this process is simply the injection of microscopic mushroom spores into grains of microwavable rice such as Uncle Bens.
The following is a list of what you will need with comments. A full shopping list for all stages is broken down at the end of the article.
Shopping list (with comments)
- Mushroom spore syringe. 5ml is enough for 8–10 bags. Keep in mind you may lose bags to contamination. Syringes may be kept in sealed food bags in the fridge.
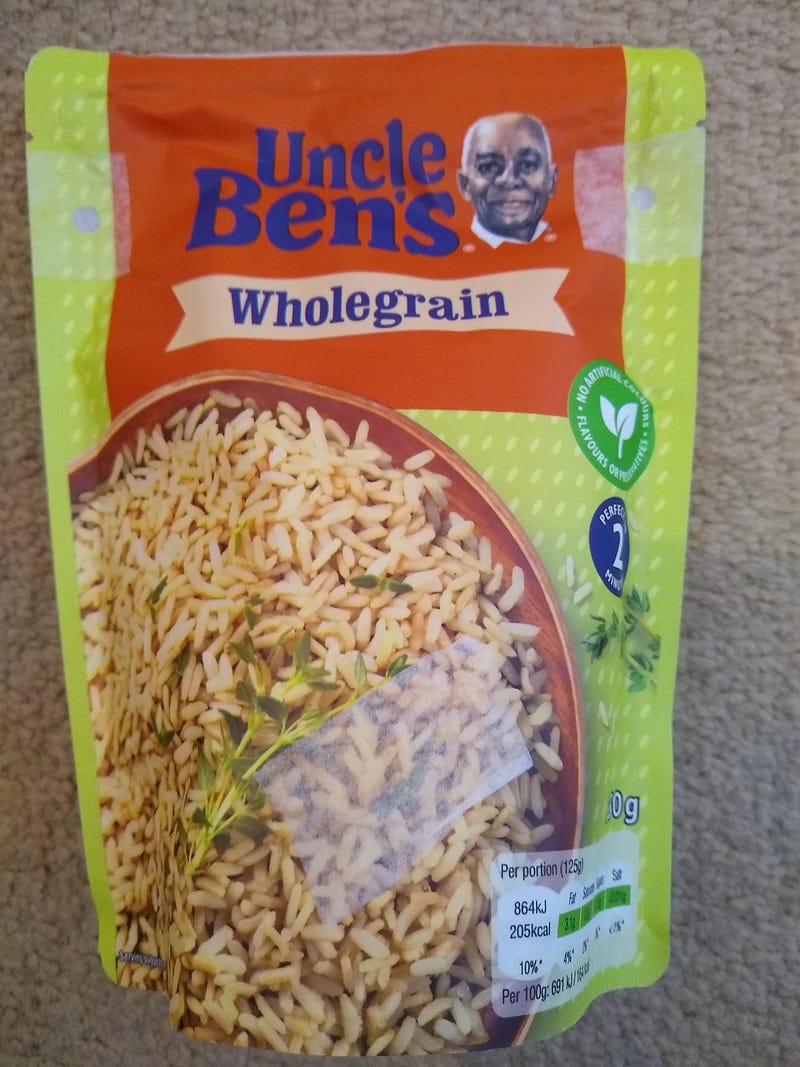
- Plain microwavable rice (e.g. Uncle Ben’s). The brand doesn’t matter (many people find uncle ben’s too mist) ingredients do. Plain rice only e.g wholegrain or brown rice. Check the ingredients there should be no more than parboiled rice plus salt and oil. The number of bags you need depends on space and amount of spore’s. For every 5ml you will need 8–10 bags of rice. Expect to lose some due to contamination or lack of growth.
- Heater. If you live somewhere cold this is a must. Temperatures need to be kept ideally above 75F and definitely below 80F. Check your heater can be controlled by a temperature controller and doesn’t require a second switch to turn on.
- Temperature controller. Controls your heater according to the correct temperature.
- Powder-free disposable gloves. Nitrile powder-free
- Alcohol Wipes 70%
- Breathable micropore tape
- Lighter
- Scissors
- Hole-punch
Optional
- Rubbing alcohol 70%. Any higher than 70% evaporates too quickly. Liquid rubbing alcohol is useful to top-up your wipes and for cleaning surfaces but not strictly necessary if you have wipes.
- Disinfectant spray — Lysol (Dettol in the UK). This is for helping to sterilise the air in the room pre inoculation.
- Face mask. Possibly difficult to find in corona-times. Helps to keep contamination off your bags.
Method
Step 1 — Clean room
The cleaner the location you have chosen to prepare you mushrooms the better and the less chance of contamination.
- First up find the cleanest most sterile place in your home. Preferably not a bathroom, kitchens are fine as long as no food is cooking or has been cooked recently. A worktop or table is fine. (I use the tiled bottom of an old fireplace as I have a tiny cramped home!)
- Vacuum all surfaces and clean with rubbing alcohol. Use wipes and top up with liquid rubbing alcohol if necessary, any surfaces you will be using. The cleaner your location, the less chance of your bags contaminating.
- Close all doors and windows — the stiller the air the better.
Optional: If your location is particularly dirty, spray the room with a disinfectant and allow to settle.
Step 2 — Prepare rice bags (hole-punch tek)
Preparation involves cleaning your bags and then creating gas exchange holes in both top corners of your bags using a hole-punch.
Gas exchange is vital to provide fresh air to mushroom spores as they colonise.
To visualise the following process, this is a single bag should look like when finished. Two hole-punches in each top corner, and one covered needle hole at the front.
- Put on gloves.
- Wipe each bag down with rubbing alcohol and line up your bags of rice ready for preparation.
- Clean your hole punch thoroughly in rubbing alcohol. Be sure to press up and down so the ‘punch’ itself is clean.
- Make two hole punches in the top corners of each of your bags. As soon as you have made the hole, cover with micropore tape as quickly as possible. Your technique will improve with multiple bags. Try not to expose the inside of the bag to air, if you do don’t worry but cover with tape as quickly as possible. Tip — do not hold your hole-punch at an angle, feed your rice bad as if it were paper under one punch only. If you make a mistake cover and punch another hole if necessary.
Now your bags are ready for inoculation.
Note — lacking a hole-punch a cruder and more risky method is just cutting off the top corner inoculating and then covering with micropore tape.
Step 3 — Inject mushroom spores (capri-sun tek)
Next, you are going to shake and clean your syringe and sterilise your needle with a lighter, ready to stab into your bag of rice and inject no more than 1ml of mushroom spores.
0.5–0.75ml is ideal, any more and your bags may get too wet which could lead to contamination.
- Shake your spore syringe.
- Clean the exterior with rubbing alcohol and let dry.
- Unscrew needle and attach to the syringe.
- Sterilise the needle by holding under a lighter until glowing red along its length. In your dominant hand, light your lighter ensuring your gloves are well away from the flame. With your other hand hold the needle in the flame.
- Allow to cool for 10 seconds.
- Insert spore syringe into your bag, ideally avoiding rice and carefully squeeze in approx 0.75 of spore solution.
- Cover needle hole with micropore tape.
- Wipe down the needle and repeat the process for all bags.
Step 4 — Storage
Once your bags are ready you need to store them somewhere ideally with a steady temperature such as a wardrobe or closet. Mycelium colonies faster with steady temperatures.
Whilst fluctuations slow down growth you can still have successful grows. I live somewhere cold so use a heater during the day to maintain 75F in my spare bedroom closet. I can’t sleep with the intermittent noise of a heater so my temperatures fluctuate, dropping overnight. This slows down the process and anecdotally seems to double your timelines.
To maintain a temperature at or above 75F (24C) if possible use a heater and temperature control device or a heating mat.
Once stored all you need to do is monitor the bags via touch and looking at the viewing port at the bottom of your rice bags.
Anytime 10–20 days after inoculation you should start to see mycelium growth.
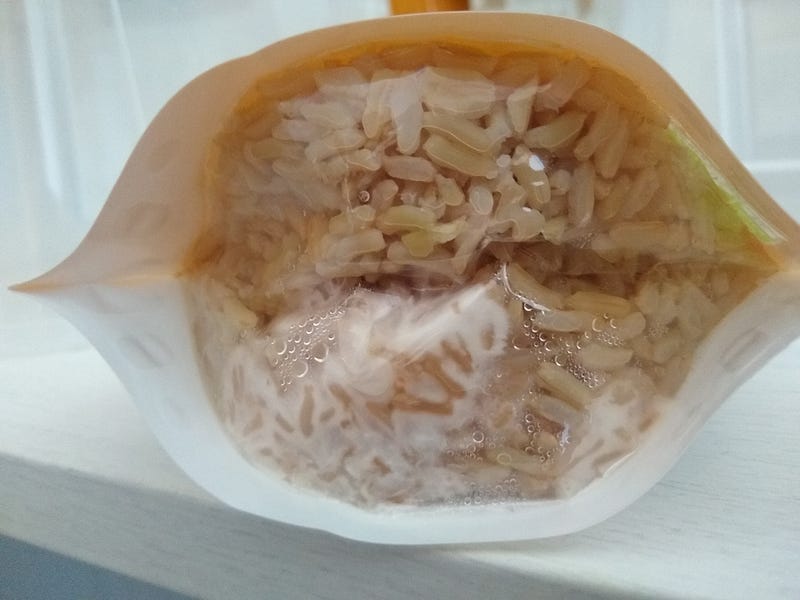
Step 5 — Break-n-shake (approx 7 days in)
Once your bag is showing approx 25% colonisation, as shown above, its a good idea to break and shake the bag up to spread the mycelium around. Do not do so until approx 7 days+ after inoculation.
This may encourage faster growth. Do not do this more than once or it can slow things down. Resist the urge to fiddle with your bags!
After a break and shake it’s likely you will see blue to dark blue discolouration. This is not contamination but bruising which will disappear.
Contamination
It is possible you will lose bag(s) due to contamination, often due to too much moisture. If there is significantly more moisture than as shown below that could be a sign that it’s too moist.
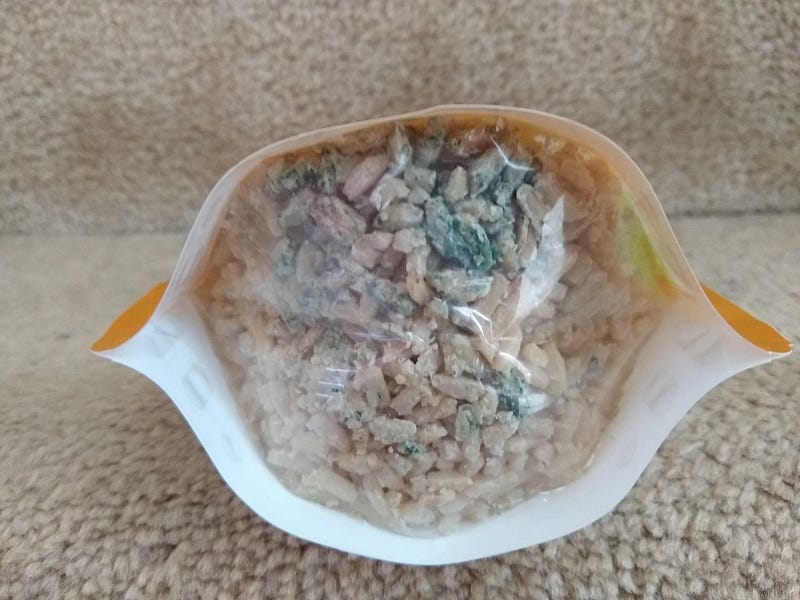
If you see any purple, reds, yellows, greens or your bags smell off, for example sour. Throw your bags away ASAP!
See below for an example of green contamination.
Note — this can look similar to bruising after break-n-shake. Look closely — green is bad, blue is just bruising. If in doubt wait a few days, as bruising will subside.
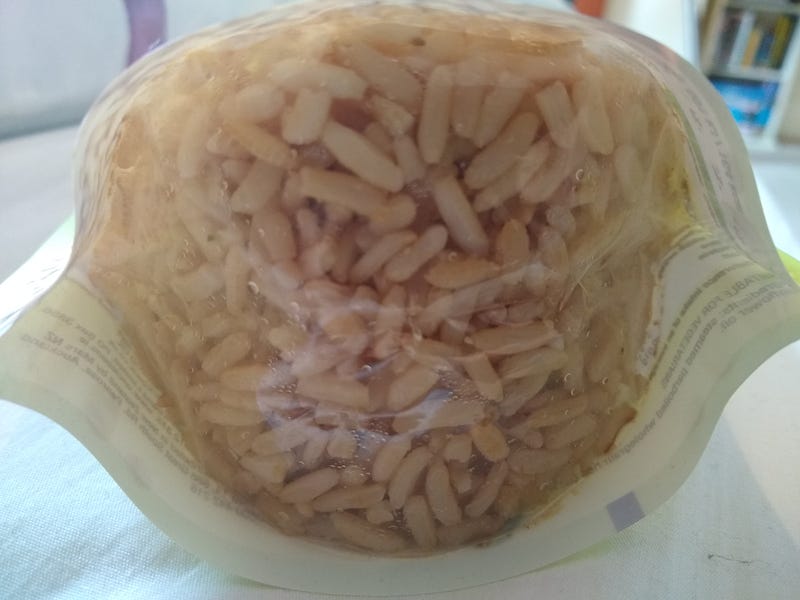
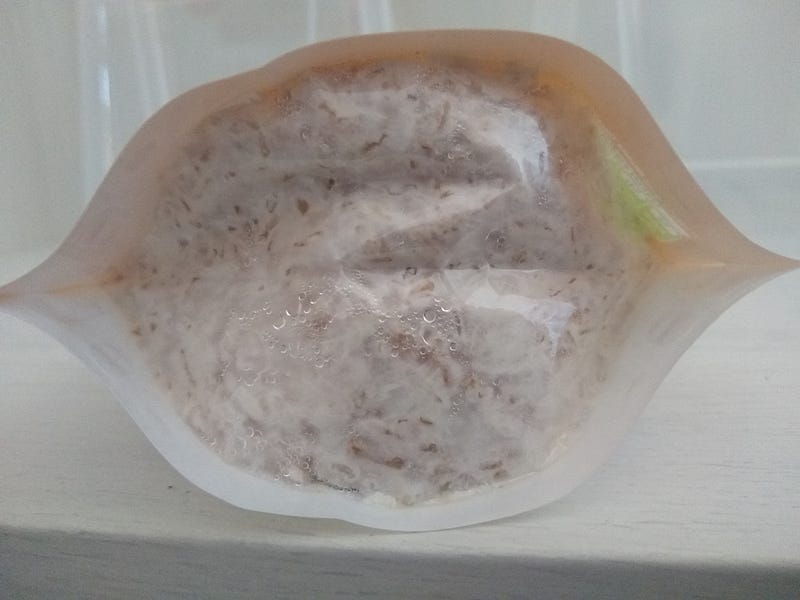
Ready to go?
Your bags are ready when fully colonised when they look like the below. This can be as quick as 10 days with the right temperatures. Bags can take 21 days or more in colder temperatures.
At this point, you are ready for Stage 2 — Fruiting
Note — Bags can be refrigerated if they are ready but you are not set up for the next stage and/or you are waiting for other bags to catch up. This is only necessary more than two days after full colonisation. If you do refrigerate, make sure to leave bags at room temperature for 24 hours before stage 2.
Stage 2. Fruiting (spawning to bulk)
You are now going to take your colonised bags of rice, break them up and mix with a substrate in plastic tubs ready to grow mushrooms.
There are two main steps to stage 2
- Spawning to bulk. Taking you rice, mixing with your substrate in a monotub (clear plastic tub).
- Introducing fruiting conditions. Exposing your tubs to fresh air and misting to introduce growth.
The following is a list of what you will need, in addition to what you already have, with comments. A full shopping list for all stages is broken down at the end of the article.
Shopping list (with comments)
- Bucket with a lid. Needs to be fairly large, 5 gallons (20L) is ideal. Has to have a lid in order to pasteurise your substrate.
- Monotub. Clear plastic tub. Can be any size, ideally deep. I use one gallon tubs from Ikea which are small but fit in my closet. One gallon will spawn 1–1.5 bags of rice. Any larger tubs will need more rice.
- Coco coir. This is your substrate. One brick of coco coir is enough for 3 x 1 gallon monotubs.
- Mister. Fine spray barbers mister.
- LED lights. Mushrooms do not need light to grow, however, they grow towards the light. Therefore when you have introduced fruiting conditions its a good idea to install LED lights within your closet.
Spawning to bulk
Step 1 — Pasteurize your substrate.
This is best done in the evening so your substrate is ready in the morning.
- Clean your bucket, wipe down with alcohol wipes and leave to dry.
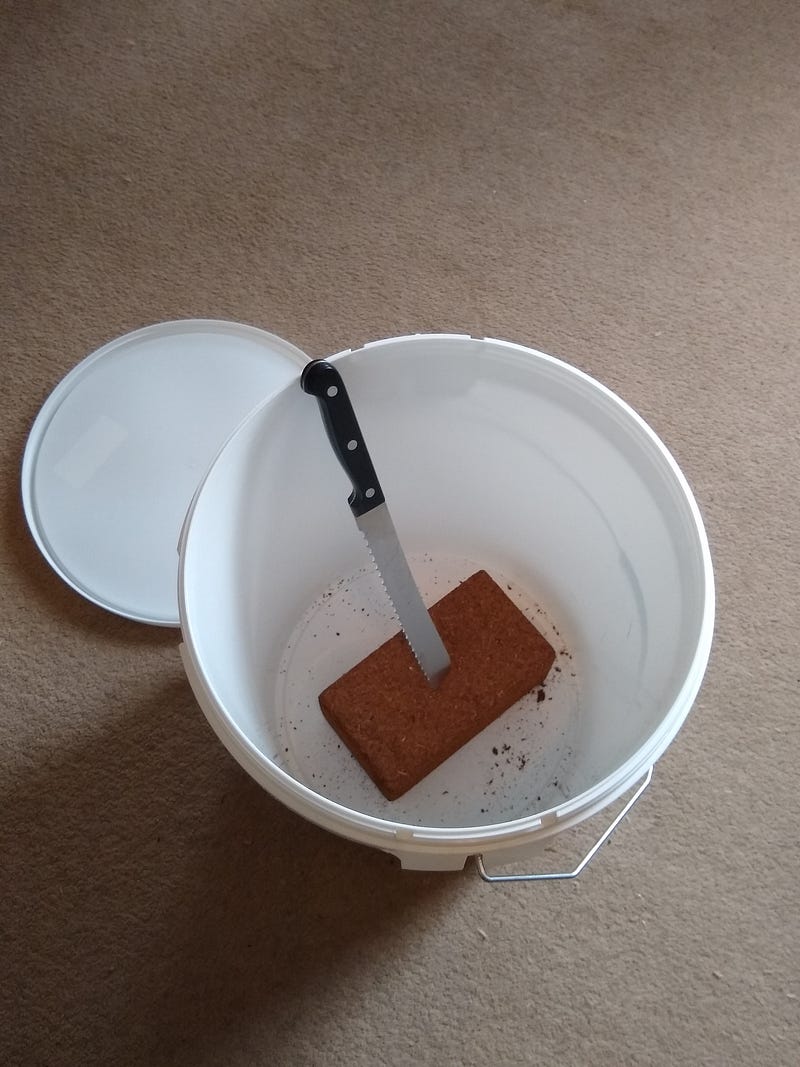
- Place an entire brick of coco coir in your bucket
- Boil a gallon of water. Use most of your hobs to boil water in saucepans.
- Pour boiling water into your bucket and break up the coco coir. Do this one saucepan of water at a time until you have broken up all your substrate. Use any implement available to break up you coir, I use a long bread knife. You do not need to wear gloves for this step. Keep adding water until there all your coir is broken up. You will need a decent amount of water. Avoid water pooling at the bottom and mix up thoroughly. As soon as its mean place the lid on — you want it to be hot for as long as possible to pasteurize the mixture. Leave to sit for 5 hours +. Tip — turn your brick on its side and it’s much easier to break up.
Step 2 — Clean
As before make sure you preparation areas/room is as clean as possible. Wipe down your tubs, bags and scissors with alcohol wipes (kitchen towel doused in rubbing alcohol also works) and allow to dry
Step 3 — Spawning
Now you are going to add your pasteurized coco coir mixture and your colonized rice grains and mix together in a monotub.
- Wearing gloves add 1–2 inch worth of coco coir to your tub. For each handful of coir from your bucket, using both hands squeeze out the water from the coir and then place in your tub.
- Add your mycelium. Cut open your bags of rice and check for contamination. Anything pink, red or green is likely contamination. Small areas of yellow are fine. Break up into fine grains avoiding large lumps.
- Mix. Mix as thoroughly as possible and add coir until your tub is roughly 3/4 full. The better you mix the more even future growth will be.
- Pack down and level. Measure the depth. You are aiming for 2.5 to 4 inches depending on the size of your tub.
- Add a casing layer. Add a small 1/4 inch casing layer of coir to cover up all grains on the top surface. Wipe all coir from the sides of your tub and level down.
All you need to do then is put the lid on and place in your closet.
Leave for 48hours, you can then lift the lid occasionally to exchange air and check surface conditions.
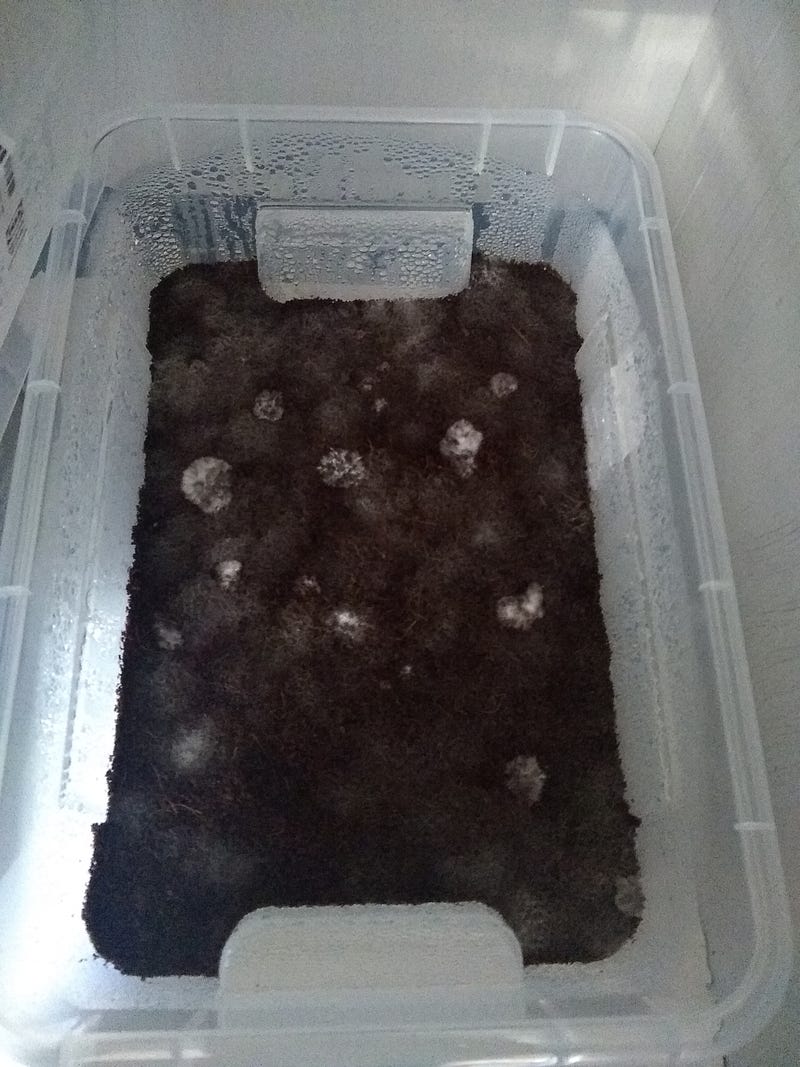
You are now waiting 3–7 days for the surface to colonise and/or pins to start forming, which is when you introduce fruiting conditions.
Fruiting
To introduce fruiting conditions all you need to do is ‘crack’ the lid. To allow for air exchange. Then due to increased evaporation, you may need to mist the surface.
Step 1 — Crack the lid
This doesn’t actually mean physically break the lid!
You just need to lift it up slightly so air can get into your monotub. The easiest way to do this is to turn the lid upside down and lay back down on top with a small gap on one side for air exchange.
Step 2 — Mist surface
This only needs to be done if your surface conditions are not ideal.
Ideal surface conditions are thousands of tiny droplets on the surface. If there are not enough droplets you need to mist the surface with a fine mist spray.
Do not over mist however, there should be no pooling of water. If so you can fan the surface with the lid to encourage evaporation or if desperate, soak up some water with a kitchen towel.
When misting, try to mist as far above the surface as possible so the min-droplets fall on the surface rather than firing it close up.
Ones you see pins forming, or you have mushrooms growing, try to avoid misting them directly.
Step 3 — Give them light
Light is not actually needed for mushrooms to grow. However, mushrooms will grow towards the light.
If you are growing in a closet, your mushrooms will grow towards the light coming from a crack if its dark inside. This can lead to your mushrooms leaning over and crazing at all kinds of crazy angles.
It is therefore recommended to install lights directly above your monotubs. This can be done in any number of ways depending on your set-up. One method is to purchase cheap LED strip lights which can be stuck on the ceiling of your closet. Lights do not need to be on 24hrs — this whole method is to replicate ideal outdoor conditions. Therefore ensure your lights are on 12–18 hrs a day.
Stage 3. Cultivation and storage
Ok, so you have grown some mushrooms. What next? You now need to pick, wash and store them and if you want more, prepare your tub for a second flush.
The following is a list of what you will need, in addition to what you already have, with comments. A full shopping list for all stages is broken down at the end of the article.
Shopping list (with comments)
- Glass airtight storage containers. These need to be at least 500ml, 0.5L minimum in size
- Silica Packets
- Food dehydrator
- Electronic scales
Optional
- Curved Scissors. Makes harvesting your mushrooms a lot easier
- Coffee grinder. If you want to microdose
- Size 1 empty vegetarian capsules (or Gelatine depending on preference). If you want to microdose.
- Capsule filling machine. The fastest way to fill capsules for microdosing
Step 1 — Harvest
When harvesting mushrooms ideally you want to harvest them as their veils are beginning to break. You will see the veil underneath the mushroom head beginning to drop. After this point, it is speculated that the amount of psilocybin drops as the mushroom drops its spores and begins the process of decay.
You can harvest as you go but obviously it’s easier to do so in one batch. Harvesting mushrooms early isn’t necessarily a problem but the bigger the better. If there is still room for growth, let them grow.
Mushrooms can be plucked with your hands, twisted and pulled, cut with a knife or scissors. My preferred method is using curved scissors. There are those who think plucking causes too much trauma to the surface which may affect 2nd 3rd and 4th flushes.
To make harvesting easier you can pour tap water (distilled if you have it) down the sides of your cake. This causes your mushroom cake to rise to the surface of the monotub, making them far easier to harvest. It also has the added bonus of re-hydrating your substrate for a second flush.
Note: If you see black dusting on top of your mushrooms, that is because spores have been dropped from other mushrooms. This does not affect the mushrooms, they will simply need washing more thoroughly.
Step1a — Reflush
After your first harvest that is not the end of the road for your monotub. You can rehydrate it and go again. It’s possible to do as many as 4/5 or even more extra ‘flushes’ after your first harvest. Mushrooms tend to be lower in quantity but greater in size.
If you have floated your cake keep it in the water for a few hours, drain thoroughly — make sure there’s no pooled water at the base. Then mist the surface thoroughly and return to fruiting conditions. Mushrooms will soon return.
Step 2 — Washing
Wash your mushrooms and wipe of any material which has fallen on the outside. It is likely at the base of your mushrooms some of the substrate is still attached. Slice or wipe of any remaining ‘soil’ from your monotub and then place your mushrooms on some kitchen towel to dry.
Step 3 — Dehydrating
Mushrooms can be consumed 24 hours after harvest and up to a week if refrigerated. It is likely you have far more than you need for a trip so you will need to dehydrate your mushrooms — after all, they are 90%+ water so will quickly rot if not.
Mushrooms can be dehydrated in many ways. The easiest way is to purchase a cheap dehydrator and leave them at around 55C (130F) until they are cracker dry and snap easily. This can take up to 24 hrs so be patient.
Step 4 — Storage
Your mushrooms are now ready to be stored for future use. They can be kept fresh in a sealed glass jar for years.
Get your hands on a glass storage jar with a good seal and, using your micropore tape, tape 2x silica packs to the lid of your glass jar. These are the often annoying packets you find in deliveries so you may not need to buy any if you have any to hand. The silica packets will absorb any unwanted moisture remaining, giving you longer shelf lives.
Store your mushrooms somewhere dark and cool. You are now free to eat, brew, grind down for microdoses as and when you please.
Advice
This process is a journey. You will make mistakes. Everyone’s local conditions are different so time periods referred too will change accordingly. This list will be added to overtime.
It’s likely the first time you attempt to grow, you will lose rice bags and/or monotubs to contamination. If it looks bad and smells bad get rid of it. Before you do so, google ‘metabolites’ or ‘myc piss’ as its affectionately known, if you don’t think its that chuck it and try again.
Labelling your tubs and glass jars is a good idea so you can track what works and what doesn't, as well as the potency and strain.
Full Shopping list
- Mushroom spore syringe.
- 8–10 plain microwavable rice bags (e.g. Uncle Ben’s).
- Heater.
- Temperature controller.
- Powder-free disposable gloves.
- Alcohol Wipes 70%
- Breathable micropore tape
- Lighter
- Scissors
- Hole-punch
- Bucket with a lid.
- Monotubs.
- Fine Spray Mister.
- Glass airtight storage containers.
- Food dehydrator
- Electronic scales
Optional
- Rubbing alcohol 70%.
- Disinfectant spray — Lysol (Dettol in the UK).
- Face mask.
- LED lights.
- Curved Scissors.
- Coffee grinder.
- Size 1 empty vegetarian capsules (or Gelatine depending on preference).
- Capsule filling machine.


