
Ethereum Development Environment Setup: A Step-By-Step Tutoriel
Welcome, adventurous coder, to the exciting world of Ethereum development!
In this guide, we’re going to embark on a journey to set up your own Ethereum development environment, unraveling the complexities.

Step 1: Choosing Your Tools
First and foremost, you need a set of tools.
Node.js and npm
To install Node.js and npm, visit the official Node.js download page, download and install the recommended version for your OS.
Truffle
Next up is Truffle, your personal Ethereum workbench. It simplifies contract deployment, testing, and overall project management. Truffle is like a seasoned local guide who knows every nook and cranny of an Ethereum city, making your development journey smoother. Install Truffle globally using npm:
npm install -g truffle
Step 2: Downloading and Opening Ganache — Your Personal Ethereum Sandbox
Ganache is your personal sandbox. It provides a safe environment to experiment and test your smart contracts without any real-world consequences.
However, before you can play in this sandbox, you need to know how to access it.
This section will guide you on how to download and open Ganache.
Downloading Ganache
The journey to our sandbox begins at the official Ganache website. There, you’ll find the “Download” button. Click it and select the version suitable for your operating system.
After downloading the installer, it’s time to install Ganache on your machine.
Run the installer and follow the on-screen instructions. In no time, you’ll have Ganache installed and ready to go.
Opening Ganache
With Ganache installed, you can now open it just like any other software on your machine:
- On Windows, navigate to your Start menu. Click on the Start button, scroll through your list of installed applications until you find Ganache, and click to open it.
- On macOS, delve into your Applications folder, locate Ganache, and double-click to open it.
- On Linux, the process might vary depending on your specific distribution and how you installed Ganache. Generally, you can find it in your applications menu. If you installed it via a package manager, you might be able to launch it using a command like
ganache.
Upon opening Ganache, you’ll encounter a screen where you can create a new workspace or open an existing one.
For beginners, it’s recommended to click on “Quickstart” to create a new workspace with default settings.
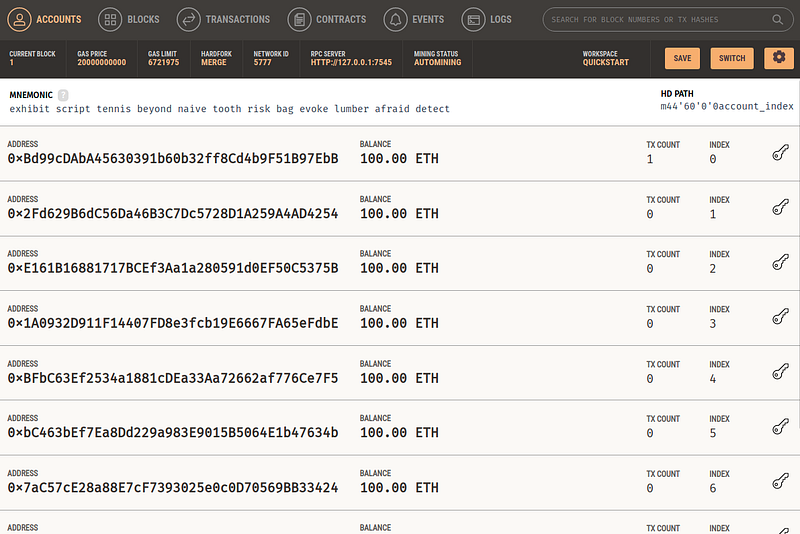
This workspace fires up a local Ethereum blockchain, allowing you to peek into its details including accounts, blocks, transactions, and contracts.
Remember, Ganache should be kept running while you’re developing your Ethereum applications. It acts as your local Ethereum node, and your applications will interact with it as if it were the actual Ethereum network.
Step 3: Setting up Base Camp — The Project Directory
Like any successful journey, organization is key. Our ‘base camp’ is the project directory.
First, create a new directory for your project. You can use the terminal or command prompt:
mkdir my-eth-project
cd my-eth-project
To set up the Truffle project, initiate it with:
truffle initThis command conjures a well-structured project directory for you. Think of it as a pre-built base camp, complete with essentials and a map of the area.
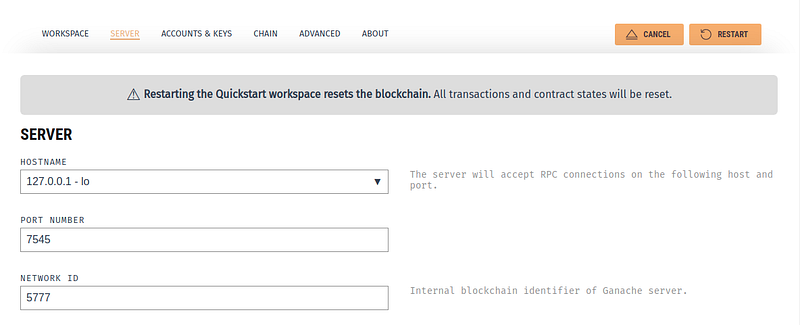
Then, you need to specify a network_id in your Truffle configuration for the 'development' network.
- Open the
truffle-config.jsortruffle.jsfile in the root of your project. This is where your project's configuration is located. - Locate the
networksproperty. It's an object containing the configurations for different networks. - In the
developmentobject (which is one of the networks), add anetwork_idproperty and assign it an arbitrary number, like so:
module.exports = {
  networks: {
    development: {
      host: "127.0.0.1",
      port: 7545, // or the port that you have configured for Ganache
      network_id: 5777
    }
  }
  // rest of your config...
};
The configuration must be the same in Ganache Settings > Server:
Step 4: Interacting with Ethereum— The MetaMask Wallet
You’ll need a wallet to interact with contracts and transactions. MetaMask serves as your digital wallet and passport, giving you an identity on the Ethereum network. To install MetaMask, go to the official MetaMask website and add it as an extension to your browser.
Step 5: Ready to Build — Writing Your First Contract
With base camp set and tools in hand, it’s time to create your first smart contract!
Create a new file SimpleStorage.sol in the /contracts directory. In this contract, you're constructing a simple storage unit:
pragma solidity >=0.4.22 <0.9.0;

contract SimpleStorage {
  uint storedData;

  function set(uint x) public {
    storedData = x;
  }

  function get() public view returns (uint) {
    return storedData;
  }
}
Compile the contract using:
truffle compileAnd voila! Your first Ethereum smart contract is ready!
Step 6: Deploying Your Smart Contract — Migrating Your Contract
Create a new file 2_deploy_contracts.js in the /migrations directory:
const SimpleStorage = artifacts.require("SimpleStorage");

module.exports = function(deployer) {
  deployer.deploy(SimpleStorage);
};
Run the migration with Ganache as your network using:
truffle migrate --network developmentNow, your smart contract lives in your Ethereum sandbox!
truffle migrate --network development

Compiling your contracts...
===========================
> Everything is up to date, there is nothing to compile.


Starting migrations...
======================
> Network name:    'development'
> Network id:      5777
> Block gas limit: 6721975 (0x6691b7)


2_deploy_contracts.js
=====================

   Deploying 'SimpleStorage'
   -------------------------
   > transaction hash:    0xe2881646c2731d4b26a11a829e0dabd1461c30ddcef19e8dfee593c8d1eef745
   > Blocks: 0            Seconds: 0
   > contract address:    0x8148cE37C3A1E8E8E689724d41900a8132AC1C18
   > block number:        1
   > block timestamp:     1687467217
   > account:             0xBd99cDAbA45630391b60b32ff8Cd4b9F51B97EbB
   > balance:             99.999575921125
   > gas used:            125653 (0x1ead5)
   > gas price:           3.375 gwei
   > value sent:          0 ETH
   > total cost:          0.000424078875 ETH

   > Saving artifacts
   -------------------------------------
   > Total cost:      0.000424078875 ETH

Summary
=======
> Total deployments:   1
> Final cost:          0.000424078875 ETH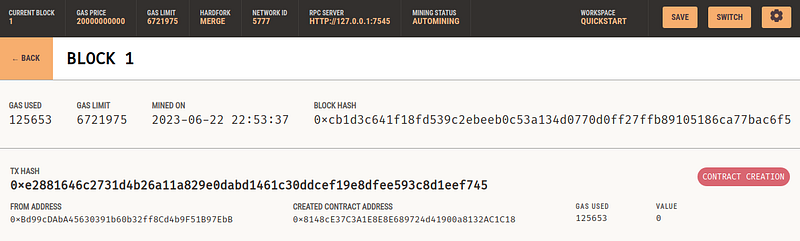
Conclusion
With this guide, you’ve taken more than a few significant strides into the world of Ethereum development. The cityscape of Ethereum now lies open to your innovation and creativity, welcoming the unique structures you’ll create, and the new paths you’ll carve out in the bustling streets of this blockchain metropolis.
Remember, there’s always more to learn and discover, but you’re well on your way. After all, as an Ethereum developer, you’re not just a tourist, but an active participant, shaping Ethereum city’s ever-evolving skyline with your codes and keystrokes. Welcome to the exciting journey of Ethereum development. Enjoy the ride!
Enjoyed the read? For more on Web Development, JavaScript, Next.js, Cybersecurity, and Blockchain, check out my other articles here:
If you have questions or feedback, don’t hesitate to reach out at [email protected] or in the comments section.
[Disclosure: Every article I pen is a fusion of my ideas and the supportive capabilities of artificial intelligence. While AI assists in refining and elaborating, the core thoughts and concepts stem from my perspective and knowledge. To know more about my creative process, read this article.]