
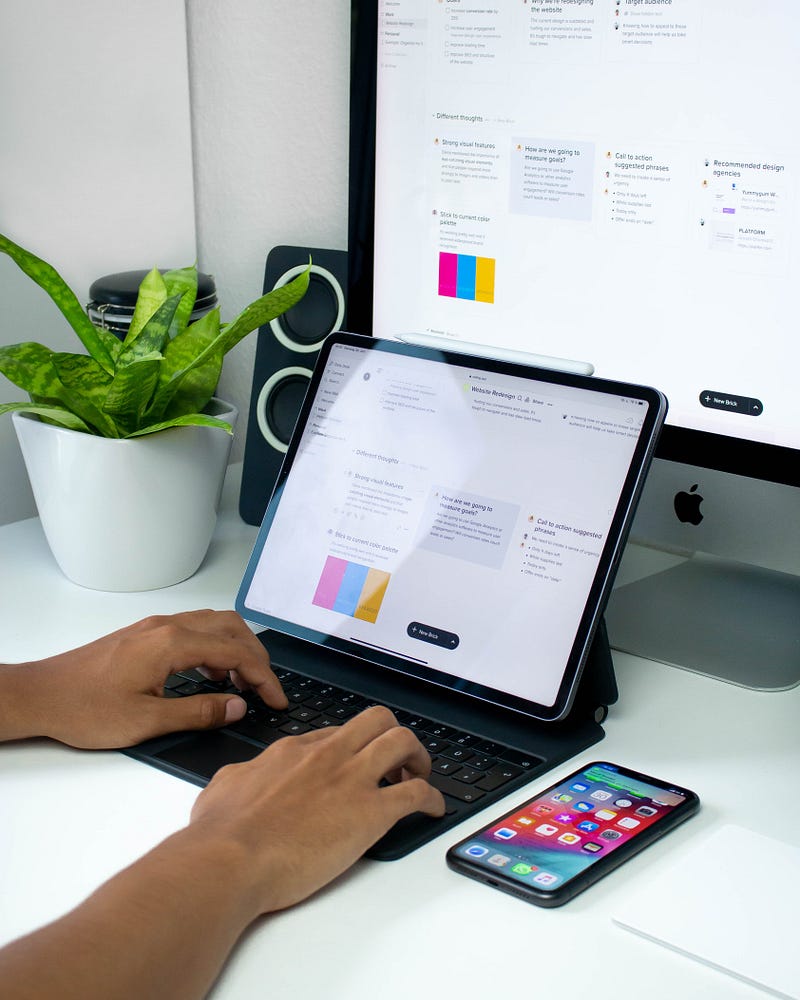
Enhancing iPad Productivity: A Practical Guide to 5 Custom Shortcuts
Make your iPad work for you
We all have routines in our everyday workflow, and we all have at least one procedure that annoys us — because it is tedious, cumbersome, or simply stupendous.
Well, there is a solution to that provided by Apple and you probably know it already (and not only because I wrote it in the title) — Shortcuts. Shortcuts allow some automation of such annoying processes to make your workday a lot more easy and enjoyable. I’ve seen people doing some complex stuff in Shortcuts and, honestly, even the default Shortcuts coming natively in the app are kind of complex (at least to me as an absolute beginner to this app). But, also for a beginner and someone who has no idea of any kind of coding, this app is relatively easy to use and to learn. But what you need is creativity. With a spark of creativity, there are plenty of options to tailor Shortcuts to your workflow.
From a beginner’s standpoint, allow me to introduce some very handy Shortcuts that boost your workflow on the iPad toward productivity. Let’s get creative.
Pomodoro timer
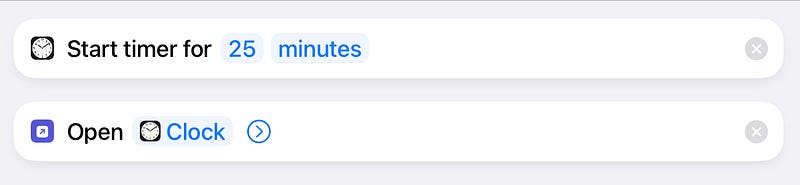
Let’s start with the least complex — the Pomodoro timer. I don’t see the point of paying for an app that simply just counts down time intervals. Unless analytic tools are important for you, this can easily be built in Shortcuts for free.
To create your own Pomodoro timer, open the Shortcuts app and search for “timer”. Select the “Start Timer” command and add it to your shortcut. Specify the time interval and search for the “Open App” command. Add it to the shortcut and select the Clock app. If you trigger the shortcut, the 25-min timer will start and the Clock app will be opened to display the time. In case you do not want the Clock app as a kind of dashboard view, omit the last command.
”Photo email”
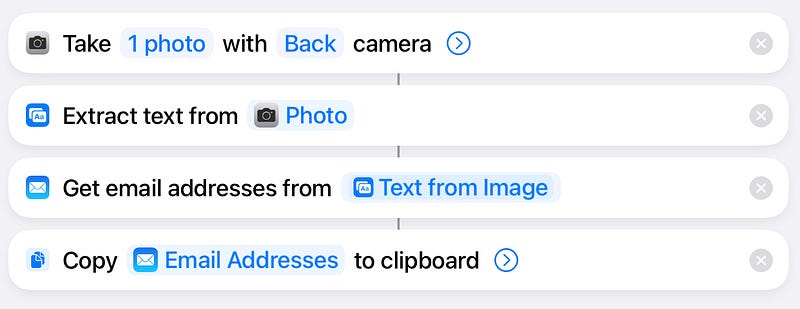
I don’t like to type in new email addresses to my mail program, a new contact, or in the CRM. I always need to at least triple-check for fear of spelling mistakes. And I always catch myself spelling names wrong. Therefore, I thought about a way around this to get the email address from a business card or any kind of medium to the place I require it. Every iPad has a camera. So, the easiest way would be to take a photo of the object that contains the email address, extract the email address from the photo, copy it to the clipboard, and have it ready to paste wherever required. And this is how you do it:
In Shortcuts, search for “Camera” and add the “Take Photo” command to your shortcut. Specify the number of photos to 1 and select the back camera. Next, search for “Text” in Shortcuts and add the “Extract Text from Image” option. It will automatically connect with the previous command. Then search for “Email” and select “Get Email Addresses from Input”. Arrange it after the “Extract” command. The variable will automatically be set to “Text from Image”. Finally, search for “Clipboard” and add the “Copy to Clipboard” command to your shortcut. That’s it, you now never need to have any hurdles with email addresses anymore.
Extracting text from images
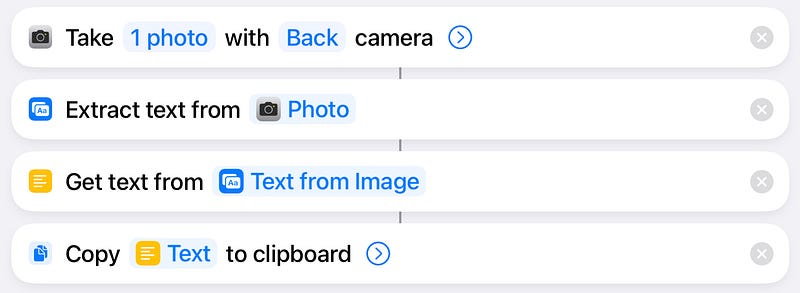
Do you want to get text out of an image, flyer, information panel, or in general from a physically printed matter? Well, then simply modify the “Photo Email” shortcut.
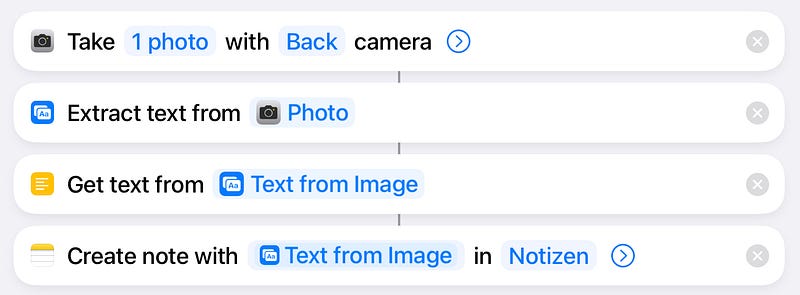
Follow the first two steps from the previous section and add the “Get Text from Input” at the third position in your new shortcut. The input variable will be automatically set to “Text from Image”. Now you have the choice: where should the text go? Allow me to suggest 3 options:
Option 1: The Clipboard. Add the “Copy to Clipboard” command to the fourth position in your shortcut.
Option 2: Apple Notes. Add the “Create Note” command and specify the folder. The body variable will automatically connect to the text from the image.
Option 3: PDF file. Add the “Make PDF” command and add it to the fourth position in your shortcut. The input variable will automatically be set to “Text”. Add the “Save file” command and specify the directory for saving the PDF file. If you want to view the file right away, add the “Open File” command and specify the app. Otherwise, omit the last command.

Creating a QR code from text input
Often, it is very useful to create a QR code from a URL, a number, or any kind of text input. To create such a shortcut, follow these steps:
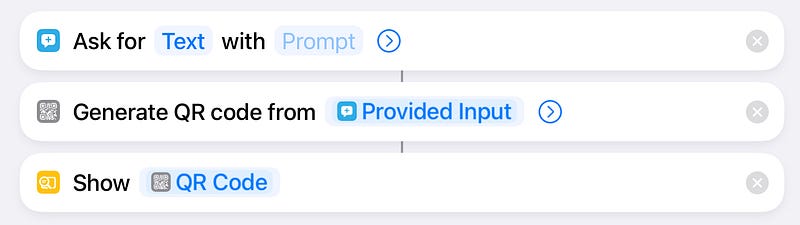
Search for “input” in the Shortcuts app, and add the “Ask for Input” command to your shortcut. Specify the variable to “Text” and keep the second variable as “Prompt”. Then, search for “QR” and add the “Generate QR Code” command. The variable will automatically be set to “Provided Input”. Finally, add the “Show Result” command. In the preview of the shortcut, tap on the QR code and select “Save Image” from the share sheet to save the QR code.
Before running the shortcut, make sure to copy the URL or text to the clipboard. Paste it to the prompt to transform it into a QR code.
Simplified handling of email attachments
The iPad is a touch-first device and nothing is more intuitive than to drag and drop files to attach them to an email or to save an email attachment to the folders in the Files app. With a simple shortcut, the Mail and Files apps can be opened in a split screen to drag and drop files between both apps. This requires only one command. Add the “Split-Screen Apps” command as a new shortcut and specify the apps to Files and your email app of choice.

One last thing…
…to make use of all these shortcuts: don’t forget to put them on your home screen for quick access. Either through the Shortcuts widgets or direct bookmarking on the Home Screen in an app-like icon. Therefore, open the shortcut in the Shortcuts app, tap on the Share icon, and select “Add to Home Screen”.
I hope this article gave you some sparks of ideas for creating your own shortcuts. Just think about the most annoying workflows and try to make them easier by creating personalized shortcuts. Please let me know of your productivity shortcuts, as I am also constantly searching for new ideas.
Thanks for reading!
Tobias


