
Enable SSH Access to WSL from a Remote Computer
Setup SSH Server on Windows Subsystems for Linux (Ubuntu) on Windows 11 and Enable SSH Access to WSL from a Remote Computer
I have a collection of computers with Windows on them and I like to play with them. I also want to treat these computers as if they were Linux computers, but after playing with many Linux distros in my life, I came to the conclusion that Linux GUI is really buggy and inconvenient to use. I guess I prefer Windows.
Best of all, I find that Windows Subsystem for Linux (WSL) is a better Linux for a tinkerer like myself. If you tinker with Linux a little too much, it can become unstable and you will need to do a fresh re-install. It is a lot easier to delete the WSL instance and create a new one than to install a whole new operating system.
Since I am a bit too lazy to walk up to those computers to install and configure applications on them, I like to control all of these computers from one computer via a terminal session using a secure protocol, such as SSH.
The tutorial was created to set up OpenSSH Server on WSL (Ubuntu) and enable SSH access into WSL (Ubuntu) from a remote computer. The following tutorial is a bit kludgy. I had planned to do a clean install and configuration of the OpenSSH Server on Windows. By changing the default shell to Bash, I could securely access the WSL from a remote computer. But life is not that simple. Microsoft decided to move WSL to a Windows Store application to enable more frequent updates, but they forgot that you cannot launch the Microsoft Store application from session zero, such as SSH. If you want to know more, please refer to the ‘Release Notes for WSL in the Microsoft Store’ on Microsoft Learn, where the known issue is “Launching Windows Subsystem for Linux from session zero does not currently work (for example from an ssh connection)”
Before proceeding with the tutorial, I recommend you use a complex password for your WSL distro, instead of a simple password.

Tutorial
Update WSL to the latest version
This is up to you. If you do not want to update to the latest version of WSL, you can follow this tutorial to ‘Setup SSH Server on Windows 11’ (https://readmedium.com/setup-ssh-server-on-windows-10-11-34c7f096eaff) and then change the default shell to ‘Bash.exe’, instead of PowerShell.
If you are like me and like to play with the latest and greatest version, you will need to update to the latest version of WSL. To update to the latest version of WSL, issue the following command in either PowerShell or the Command Prompt:
wsl --updateOnce the update is complete, validate it by checking the version of WSL using the following steps:
wsl --versionwhich should return information similar to the following:

Enable systemd
The latest version of WSL supports “systemd” and we should utilize it fully. From the WSL distribution terminal (e.g., Ubuntu 22.04), edit the /etc/wsl.conf file.
sudo nano /etc/wsl.conf
then, add the following:
[boot]
systemd=true
Exit out of the nano editor by using ‘CTRL+O’ to save and ‘CTRL+X’ to exit. Close the WSL distribution terminal (e.g., Ubuntu 22.04). From either PowerShell or the Command Prompt, issue a command to shut down all instances of running WSL distributions:
wsl --shutdownInstall OpenSSH Server
To install the OpenSSH Server, issue the following commands from a new WSL distribution terminal (e.g., Ubuntu 22.04):
sudo apt update
sudo apt install openssh-server
To confirm the installation, check the status of SSH by issuing the following command:
sudo service ssh statuswhich should return the following information:

If the SSH service is not running, you can start it by issuing the following command through systemd:
sudo systemctl start sshd.serviceValidate OpenSSH Service (i.e, sshd)
Let’s verify if the sshd is functioning as intended by connecting to the localhost.
ssh sungkim@localhostEnter your password when prompted, this will connect you to the same WSL session via SSH. Type “exit” to end the SSH session. You should also verify that the sshd is working properly from a host computer (e.g., Windows computer). First, obtain the IP address of the WSL distribution session (e.g., Ubuntu 22.04) by issuing the following command (you may need to install net-tools):
ifconfig
which should return the IP address of the WSL distribution session (e.g., Ubuntu 22.04).

From either PowerShell or the Command Prompt, let’s connect to the WSL distribution session (e.g., Ubuntu 22.04) using its IP address via SSH:
ssh sungkim@172.18.181.124Enter your password when prompted, and you will be connected to the WSL distribution session (e.g., Ubuntu 22.04), and it will appear as if you are using the WSL distribution session (e.g., Ubuntu 22.04) directly.
You have successfully installed the OpenSSH Server on the WSL distribution session (e.g., Ubuntu 22.04)!
Route Port 22 (SSH port) Traffic to WSL Distro (e.g., Ubuntu 22.04) Session
This is where the tutorial becomes kludgy because there are a few problems with WSL as follows:
- The IP address is assigned to the WSL distro (e.g., Ubuntu 22.04) session dynamically, so every time the WSL session starts or restarts, a new IP address is assigned. If you issue a command like ‘wsl — shutdown’ to shut down the WSL session(s) and start a new WSL session, a new IP address gets assigned.
- The IP address assigned to the WSL distro (e.g., Ubuntu 22.04) session is only accessible by the host computer (i.e., Windows computer). It is not accessible by remote computers. The only way a remote computer can SSH into the WSL session is by creating a network port proxy rule on a Windows computer that maps port 22 to the WSL distro (e.g., Ubuntu 22.04) session. This means that every time the WSL IP address changes, we will need to delete the existing network port proxy rule and replace it with a new one.
I have come up with a kludgy solution that automates the above steps whenever the Windows computer starts, but you can also run them manually.
Step 1: Launch WSL Distro on Machine Startup
We need to first start the WSL distro (e.g., Ubuntu 22.04) session. This can be done easily by changing the settings of Windows Terminal, as shown below where you change the following settings:
- Change the “Default Profile” to WSL Distro Name.
- Turn On the Launch on machine startup
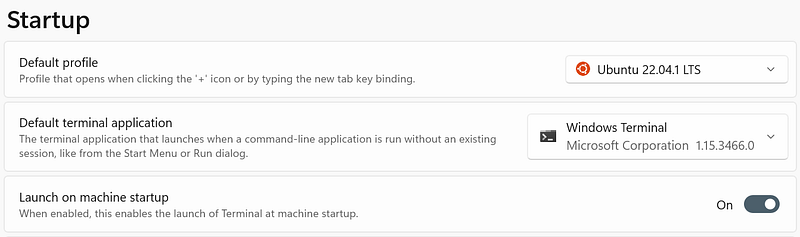
With these setting changes, every time the Windows computer starts, the WSL distro (i.e., Ubunutu 22.04) will start.
Step 2: Get WSL Distro (e.g., Ubuntu 22.04) session’s IP address from Windows.
We need to obtain the WSL distro (e.g., Ubuntu 22.04) session’s IP address so we can programmatically change network port proxy rules.
From PowerShell, issue the following command to get the WSL distro (e.g., Ubuntu 22.04) session’s IP address:
wsl -d "Ubuntu" hostname -IIt should return two IP addresses where the first IP address will be used to connect to the WSL distro (e.g., Ubuntu 22.04) session via SSH:
172.18.181.124 172.17.0.1We assign two IP addresses to a variable and then parse the string to get the first IP address:
$wsl_ipaddress = wsl -d "Ubuntu" hostname -I
$wsl_ipaddress1 = $wsl_ipaddress.split(" ", 2)[0]
which should return
172.18.181.124Step 3: Delete the Existing Network Port Proxy Rule and Create a New Network Port Proxy Rule
This information was provided by Scott Hanselman on his blog “How to SSH into WSL2 on Windows 10 from an external machine”.
From PowerShell in administrator mode or run as administrator, issue the following command to delete/add network port proxy rules where it uses $wsl_ipaddress1 variable:
netsh interface portproxy delete v4tov4 listenaddress=0.0.0.0 listenport=22
netsh interface portproxy add v4tov4 listenaddress=0.0.0.0 listenport=22 connectaddress=$wsl_ipaddress1 connectport=22
Issue the following command to validate network port proxy rule has been changed:
netsh interface portproxy show v4tov4which should return the following information:
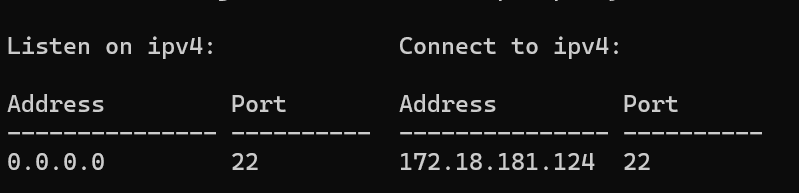
You can also remove all port proxy rules:
netsh int portproxy reset allStep 4: Open the Firewall
By default, port 22 is blocked by Windows Defender’s firewall. From the same PowerShell in administrator mode or run as administrator, issue the following command to open port 22.
netsh advfirewall firewall add rule name=”WSL SSH” dir=in action=allow protocol=TCP localport=22Step 5: Use Task Scheduler to automate the script
Use Notepad to create a new text file then add the following commands:
$wsl_ipaddress = wsl -d "Ubuntu" hostname -I
$wsl_ipaddress1 = $wsl_ipaddress.split(" ", 2)[0]
netsh interface portproxy delete v4tov4 listenaddress=0.0.0.0 listenport=22
netsh interface portproxy add v4tov4 listenaddress=0.0.0.0 listenport=22 connectaddress=$wsl_ipaddress1 connectport=22
Save the text file with an extension of .ps1 where I named my file as “route_wsl_sshd.ps1” and saved the file under “c:\apps” folder.
- Start “Task Scheduler”. You can find the application using the Windows search feature.
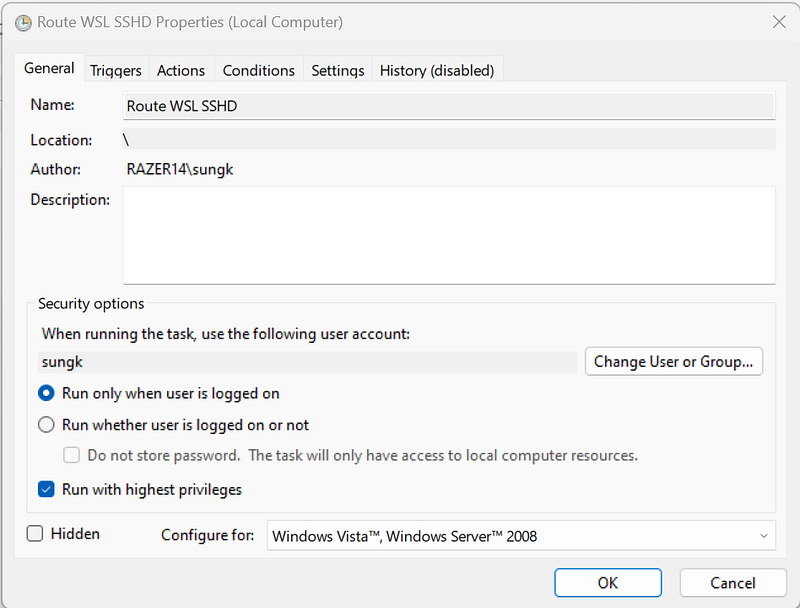
- Select “Action | Create Task…” to create a new task then enter the following information:
- On “General” tab, Enter the name of the Task. I have changed Name, selected “Run only when user is logged on”, and “Run with highest privileges”.
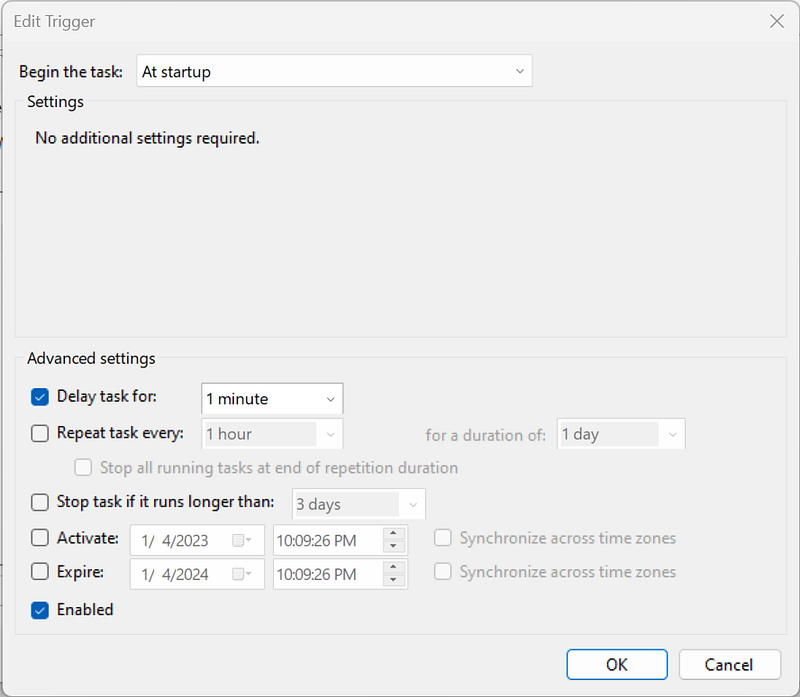
- On “Trigger” tab, create a New… trigger. I have changed the Begin the task to “At startup”, Delay task for “1 minute”, and checked “Enabled”.
- On “Actions” tab, create New… action. I have changed the Program/script to “PowerShell.exe” and Add arguments (optional) as follows since this script needs in administrator mode:
-ExecutionPolicy Bypass -File c:\Apps\route_wsl_sshd.ps1I have not changed the other tabs. Save the changes.
Test SSH Access to WSL from a Remote Computer
Finally, restart the computer then log into the computer. You should see two activities:
- Windows Terminal window starting with selected WSL Distro (Ubuntu 22.04)
- Flash of Powershell terminal executing Powershell script.
Using the remote computer, SSH into the Windows computer using its IP address:
ssh sungkim@192.168.1.100You will be presented with an Ubuntu screen when you successfully SSH into a Windows computer with a WSL Distro session.

If your SSH session is timing out then use the following commands from PowerShell terminal to test the network port connectivity:
Test-NetConnection -ComputerName 192.168.1.100 -Port 22If TcpTestSucceeded = True then it is not a firewall issue. If TcpTestSucceeded = False then you may want to add a firewall rule. For more information, refer to => https://learn.microsoft.com/en-us/troubleshoot/windows-server/networking/netsh-advfirewall-firewall-control-firewall-behavior
netsh advfirewall firewall add rule name="WSL SSH" dir=in action=allow protocol=TCP localport=22You can check the newly added firewall rule by:
Get-NetFirewallPortFilter | Where-Object { $_.LocalPort -eq 22 } | Get-NetFirewallRuleIf your firewall rules are fine, but your SSH session is still timing out then you may want to reset the proxy rules since you may have more than one proxy rules that conflict with each other.
netsh int portproxy reset allI hope you have enjoyed this article. If you have any questions or comments, please provide them here.
Resources
The following resources were used in this article:
- How to SSH into WSL2 on Windows 10 from an external machine — Scott Hanselman’s Blog
- Release Notes for WSL in the Microsoft Store | Microsoft Learn
- Setup SSH Server on Windows 11 (https://readmedium.com/setup-ssh-server-on-windows-10-11-34c7f096eaff)
- https://learn.microsoft.com/en-us/troubleshoot/windows-server/networking/netsh-advfirewall-firewall-control-firewall-behavior


