
How to Add ANY Model to Ollama
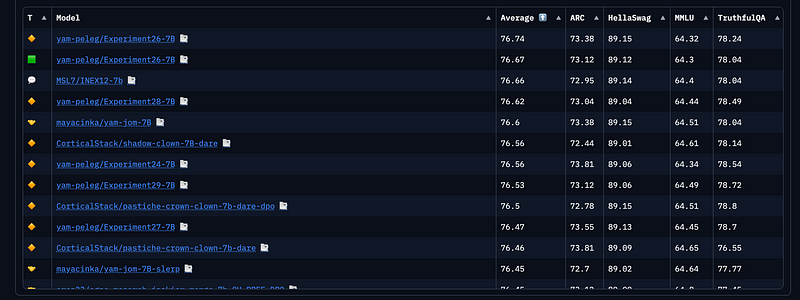
I have somewhat accidentally created a “smart” LLM with 7b parameters.
I’m not going to lie, I managed to do so (as a person with no background in machine learning) thanks to luck and this amazing Medium article by Maxime Labonne.
When I say it’s smart, what I mean is: “Open LLM Leaderboard says that the model is smart, but I can’t reap the benefits and do inference due to my poor hardware.”

So I decided to add the model to Ollama and see if it passes my “vibe check” benchmark.
Why Ollama?
Well, it lets you run large language models locally. It’s fast, simple to install BUT it offers limited number of open source models, usually the most popular ones.
In case you have just fine tuned/merged a model and you want to run it locally, you too might want to add it to Ollama.
Here’s how:
Step #1 — Modelfile
Locate your model.
If it’s not already on your machine, download it from huggingface by running this command in the terminal.
git lfs clone https://huggingface.co/mayacinka/yam-jom-7B # this is my url to my model as an example, replace it with whatever you want to downloadOnce the model has downloaded, it’s time to create a file that you’re going to name “Modelfile”.
The content of this file should look something like this:
FROM /path-to-your-model

TEMPLATE """{{ if .System }}<|im_start|>system
{{ .System }}<|im_end|>
{{ end }}{{ if .Prompt }}<|im_start|>user
{{ .Prompt }}<|im_end|>
{{ end }}<|im_start|>assistant
"""

SYSTEM """"""
PARAMETER stop [INST]
PARAMETER stop [/INST]
PARAMETER stop <<SYS>>
PARAMETER stop <</SYS>>
Of course, it helps if you know what type of chat template is required for your model. This one in the example is “chatML” template, but other models require different templates.
For example, this is Zephyr:
<|system|>
{system_message}</s>
<|user|>
{prompt}</s>
<|assistant|>
And Orca-Vicuna looks like this:
SYSTEM: {system_message}
USER: {prompt}
ASSISTANT:
Step #2 — Quantize (optional)
If you’re dealing with a previously quantized model, feel free to skip this step. But if you’re dealing with a freshly merged/trained/fine tuned model like me, than you should really quantize it first.
Quantizing a model is a process of reducing the computational and memory costs of running inference by representing the weights and activations with low-precision data types like 8-bit integers (int8) instead of the usual 32-bit floating-point numbers (float32).
I was able to quantize my model on my M1 16GB RAM mac.
Here’s how to do it:
- First clone the ollama repo and move to the downloaded folder
git clone [email protected]:ollama/ollama.git ollamacd ollama2. Now you want to fetch llama.cpp submodule
git submodule init
git submodule update llm/llama.cpp
3. Activate the virtual environment and all the Python dependencies
python3 -m venv llm/llama.cpp/.venv
source llm/llama.cpp/.venv/bin/activate
pip install -r llm/llama.cpp/requirements.txt
4. You want to build the quantize tool by running this command
make -C llm/llama.cpp quantize
5. Prepare the model by converting it first
python llm/llama.cpp/convert.py ./path-to-your-model \
--outtype f16 \ # you can also use --outtype f32 to perserve some quality
--outfile converted.bin # name of the output file
But keep in mind that some model architectures require using specific convert scripts. For example, Qwen models require running convert-hf-to-gguf.py instead of convert.py .
You can check out the docs here.
6. Finally, quantize the model
llm/llama.cpp/quantize converted.bin quantized.bin q4_0
Here are the quantization options:
q2_Kq3_Kq3_K_Sq3_K_Mq3_K_Lq4_0(recommended)q4_1q4_Kq4_K_Sq4_K_Mq5_0q5_1q5_Kq5_K_Sq5_K_Mq6_Kq8_0f16
q2_K is going to produce a smallest model with worst quality and q8_0 will produce largest model with smallest loss of quality, but it’s not recommended for if you have consumer hardware.
7. If you’ve already finished a Modelfile for a model before it was quantized, you might want to go back to it and change the first line to point to your quantized model instead of the full model
FROM /path-to-your-quantized-model # change this path

TEMPLATE """{{ if .System }}<|im_start|>system
{{ .System }}<|im_end|>
{{ end }}{{ if .Prompt }}<|im_start|>user
{{ .Prompt }}<|im_end|>
{{ end }}<|im_start|>assistant
"""

SYSTEM """"""
PARAMETER stop [INST]
PARAMETER stop [/INST]
PARAMETER stop <<SYS>>
PARAMETER stop <</SYS>>
Step #3 Create and Run the model
As a last step, you should create a Ollama model:
ollama create name-of-your-model -f Modelfile
You should see few lines in the terminal, that are telling you that system, template and parameters layers were created and finally in the last line word “success”.
And to run the model you should type:
ollama run name-of-your-model
Step #4 Upload the model to Ollama (optional)
In case you want to let your model be used by others, you can upload it to Ollama.
- Create a new Ollama profile

2. Typing following in the terminal:
- macOS:
cat ~/.ollama/id_ed25519.pub - Windows:
type %USERPROFILE%\.ollama\id_ed25519.pub - Linux:
cat /usr/share/ollama/.ollama/id_ed25519.pub
As a result, you’ll see in the terminal your Ollama key that’ll look something like this ssh-****….
3. Under settings, add and paste the key

4. Next, copy your model to your username’s namespace:
ollama cp name-of-your-model <your username>/example5. And finally, to push the model:
ollama push <your username>/example
I you enjoyed the article, maybe you’d also enjoy ↓
✉︎ Follow me on Medium
❑ Check out my youtube channel
🆇 Follow me on Twitter/X


