
Unlocking GPU Memory Allocation on AMD Ryzen™ APU?
Table of Contents
1. Background 2. Guide — Basic system check — Prepare the bootable USB drive — Boot the USB drive
Background:
I want to run stable diffusion on my Asus Zenbook S13 OLED laptop, which runs AMD Ryzen™ 7 6800U. I would like to use the built-in Radeon 680M to run stable diffusion. However Asus locked the GPU memory allocation in BIOS setting and by default it only allocate 512MB memory to GPU. So in this guide, I will reveal how to unlock the GPU memory allocation, allocate 8GB of system memory as dedicated memory, and run stable diffusion smoothly.
Guide:
Basic system check
Before making modification, please make sure that your system could is supported and configured.
Verify
I would use the damico’s script to verify
# Install Python

# Download test script
$ wget https://gist.githubusercontent.com/damico/484f7b0a148a0c5f707054cf9c0a0533/raw/43c317bfbde626d9112d44462d815613194988e0/test-rocm.py
# Run test script
$ HSA_OVERRIDE_GFX_VERSION=10.3.0 python test-rocm.py
The following snippet is the result of my system passing the test:
Checking ROCM support...
GOOD: ROCM devices found:  2
Checking PyTorch...
GOOD: PyTorch is working fine.
Checking user groups...
GOOD: The user winston is in RENDER and VIDEO groups.
GOOD: PyTorch ROCM support found.
Testing PyTorch ROCM support...
Everything fine! You can run PyTorch code inside of:
--->  AMD Ryzen 7 6800U with Radeon Graphics
--->  gfx1030
If you pass the verification process. Then you could go to Prepare the bootable USB drive section directly.
Install AMD Driver on Ubuntu
# Install AMD Driver
TEMP_FOLDER="/tmp"
TEMP_DRIVER_HTML="amd-driver.html"
DISTRO_CODENAME=$(lsb_release --codename --short)

# Find the package URL from AMD website
AMD_DRIVER_URL="https://www.amd.com/en/support/linux-drivers"
URL_RESPONSE=$(wget -U 'Mozilla/5.0' -qO- ${AMD_DRIVER_URL})
AMD_DEB_URL=$(echo $URL_RESPONSE | grep -o 'https://[^ "<]*.deb' | grep $DISTRO_CODENAME | head -1)
FILENAME=$(basename $AMD_DEB_URL)

# Download and install the driver package
wget -P $TEMP_FOLDER $AMD_DEB_URL
sudo dpkg -i $TEMP_FOLDER/$FILENAME
rm $TEMP_FOLDER/$FILENAME

amdgpu-install -y --usecase=rocm

# Add user to the render group if you're using Ubuntu20.04
usermod -a -G render root

# To add future users to the video and render groups, run the following command:
echo 'ADD_EXTRA_GROUPS=1' | sudo tee -a /etc/adduser.conf
echo 'EXTRA_GROUPS=video' | sudo tee -a /etc/adduser.conf
echo 'EXTRA_GROUPS=render' | sudo tee -a /etc/adduser.conf
Install/Update PyTorch
This is the script for installing PyTorch 2.1.1. Please check their website for latest version
# Install PyTorch
pip install --upgrade torch torchvision torchaudio --index-url https://download.pytorch.org/whl/rocm5.6
After successfully install AMD Driver and PyTorch installation, please run the verification script again.
Prepare the bootable USB drive
- Prepare an empty USB thumb drive with at least 128MB, plug the USB drive to your laptop
- Download UniversalAMDFormBrowser
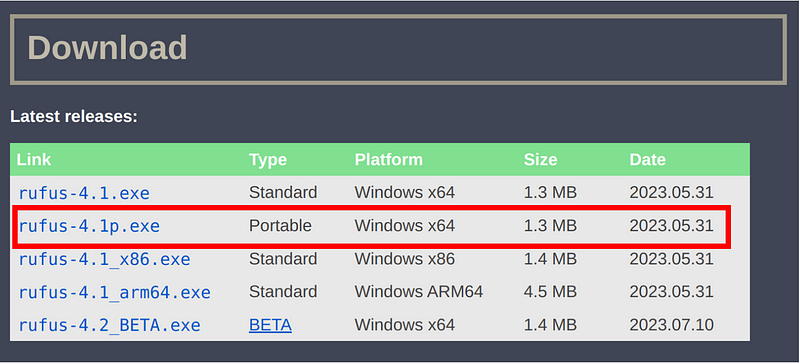
- Download Rufus Go to official page, go to download section and download the Portable version
- Format USB Drive - Open Rufus - Select the USB Drive - In Boot selection, select FreeDOS - Press Start - Close Rufus after the format process is finished

- In file explorer, open UniversalAMDFormBrowser.zip and extract everything to USB drive
Your bootable USB drive is now ready
Boot the USB drive
- Reboot your system and go to BIOS
- Go to Boot menu and select USB Drive as the first boot device. Then you should be able to boot to UniversalAMDFormBrowser
- Go to Device Manager→AMD CBS→NBIO Common Option→GFX Configuration - In Integrated Graphics Controller, select Forces - In UMA Mode, select UMA_SPECIFIED - In UMA Frame Buffer Size, select your desired VRAM value (8G for Stable Diffusion) - Press F10 to save your settings

- Press Esc several times to go back to the main menu
- Select Continue to reboot your laptop


