Elaborate Microservice async example with FastAPI, RabbitMQ, MongoDB and Redis — part1.
Introduction
This is part1 in the series. This part talks about the problem space and a solution to handle asynchronous events between Microservices. It also covers the installation of required components.
Here’s a brief outline of the article parts:
- Introduction and installation of required components (this article).
- OrderService Architecture and Design patterns.
- OrderService usage of RabbitMQ.
- PaymentService Architecture and Design patterns.
- FastAPI enhancements.
- Putting it all together.
The problem space and a solution
The most used communication method with, and between Microservices is the HTTP RESTful protocol. This works fine when the blocking request calls are fast enough for the API to feel responsive. But if it takes some time to come up with an answer to the request, or when one request results in several responses over time?
For external API calls, Webhook callbacks is a good solution. But internally, between your own Microservices there’s a simpler solution. A Message Broker like RabbitMQ is more flexible and scales automatically without any changes in the code. When used with a pub-sub design pattern you get a loose coupling that is flexible and scalable for most solutions. By using the RabbitMQ queue routing you get automatic scaling (using round-robin load balancing).
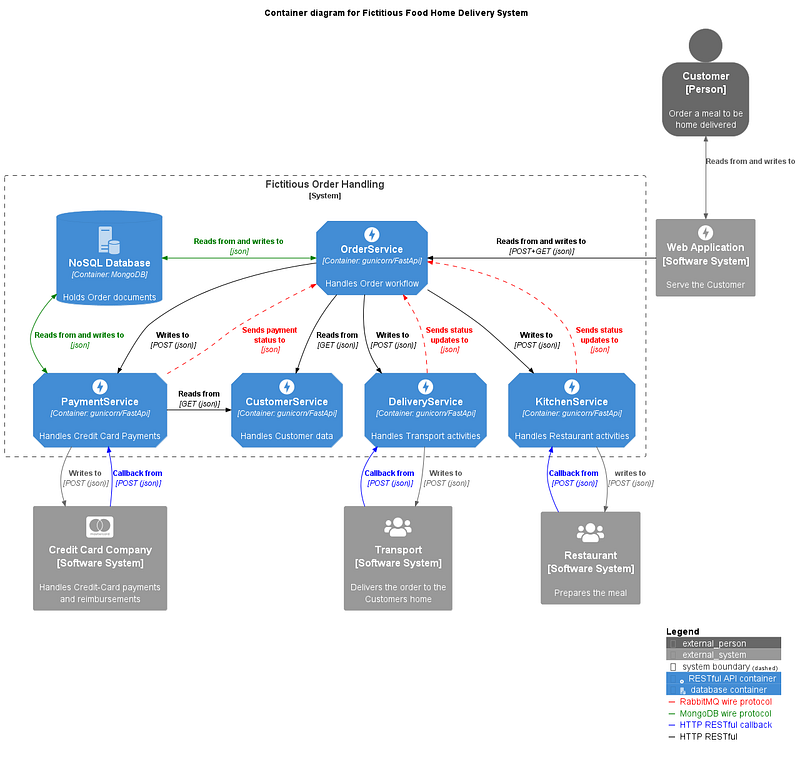
A brief system description
In this example I have created the “Fictitious Food Home Delivery system”. It’s built using several useful design patterns and good coding techniques that I have found useful in my work (there might be some bad ones as well 😊). Hopefully there’s at least one solution that you find interesting and might use in your own development.
In the picture above I have implemented the OrderService and PaymentService Microservices. These two services also have health endpoints implemented. The other three only exists as OpenAPI YAML documentation files. By using the excellent Prism command line tool, you can mock their behavior well enough for the implemented services to work correctly. I have also developed a couple of small scripts that eighter will demonstrate a feature in the system or simplify the usage or the testing of the system.
Business Logic
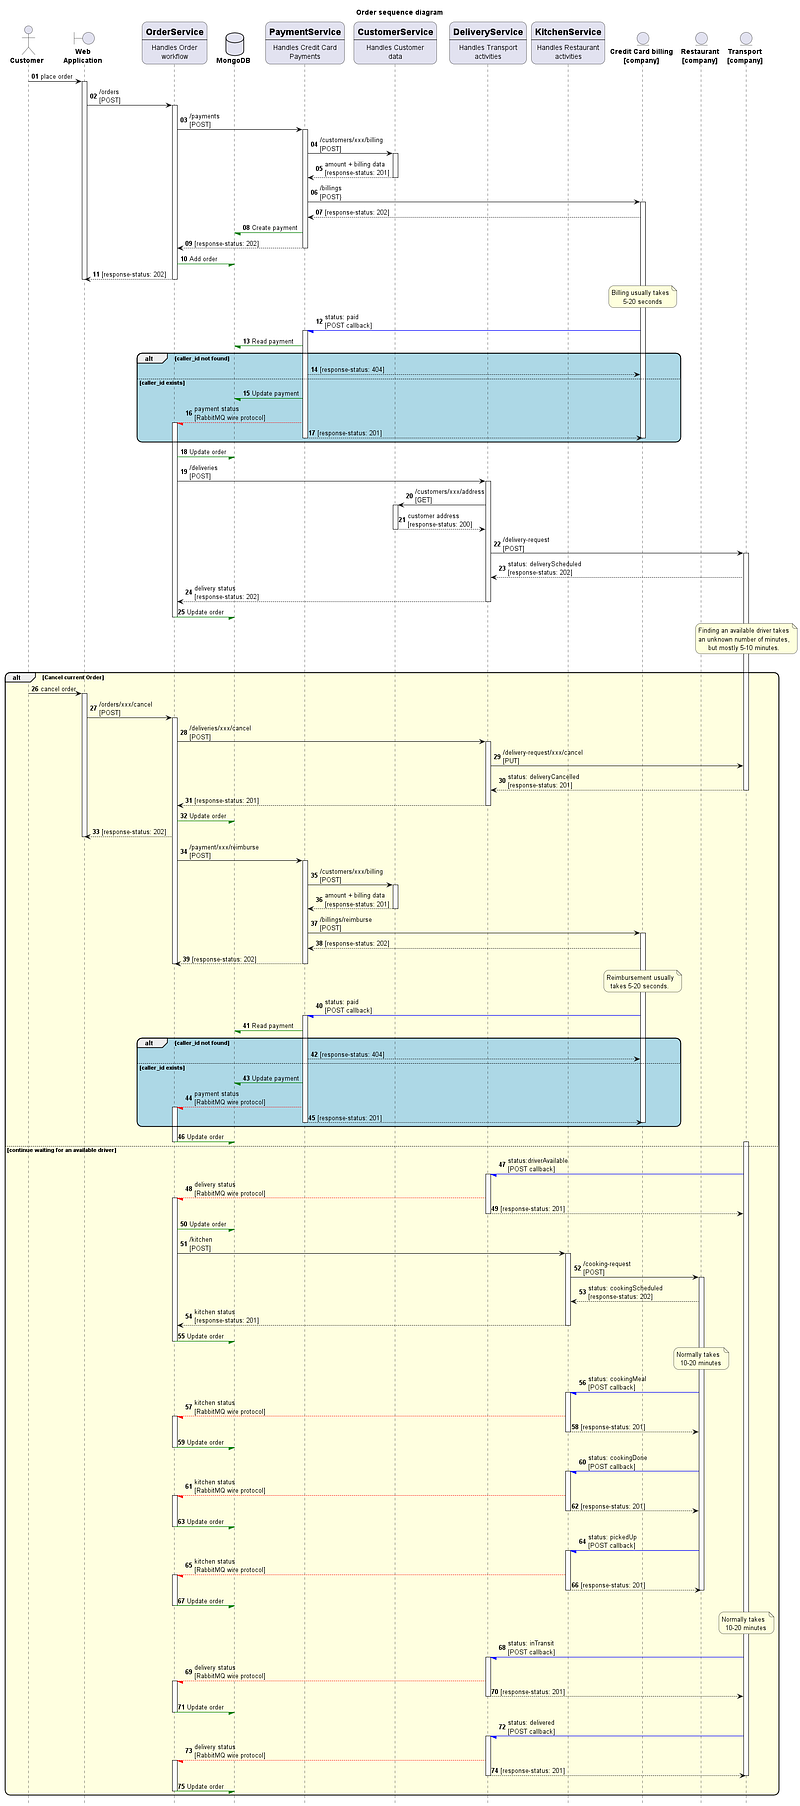
This is the sequence diagram for the Order system. It shows the business logic and interaction between objects over time. Use this as a reference when we go through the code below.
The blue and yellow boxes show alternate flows. The alternatives are divided by a dotted line. For blue boxes; one is a failure flow and the other is a normal flow. For the yellow box; one is the reimburse flow and the other is a normal flow.
It might look complicated, but everything is always relative 😊. If you never seen or are uncertain how to interpret a sequence diagram. Start in the upper left corner and follow the numbered arrows in sequence. That should get you started. Some of the response arrows have a full allow, others are half. The full arrow indicates synchronous communication and the half arrow indicate asynchronous communication. The colors are the same as in the container diagram.
The yellow block shows two alternate flows. The description to the right, just above the yellow block states that sometimes it can take a long time before a driver is available to pick up the food. During the waiting period the Customer can cancel the Order and his credit card will be reimbursed with the previously paid amount. But as soon as a driver is available the Order can’t be cancelled anymore.
External building blocks
The building components that I have used are:
- Prism CLI for mocking the behavior of several of my Microservices.
- Docker Desktop to manage the external components below.
- MongoDB as a database.
- RabbitMQ as a Message Broker.
- Redis for caching of Orders and Microservice URLs.
Installing Prism CLI
There’s an good description on their web site on how to install the tool on various platforms. On windows it’s an exe file that you download. Make sure the program is visible in your PATH environment variable, then it will work as expected. The easiest way to test this is to start a command window, type prism and press TAB. This expands to prism-cli-win.exe on my Windows platform. I suspect that you would get the equivalent on a Linux or MacOS platform as well.
Installing Docker Desktop
Having Docker as a tool in your development toolbox is a good thing. The reason I’m thinking this is good is that it is so easy install and to remove different components when you don’t need them anymore. No more droves of DLL, or packages that might be hard to remove when you are finished due to their interdependencies.
I’m using the Docker Desktop since it’s free for personal use. There are alternatives, but that is outside the scope of this article.
There are install kits for different platforms on the Docker site. Just make sure your computer meets the requirements before you start:
When you have the Docker Desktop program up and running it’s time to install the required components.
Start with creating a directory named fastapi_messaging where you want to develop this example. Then create a subdirectory named Docker. Create the following four files in that Docker directory.
docker-compose.yaml
I’m showing the simplest way here, but if you feel it’s a better option to split this file into three different files, one for each Dockerfile then please do so.
There is one important thing you need to do for this to work. You have to set the MONGO_ROOT_PWD environment variable in your own user context.
version: '3.7'

services:

  redis:
    build:
      context: .
      dockerfile: Dockerfile.redis
    restart: always
    container_name: redis
    volumes:
      - redis-data:/data
    ports:
      - "6379:6379"
    healthcheck:
      test: ["CMD", "redis-cli", "ping"]
      interval: 5s
      timeout: 30s
      retries: 50
    networks:
      - proxynet

  mongo:
    build:
      context: .
      dockerfile: Dockerfile.mongo
    restart: always
    container_name: mongo
    volumes:
      - mongo-data:/data/db
      - mongo-config:/data/configdb
    ports:
      - 27017-27019:27017-27019
    environment:
      - MONGO_INITDB_ROOT_USERNAME=phoenix
      - MONGO_INITDB_ROOT_PASSWORD=${MONGO_ROOT_PWD}
    networks:
      - proxynet

  rabbitmq:
    build:
      context: .
      dockerfile: Dockerfile.rabbitmq
    restart: always
    container_name: rabbitmq
    volumes:
      - rabbitmq-log:/var/log/rabbitmq
      - rabbitmq-data:/var/lib/rabbitmq
    ports:
      - 5672:5672
      - 15672:15672
    networks:
      - proxynet

volumes:
  redis-data:
  mongo-data:
  mongo-config:
  rabbitmq-log:
  rabbitmq-data:

networks:
  proxynet:
    name: custom_network
Dockerfile.mongo
# pull official base image
FROM mongo:latest

# Set local timezone.
ENV TZ=Europe/Stockholm
RUN ln -snf /usr/share/zoneinfo/$TZ /etc/localtime && echo $TZ > /etc/timezone
Dockerfile.rabbitmq
# pull official base image
FROM rabbitmq:management

# Set local timezone.
ENV TZ=Europe/Stockholm
RUN ln -snf /usr/share/zoneinfo/$TZ /etc/localtime && echo $TZ > /etc/timezone
Dockerfile.redis
# pull official base image
FROM redis:latest

# Set local timezone.
ENV TZ=Europe/Stockholm
RUN ln -snf /usr/share/zoneinfo/$TZ /etc/localtime && echo $TZ > /etc/timezone
Then start a command window in the Docker directory and run the following two commands:
$ docker-compose build
$ docker-compose up -d
This should build the images for MongoDB, RabbitMQ and Redis and start them as three different containers.
Installing the python environment
First, we need to setup the python environment for the example by creating a virtual environment, called venv under the fastapi_messages directory by issuing the following command in a command window:
$ python -m venv venvActivate the environment in the command window like this (for Windows):
$ venv\scripts\activateIf you are on Linux or MacOS you type:
$ source venv/bin/activateYou can see it activated when (venv) is shown as a prefix in the command line prompt.
Then we need to install third-party python packages. Create the the following file under the fastapi_messages directory:
requirements.txt
aio-pika==9.0.5
aioredis==2.0.1
fastapi==0.95.0
hiredis==2.2.2
httpx==0.23.3
loguru==0.6.0
motor==3.1.1
python-dotenv==1.0.0
ujson==5.7.0
uvicorn==0.21.1
Install the content of the created file by running the following command in the venv activated command window created above:
(venv)$ pip install -r requirements.txt
Now you are ready to implement the following structure:
📂 fastapi_messaging
├───📃 customers.yaml
├───📃 deliveries.yaml
├───📃 kitchen.yaml
├───📃 requirements.txt
├───📃 __init__.py
├───📂 design_docs
│   ├───📃 order_container_diagram.png
│   ├───📃 order_container_diagram.puml
│   ├───📃 order_sequence_diagram.png
│   └───📃 order_sequence_diagram.puml
├───📂 Docker
│   ├───📃 docker-compose.yaml
│   ├───📃 Dockerfile.mongo
│   ├───📃 Dockerfile.rabbitmq
│   └───📃 Dockerfile.redis
├───📂 OrderService
│   ├───📃 db_url_creator.py
│   ├───📃 queue_test_receiver.py
│   ├───📃 queue_test_sender.py
│   ├───📃 redis_order_viewer.py
│   ├───📃 redis_url_cleaner.py
│   ├───📃 response_test_sender.py
│   ├───📃 run.py
│   ├───📃 __init__.py
│   └───📂 src
│       ├───📂 business
│       │   ├───📃 request_handler.py
│       │   ├───📃 response_handler.py
│       │   └───📃 schemas.py
│       ├───📂 config
│       │   ├───📃 .env
│       │   └───📃 setup.py
│       ├───📂 repository
│       │   ├───📃 db.py
│       │   ├───📃 documentation.py
│       │   ├───📃 models.py
│       │   ├───📃 order_data_adapter.py
│       │   └───📃 url_cache.py
│       ├───📂 tools
│       │   ├───📃 custom_logging.py
│       │   └───📃 rabbit_client.py
│       └───📂 web
│           ├───📃 health_manager.py
│           ├───📃 main.py
│           └───📂 api
│               ├───📃 api.py
│               ├───📃 documentation.py
│               ├───📃 order_api_adapter.py
│               └───📃 schemas.py
└───📂 PaymentService
    ├───📃 run.py
    ├───📃 __init__.py
    └───📂 src
        ├───📂 business
        │   ├───📃 payment_handler.py
        │   └───📃 schemas.py
        ├───📂 config
        │   ├───📃 .env
        │   └───📃 setup.py
        ├───📂 repository
        │   ├───📃 db.py
        │   ├───📃 documentation.py
        │   ├───📃 models.py
        │   ├───📃 payment_data_adapter.py
        │   └───📃 url_cache.py
        ├───📂 tools
        │   ├───📃 custom_logging.py
        │   └───📃 rabbit_client.py
        └───📂 web
            ├───📃 health_manager.py
            ├───📃 main.py
            └───📂 api
                ├───📃 api.py
                ├───📃 documentation.py
└───📃 schemas.py😵💫, don’t worry. You don’t have to create this structure yourself. You can download a zip file from my GitHub repository (link below) that already contains the whole example (I did say it was elaborate). I will go through some of the files to highlight what I think is essential or useful to know to be able to understand the example. The rest I leave up to you to explore and contemplate over.
Conclusion
The example code is available in my GitHub repository.
In this article we have taken a quick look at the problem space and a solution to handle asynchronous events between Microservices. And we have installed required components.
I hope you enjoyed this article and are stooked for the upcoming parts of this article series. Remember, if you like this article don’t hesitate to clap (I mean digitally 😊).
Happy coding in Gotham.
/Anders


