
Easy Implementation of the Decision Tree with Python & Numpy
Easy and blazingly fast read about this popular algorithm!
Decision Tree is one of the most important algorithms for many Data Scientists who fit Xgboost and other tree-based algorithms almost every day. It is crucial to understand the basic idea and implementation of this Machine Learning algorithm, in order to build more accurate and better quality models. In this article, I will try to explain and implement the basic Decision Tree Classifier algorithm with Python. I will use the famous Iris dataset for training and testing the model. Shall we begin?

Preparing the Iris dataset
Let’s load the dataset and display the first rows of the DataFrame.
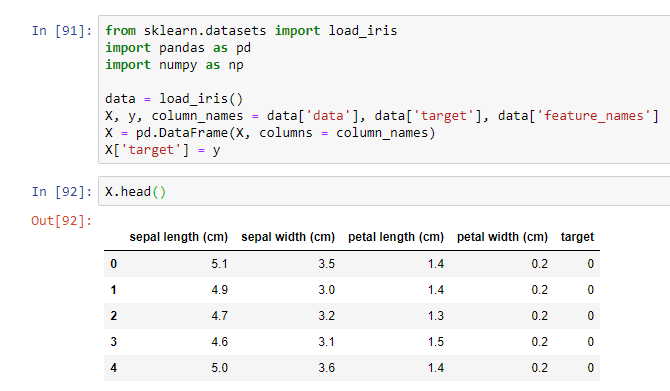
I will also show a pairplot for the data. This can be done with seaborn.pairplot function.
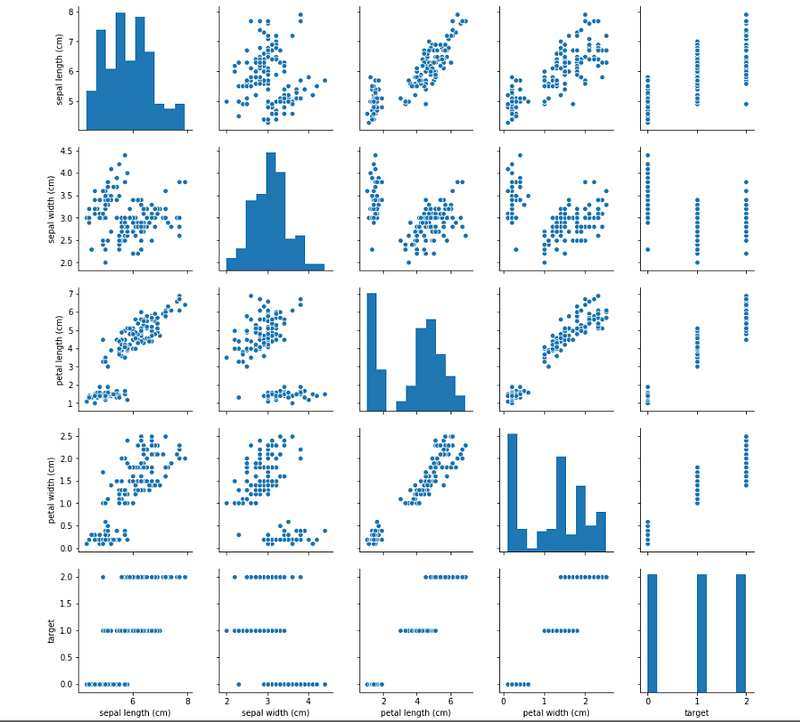
On the pairplots you can see, that “petal length” and “petal width” variables separate the target feature pretty well.
Finally, let’s split the data into train and test parts.

So now, when the dataset is ready, let’s move to the theory and intuiton behind the Decision Tree model.
Intuition behind the Decision Tree Algorithm
In this article, I will use the CART model for building the Decision Tree, this model is nothing else, but a simple binary tree, like this one:
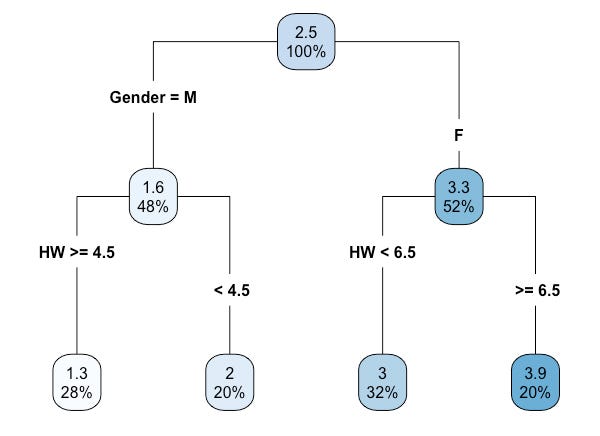
The idea behind training a simple Decision Tree model is quite straightforward. While building each tree node we perform the algorithm, expressed in the following pseudo code:
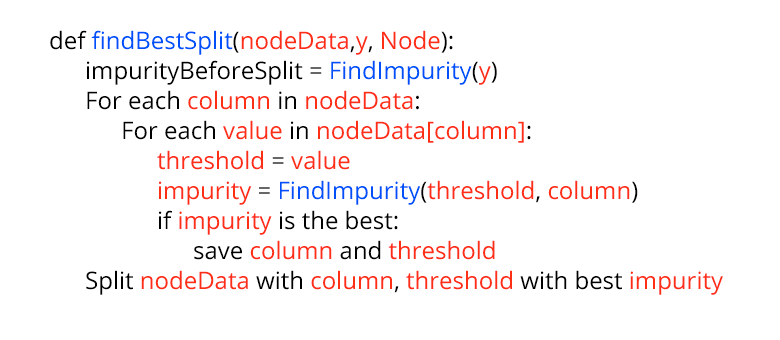
We will recursively add new nodes to our tree following this algorithm, until we meet one of the stopping criterions. In my implementation, I will use the following stopping rules: max_depth, min_samples_in_leaf, min_samples_split.
Example:
max_depth = 3 — Tree depth can’t be larger than 3
min_samples_in_leaf = 2 — There can’t be less than 2 samples in one tree node.
min_samples_split = 2 — There can’t be less than 2 samples in the tree node, when we are looking for the best split column and threshold.
So, as you could see, on each step I am calculating the Impurity value, what is that? In this implementation, I will use the Gini criterion for the calculation, it can be calculated as follows:
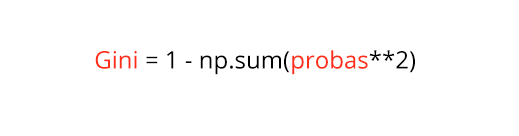
probas here can be defined as follows:
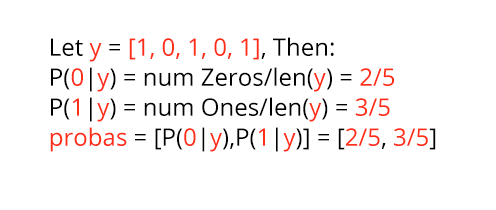
Finally, to perform FindImpurity function in my upper pseudocode I should do the following:
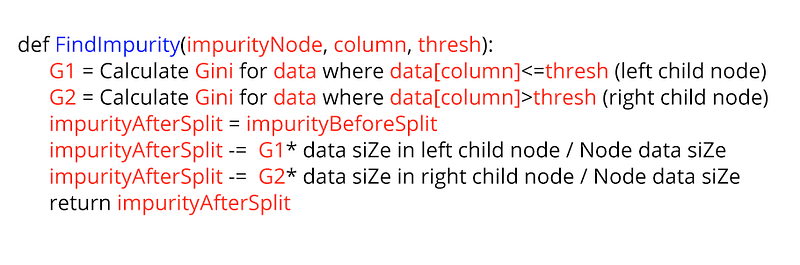
What I do here is I split the data according to the given threshold and column, I calculate G1 and G2 for left and right child nodes. Also you might have noticed that in the upper pseudocode I have calculated the impurityBeforeSplit value. In this function, we will use it to calculate the impurityAfterSplit value.
So, to sum up, all the training procedure, the following function will train a Decision Tree for us.
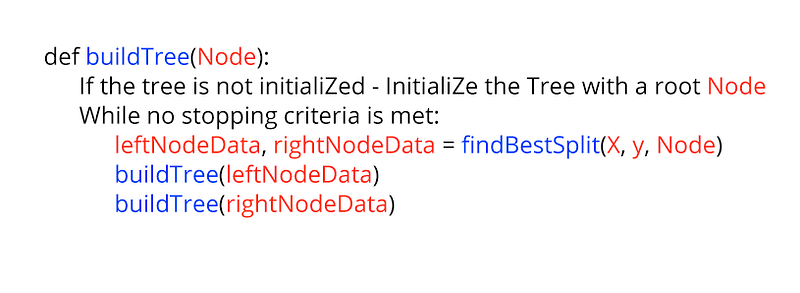
Now, when I have explained the Intuition of the CART Decision Tree, let’s implement it with Python and Numpy!
Decision Tree Implementation with Python and Numpy
Let’s first create 2 classes, one class for the Node in the Decision Tree and one for the Decision Tree itself.
Our Node class will look like the following:
For the DecisionTree class I will create a skeleton for now, we will fill that as we go.
Let’s first of all implement gini and nodeProbas methods, as so far I have explained them pretty well in my pseudocode. Nothing really fancy here:
The calcImpurity function is just the wrapper for these 2. We calculate nodeProbas first and then pass them to the gini function, this can be coded as follows:
Now, it’s time to code the calcBestSplit function. As described above, all I do here is I look over all the pairs of (column, value from data[column]), for each of such pairs I calculate the information gain and finally just choose the pair with the best information gain.
Knowing how to find the best split in one node, let’s implement the function for building the Decision Tree itself. Here I initialize the Tree with a root Node and then recursively split the data into left and right child nodes, until one of our stopping criteria is met.
Fit method is simple here, I just initialize the root node and run the buildDT function.
The last step is to implement the prediction method. When an objects x comes to the root Node of the tree on each step it is compared against the calculated (column, threshold) node values until it reaches the root node in the following way:
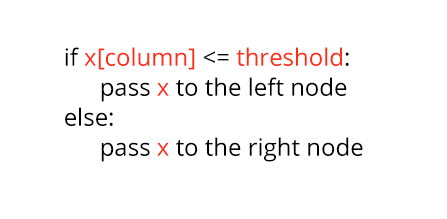
All in all, for one object the prediction looks the following way:
To calculate the predictions for all objects we just need to iterate through them, and for each one call predictSample function.
Well, it looks like this was all the code needed for our simple Decision Tree model. Let’s test it against Sklearns’ Decision Tree Classifier.
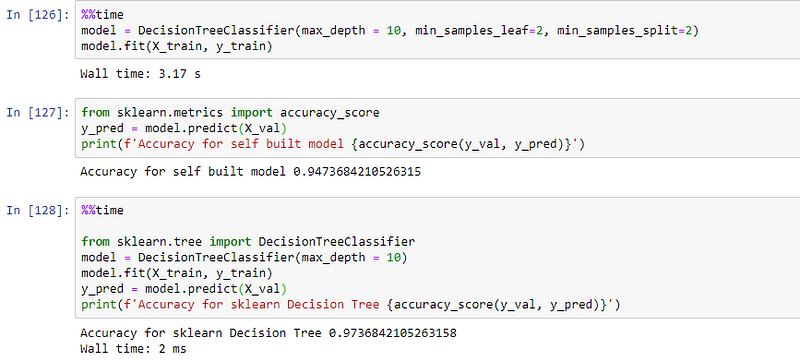
As you see, Sklearns’ implementation is not only faster, due to the fact that their tree building procedure is much more efficient, but also the accuracy of the Sklearns’ model is higher. All in all, this is not so bad for a Simple Decision Tree implementation! You can find the whole Jupyter Notebook bellow. Thank you for reading :)
You may like to check other posts on my website


