Use ChatGPT in Python via an API
Quick step-by-step guide on how to use ChatGPT from Python

In this short article, you will learn how to use ChatGPT from within your Python IDE. This will enable you to kick off your journeys on developing your own Chatbot or integrating ChatGPT into your application.
Step 1: Register at OpenAI.com
If you don’t have an OpenAI account, you first need to sign up under https://platform.openai.com/signup?launch by proving your email address, birth date and phone number which both will be automatically verified.
Step 2: Set up billing details in your account
So, here is the deal: Using ChatGPT via API (e.g. in Python or over the command line) is not free. Bummer right!? But, here is the positive part, it is veeery very cheap (a couple of cents) if you don’t use it excessively and you can easily protect yourself from unexpected charges! Which you will also learn in this article.
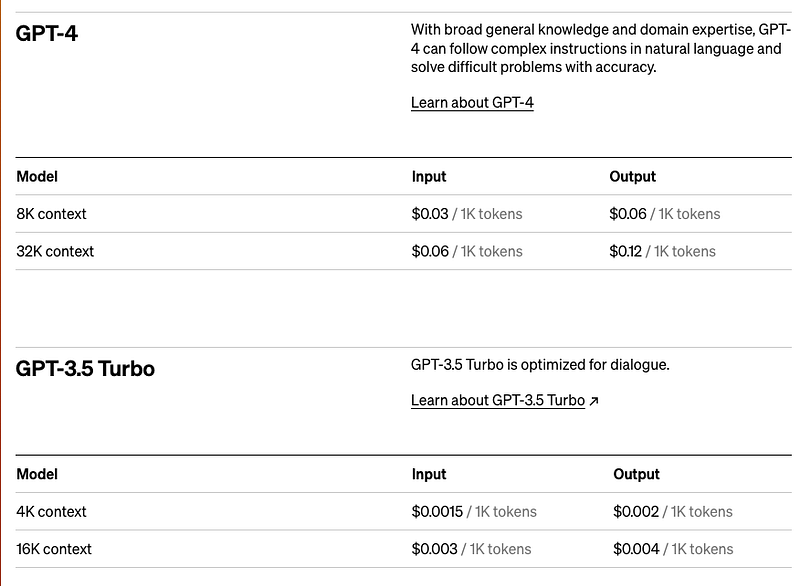
Pricing:
The pricing can be found on the OpenAI.com website and is depicted below (Status: 15th July 2023). You can see that for the newest version (GPT-4) of ChatGPT you roughly pay 3 cents per 1000 tokens sent to the API. A token approximately corresponds to 4 letters. The older versions of the model are cheaper.
Here is how you set up your account:
- Go to https://platform.openai.com/account/ and navigate to “Billing” where you click on “Set up paid account”. Select if you are doing this as an individual or on behalf of a company.
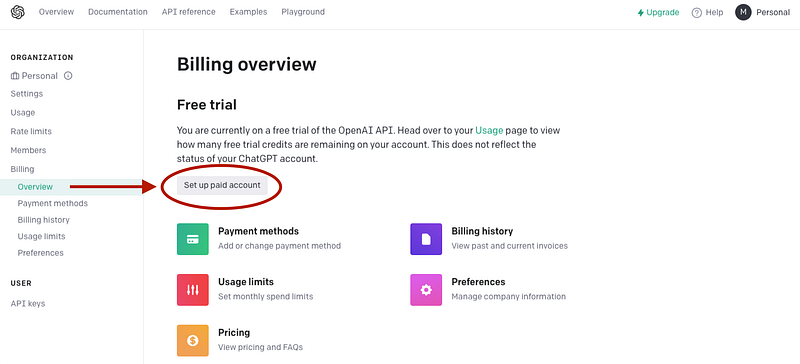
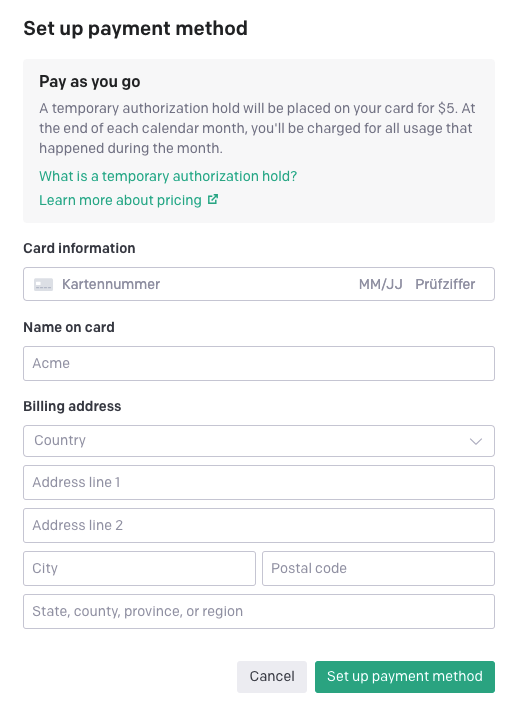
You will now be asked to provide your Credit Card details. The provision of your credit card details alone doesn’t involve any charges. However please make sure that you familiarise yourself with the relevant T&C before the sign-up and the billing set-up.
Step 3: Protect yourself from unexpected costs
To avoid you will be charged unexpected costs in case you are overusing your account or someone steals your API Key, I recommend setting up Usage Limits that you feel comfortable with. Navigate to “Billing -> Usage Limits” and set your Hard- and Soft Limits.
- Hard Limit: The API will stop working when this threshold of USD is reached (per month). This sets a “hard cap” on your billing.
- Soft Limit: When this threshold of USD / month is reached, you will receive an email notification that you can then act on.
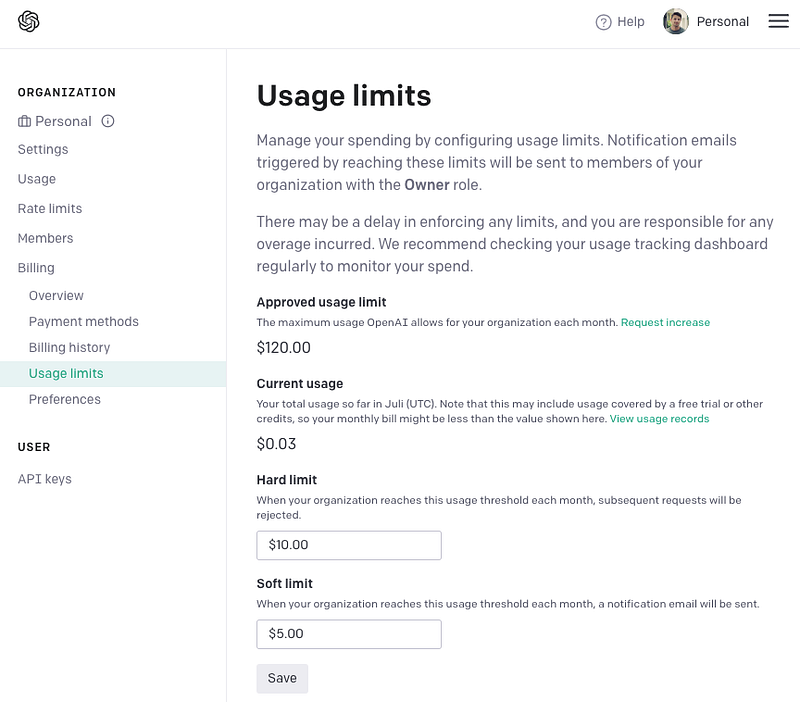
In my case, I set my hard limit to 10 USD and will receive an email when I hit 5 USD this month. My current bill of 3 US cents is shown above under “Current Usage”.
Step 4: Set up an API Key
You will need a secret API Key if you want to use ChatGPT via the API. Navigate to User -> API Keys to set such a key up.
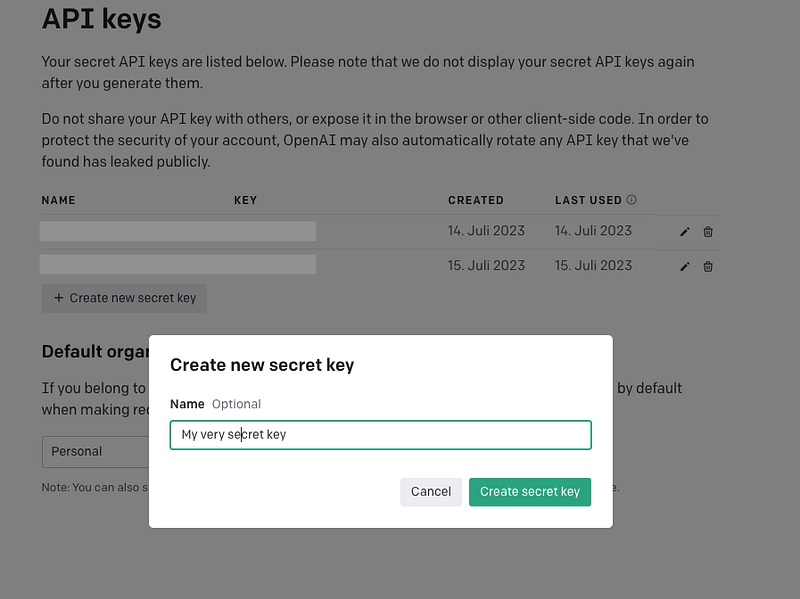
Click on “+ Create new secret key” and provide a name for your key. Subsequently, copy it to a safe location (e.g. password manager) and protect it from others. You will need this key inside your Python IDE in the next step.
Step 5: Use ChatGPT from Python
I guess, this is the part you actually came for so let’s make it quick and easy. All you need is to install the openai library from your command line:
pip install openai
Once this is finished go to your favourite IDE and set up the code
import openai

api_key = "<you API key>"
openai.api_key = api_key #pass your key to the openai API
gpt_model = 'gpt-3.5-turbo' #select a model (gpt-3.5-turbo corresponds to the older and cheaper model version)- Provide your API Key in the code above which is then being passed to the openai API for authentication.
- Select a model that you want to use. In the example above gpt-3.5-turbo is used. This model corresponds to the older and cheaper model predecessor of the current gpt-4 model. For all available models please visit https://platform.openai.com/docs/models.
Create a wrapper function that calls the ChatGPT API:
def chat(message:str) -> str:
    """
    Call the OpenAI chat completion API as a user
    """
    result = openai.ChatCompletion.create(
        model=gpt_model,
        messages=[
    {"role": "system", "content": "You are a helpful assistant."},
    {"role": "user", "content": message}]
    )

    response = result.choices[0].message.content

return response- This function makes use of the openai chatCompletion API that “given a list of messages comprising a conversation, will return a response”. Which is exactly what ChatGPT does under the hood. You can read the documentation here.
- Please note that before the message (e.g. a question) is passed to the API, the model is first instructed by a so-called “system” role on how to behave and answer to the user. In this case, it is asked to be a “helpful assistant”. Feel free to play around with other self-formulated behaviours and find out more under this link if you are curious.
Test the function
message = "How do I sign up for the ChatGPT API so I can communicate with you in Python directly?"
chat(message = message)
Response:
To sign up for the ChatGPT API, you can follow these steps:\n\n1.
Go to the OpenAI website:
https://www.openai.com\n2. Click on the "Get started" button or navigate to the API section.\n3.
If you haven\'t created an OpenAI account yet, sign up with your email address and password.
If you already have an account, sign in.\n4.
Once you\'re logged in, navigate to the API section of the OpenAI website.\n5.
Read and agree to the terms and conditions for the ChatGPT API.\n6.
Fill out the API access request form, providing the required details such as your name, company (if applicable),
and project information.\n7. Submit your request, and OpenAI will review it.\n8.
Once your request is approved, you\'ll receive the necessary instructions to access and use the ChatGPT API.\n\n
With access to the API, you\'ll be able to communicate with ChatGPT programmatically using Python or any other programming language that supports HTTP requests.
Well as you see, it would have been faster to ask ChatGPT directly how to use it from Python and not search Medium ;) #AIwillReplaceMe

Since you are now at the end of the article you might as well send me a clap or follow me for more content like this. In my next articles, I will show you how to interact with ChatGPT and other LLMs and ask them questions about your own data by using a library called LangChain.
See you next time!
Further reading and relevant links:
[1] OpenAI Platform Link: https://platform.openai.com/overview [2] OpenAI API Reference: https://platform.openai.com/docs/api-reference
If you enjoyed this article, send me a clap or follow me for similar content. If you enjoy Medium and want to deepen your data science knowledge and haven’t signed up for unlimited Medium use yet, you can support me by using my referral link.