
Exploring SonarQube With Create React App
An entry-level guide on how to use SonarQube in your React projects

What is SonarQube?
Static code analysis is the analysis of applications performed without executing them, in contrast with dynamic analysis, which is performed on applications during their execution.
SonarQube is an open-source platform that is developed by SonarSource. It continuously inspects code quality by performing automatic reviews with static analysis of code. It detects bugs, code smells, security hotspots, and vulnerabilities.
- Bug: An issue that represents something wrong in the code. This needs to be fixed yesterday.
- Code smell: A maintainability-related issue in the code. It makes further changes harder, and possibly will introduce additional errors with future changes.
- Security hotspot: Security-sensitive pieces of code that need to be manually reviewed.
- Vulnerability: A security-related issue which represents a backdoor for attackers.
Among them, bugs, code smells, and vulnerabilities are defined as issues. Each issue has one of five severities: BLOCKER, CRITICAL, MAJOR, MINOR, or INFO.
SonarQube version 9.6 can analyze 29 different languages, including Java , C#, C, C++, JavaScript, TypeScript, Python, Go, Swift, COBOL, Apex, PHP, Kotlin, Ruby, Scala, HTML, CSS, ABAP, Flex, Obj-C, Objective-C, PL/I, PL/SQL, RPG, Swift, T-SQL, VB.NET, VB6, and XML.
SonarQube integrates with Eclipse, Visual Studio, Visual Studio Code, and IntelliJ IDEA development environments, with SonarLint plug-ins. It also integrates with external tools, such as LDAP, Active Directory, and GitHub.
Why SonarQube?
SonarQube has 6 million developers. It helps to build high-quality code quickly and systematically.
- It helps to write clean code and keeps maintenance time and costs to a minimum.
- Clean code makes the work environment enjoyable and satisfying.
- Clean code empowers developers to focus on solving business problems.
- It ensures software is robust and secure with the right checks at the right place and time. It minimizes risks and maximizes the product's reputation.
Prerequisite Testing Tools in React
SonarQube is built upon the existing testing tools in React, such as Jest and Istanbul/nyc.
Jest is a JavaScript/TypeScript testing framework that ensures the correctness of the codebase. Jest has been built into Create React App.
Istanbul was the JavaScript/TypeScript code coverage tool that computes statement, line, function, and branch coverage when running tests. Istanbul has been deprecated. The current version is called nyc, which stands for New York City. The naming is a joke that comes from the lyrics of the song, They Might Be Giants:
- Istanbul was Constantinople. Now it’s Istanbul, not Constantinople.
- Even old New York was once New Amsterdam. Why they changed it I can’t say.
Also, the author, Kushal V. Mahajan, wanted it short.
Sometimes, Istanbul and nyc are used interchangeably. Istanbul/nyc has been built into Jest, and handled directly by Jest. Create React App includes Jest and Istanbul/nyc.
Create a TypeScript-based Create React App environment:
% npx create-react-app react-sonarqube --template typescript
% cd react-sonarqube
Create React App comes with one test file, src/App.test.tsx. Run the test coverage command:
% npm run test -- --coverage . --watchAll=falseThe command creates a folder, named coverage, which includes the folder, lcov-report, and file, lcov.info. Lcov (Linux test project gcov) is a graphical front-end for gcov (GNU Coverage), which is a source code coverage analysis and statement-by-statement profiling tool. It collects gcov data for multiple source files, and creates HTML pages containing the source code that is annotated with coverage information. Lcov supports statement, function, and branch coverage measurement.

coverage-final.json in the image above is the JSON file of the test coverage result, which is converted to be the following “graphical” output:

The report includes a lot of testing information:
App.tsxis 100% covered.index.tsxis partially covered.reportWebVitals.tsis not covered.
More specifically, statements in index.tsx is 0% covered, and the uncovered lines are 7–19.
It is nice.
But, we need to open index.tsx to view what code lines 7–19 are .
It is not nice enough.
This is how SonarQube can help.
How to Use SonarQube?
It takes a few steps to set up SonarQube for a React Project.
- Install a local instance of SonarQube.
- Create a project in SonarQube to be analyzed.
- Configure Create React App project for analyzing.
Install a local instance of SonarQube
It is a one-time task to install a local instance of SonarQube. Once it is set up, the instance can be reused for different projects. Here is the procedure to install:
- Download and install Java 11.
% java --version
openjdk 11.0.11 2021-04-20- Download the SonarQube Community Edition zip file.
% ls -l sonarqube-9.6.1.59531.zip
-rw-r--r--@ 1 jenniferfu staff 290033351 Sep 8 20:38 sonarqube-9.6.1.59531.zip- Unzip
sonarqube-9.6.1.59531.zip, and move it to/sonarqubeor/opt/sonarqube.
% sudo mv sonarqube-9.6.1.59531 /opt/sonarqube- Start the SonarQube Server:
% /opt/sonarqube/bin/macosx-universal-64/sonar.sh console- Visit
http://localhost:9000/on a browser.

Log in as admin, with the password, admin.
When it prompts for a new password, change it to a new password, such as MyAdmin.
The local instance of SonarQube is up and ready to be used.
Create a project in SonarQube to be analyzed
This step is specific for each project. SonarQube provides a few options to create a project, From Azure DevOps, From Bitbucket, From GitHub, From GitLab, and Manually.

We choose the choice, Manually. It pops up a window for Project display name and Project key.

Fill in the fields, and click on the Set Up button. The following screen asks how to analyze the repository, With Jenkins, With GitHub Actions, With Bitbucket Pipelines, With GitLab CI, With Azure Pipelines, Other CI, or Locally:

We choose the choice, Locally. Then, it asks for a project token.

Click on Generate, and a token, sqp_f0a4edb0fbb43c80d52d47d739b5633d6d6da4dd, is created.

Click the button, Continue. The next screen asks for the type of build, among the choices of Maven, Gradle, .NET, and Other (for JS, TS, Go, Python, PHP, …).

We choose Other and it pops up the choices of OS. Among Linux, Windows, and macOS, we pick up the choice, macOS.

The project has been set up, and is ready to be analyzed.
In screenshot above, it shows the command to execute the scanner.
We choose not to download the Java runtime, sonar-scanner. Instead, we will run the equivalent NPM module to perform the analysis.
Configure Create React App project for analyzing
In the Create React App working environment, we apply two packages:
jest-sonar-reporter: It is a custom results processor for Jest. The processor converts Jest’s coverage output into Sonar’s generic test data format.sonarqube-scanner: It is an NPM module to run SonarQube analyses.
Install the two packages:
npm install -D jest-sonar-reporter sonarqube-scannerThey become part of devDependencies in package.json:
Execute the following command:
- Line 1 executes the NPM module,
sonar-scanner. - Line 2 specifies the project key.
- Line 3 specifies the project token that has been generated for this project.
- Line 4 specifies the source file location to be the current folder — This setting can be moved to
sonar-project.properties. - Line 5 specifies the URL that the SonarQube server runs upon— This setting can be moved to
sonar-project.properties.
The analysis runs successfully and finishes.
Go to http://localhost:9000/dashboard?id=React-SonarQube. The status shows Passed, and there are two tabs on the page:
New Code: It is code added or updated as defined by previous version, specific analysis, reference branch, or number of days. The previous version is the default setting.Overall Code: It is all code, both old and new.
Data presented in New Code has been integrated into Overall Code. For a pull request, it is more meaningful to check New Code for changes in the PR.
Here, we look at Overall Code, as it is more stable for the writing.

It shows the coverage is 0.0% for 20 lines. Click on the percent link, and it shows the details:

There are two problems here:
- Create React App comes with one test,
src/App.test.tsx. Why is the test coverage0.0%? src/App.test.tsxis listed as code to be tested.
For #1, since SonarQube is a static code analysis tool, it does not run the tests. We need to configure it to read Jest’s coverage output.
For #2, we need to exclude test files to be tested. To accommodate more common practice, we move src/App.test.tsx to src/__tests__/App.test.tsx.
In addition, we create a configuration file, sonar-project.properties, in the project’s root directory, to avoid passing all parameters into the command line. According to the property definition, we configure sonar-project.properties as follows:
- Line 1 specifies the project key.
- Line 2 specifies the source file location to be the current folder.
- Line 3 specifies the URL that the SonarQube server runs upon.
- Line 4 specifies the test file paths.
- Line 5 specifies the test file naming conventions.
- Line 6 specifies the files to be ignored.
- Line 7 specifies where to read the Jest test report.
In fact, all settings can be set up globally in Administration > Configuration:

We are ready to run.
Step 1: Regenerate test coverage report.
% npm run test -- --coverage . --watchAll=falseStep 2: Execute the NPM module, sonar-scanner.
Step 3: Go to http://localhost:9000/dashboard?id=React-SonarQube to view results.
The status is Passed, and go to the tab, Overall Code:
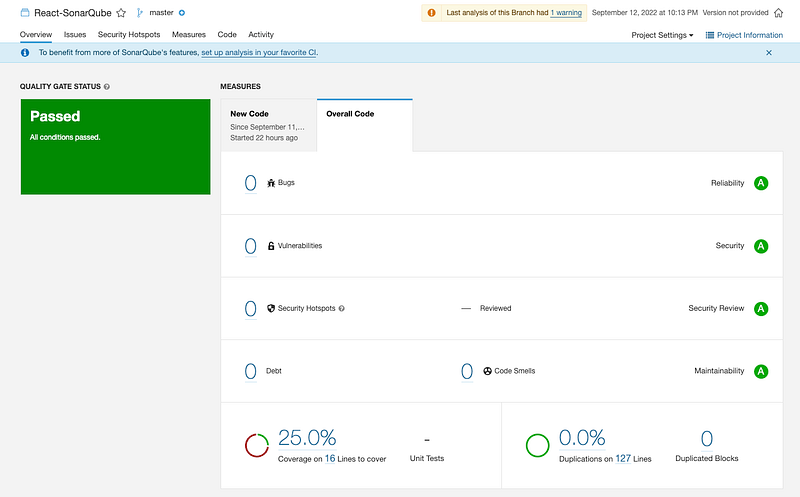
The test coverage is 25.0% and line count is 16 (src/__tests__/App.test.tsx is ignored). The result is encouraging.
Click on the percent link, and it is confirmed that src/__tests__/App.test.tsx is not listed:

Let’s view changes for each file.
src/App.tsx: It shows that lines 6–10 are covered (green — We have added lines 6–9 for more lines that can be removed).

src/reportWebVitals.ts: It shows that lines 3–10 are not covered (red).

src/index.tsx: It shows that lines 7 and 10 are not covered (red).

Isn’t SonarQube’s UI nicer than Jest’s command line coverage report?
Remove the extra lines in src/App.tsx. The coverage number is reduced:

It shows Create React App’s coverage out of box:

Conclusion
This article is an entry-level guide on how to use SonarQube for your React projects. With a beautiful UI, SonarQube is more user-friendly than Jest’s command line coverage report. There are more advanced settings in SonarQube, such as metrics, quality gates, and rules. For more advanced usages, please check out the official document.
Thanks for reading.
Want to Connect? If you are interested, check out my directory of web development articles.Thanks, Daria Mehra, for showing me SonarQube, the powerful static code analysis tool.


