
Spring Boot | Spring Cloud | Neflix Eureka
Dynamic Service Discovery in SpringBoot Microservices using Eureka
In this tutorial, we will start by understanding what is service discovery and then we will explore Netflix Eureka Server and Client setup, and finally the configuration in a sample Spring microservice project.
Why Service Discovery?
In a microservices architecture, each functionality is typically isolated into its separate service. These services then need to communicate with each other to provide a unified user experience. As the number of microservices grows, hardcoding IP addresses and ports becomes impractical. In cloud environments, instances of services can be spun up or torn down dynamically based on the demand. This means that the IP addresses and ports can change frequently.
Therefore, we need a mechanism that allows microservices to locate each other without having their addresses defined in the code. This is where Service Discovery comes into play.
What is Eureka Discovery Service?
Eureka Discovery Service is a service discovery tool for microservices architecture. It is part of the Spring Cloud Netflix suite and is built on the Spring Framework. Eureka helps microservices find each other and communicate with each other.
There are two main components of it in terms of Eureka service:
- Eureka server (service registry): It is a server that stores the addresses (host and ports) of all the registered microservices.
- Eureka Client: It’s a microservice registered on the central server and it updates and retrieves addresses to/from the central Eureka server.
When a microservice needs to communicate with another microservice, it can use Eureka to discover the address of that microservice. The microservice will then be able to send HTTP requests to the discovered address.
Eureka also supports load balancing, which means that it can distribute traffic evenly across multiple instances of a microservice. This can help to improve the performance and reliability of your application.
Scenario
Let’s illustrate this with a practical scenario. Consider two services: a Product Service running on port 8081 and an Order Service on 8021. If multiple instances of these services are spawned, each instance would likely run on a different port. Directly referencing services via hardcoded addresses is neither scalable nor maintainable. This is where Eureka comes into play.
Implementation
Setting up the Eureka Server
- Use Spring Initializr with the “Eureka Server” dependency.
<dependency>
    <groupId>org.springframework.cloud</groupId>
    <artifactId>spring-cloud-starter-netflix-eureka-server</artifactId>
</dependency>
2. In the main application class, enable Eureka Server by adding the annotation@EnableEurekaServer.
3. In application.properties, specify the server port and disable the registration as this will act as a server:
server.port=8761
eureka.client.register-with-eureka=false
eureka.client.fetch-registry=false
For a standalone Eureka server, the Eureka server does not need to register itself with its own registry, so it’s set to false. In more advanced setups, where you might have multiple Eureka servers in a peer-aware configuration, this could be set to true.
Since the Eureka server itself doesn’t need to be aware of other services in a simple setup (it’s just maintaining the registry), this is set to false. For applications acting as Eureka clients that need to communicate with other services, this would be set to true.
By default, the Eureka server will log warnings if it can’t find peers. Since this setup involves a single Eureka instance, suppress this logging with:
logging.level.com.netflix.eureka=OFF
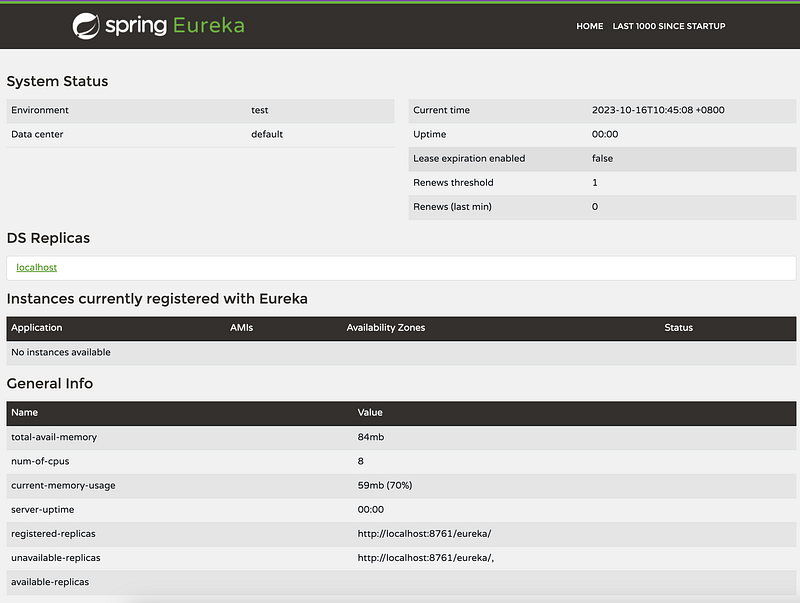
logging.level.com.netflix.discovery=OFFStart your Spring Boot application, and Eureka Server should be up and running at http://localhost:8761
Registering Microservices with Eureka
To allow our services (Product and Order) to register with Eureka:
- Add the “Eureka Discovery” dependency in both microservices’
pom.xml.
<dependency>
    <groupId>org.springframework.cloud</groupId>
    <artifactId>spring-cloud-starter-netflix-eureka-client</artifactId>
</dependency>
2. In the application.properties (or application.yml) for the "Product" service, specify the Eureka server location and the service name for the "Product" service:
spring.application.name=product-service
eureka.client.serviceUrl.defaultZone=http://localhost:8761/eureka/
When we start a service (let’s say product service) with the @EnableEurekaClient annotation and the proper configuration in application.properties or application.yml, it will automatically register itself with the Eureka server.
It will provide the server with its name (defined by spring.application.name) and its current location (IP and port).
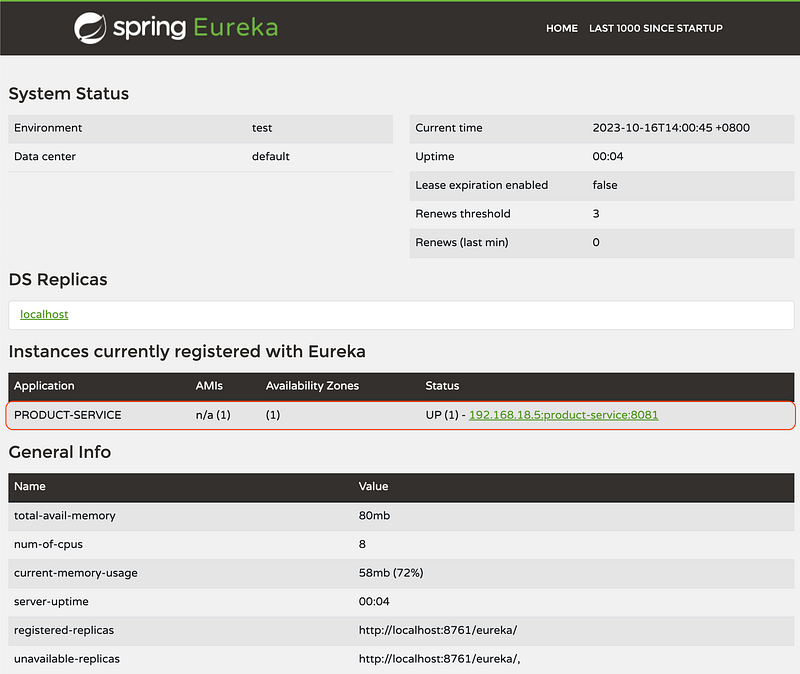
Start the product service, and refresh the eureka dashboard. You shall see one product service instance was added.
3. In the application.properties (or application.yml) for the "Order" service, specify the Eureka server location and the service name for the "Order" service:
spring.application.name=order-service
eureka.client.serviceUrl.defaultZone=http://localhost:8761/eureka/
Also specify the name of the “Product” service. This is important for service discovery.
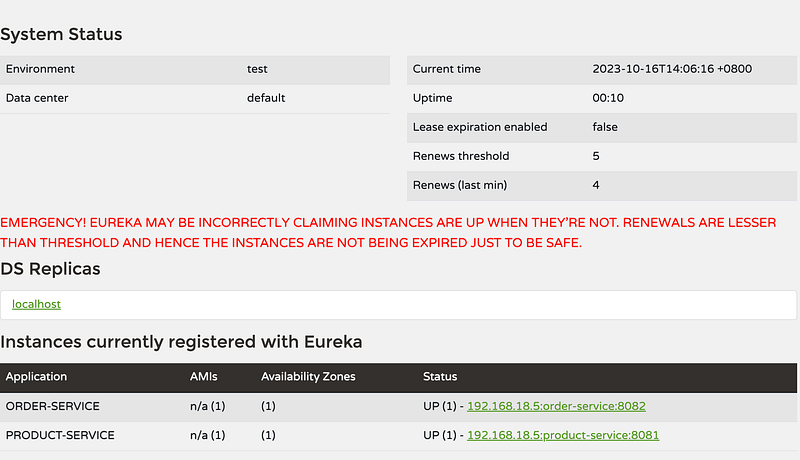
product-service.name=product-service/api/productsStart the order service, and refresh the eureka dashboard. You shall see one order service instance was added.
4. In the ProductClient, make sure that we specify the name of the "Product" service using the configuration property, just like we’ve done with the product-service.name property. Also, make sure we have FeignConfig correctly configured.
@FeignClient(name = "${product-service.name}")
public interface ProductClient {
    @GetMapping("/{id}")
    ResponseEntity<Map<String, Object>> getProductById(@PathVariable("id") Long id);
}
With these configurations, the “Order” and “Product” service will be registered with Eureka, and it will be able to discover the “Product” service using the name we’ve specified.
Testing
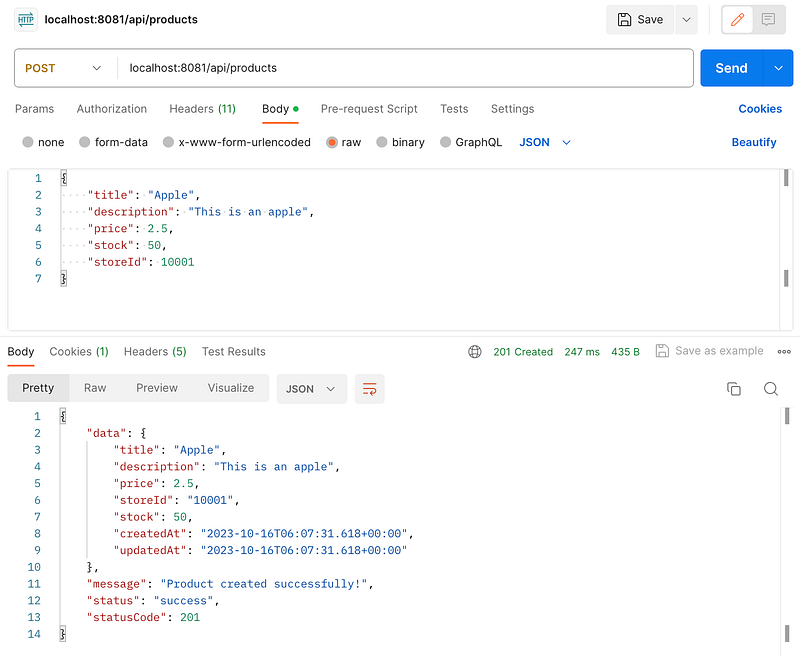
- Use Postman to call products API to insert a product record.
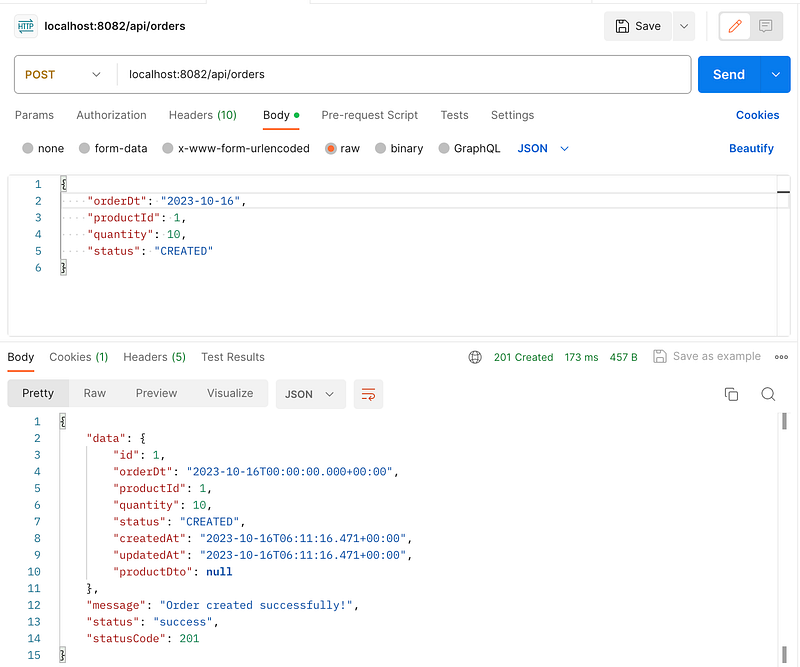
2. Create an order record with product ID set to 1, assuming you’ve inserted the product with ID 1 in the previous step.
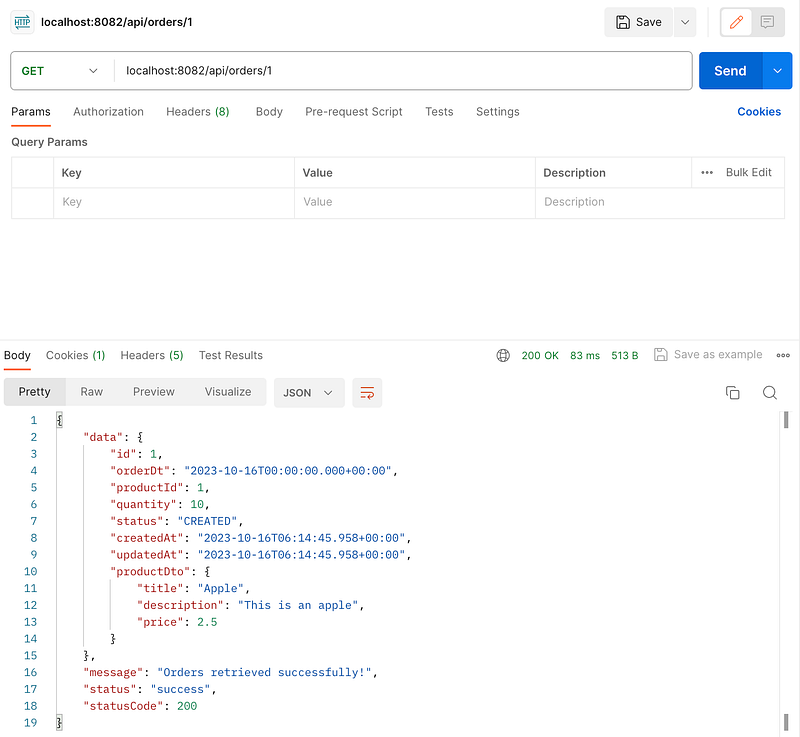
3. To test the integration between the “Order” and “Product” services via Eureka, make a GET request to the “Order” service’s endpoint that retrieves order details.
Conclusion
In this post, we’ve walked through the process of setting up Eureka for service registration and discovery in a Spring Boot microservices architecture. By implementing Eureka, you’ve taken a significant step towards building a robust, scalable microservices ecosystem. However, Eureka is just the beginning of the journey. The next logical step is to explore load balancing to ensure efficient distribution of incoming requests among service instances.
Happy coding! 🎉
- Leave a comment if you have any question.
- Clap if you find this tutorial useful.
- Follow me to get notified when I publish new tutorials.
- Buy me a coffee to support me.