
Drawing Curved Dashed Lines in Flutter
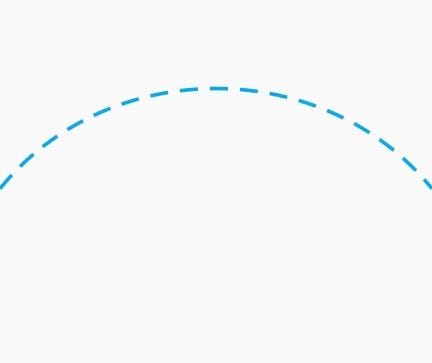
In this article we are going to draw a curved dashed line like the following:
I suppose you are already familiar with how to draw custom shapes and lines in Flutter. If not, you can read the article I wrote on this topic.
Let’s get started by creating our main file:
The drawing will happen in the DrawingPage class:
As usual, our page starts with Scaffold which has an appBar and a body which is set to an instance of CustomPaint widget.
The empty Container I have used (for the child property) will expand and fill the whole screen, therefore the size of our canvas will be as big as the whole screen (again if you don’t understand why, please read the article I wrote on this topic.).
And here goes theCurvePainter class:
We will implement the paint method to draw the curve line.
To draw bezier lines we need four points: the start point, the end point and also two control points, just like in the following picture. Moving the control points changes the slope of the curve. You can play with the control points in this online tool.

We can draw bezier curves using the cubicTo method of the Path class:
void cubicTo(double x1, double y1, double x2, double y2, double x3, double y3)Adds a cubic bezier segment that curves from the current point to the given point (x3,y3), using the control points (x1,y1) and (x2,y2).
as you see, the cubicTo method accepts three parameters. Two of them are the control points, and the last parameter is the end point. The starting point is where your pen is located already on the canvas.
Do not forget that in the canvas coordinates, the upper left corner is the (0, 0) point and the lower right corner is (size.width, size.height). So try to adjust the four points accordingly:
Remember that the paint object is like our pen and we have set its color to blue and its width to 3.
And we have described the bezier path using a path object. The moveTo method has been used to move the pen to the start point of our path. Then we have called the cubicTo method to define the control points and the end point. After that, we’ve drawn the path using the drawPath method. Try to change the x and y of the defined points and see how the curve shape changes:

Dashed Path
For converting any normal path to a dashed path, there is, fortunately, a third party package which can be used here. It’s called Path Drawing.
To use this package, first add it to the dependencies section of thepubspec.yml file of your project (the package version is currently 0.4.0):
Then run the “flutter packages get” command to get the new package.
Now import the following file in your curve_painter.dart file:
import 'package:path_drawing/path_drawing.dart';and wrap your path in the dashPath method before drawing it:
The dashPath method takes two parameters. The first one is your path, which you want to be dashed, and the second parameter defines the length of each dash (15.0) and the length of space between every two dashes (10.0). Play with these two number and see how the dashed line changes. The result is:
OK guys, that’s all for today!
If you are wondering what’s the usage of drawing such line, you will find out soon! In the next article, I will show you how the Animation works in Flutter. And we will implement the following animation for a restaurant application:
The source code of this article is available on GitHub.
Thanks for reading!


