
Don’t Be Intimidated — Learn How to Run AWS on Your Local Machine With LocalStack
A frugal programmer’s guide to leveraging AWS APIs without breaking your bank account

AWS cloud has become pretty much a norm, with over one million businesses around the world building applications on it. In your career, at some point, you have or will have to deploy something within this ecosystem: It’s inevitable, which shows how far the reach of AWS is.
One of the biggest challenges while trying to build in the cloud is the sheer number of services available at your disposal and the number of moving parts. Gone are the days when building applications was simple through a UI: some business logic, a database, and a domain, and you’re good to go. Now we have services that promise perpetual scalability pretty much for anything you can conjure up.
Let’s take, for instance, building on AWS serverless architecture. It promises ease of use but comes with N number of moving parts to get things working. If you build a simple lambda function, you end up having to use a mixture of services, such as CloudWatch, S3, IAM, Kinesis, Step Functions, and so on.
When using AWS, making your development environment look like production is hard, especially when you are bound by organizational constraints — which are either usually security-related or cost-related. Having to deploy to test is cumbersome since most of the services are black boxes; this does make life a bit challenging when stuff isn’t working.
What’s LocalStack All About?
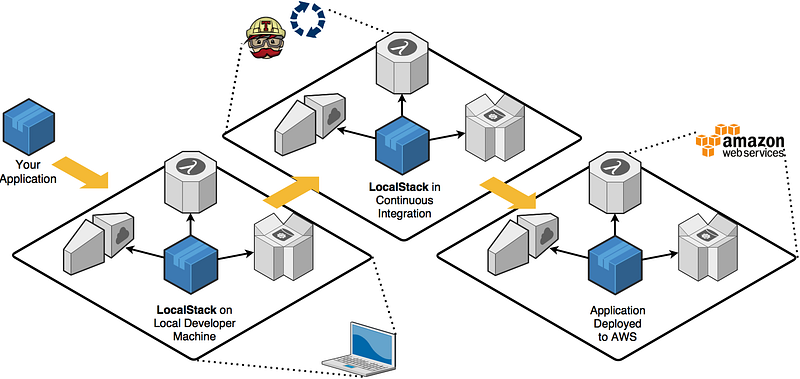
LocalStack is a project open-sourced by Atlassian that provides an easy way to develop AWS cloud applications directly from your localhost. It spins up a testing environment on your local machine that provides almost the same parity functionality and APIs as the real AWS cloud environment, minus the scaling and robustness and a whole lot of magic.
This is done through a combination of mocking/testing tools, primarily kinesalite/dynalite and moto. Though LocalStack is written in Python, it's language-agnostic as all services are exposed via HTTP services, so you can pretty much use any language to interact with it, such as you would with AWS.
Initially, my concern about LocalStack was it not having feature parity with the AWS offering. I have realized your local environment doesn’t have to be one-to-one; it just has to be adequate to ensure you cover all your use cases.
It helps you focus on what’s essential in getting stuff done rather than firefighting with infrastructure and battling with gatekeepers to request AWS access. I believe if a tool can help you reduce your overall bug count in a complicated distributed system while lowering costs, then it’s very well worth the investment to have as part of your core local development tools.
A Love-Hate Relationship With AWS Gatekeepers
Depending on the nature of your environment, sometimes AWS services can be restricted exclusively and reserved for a few gatekeepers. Don’t get me wrong — gatekeepers are necessary to ensure developers do not shoot themselves in the foot. After all, they have cost visibility. Though it may be good at times, when there are too many restrictions, it means one has a limited ability to explore AWS offerings.
One of the projects I was working on in AWS was the core stack with SQS been the sole entry point into our application. In the early days, we resorted to creating SQS pipelines for different developers. This led to an exponential increase in queues as each developer had to be awarded x number of queues to prevent message passing conflicts.
In the world of Jeff Bezos, every byte has a dollar value. Using AWS for local development can quickly get costly, especially if those services are always in an idle state, which is usually most of the time. We may not want to admit this, but these are just facts. Ask yourself a question: How many times do you actually need to hit an EC2 instance to run your application on a development environment or QA environment?
Some of these environments do not need the service running all the time. Serverless helps in this regard but also makes testing difficult. Thus it makes sense to have some of these services on a per need basis. If you are going to be running testing on certain days or when features are released, then it makes sense to provision the services when they are most needed.
LocalStack for my team has solved some of these issues as one can build out an AWS native application end-to-end without having to integrate directly into a live AWS account.
In this piece, I will walk you through some examples of how I have approached this.
Prerequisites
- Have Docker installed, if you haven’t already.
- Install the Serverless framework.
- Install the AWS CLI. Although we aren’t going to work with real AWS, this is required to interact with the LocalStack.
- awscli-local, a thin wrapper around the command-line interface for use with LocalStack, is optional.
Setup
LocalStack can be installed in two ways: directly, such as in the example below, or using Docker. If you’re using direct pip install, ensure you’re running pip within a new virtual environment or conda environment.
$ pip install localstackTo start LocalStack with Python, you can execute the command below.
$ localstack startWe will be taking the Docker approach as this allows everyone running through this exercise to have the same consistent working environment, regardless of the operating system.
This article assumes you have an elementary understanding of Docker and you have a copy installed on your machine. If you don't, it would be good to brush up on that before proceeding.
Where It All Begins: The compose File
Create a new docker-compose.yml file, or append the following to your existing compose-file.
Create a directory called data in the same root level as your compose file. We will be using this data folder to mount to our tmp/localstack directory. The tmp directory will be used by the stack for persistent data, for services such as Kinesis, DynamoDB, Elasticsearch, S3, Secrets Manager, SSM, SQS, and SNS.
Enabling this directory ensures that in the event of restarts or stack failures, your persisted data is not lost.
./bin:/docker-entrypoint-initaws.d
Create a bin folder and bash file at the same level as your docker-compose.yml file: /bin/localstack-entrypoint.sh. Since LocalStack does not provide a meaningful UI without your forking out some money for the enterprise version, the localstack-entrypoint.sh bash script file will serve the purpose of creating services and resources into our LocalStack, such as S3 files, database tables, etc., on LocalStack bootup.
If you don’t feel confident in writing bash scripts, you can also execute Python scripts directly from within the localstack-entrypoint.sh, provided those scripts are placed within the same folder or leverage on the AWS CLI directly. If you wish to run ad hoc commands against your LocalStack environment, we will see how this is done in the script below.
LocalStack requires credentials to be set, though, at this stage of development, the framework does not use the IAM authentication mechanism for any real authentication. Whichever credentials you provide, LocalStack will accept them without a need for validation. Always ensure you adhere to security best practices and you do not push your real AWS keys into your version control.
LocalStack ports '4563-4599:4563-4599' and '8080'
When your Docker container starts, LocalStack will open up ports defined in the above docker-compose.yml file where the left number binds the port on your host with the container port on the right. In most cases, these two numbers can be the same, e.g., 8080:8080. If you have other things running on the port on the right, you may have to change the default to, for instance, 8086:8080. Opening up, for example, your browser on http://localhost:8086 would route to 8080 on your container.
The line '4566-4599:4566-4599' does the same thing, but binds a whole range of ports. These port numbers are what LocalStack uses as endpoints for the various APIs such as S3, RDS, API-gateway, etc.
Something to take note, the above ports may be exposed to the outside world if you’re not behind a network firewall. You can always opt to bind to the host machine only 127.0.0.1:8080:8080.
LocalStack Environment Variables
LocalStack has quite a number of environment variables that are supplied to the LocalStack container on bootup.
SERVICES=s3: You can define a comma-delimited list of AWS services to emulate. Each service may spin up another docker container to service such requests.DATA_DIR=/tmp/localstack/data: This is the directory where LocalStack will save its data internally. More on this in the next sections.
Volumes
'./data:/tmp/localstack'
Docker containers do not store state, and the only way to do this is via volumes, which access a portion of your hard drive. ./data is relative to your docker-compose.yml file. You’re free to define any other path you wish.
The above compose configuration is enough to get you started. To start up, your LocalStack environment via Docker compose executes the below command in the same location as your docker-compose.yml file. You may append the -d argument at the end to run the LocalStack as a daemon in the background.
$ docker-compose upHave a look at your console while docker-compose up is running. You will be able to see that LocalStack has created a file:
../data/data/recorded_api_calls.jsonEarlier we talked about the LocalStack tmp directory that stores your files. This persistence is achieved through the automatic creation of the recorded_api_calls.json file that facilitates playback of previously run AWS service calls.
When the container restarts, it will re-apply these calls. this is how we are able to keep our data between restarts. Once we start uploading, we won’t see new files appear in this directory. Instead, our uploads will be recorded in this file as byte raw data. You could include this file in your repo if you wanted to share the state of the container with others — but depending on how much you uploaded, this file can get pretty huge quickly.
If you want to be able to restore your bucket later, you can make a backup of this file. When you are ready to restore, just remove the updated file, replace it with your backup, and restart your container.
Accessing Your LocalStack Outside of Docker
If you have spent a little bit of time working on AWS, you will appreciate the need to use named profiles for both security and for managing your keys when you have access to more than one AWS account or when you have more than one access and secret key.
Let’s define a new named profile called localstack so we can execute AWS CLI commands against the LocalStack environment where ~ references $HOME directory.
~/.aws/credentials
[localstack]
aws_access_key_id = foo
aws_secret_access_key = bar
~/.aws/config
[profile localstack]
region = us-east-1
output = json
If your LocalStack is running, each of your AWS CLI commands can now consist of the endpoint-url parameter, which ensures your commands are executed against your LocalStack along with the named profile we created to fake authentication.
$ aws --endpoint-url=http://localhost:4572 s3 ls "s3://nyc-tlc/trip data/" --profile localstackUsing LocalStack With SQS
The example below illustrates how you connect to your LocalStack using boto3 SQS. The same principles can be applied if you’re using other programming languages.
Node.js equivalent:
var AWS = require(‘aws-sdk’);
// Create an SQS service object using localstack endpoint
var config = {
  endpoint: new AWS.Endpoint('http://localhost:4576'),
  accessKeyId: 'foo',
  secretAccessKey: 'bar',
  region: 'us-east-1'
}
var sqs = new AWS.SQS(config);
With Java, we can achieve something similar:
import software.amazon.awssdk.regions.Region;
import software.amazon.awssdk.services.sqs.SqsClient;
import software.amazon.awssdk.services.sqs.model.*;

import java.net.URI;

public class Sqs {

    private SqsClient client;

    public Sqs(URI endpoint) {
        client = SqsClient.builder()
                .region(Region.US_EAST_1)
                .endpointOverride(endpoint)
                .build();
    }
}
Using LocalStack With Dask
Dask is a must-have tool in your toolbox if you’re going to be doing relatively medium-size to big data processing in your data science solutions. Essentially, you write code once, and Dask handles how to distribute your work to multiple processors or nodes while managing larger than memory computations. Testing Dask on LocalStack is trivial, provided you understand exactly where you need to change, as illustrated in the below example.
You need to ensure you explicitly define storage_options and explicitly define your endpoint-url so boto3 understands where your LocalStack is located.
os.environ['LOCALSTACK_S3_ENDPOINT_URL'] = 'http://localstack:4572'Notice how LOCALSTACK_S3_ENDPOINT_URL is pointing to LocalStack, which is the default DNS given to your LocalStack Docker instance. Dask does a lot of persistence to local file storage, thus it’s important that your Dask code run in the same network as your docker container. For a better illustration of how all the pieces are connected, you may refer to the GitHub link at the end of this article.
How to Create a Lambda Function in Your LocalStack the Easy Way
If you don’t fancy writing CloudFormation YAML files, serverless is an alternative option that makes it easy for you to deploy your lambda functions.
Without going into details on how serverless works, the serverless.yml configuration file below should give you an idea of what’s required to deploy an API gateway with an HTTP function. The custom -> localstack section defines all the configurations you need to deploy your local lambda function into LocalStack.
The lambda function illustrates a simple function that returns “Hello World” with the current timestamp.
def endpoint(event, context):
    current_time = datetime.datetime.now().time()
    body = {
        "message": "Hello, world",
        "eventTime": str(current_time)
    }
    response = {
        "statusCode": 200,
        "body": json.dumps(body)
    }
    return response
The above serverless.yml file will perform all the heavy lifting for us, such as creating the lambda package, uploading it into our LocalStack, provisioning any additional resources required, e.g., API-gateway. One thing it won’t do automatically for us is S3 bucket creation. thus it's important to update your localstack-entrypoint.sh with the bucket creation command or execute it once manually once your stack is running.
# Create lambda deploy bucket for our simple http endpoint example
$ aws --endpoint-url=$LOCALSTACK_S3_URL s3api create-bucket --bucket simple-http-endpoint-local-deploy
Within our serverless.yml file, we use ${self:service}-${opt:stage}-deploy instead of a hardcoded bucket name. Serverless variables allow users to dynamically replace config values in serverless.yml config. They are especially useful when providing secrets for your serverless services or when we wish to deploy to multiple environments, e.g, CI, dev, QA, and, production via the stage argument.
If your LocalStack is running in the background, the only thing you will need to do is execute the following command that will invoke deployment on your LocalStack since your stage parameter is pointing to your local.
$ serverless deploy --stage local --profile localstackTo execute the lambda function via serverless on LocalStack, you can execute the following:
$ serverless invoke --function currentTime --log --profile localstack --stage localThis produces the output below.
To invoke our lambda function via our browser served by API Gateway, we can execute the below URL where the URL pattern for API Gateway LocalStack executions is as follows:
http://localhost:4566/restapis/<apiId>/<stage>/_user_request_/<methodPath>If we were to omit the profile argument and we changed stage to dev profile, for example, assuming that our default AWS named profile points to a live AWS account, the normal live deploy sequence will be initiated on that account.
Verifying LocalStack Health
Once you have your LocalStack running, you can access the health check endpoint by hitting this URL:
http://localhost:4566/health
{
  "services": {
    "cloudformation": "running",
    "cloudwatch": "running",
    "iam": "running",
    "sts": "running",
    "lambda": "running",
    "logs": "running",
    "s3": "running",
    "sqs": "running",
    "events": "running",
    "apigateway": "running"
  }
}
Take note that the initial run of your rest API calls may take some time. The endpoint will list the total number of running services and their corresponding status. Where a service is running will depend on where you have declared in the LocalStack environment variable.
SERVICES=s3,sqs,lambda,cloudformation,sts,iam,cloudwatch,apigateway,eventsGoing More Local With awscli-local Utility
Thus far, we have been using our default AWS CLI. If you don’t want to keep specifying the endpoint URL when running your CLI commands, you can opt to use the awscli-local package. This is a neat little wrapper around the AWS CLI that makes sure that everything you run runs against your LocalStack by default.
How to create an S3 bucket
You can create an S3 bucket called “my-test-bucket” with the following command. It’s important to grant ACL public-read access if you want to list your bucket contents.
$ awslocal s3 mb s3://my-test-bucketYou should see “make_bucket: my-test-bucket” in your terminal. Verify the bucket was created successfully.
$ awslocal s3 lsLocalStack Gotchas
- LocalStack parameters that won’t work well together, persisting your buckets to mount points, and trying to deploy your lambda by zipping and copying your lambda into your LocalStack bucket will throw off the error below.
2020-07-22T12:12:51:DEBUG:localstack.services.cloudformation.cloudformation_listener: Error response for CloudFormation action "CreateStack" (400) POST /: b'Unknown error: Please note that Lambda mounts (bucket name "__local__") cannot be used with LAMBDA_REMOTE_DOCKER=1 Traceback (most recent call last):\n  File "/opt/code/localstack/localstack/services/awslambda/lambda_api.py", line 954, in create_function\n    result = set_function_code(func_details.code, lambda_name)\n  File "/opt/code/localstack/localstack/services/awslambda/lambda_api.py", line 721, in set_function_code\n    lambda_cwd = lambda_cwd or set_archive_code(code_passed, lambda_name)\n  File "/opt/code/localstack/localstack/services/awslambda/lambda_api.py", line 676, in set_archive_code\n    raise Exception(msg % BUCKET_MARKER_LOCAL)\nException: Please note that Lambda mounts (bucket name "__local__") cannot be used with LAMBDA_REMOTE_DOCKER=1\n'
localstac- It’s always good to delete your
/data/data/recorded_api_calls.jsonfile in the event you have made some changes to your LocalStack docker-compose environment settings. I have noticed at times it crashes when performing playback of executed API calls. - Within your
docker-compose.yml, it's probably a good idea to specify the exact LocalStack image version you want to use rather than pulling the latest. The latest tag makes it hard to track which version of the image is running, and at times new features may contain break changes. - Jeff Bezos moves fast, so don't expect LocalStack to be able to keep up with AWS offering s— but it's free.
- At first glance, you may think it’s all free in reference to LocalStack itself, but there are some advanced features that may require you to fork out some dollars. But from what I have seen thus far, the basics should pretty much cover most of your use cases — developers have to eat too.
image: localstack/localstack:<TAG-VERSION-NUMBER>
For more issues that you should be aware of, see the README file for Localstack troubleshooting tips. Being aware of some of the issues will save you and your team an incredible amount of time debugging.
What Are My Alternatives to LocalStack?
If you feel LocalStack does not meet some of your needs, you can always opt for using mock SDKs, which are the conventional way of doing things. This approach works best if you design your classes with extension in mind.
For an alternative option to the S3 bucket, there’s MinIO as a direct replacement for S3 cloud-native object storage service.
If you’re building for other cloud services, like Google’s, you have other options, like Google Cloud emulators and an open-source FaaS (function-as-a-service) framework by Google for writing portable Node.js functions that can be run on your local machine. If you’re going for a cloud-native way of doing things, a mix-and-match approach might meet your needs.
Final Thoughts
When building applications on AWS, you need to take control of the economic model of your architecture. It’s easy to go down a perpetual rabbit hole of expensive bills if you're not careful.
Mocking works to a certain extent but does not truly depict the actual reality once you hit the Deploy button.
LocalStack makes for a great starting point, giving developers a platform to experiment and test out new code without bending over backward trying to convince your bosses of why they need to fork out a couple of hundred dollars a month for the proof of concept. Going the LocalStack approach is, in my opinion, a pragmatic approach to hashing out code that will run on AWS.
A small side project you can try out is to build out a boto3 or AWS SDK wrapper with your most-used AWS services and enable the LocalStack toggling feature by either an environment variable or property files. Your LocalStack endpoints can be configured in a YAML file as illustrated below.
endpoints:
  S3: http://localhost:4572
  DynamoDB: http://localhost:4569
  CloudFormation: http://localhost:4581
  Elasticsearch: http://localhost:4571
  ES: http://localhost:4578
  SNS: http://localhost:4575
  SQS: http://localhost:4576
  Lambda: http://localhost:4574
  Kinesis: http://localhost:4568
Feel free to clone the below repository, which has more examples for your reference:
timothymugayi/localstack_python_examples
There is so much more you can do with LocalStack that goes beyond the scope of this article. I recommend you spend some time in the LocalStack GitHub issues section so as to familiarize yourself with some of the advanced settings and configurations.
I hope you enjoyed the read. Do share your thoughts in the comments section below. If you feel this article will help the next developer, do push it forward.