
Document Your Machine Learning Project in a Smart Way
Step-by-step tutorial on how to use Sphinx with Vertex AI pipelines.

The purpose of this article is to share the procedure for using Sphinx to auto-generate the documentation of your machine learning project.
I‘m going to use advanced features of Sphinx such as the addition of logos, notes, images, and markdown documents. Also, I am going to show the python package you need so that Sphinx can extract the docstrings presented in your Vertex pipelines.
Some context
Let’s get started! As you may know, having up-to-date documentation for your machine learning projects is vital for both the production and proof of concept phases. Why it is vital? Because it helps to clarify and simplify your modules, collaborate with your team, integrate quickly a new team member, make faster evolutions, and share with the business owners.
Personally, I have experienced so many cases in which due to time-to-market constraints the documentation was ignored, but this turned out to be fatal once the project was released in production. Therefore I advise you to sidestep any manual procedure, to generate your documentation, as such procedures always end up getting desynchronized and time-consuming.
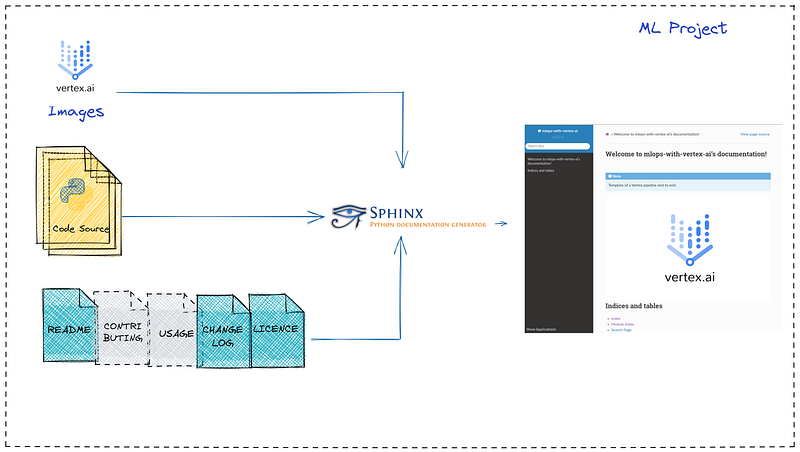
So, before publishing your project, take some time to check the readability of your project. In my case, I tend to use the following files :
- README— a file easy to read that provides an introduction and general information on the project such as the purpose, technical information, the software components
- LICENCE — a file that mentions the license step-by-step procedure to follow for contributors
- USAGE — a file to explain how to use the project
- CHANGELOG — a file that tracks the changes and the released versions of the project
Please note that the most important file is the README. The contribution and usage information can be added directly to the Readme file. The changelog file can be added later on before releasing the project in production. To edit the files you can use markdown, simple text, or reStructuredText.
See below the overview of the process we are going to describe.
What is Sphinx ?
Sphinx is a powerful and easy-to-use open source auto-generator tool highly used by the Python community. It is able to generate excellent structured documentation. There exists a few alternatives such as MkDocs, Doxygen, pdoc, and others, but Sphinx remains a complete and easy-to-use strong competitor.
The main features:
- support for several output formats: HTML, PDF, plain text, EPUB, TeX, etc.
- automatic generation of the documentation
- automatic link generation
- multi-language support
- various extensions available
Steps:
I. Set up the environment
II. Install a virtual environment
III. Install Sphinx
IV. Set-up Sphinx
V. Build the documentation
I. Set up the environment
- Python 3
- Local virtual machine or Vertex AI Workbench (Jupyter notebook running in a virtual environment with Python 3)
- Python project that contains Vertex AI code
- Virtualenv
- Kfx — extension for kubeflow pipeline sdk
- MyST parser — flavor of Markdown
- Vertex project containing sdk pipelines
Let’s use an end-to-end open source example of a Vertex AI pipeline under the Apache-2.0 license. The project is a good example as the project uses Vertex pipelines and doesn't use a documentation generator.
First, clone the source code and go to the vertex-pipelines-end-to-end-samples directory:
git clone https://github.com/GoogleCloudPlatform/vertex-pipelines-end-to-end-samples.git
cd vertex-pipelines-end-to-end-samples
II. Create a virtual environment & activate it
III. Install Sphinx
Create a file requirements-sphinx.txt and add :
myst-parser==0.15
requests==2.28.1
sphinx==4.5.0
sphinx-click==4.3.0
sphinx-me==0.3
sphinx-rtd-theme==1.0.0
rst2pdf==0.99
kfx
Install at once Sphinx and its extensions listed in the requirements-sphinx.txt:
pip install -r requirements-sphinx.txtCreate a docs directory (if doesn’t exist) to store the Sphinx layout :
mkdir docs
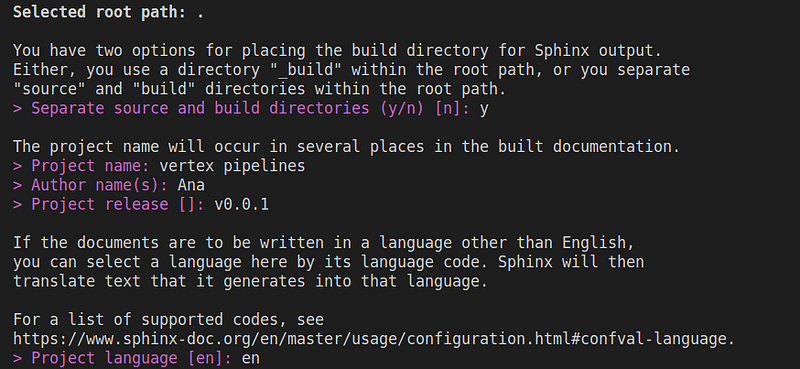
cd docs Generate the initial directory structure with sphinx-quickstart command:
sphinx-quickstartChoose separate sources and build directories, the project name, author name, project release, and the project language. You can find below my configuration:
You should obtain the following tree structure :
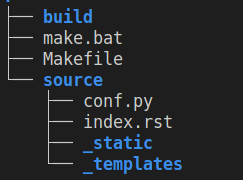
As you can see, we chose to separate the build and the source directories. Let’s give a few explanations about its content.
The build/ directory is meant to keep the generated documentation. It is empty for now as we don’t have yet any generated documentation.
The make.bat (Windows) and Makefile(Unix) files are scripts that simplify the generation of documentation.
The source/conf.py is the configuration file of the Sphinx project. It contains the default configuration keys and the configuration you specified to sphinx-quickstart.
The source/index.rst is the root document of the project that contains the table of contents tree (toctree) directive where you should list all the modules you want to include in your document.
The _static directory contains custom stylesheets and other static files.
The _templates directory stores the Sphinx templates.
IV. Set up Sphinx
Identify the python modules: /pipelines
The directory /pipelines contains the python code we want to include in the Sphinx documentation. Note that Sphinx sees the submodules present in the pipelines package only if you add an __init__.py file in the /pipelines directory.
Generate the Sphinx sources
Use the sphinx-apidoc to build your API documentation (be sure you are at the root of the project). The created Sphinx sources are stored at docs/source/pipelines.
sphinx-apidoc -f -o docs/source/pipelines pipelines/You can check that the following files were created at docs/source/pipelines:

Copy the markdown files to the docs/source
Copy the README.md, CONTRIBUTING.md, and USAGE.md files automatically in the Sphinx source directory (docs/source/). Add in the docs/Makefile the following lines to automate the synchronization of markdown files:
COPY_README = ../README.md
COPY_CONTRIBUTING = ../CONTRIBUTING.md
COPY_USAGE = ../USAGE.md
#sincronyze MD files
$(shell cp -f $(COPY_README) $(SOURCEDIR))
$(shell cp -f $(COPY_CONTRIBUTING) $(SOURCEDIR))
$(shell cp -f $(COPY_USAGE) $(SOURCEDIR))Edit the index.rst
Use the note directive for the information you want to highlight.
.. note:: Sphinx with Vertex AI.Use image directive to add an image. The recommended image size has a width between 400–800 pixels.
.. image:: ../images/xgboost_architecture.png
    :align: center
    :width: 800px
    :alt: alternate text
Under the toctree directive list all the modules you want to be included in the final documentation (README, modules).
.. toctree::
   :maxdepth: 2
   :caption: Contents:
README pipelines/modules CONTRIBUTING USAGE
Please find my index.rst below:
Edit conf.py — the main configuration file of Sphinx
Define the path:
# Define path
sys.path.insert(0, os.path.abspath("../.."))
Add your extensions:
extensions = [
    "sphinx.ext.duration",
    "sphinx.ext.doctest",
    "sphinx.ext.viewcode",
    "sphinx.ext.autosummary",
    "sphinx.ext.intersphinx",
    "sphinx_rtd_theme",
    "sphinx_click",
    "myst_parser",
    "sphinx.ext.todo",
    "sphinx.ext.coverage",
    "myst_parser",
]
List the list of files to be parsed:
source_suffix = {
    ".rst": "restructuredtext",
    ".md": "markdown",
}
Specify the HTML theme:
html_theme = "sphinx_rtd_theme"To add a logo be sure that the image is present in source/_static. I have used the vertex AI logo . Then you can define the logo path :
html_logo = "_static/vertex.png"List all the external links present in the markdown files:
intersphinx_mapping = { "python": ("https://python.readthedocs.org/en/latest/", None)}See my configuration file conf.py:
V. Build the documentation
To generate HTML documentation with Sphinx go to /docs and use the command:
make htmlUse Firefox to open the HTML page:
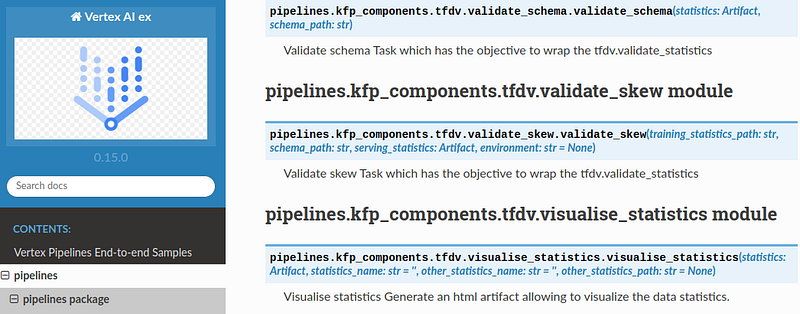
firefox docs/build/html/index.htmlIf you managed to go through all the steps you should be able to see an even more appealing HTML page.

The KFX extension will enable Sphinx to read the Kubeflow components, function names, parameters, and docstrings.
Automate the build of the documentation using the Makefile(present at the root of the project). Edit the Makefile and add the following lines:
create-sphinx-sources:
cd docs; make clean; cd ..; rm -r docs/source/pipelines; sphinx-apidoc -f -o docs/source/pipelines pipelines/generate-doc:
@ $(MAKE) create-sphinx-sources && \
cd docs; make htmlThen call the make generate-doc:
make generate-docWe reached the end of our journey with Sphinx. I hope that you found the content useful!
Summary
We have seen how to use Sphinx, a powerful tool to generate documentation for your machine-learning project. We have customized the documentation with logos, images, and markdown content. Of course, Sphinx comes with plenty of other extensions you can use to render your documentation even more appealing.
Thank you for reading!
Don’t forget to subscribe if you want to get my future stories in your inbox.
If you enjoy reading my story and want to support me as a writer, consider signing up to become a Medium member and gain access to thousands of Data Engineering and Data Science articles.


