
Dockerizing Spring App & Automating Docker with Gradle
Docker is a tool designed to make it easier to create, deploy, and run applications by using containers.
Today we will cover bellow things
- The importance of docker
- Overview on docker
- Dockerizing spring app with detailed explanations
- Docker various operations eg: Image creation and deletion, container creation and deletion and so more
- Monitor Docker images using command line and docker desktop apps
- Advance part: Automotion of docker task eg: docker build, run and push to docker hub from Gradle command
Prerequisites: Before starting this article you must have knowledge of spring boot with Gradle dependencies. You can learn this from the below link
- The importance of docker
- is a tool designed to make it easier to create, deploy, and run applications by using containers.
- Containers are great for continuous integration and continuous delivery (CI/CD) workflows.
- Docker’s portability and lightweight nature also make it easy to dynamically manage workloads, scaling up or tearing down applications and services as business needs dictate, in near real-time.
- Docker is lightweight and fast. It provides a viable, cost-effective alternative to hypervisor-based virtual machines, so you can use more of your compute capacity to achieve your business goals.
- Containers allow a developer to package up an application with all of the parts it needs, such as libraries and other dependencies, and ship it all out as one package. So the developer can rest assured that the application will run on any other Linux machine regardless of any customized settings that the machine might have that could differ from the machine used for writing and testing the code.
- Docker is a bit like a virtual machine. But unlike a virtual machine, rather than creating a whole virtual operating system, Docker allows applications to use the same Linux kernel as the system that they’re running on and only requires applications to be shipped with things not already running on the host computer. This gives a significant performance boost and reduces the size of the application.
- importantly, Docker is open source. This means that anyone can contribute to Docker and extend it to meet their own needs if they need additional features that aren’t available out of the box.
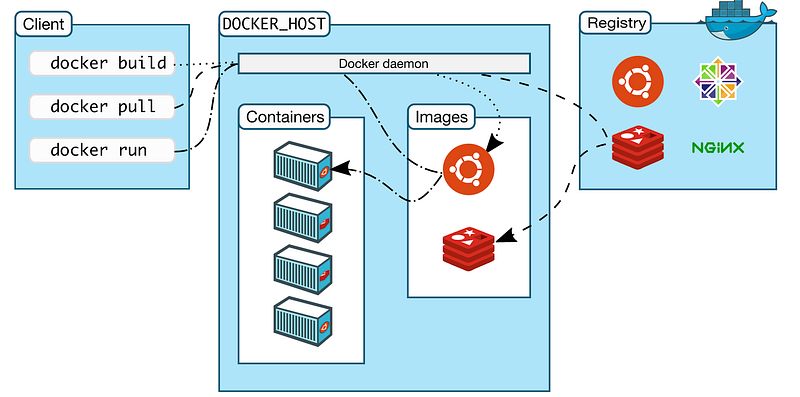
2. Overview on docker Docker is a software platform for building applications based on containers — small and lightweight execution environments that make shared use of the operating system kernel but otherwise run in isolation from one another. Originally built for Linux, Docker now runs on Windows and macOS as well. To understand how Docker works, let’s take a look at some of the components you would use to create Docker-containerized applications.
I am explaining the basic terms
Docker Image:
- A read-only template with instructions for creating a Docker container.
- The filename is Dockerfile and placed in the code folder
- Contains instructions and image related files
- For our purpose, it will describe our java dependency and a war file and its run commands.
- It manages the version and it pushed to Registry like docker hub
Docker container
- A container is a runnable instance of an image
- You can create, start, stop, move, or delete a container using the Docker API or CLI
- When a container is removed, any changes to its state that are not stored in persistent storage disappear.
- We build a container from the docker image and run this container in a specific port. Port mapping required for these steps
Docker Registry
- stores Docker images with appropriate versions
- All renowned applications must have entries in the registry
- Docker Hub is a public registry that anyone can use, and Docker is configured to look for images on Docker Hub by default.
- You can even run your own private registry.
- docker push and pull command are used to push and pull images from the public registry’s
The Docker daemon
- listens for Docker API requests and manages Docker objects
- A daemon can also communicate with other daemons to manage Docker services.
Docker Client
- a primary way that many Docker users interact with Docker
- It takes clients command and sends it to the Docker daemon
- Can communicate with multiple daemons
3. Dockerizing spring app with detailed explanations For dockerizing spring boot applications, we won’t do extra things. We just add a file named Dockerfile into the home directory. This file will contain all instructions for running this application
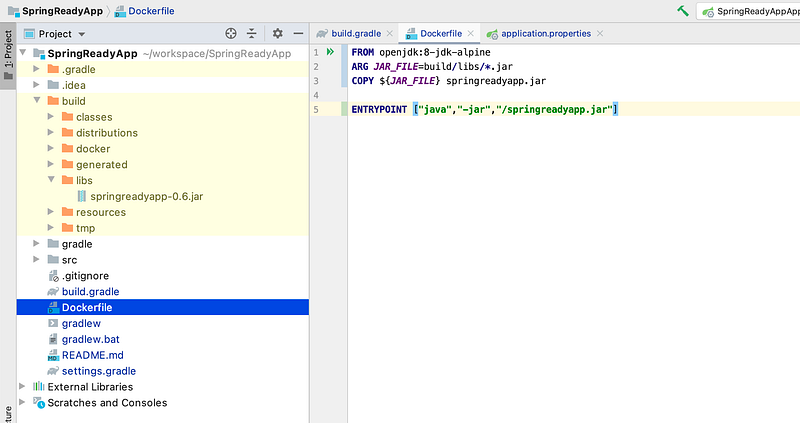
Our docker file code is
FROM: We are building this image using openjdk:8 alpine image. JDK has many more images, we are using this version. You can check more images from the docker hub link ARG: We are taking jar path as ARG variable. Here our jar file is in build/libs/springreadyapp.jar . ARG is only available during the build of a Docker image (RUN etc), not after the image is created and containers are started from it (ENTRYPOINT, CMD) Copy: Copying this jar file as springreadyapp.jar. We will execute the run command on this jar file with this name ENTRYPOINT: This will be executable to start when the container is booting. We must define them as JSON-Array because we will use an ENTRYPOINT in combination with a CMD for some application arguments. Here we are passing the jar file run commands
4. Docker various operations We have to follow below steps
- build the project using the Gradle command and Jar creation.
- Build docker image based on our jar file
- Run container using provided docker image
- Delete docker container and docker image
Build project Using gradlew command you can clean and build the project. sometimes it shows an executable permission error. In this case, you have to allow executable permission to gradlew. Its command is given below:
chmod 777 gradlew
./gradlew clean build -x test
Now the jar file is ready. We can start building an image based on our docker file
Building docker image
The docker build command builds Docker images from a Dockerfile and a “context”. A build’s context is the set of files located in the specified PATH or URL. Using this command it compacts the image with specified instructions and files of that context. In our case, we will build an image from OpenJDK 8 version, copy the jar from the libs folder and add a command for execution.
Here is the build command with tag:
Build Image
docker image build -t springreadyapp .
View Images
docker images
Here, we are building a docker image with tag springreadyapp. Your application has been compiled, packaged, and converted to a Docker image. The output is like bellow
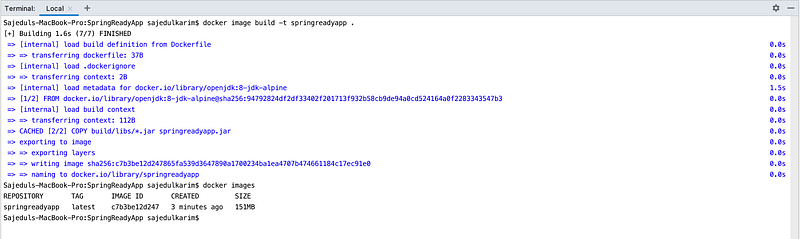
Here our image build is done and image id is : c7b3be12d247
Docker container run from image Now we have to run a container from our image c7b3be12d247. To do this we have to do port mapping also. Here is the command
Run command
docker run -d -p 8081:8081 c7b3be12d247
Container List
docker container pshere, -d means detach mode, and -p 8081:8081 means external port is 8081 is mapped with internal port 8081. Here, you must ensure that the external port must be free. Here, it’s important to define the port mapping, which maps a port on the host (8081) to the port inside Docker (8081), which is the port we have defined in the properties of the Spring Boot application. The output is like below

The container is running and container id is : c7b3be12d247.
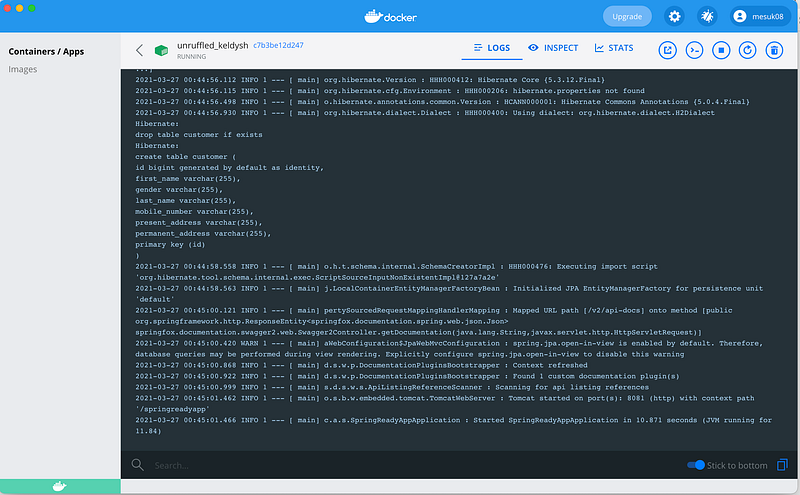
5. Monitor docker insights We can monitor the docker container insights using both command line and docker desktop UI tools.
Insights the docker container
docker exec -it 804c6b86d49a /bin/sh
Using exec command you entered the docker containe. Now you can execute all your necessary command here
You can also achieve this using Docker desktop. It is like bellow image
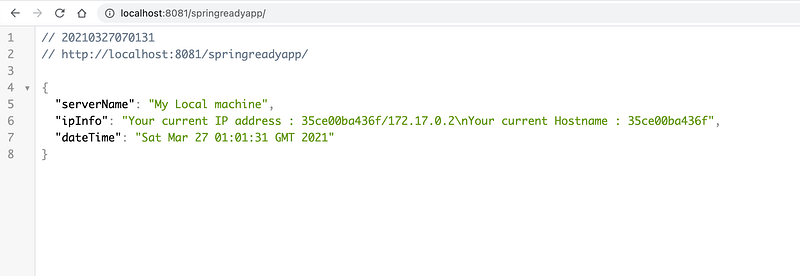
Now your application is running and it is running on eternal port 8081. you can check the output from here
Container and image control
Docker container stop
docker container stop 35ce00ba436f
Here, 35ce00ba436f is the container id
Docker container removed
docker container rm -f 35ce00ba436f
Here, -f means forcefully removing the container. This is optional
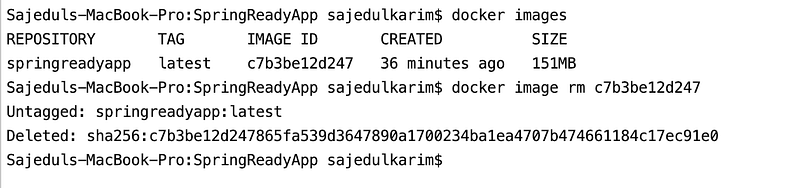
Docker Image Delete
docker image rm c7b3be12d247 Here, c7b3be12d247 is docker image id.
6. Advance part: Automotion Now you may want to docker image build, container run, and push images to docker hub using Gradle command in an gradle project. We will use the Palantir Docker Plugin for docker automation. To achieve this we have to dome steps on our build.gradle file. Here is the gradle file
Here I added only the automation-related changes. We require docker and docker-run both plugins. In docker closure, I added the Dockerfile path and file access instructions. In dockerRun closure, I added instructions for running the docker container from docker images.
Docker push image to docker hub
It’s command is : ./gradlew dockerPushDockerHub
Using this command, this new version of image will push to docker hub account.
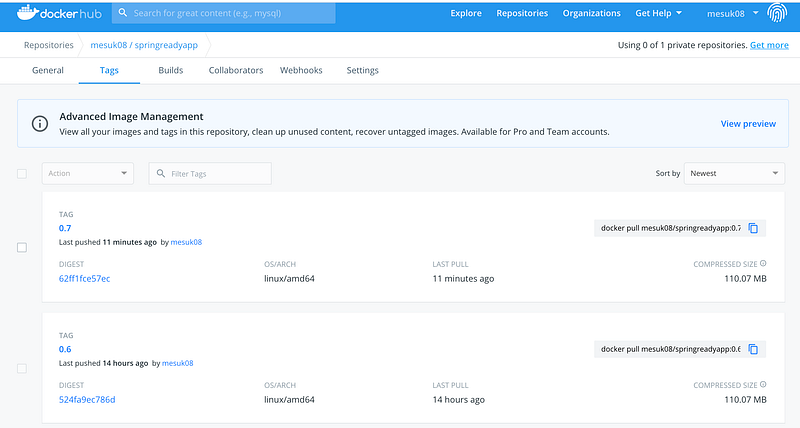
Here, my repository path is
tag 'DockerHub', "mesuk08/springreadyapp:${project.version}" in docker closureDuring docker push/pull operation from the command line, you may need to log in and log out from the terminal. Login and logout command is below
docker logout
docker login
How to use docker image Other users will pull the image with tag number from docker hub and just run that image into their premises. Now here our tag is : 0.7 It’s command is like : docker pull mesuk08/springreadyapp:0.7
You can get full source code in this GitHub repository. Swagger URL : http://localhost:8081/springreadyapp/swagger-ui.html#/
Thanks for reading :)